
Popular categories
Looking for a yarn?


|
|
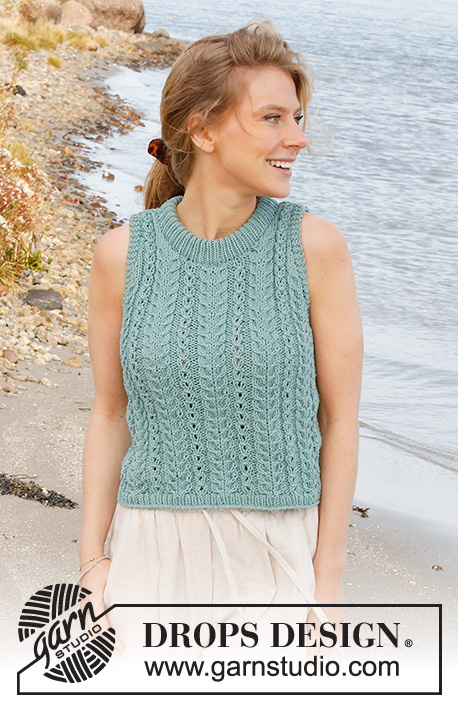
Water Ballet |
|
 |
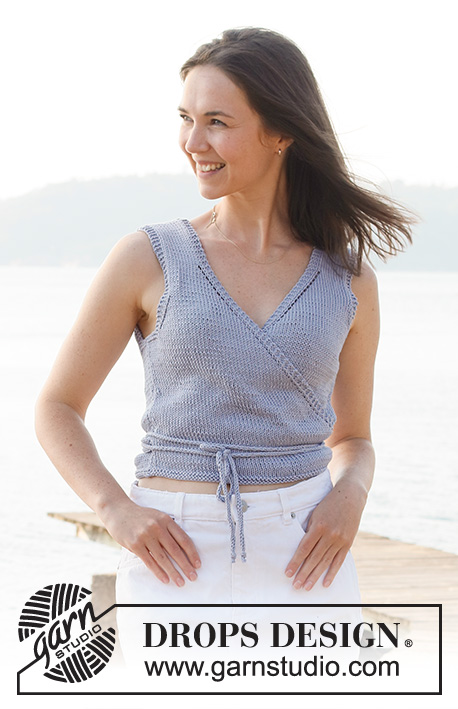 |
Knitted top in DROPS Muskat. The piece is worked top down with a wrap-around. Sizes S - XXXL.
DROPS 221-22 |
|
|
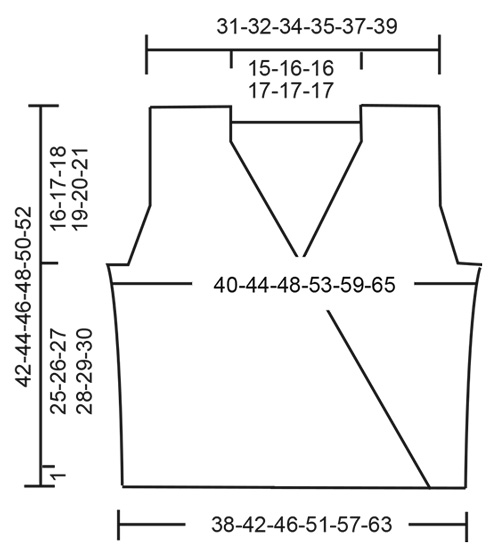
------------------------------------------------------- EXPLANATIONS FOR THE PATTERN: ------------------------------------------------------- RIDGE/GARTER STITCH (worked back and forth): Knit all rows. 1 ridge in height = Knit 2 rows. INCREASE TIP-1 (for armholes): All increases are worked from the right side! Increase 1 stitch on the beginning of the row as follows: Work 3 stitches in garter stitch, 1 stitch in stocking stitch, make 1 yarn over. Increase 1 stitch at the end of row as follows: Work until 4 stitches remain on row, make 1 yarn over, 1 stitch in stocking stitch, work 3 stitches in garter stitch. On next row from wrong side work the yarn overs twisted purl to avoid holes. INCREASE TIP-2 (for wrap-around): All increases are worked from the right side! Right front piece: Work until there are 4 stitches left, 1 yarn over, knit 1, 3 stitches in garter stitch. Left front piece: 3 stitches in garter stitch, knit 1, 1 yarn over, work as before to end of row. On the next row (wrong side) purl the yarn overs to leave holes. DECREASE TIP (for sides of body): All decreases are worked from the right side! Decrease as follows at the beginning of the row: Work 1 edge stitch in garter stitch, knit 2 , slip 1 stitch as if to knit, knit 1 and pass the slipped stitch over (= 1 stitch decreased). Decrease as follows at the end of the row: Work until there are 5 stitches left on the row, knit 2 together, knit 2 and work 1 edge stitch in garter stitch. CASTING-OFF TIP: To avoid the cast-off edge being tight you can cast off with a larger size needle. If the edge is still tight, make 1 yarn over after approx. each 4th stitch at the same time as casting off; the yarn overs are cast off as normal stitches. ------------------------------------------------------- START THE PIECE HERE: ------------------------------------------------------- TOP – SHORT OVERVIEW OF THE PIECE: The piece is worked back and forth, top down and in sections. BACK PIECE: Right shoulder: Cast on 17-17-19-19-21-23 stitches with circular needle size 4 mm and Muskat. Purl 1 row from the wrong side. Then work stocking stitch back and forth, with 3 stitches in GARTER STITCH – read description above, on each side. When the piece measures 3 cm – adjust so the next row is from the right side, lay it to one side and work the left shoulder. Left shoulder: Cast on 17-17-19-19-21-23 stitches with circular needle size 4 mm and Muskat. Purl 1 row from the wrong side. Then work stocking stitch back and forth, with 3 stitches in GARTER STITCH – read description above, on each side. When the piece measures 3 cm – adjust so the next row is from the right side, work the 2 shoulders together as follows: Work as before over the left shoulder, cast on 32-34-34-36-36-36 stitches (= neck) and work the stitches from the right shoulder = 66-68-72-74-78-82 stitches. Continue back and forth with 3 stitches in garter stitch on each side, garter stitch over the middle 38-40-40-42-42-42 stitches and stocking stitch over the remaining stitches. When you have worked 2 ridges over the middle stitches continue with stocking stitch and 3 stitches in garter stitch on each side. REMEMBER THE KNITTING TENSION! When the piece measures 11-11-12-10-9-8 cm from the cast-on edge on the shoulders, start to increase for the armholes on each side – read INCREASE TIP-1. Increase like this every 2nd row (each row from the right side) a total of 6-7-8-12-14-17 times on each side. At the end of the next 2 rows cast on 4-6-7-8-10-11 stitches for the armholes = 86-94-102-114-126-138 stitches. Now work stocking stitch, with garter stitch over the outermost 7-9-10-11-13-14 stitches on each side. When you have worked 2 ridges over these stitches, continue with 1 edge stitch in garter stitch on each side. When the piece measures 4 cm from the bottom of the armholes, decrease 1 stitch on each side – read DECREASE TIP. Repeat the decrease when the piece measures 12 cm = 82-90-98-110-122-134 stitches. When the piece measures 41-43-45-47-49-51 cm from the shoulder, change to circular needle size 3.5 mm. Work 2 ridges over all stitches. Cast off – read CASTING-OFF TIP. The back piece measures approx. 42-44-46-48-50-52 cm from the shoulder down. RIGHT FRONT PIECE: Cast on 17-17-19-19-21-23 stitches with circular needle size 4 mm and Muskat. Purl 1 row from the wrong side. Then work stocking stitch back and forth, with 3 stitches in garter stitch on each side. When the piece measures 8-7-6-5-5-5 cm, start to increase for the wrap-around – read INCREASE TIP-2. Increase like this every 2nd row to finished length; at the same time, when the piece measures 11-11-12-10-9-8 cm, start to increase for the armhole – remember INCREASE TIP-1. Increase like this every 2nd row (each row from the right side) a total of 6-7-8-12-14-17 times. At the end of the next row from the wrong side cast on 4-6-7-8-10-11 stitches for the armhole. Now work garter stitch over the outermost 7-9-10-11-13-14 stitches under the armhole; the remaining stitches are worked as before. When you have worked 2 ridges over these 7-9-10-11-13-14 stitches, continue with 1 edge stitch in garter stitch under the armhole, 3 stitches in garter stitch towards mid-front and stocking stitch over the remaining stitches. When the piece measures 4 cm from the bottom of the armhole, decrease 1 stitch in the side– remember DECREASE TIP. Repeat the decrease when the piece measures 12 cm. When the piece measures a total of 41-43-45-47-49-51 cm there are 71-78-87-96-105-113 stitches on the needle. Change to circular needle size 3.5 mm. Work 2 ridges. Cast off – remember CASTING-OFF TIP. LEFT FRONT PIECE: Cast on 17-17-19-19-21-23 stitches with circular needle size 4 mm and Muskat. Purl 1 row from the wrong side. Then work stocking stitch back and forth, with 3 stitches in garter stitch on each side. When the piece measures 8-7-6-5-5-5 cm, start to increase for the wrap-around – remember INCREASE TIP-2. Increase like this every 2nd row to finished length; at the same time, when the piece measures 11-11-12-10-9-8 cm, start to increase for the armhole – remember INCREASE TIP-1. Increase like this every 2nd row (each row from the right side) a total of 6-7-8-12-14-17 times. At the end of the next row from the right side cast on 4-6-7-8-10-11 stitches for the armhole. Now work garter stitch over the outermost 7-9-10-11-13-14 stitches under the armhole; the remaining stitches are worked as before. When you have worked 2 ridges over these 7-9-10-11-13-14 stitches, continue with 1 edge stitch in garter stitch under the armhole, 3 stitches in garter stitch towards mid-front and stocking stitch over the remaining stitches. When the piece measures 4 cm from the bottom of the armhole, decrease 1 stitch in the side– remember DECREASE TIP. Repeat the decrease when the piece measures 12 cm. When the piece measures a total of 41-43-45-47-49-51 cm there are 71-78-87-96-105-113 stitches on the needle. Change to circular needle size 3.5 mm. Work 2 ridges. Cast off – remember CASTING-OFF TIP. ASSEMBLY: Sew the shoulder seams with grafting stitches, inside the cast-on edges. Sew the right side-seam, from the armhole down. Sew the left side-seam, from the armhole down, but leave a 1 cm opening 5 cm above the bottom edge. This opening is for the tie on the right front piece to be threaded through. TIES: Knit up 3 stitches along the edge of the 2 ridges at the bottom of the right front piece, with circular needle size 3.5 mm and Muskat. Work stocking stitch back and forth over these 3 stitches for 74 to 90 cm. Cast off. Knit up 3 stitches along the edge of the 2 ridges at the bottom of the left front piece with circular needle size 3.5 mm and Muskat. Work stocking stitch back and forth over these 3 stitches for 140 cm to 160 cm. Cast off. |
|
|
|
|
Have you made this or any other of our designs? Tag your pictures in social media with #dropsdesign so we can see them! Do you need help with this pattern?You'll find tutorial videos, a Comments/Questions area and more by visiting the pattern on garnstudio.com. © 1982-2024 DROPS Design A/S. We reserve all rights. This document, including all its sub-sections, has copyrights. Read more about what you can do with our patterns at the bottom of each pattern on our site. |
|


With over 40 years in knitting and crochet design, DROPS Design offers one of the most extensive collections of free patterns on the internet - translated to 17 languages. As of today we count 304 catalogues and 11422 patterns - 11422 of which are translated into English (UK/cm).
We work hard to bring you the best knitting and crochet have to offer, inspiration and advice as well as great quality yarns at incredible prices! Would you like to use our patterns for other than personal use? You can read what you are allowed to do in the Copyright text at the bottom of all our patterns. Happy crafting!
Comments / Questions (22)
Jeg strikker Warter ballet blusen, men forstår ikke hvor binde båndene skal sættes på. Er det for enden af fordtykkerne? I opskriften står midt foran??
01.02.2024 - 16:52DROPS Design answered:
Hei Hanne. Ja, endene på forstykkene (dette er kanten midt foran, selv om den går på skrå). mvh DROPS Design
12.02.2024 - 10:08Hi, is it possible to do this pattern using DROPS Belle uni color . Thank you very much!
11.04.2023 - 20:35DROPS Design answered:
Hi Anne, Yes, as both Muskat and Belle are in the same yarn group you can use Belle for this pattern. We do recommend that you work a swatch to test your knitting tension before beginning. Happy knitting!
12.04.2023 - 06:56Hei! Er i gang med høyre forstykket og det står at jeg skal gjøre øketips-2 til ferdig mål, samtidig som jeg skal begynne øketips-1 etter 11 cm. De to kolliderer på den éne siden, skal jeg da gjøre to kast mot den ene siden? Eller skal jeg avslutte øk-2, og kun gjøre øk-1? Takk:)
26.04.2022 - 08:37DROPS Design answered:
Hej, Øgetips-1 strikker du i siden mod ærmegabet og øgetips -2 strikker du mod midt foran, og altså det som skal blive omslaget. God fornøjelse!
27.04.2022 - 14:26Kan man lave udtagningerne således at der ikke kommer hul langs kanten?
21.04.2022 - 15:01DROPS Design answered:
Hej Marie, ja der er mange måder at tage ud på. Her ser du én Udtagning - usynlig Hvis den ikke passer dig, så klik på "tag ud" øverst i videoen så får du alle vore udtagninger :)
22.04.2022 - 10:07Das ist ein richtig schönes Top. Allerdings würde ich es gerne länger machen. Beim Rückenteil bekomme ich das sicherlich hin, aber bei den Vorderteilen bin ich mir sehr unsicher, wie ich das am besten machen soll. Hätten Sie da einen Tipp für mich? Oder hat es schon jemand ausprobiert und kann mir weiterhelfen? Würde mich über eine Nachricht sehr freuen.
13.07.2021 - 15:18DROPS Design answered:
Liebe Frau Niedermeier, leider können wir jeder Anleitung nach jedem individuellen Frage anpassen und einzelne Modelle auf individuellen Wunsch hin umrechnen. Wenn sie Hilfe damit brauchen, wenden Sie sich bitte an Ihrem DROPS Laden, dort hilft man Ihnen gerne weiter - auch telefonisch oder per E-Mail. Danke im voraus für Ihr Verständnis. Viel Spaß beim stricken!
13.07.2021 - 16:22Hallo, wollte in meinem vorigen Kommentar nur anmerken, dass auch in der korrigierten Version noch ein Fehler steckt: bei Zun-tipp 1, Zun am R-Ende muss 1Mre eingefügt werden, da sonst 1M ungestrickt bliebe (durch den U wird schließlich keine vorhandene M abgestrickt). Ich hoffe, dass dieser Kommentar anderen weiterhilft.
27.06.2021 - 17:41DROPS Design answered:
Liebe Johanna, herlichen Dank! Korrektur erfolgt! Viel Spaß beim stricken!
28.06.2021 - 07:53Liebes garnstudio Team, auch ich hatte Probleme mit Zunahmetipp 1 in der deutschen Anleitung. Vielen Dank für die schnelle Korrektur! Allerdings habe ich auch in dieser nun wieder einen Fehler entdeckt. Ich gehe davon aus, dass es bei "1 Masche am Ende der Reihe zunehmen" heißen muss: str,. bis noch 4 M übrig sind, 1 U, !! 1 M re !!, 3 M kraus re Ist das korrekt? Mir ist außerdem aufgefallen, dass nirgends etwas zu Randmaschen erwähnt wird, das jedoch fände ich sehr hilfreich.
23.06.2021 - 17:32DROPS Design answered:
Liebe Johanna, die Zunahmen entstehen innerhalb 4 Maschen (= die 3 Maschen krausrechts gestrickt + 1 Masche glatt rechts) - diese 3 Maschen sind von Anfang an beidseitig krausrechts gestrickt - oder misverstehe ich Ihre Meinung?
24.06.2021 - 08:47Die Angaben sind an vielen Stellen völlig falsch!! Nach einer Zunahme beim rechten Vorderteil von 7x 4 Maschen plus den restlichen Zunahmen kommt man weit über 78 M in Größe M!! Außerdem steht dort bei Zunahmetipp-1 "Nach dem Markierungsfaden" jedoch gibt es keinen Markierer. Bitte überarbeiten Sie die Anleitung zeitnah ich habe bereits alle passende Wolle gekauft und kann jetzt das Oberteil nicht stricken...
20.06.2021 - 17:16DROPS Design answered:
Liebe Frau Rolke, die Zunahmetipp-1 wird gleich korrigiert - die Maschenanzahl sollte richtig sein, es wird nach 7 cm 1 Maschen für das Revers in jede 2. Reihe bis zur Ende (= 43 cm - 7 cm = 36 cm) zugenommen, sollte Ihre Maschenprobe in der Höhe stimmen dann stricken Sie ca 100 Reihe dazwischen = ca 50 Zunahmen für das Revers - und dazu kommen für das Armloch: 7+6+9 Zunahmen und für die Seite: 12 Abnahmen = ca 77 Maschen. Viel Spaß beim stricken!
21.06.2021 - 07:55Bonjour, Comme Muriel, il n’est pas clair où doit être mis le fil marqueur pour augmentations 1. Merci pour l’explication. Meilleures salutations
16.06.2021 - 00:27DROPS Design answered:
Bonjour Fabienne, bonne nouvelle, la correction vient d'être faite: vous augmentez à 4 m des bords - la partie AUGMENTATIONS-1 a été corrigée. Bon tricot!
16.06.2021 - 15:05Hallo, wenn ich beim Rückenteil in Größe S mit 66 Maschen für die Armausschnitte 6 x beidseitig je 2 Ma. (= 24 Ma.) zunehme (Zunahmetipp 1) und danach beidseitig je 4 Maschen (= 8 Ma.) anschlage, komme ich auf 98 Maschen und nicht wie angegeben auf 86 Maschen. Wer kann mir helfen?
09.06.2021 - 15:05DROPS Design answered:
Liebe Frau Höhnle, es wird für die Armlöcher je 1 Masche beidseitig innerhalb 4 Maschen (=4 M kraus rechts + 1 M glatt rechts) = 2 Maschen/Hinreihe zugenommen - Korrektur erfolt. Viel Spaß beim stricken!
16.06.2021 - 15:05