DROPS Sky
DROPS Sky
74% Alpaca, 18% Polyamide, 8% Wool
from 5.40 € /50g
DROPS SS24

Sjøbris

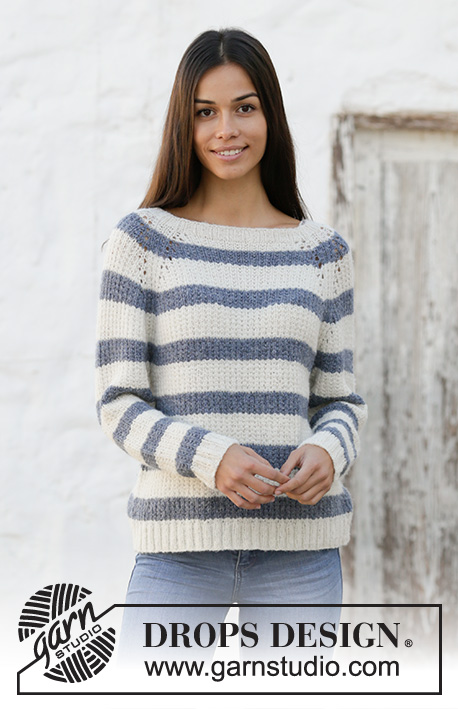
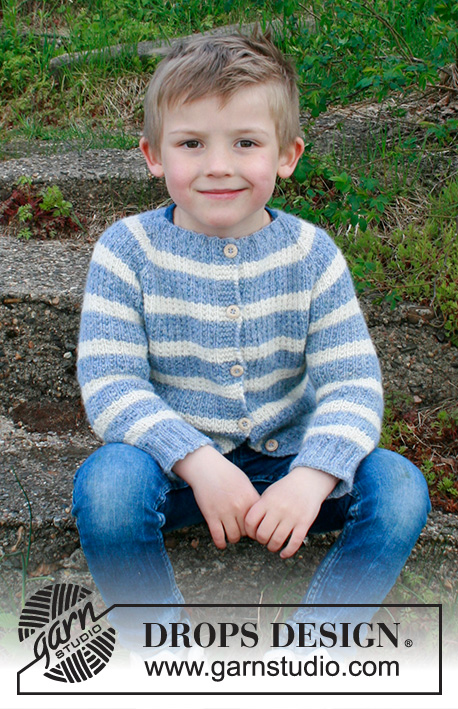
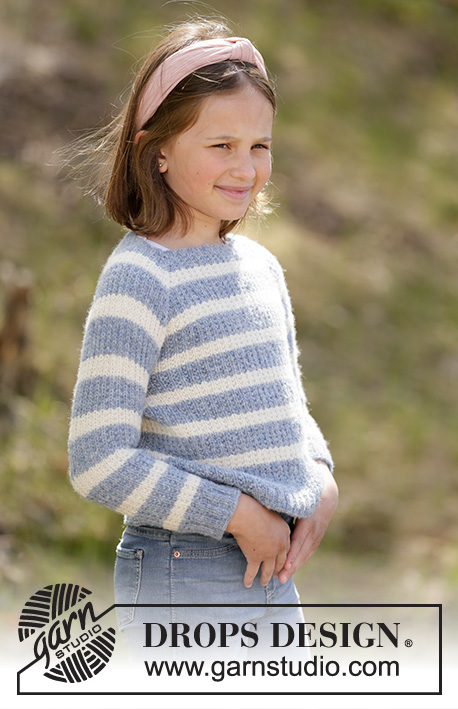
Knitted jumper for men in DROPS Sky. The piece is worked top down with raglan, stripes and textured pattern. Sizes S - XXXL.

DROPS 224-1
DROPS Design: Pattern no sk-154
Yarn group B
-------------------------------------------------------

SIZES:
S - M - L - XL - XXL - XXXL

MATERIALS:
DROPS SKY from Garnstudio (belongs to yarn group B)
250-250-300-300-350-350 g colour 01, white
100-150-150-150-150-150 g colour 12, jeans blue

NEEDLES:
DROPS CIRCULAR NEEDLE SIZE 4.5 MM: Length 40 cm and 60 - 80 cm.
DROPS CIRCULAR NEEDLE SIZE 3.5 MM: Length 40 cm and 60 - 80 cm for rib.
DROPS DOUBLE POINTED NEEDLES SIZE 4.5 MM.
DROPS DOUBLE POINTED NEEDLES SIZE 3.5 MM for rib.
If you work Magic Loop, you will not need double pointed needles.

KNITTING TENSION:
20 stitches in width and 26 rows in height with pattern = 10 x 10 cm.
Remember, needle size is only a guide. If you get too many stitches on 10 cm, change to a larger needle size. If you get too few stitches on 10 cm, change to a smaller needle size.

-------------------------------------------------------

Alternative Yarn – See how to change yarns here
Yarn Groups A to F – Use the same pattern and change the yarn here
Yarn usage using an alternative yarn – Use our yarn converter here

-------------------------------------------------------

DROPS Sky
DROPS Sky
74% Alpaca, 18% Polyamide, 8% Wool
from 5.40 € /50g

Pattern instructions

NOTE: This pattern is written in British English. All measurements in charts are in cm. For conversion from cm to inches - click here. There are different terms for crocheting in British and American English. If this pattern includes crochet, click for "crochet terms" here. For this pattern in American English, please click here.
-------------------------------------------------------

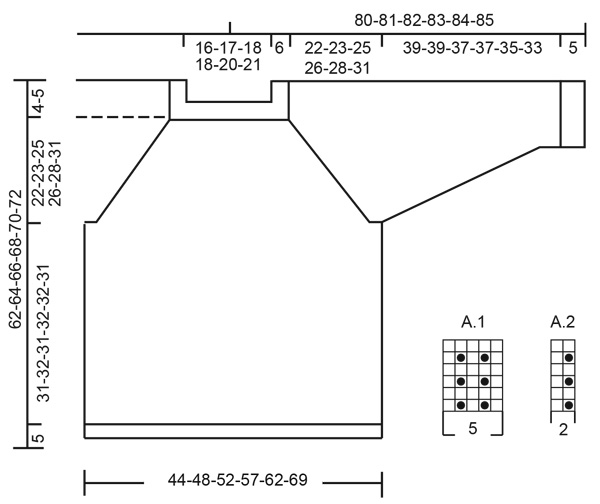
EXPLANATIONS FOR THE PATTERN:

-------------------------------------------------------

DECREASE/INCREASE TIP (evenly spaced):
To work out how to decrease/increase evenly, count the total number of stitches to be decreased/increased over (e.g. 96 stitches) and divide by number of decreases/increases to be made (e.g. 8) = 12. In this example, decrease by knitting together each 11th and 12th stitch.
When increasing, make 1 yarn over after each 12th stitch. On the next round knit the yarn overs twisted to avoid holes.

PATTERN:
See diagrams A.1 and A.2.

RAGLAN:
Increase to raglan by making 1 yarn over on each side of A.1; the yarn overs are worked twisted on the next round, then worked into A.2.

STRIPES:
The neck and the first 2 cm on the yoke are worked with white before starting the stripes. Then work alternately 3½-3½-3½-3-3-3½ cm with jeans blue and 5 cm with white until you have worked 6-6-6-7-7-7 jeans blue stripes on the yoke/body and 7-7-7-7-7-7 jeans blue stripes on the yoke/sleeves. Then finish the pieces with white.

DECREASE TIP (sleeves): 
Decrease 1 stitch on either side of the marker-stitch as follows: Work until there are 2 stitches left before the marker-stitch, knit 2 together, knit 1 (marker-stitch), slip 1 stitch as if to knit, knit 1 and pass the slipped stitch over the knitted stitch.

CASTING-OFF TIP:
To avoid the cast-off edge being tight you can cast off with a larger size needle. If the edge is still tight, make 1 yarn over after approx. each 4th stitch at the same time as casting off; the yarn overs are cast off as normal stitches.

-------------------------------------------------------

START THE PIECE HERE:
-------------------------------------------------------

JUMPER – SHORT OVERVIEW OF THE PIECE:
The neck and yoke are worked in the round with circular needle, top down. The yoke is divided for body and sleeves and the body is continued in the round with circular needle. The sleeves are worked with double pointed needles/short circular needle.

NECK:
Cast on 96-100-104-112-120-124 stitches with circular needle size 3.5 mm and white DROPS Sky. Work rib in the round (knit 2, purl 2) for 12 cm (the neck is later folded double and sewn down to the wrong side).
Knit 1 round where you decrease 8-8-8-12-12-12 stitches evenly spaced – read DECREASE/INCREASE TIP in explanations above = 88-92-96-100-108-112 stitches.

YOKE:
Change to circular needle size 4.5 mm. Read STRIPES before continuing.
Insert 1 marker thread on this round; it will be used when measuring the yoke.
In addition insert 8 markers before continuing, which will be used when increasing to raglan:
Insert 1 marker at the beginning of the round (= between back piece and sleeve), count 5 stitches and insert 1 marker here, count 7-7-9-9-11-11 stitches and insert 1 marker here (= sleeve), count 5 stitches and insert 1 marker here, count 27-29-29-31-33-35 stitches and insert 1 marker here (= front piece), count 5 stitches and insert 1 marker here, count 7-7-9-9-11-11 stitches and insert 1 marker here (= sleeve), count 5 stitches and insert 1 marker here. There are 27-29-29-31-33-35 stitches left between the last and the first marker (= back piece).

Now work pattern and increase to RAGLAN – read description above, as follows:
Work A.1 over the first 5 stitches, 1 yarn over, work A.2 over the next 7-7-9-9-11-11 stitches (= sleeve), 1 yarn over, work A.1 over the next 5 stitches, 1 yarn over, work A.2 over the next 27-29-29-31-33-35 stitches (= front piece), 1 yarn over, work A.1 over the next 5 stitches, 1 yarn over, work A.2 over the next 7-7-9-9-11-11 stitches (= sleeve), 1 yarn over, work A.1 over the next 5 stitches, 1 yarn over, work A.2 over the next 27-29-29-31-33-35 stitches (= back piece), 1 yarn over. You have increased 8 stitches on the round.
REMEMBER THE KNITTING TENSION!

Continue with the pattern, stripes and increase to raglan every 2nd round a total of 24-28-30-32-34-40 times = 280-316-336-356-380-432 stitches.
Continue with stripes and pattern, but without further increases, until the piece measures 22-23-25-26-28-31 cm from the marker on the neck.
Now divide the yoke for the body and sleeves as follows: Work the first 3-2-3-5-6-6 stitches as before (= back piece), place the next 59-69-73-73-77-89 stitches on 1 thread for the sleeve, cast on 7-7-9-9-11-11 new stitches (= in side under sleeve), work the next 81-89-95-105-113-127 stitches as before (= front piece), place the next 59-69-73-73-77-89 stitches on 1 thread for the sleeve, cast on 7-7-9-9-11-11 new stitches (= in side under sleeve), work the last 78-87-92-100-107-121 stitches (= the rest of the back piece).
Body and sleeves are finished separately. THE PIECE IS NOW MEASURED FROM HERE!

BODY:
= 176-192-208-228-248-276 stitches. Continue the pattern and stripes as before over all stitches.
When the piece measures 31-32-31-32-32-31 cm from the division, knit 1 round where you increase 36-36-40-44-48-56 stitches evenly spaced = 212-228-248-272-300-332 stitches.
Change to circular needle size 3.5 mm and work rib (knit 2, purl 2) for 5 cm.
Read CASTING-OFF TIP and cast off with knit over knit and purl over purl. The jumper measures approx. 62-64-66-68-70-72 cm from the shoulder down.

SLEEVE:
Place the 59-69-73-72-77-89 stitches from the thread on the one side of the piece on double pointed needles/short circular needle size 4.5 mm and knit up 1 stitch in each of the 7-7-9-9-11-11 stitches cast on under the sleeve = 66-76-82-82-88-100 stitches. Insert a marker in the middle stitch under the sleeve and begin the round here. Continue in the round, with stripes and pattern as before.
When the piece measures 2 cm from the division, decrease 2 stitches under the sleeve – read DECREASE TIP. Decrease like this every 4-2½-2-2½-2-1 cm a total of 9-13-15-14-16-21 times = 48-50-52-54-56-58 stitches. Continue working until the piece measures 39-39-37-37-35-33 cm from the division (shorter measurements in larger sizes due to longer yoke).
Knit 1 round where you increase 4-2-4-2-4-2 stitches evenly spaced = 52-52-56-56-60-60 stitches. Change to double pointed needles size 3.5 mm and work rib (knit 2, purl 2) for 5 cm.
Remember CASTING OFF TIP and cast off with knit over knit and purl over purl.
Work the other sleeve in the same way.

ASSEMBLY:
Fold the neck double to the wrong side. Sew the cast-on edge to the neckline, with long, loose stitches from the wrong side (making sure the seam is invisible on the right side and that it is not tight).

This pattern has been corrected.

Updated online: 08.11.2022
BODY: ...
When the piece measures 31-32-31-32-32-31 cm from the division, knit 1 round where you increase 36-36-40-44-48-56 stitches evenly spaced = 212-228-248-272-300-332 stitches.

Diagram

symbols = knit
symbols = purl
diagram

Each of our patterns has specific tutorial videos to help you.

Do you have a question? See a list of frequently asked questions (FAQ)

Knitting tension is what determines the final measurements of your work, and is usually measured per 10 x 10 cm. It is provided like so: number of stitches in width x number of rows in height - eg: 19 stitches x 26 rows = 10 x 10 cm.

The knitting tension is very individual; some people knit/crochet loosely while others work tightly. You adjust the knitting tension with the needle size, which is why the suggested needle size is only meant as a guide! You need to adjust this (up or down) to ensure that YOUR knitting tension matches the knitting tension provided in the pattern. If you work with a different knitting tension than provided you will have a different yarn consumption, and your work will have different measurements than what the pattern suggests.

The knitting tension also determines which yarns can replace each other. As long as you achieve the same knitting tension you can replace one yarn with another.

See DROPS lesson: How to measure your tension/gauge

See DROPS video: How to make a gauge tension swatch

The required amount of yarn is provided in grams, eg: 450 g. To calculate how many balls you’ll need you first need to know how many grams are in 1 ball (25g, 50g or 100g). This information is available if you click on the individual yarn quality on our pages. Divide the amount required with the amount of each ball. For example, if each ball is 50g (the most common amount), the calculation will be as follows: 450 / 50 = 9 balls.

The important thing when changing from one yarn to another is that the knitting/crochet tension remains the same. This is so that the measurements of the finished piece will be the same as on the sketch provided. It is easier to achieve the same knitting tension using yarns from the same yarn group. It is also possible to work with multiple strands of a thinner yarn to achieve the knitting tension of a thicker one. Please try our yarn converter. We recommend you to always work a test swatch.

Please NOTE: when changing yarn the garment might have a different look and feel to the garment in the photo, due to individual properties and qualities of each yarn.

See DROPS lesson: Can I use a different yarn than the one mentioned in the pattern?

All our yarns are categorised into yarn groups (from A to F) according to thickness and knitting tension – group A contains the thinnest yarns and group F the thickest. This makes it easier for you to find alternative yarns to our patterns, should you wish to switch yarn. All yarns within the same group have a similar knitting tension and can easily replace each other. However, different yarn qualities have different structures and properties which will give the finished work a unique look and feel.

Click here for an overview of the yarns in each yarn group

At the top of all our patterns you’ll find a link to our yarn calculator, which is a helpful tool should you wish to use a different yarn than suggested. By filling in the yarn quality you wish to replace, the amount (in your size) and number of strands, the calculator will present good alternative yarns with the same knitting tension. Additionally it will tell you how much you’ll require in the new qualities and whether you’ll need to work with multiple strands. Most skeins are 50g (some are 25g or 100g).

If the pattern is worked with multiple colours, every colour will have to be calculated separately. Similarly, if the pattern is worked with several strands of different yarns (for example 1 strand Alpaca and 1 strand Kid-Silk) you will have to find alternatives for each, individually.

Click here to see our yarn calculator

Since different yarns have different qualities and textures we have chosen to keep the original yarn in our patterns. However, you can easily find options among our available qualities by using our yarn calculator, or simply pick a yarn from the same yarn group.

It is possible that some retailers still have discontinued yarns in stock, or that someone has a few skeins at home that they would like to find patterns for.

The yarn calculator will provide both alternative yarn as well as required amount in the new quality.

If you think it's hard to decide what size to make, it can be a good idea to measure a garment you own already and like the size of. Then you can pick the size by comparing those measures with the ones available in the pattern's size chart.

You'll find the size chart at the bottom of the pattern.

See DROPS lesson: How to read size chart

The needle size provided in the pattern serves only as a guide, the important thing is to follow the knitting tension. And since knitting tension is very individual, you will have to adjust the needle size to ensure that YOUR tension is the same as in the pattern – maybe you’ll have to adjust 1, or even 2 needle sizes, up or down to achieve the correct tension. For this, we recommend that you work test swatches.

Should you work with a different knitting tension than the one provided, the measurements of the finished garment might deviate from the measurement sketch.

See DROPS lesson: How to measure your tension/gauge

See DROPS video: How to make a tension/gauge swatch

Working a garment top-down provides more flexibility and room for personal adjustment. For example it is easier to try the garment on while working, as well as making adjustments to length of yoke and shoulder caps.

The instructions are carefully explaining every step, in the correct order. Diagrams are adjusted to the knitting direction and are worked as usual.

The diagram depicts all rows/rounds, and every stitch seen from the right side. It is read from bottom to top, from right to left. 1 square = 1 stitch.

When working back and forth, every other row is worked from the right side and every other row is worked from the wrong side. When working from the wrong side, the diagram will have to be worked reversed: from left to right, knit stitches are purled, purl stitches are knit etc.

When working in the round every round is worked from the right side and the diagram are worked from right to left on all rounds.

See DROPS lesson: How to read knitting diagrams

The diagram depicts all rows/rounds, and every stitch seen from the right side. It is worked from bottom to top, from right to left.

When working back and forth every other row is worked from the right side: from right to left and every other row is worked from the wrong side: from left to right.

When working in the round, every row in the diagram are worked from the right side, from right to left.

When working a circular diagram you start in the middle and work your way outwards, counter clockwise, row by row.

The rows usually start with a given number of chain stitches (equivalent to the height of the following stitch), this will either be depicted in the diagram or explained in the pattern.

See DROPS lesson: How to read crochet diagrams

Instructions for working several diagrams after each other on the same row/round, will often be written like so: “work A.1, A.2, A.3 a total of 0-0-2-3-4 times". This means you work A.1 once, then A.2 is worked once, and A.3 is repeated (in width) the number of times provided for your size – in this case like so: S = 0 times, M = 0 times, L=2 times, XL= 3 times and XXL = 4 times.

The diagrams are worked as usual: begin with the first row in A.1, then work the first row in A.2 etc.

See DROPS lesson: How to read knitting diagrams

See DROPS lesson: How to read crochet diagrams

The total width of the garment (from wrist-to-wrist) will be larger in the larger sizes, despite the actual sleeves being shorter. The larger sizes have longer sleeve caps and wider shoulders, so there will be a good fit in all sizes.

The measurement sketch/schematic drawing provides information regarding the full length of the garment. If it’s a jumper or a jacket the length is measured from the highest point on the shoulder closest to the neckline, and straight down to the bottom of the garment. It is NOT measured from the tip of shoulder. Similarly, the length of yoke is measured from the highest point on the shoulder and down to where yoke is split into body and sleeves.

On a jacket measures are never taken along bands, unless specifically stated. Always measure inside band stitches when measuring the length.

See DROPS lesson: How to read a schematic drawing

Diagrams are often repeated on the round or in height. 1 repeat is the diagram the way it appears in the pattern. If it says to work 5 repeats of A.1 in the round, then you work A.1 a total of 5 times after/next to each other in the round. If it says to work 2 repeats of A.1 vertically/in height you work the entire diagram once, then begin again at the start and work the entire diagram one more time.

Chain stitches are slightly narrower than other stitches and to avoid working the cast-on edge too tight, we simply chain more stitches to begin with. The stitch count will be adjusted on the following row to fit the pattern and measurement sketch.

The rib edge is more elastic and will contract slightly compared to, for example, stocking stitch. By increasing before the rib edge, you avoid a visible difference in width between the rib edge and the rest of the body.

It’s very easy to cast off too tightly, and by making yarn overs while casting off (and simultaneously casting these off) you avoid a too tight cast off edge.

See DROPS video: How to bind off with yarn overs (yo)

To achieve an even increase (or decrease) you can increase on, for example: every 3rd and 4th row alternately, like so: work 2 rows and increase on the 3rd row, work 3 rows and increase on the 4th. Repeat this until the increase is complete.

See DROPS lesson: Increase or decrease 1 st on every 3rd and 4th row alternately

Should you prefer to work in the round instead of back and forth, you may of course adjust the pattern. You’ll need to add steeks mid-front (usually 5 stitches), and follow the instructions. When you would normally turn and work from the wrong side, simply work across the steek and continue in the round. At the end you’ll cut the piece open, pick up stitches to work bands, and cover the cut edges.

See DROPS video: How to knit steeks and cut open

Should you prefer to work back and forth instead of in the round, you may of course adjust the pattern so you work the pieces separately and then assemble them at the end. Divide the stitches for the body in 2, add 1 edge stitch in each side (for sewing) and work the front and back pieces separately.

See DROPS lesson: Can I adapt a pattern for circular needles into straight needles?

Pattern repeats can vary slightly in the different sizes, in order to get the correct proportions. If you’re not working the exact same size as the garment in the photo, yours might deviate slightly. This has been carefully developed and adjusted so that the complete impression of the garment is the same in all sizes.

Make sure to follow instructions and diagrams for your size!

If you have found a pattern you like which is available in women’s size it’s not very difficult to convert it to men’s size. The biggest difference will be the length of sleeves and body. Start working on the women size that you think would fit across the chest. The additional length will be worked right before you cast off for the armhole/sleeve cap. If the pattern is worked top-down you can add the length right after the armhole or before the first decrease on sleeve.

Regarding additional yarn amount, this will depend on how much length you add, but it is better with a skein too many than too few.

All yarns will have excess fibres (from production) that might come off as lint or shedding. Brushed yarns (ie hairier yarns) have more of these loose, excess fibres, causing more shedding.

Shedding also depends on what is worn under or over the garment, and whether this pulls at the yarn fibres. It’s therefore not possible to guarantee that there will be no shedding

Below are some tips on how to get the best result when working with hairier yarns:

1. When the garment is finished (before you wash it) shake it vigorously so the looser hairs come off. NOTE: do NOT use a lint roller, brush or any method that pulls at the yarn.

2. Place the garment in a plastic bag and put it in your freezer - the temperature will cause the fibres to become less attached to each other, and excess fibres will come off easier.

3. Leave in the freezer for a few hours before taking it out and shaking it again.

4. Wash the garment according to the instructions on the yarn label.

Pilling is a natural process that happens to even the most exclusive of fibers. It's a natural sign of wear and tear that is hard to avoid, and that is most visible in high friction areas of your garment like a sweater's arms and cuffs.

You can make your garment look as new by removing the pilling, using a fabric comb or a pill/lint remover.

Still can't find the answer you need? Then scroll down and leave your question so one of our experts can try to help you. This will be done normally within 5 to 10 working days.
In the meantime, you can read the questions and answers that others have left to this pattern or join the DROPS Workshop on Facebook to get help from fellow knitters/crocheters!

You might also like...

Post a comment to pattern DROPS 224-1

We would love to hear what you have to say about this pattern!

If you want to leave a question, please make sure you select the correct category in the form below, to speed up the answering process. Required fields are marked *.

Comments / Questions (28)

country flag Laura wrote:

Hi, when i’m doing the raglan increases, should my marker go before or after yarn overs? Thank you!

06.04.2024 - 23:36

DROPS Design answered:

Dear Laura, you should do the yarnovers before and after the A.1 pattern. The best would be to keep the markers between the yarnovers and the A.1 pattern. Happy Knitting!

07.04.2024 - 01:20

country flag Marin wrote:

Modèle pull homme:Sjôbris N'y a t-il pas une erreur au niveau de la répartition des mailles pour l'empiècement pour le dos le devant et les manches . Les manches ne se trouvent pas au bon endroit. Merci. Bien cordialement

25.03.2024 - 11:10

DROPS Design answered:

Bonjour Mme Marin, l'empiècement commence par le raglan avant la manche droite: les 5 mailles de A.1, puis on tricote la manche droite, A.1 pour le raglan, le devant, A.1 pour le raglan, la manche gauche, A.1 pour le raglan et le dos. Ou bien ai-je mal compris votre question?

02.04.2024 - 09:29

country flag Danuta wrote:

Dzien dobry mam welne worsted probka 20/26(4,5mm)dzersejem.Czy moge uzyc tych wymiarow tzn. liczby oczek,dodawania itd. I zrobic caly sweter dzersejem? pozdrawiam.

07.01.2024 - 15:34

country flag Kelly wrote:

I’m using the Drops Sky wool. I checked the gauge using 4.5 mm needles and It wasn’t even close. I have moved up to 6 mm needles and still don’t have gauge (measurement of square is almost 4 inches wide and 3.5 in. In height). The guage on the Drops Sky wool is is 21 st and 28 rows and the pattern gauge is 20 st and 26 rows. I don’t want to waste the $150 I spent in wool. Do you suggest going up to 6.5 mm? It seems a big jump.

01.01.2024 - 02:44

DROPS Design answered:

Dear Kelly, the gauge 21 sts x 28 rows in stocking stitch is worked with needle size 4 mm as the jumper is here worked with larger needle: size 4,5 mm, so that the tension will be 20 sts x 26 rows in pattern = 10 x 10 cm. But remember that most important is the gauge, not the needle size. Read more here. Happy knitting!

02.01.2024 - 11:48

country flag Babette Van Atten wrote:

Wat is het patroon in 224-1 ? Is dat 1 tour recht, 1 tour averecht?? Bij patroon staat: zie A.1 en A.2, maar dat zie ik nergens?

07.11.2023 - 09:16

DROPS Design answered:

Dag Babette,

A.1 en A.2 kun je onderaan de beschrijving van het patroon vinden, rechts onder de maattekening.

13.11.2023 - 06:46

country flag Adriana wrote:

Hello! I have started this sweater, and then noticed that what I have knitted so far makes my skin itchy. What could be the itchy component, the Alpaca or the wool in the yarn? I just need to know so as to make sure not to buy yarn with that specific component next time. By the way, I bought the Drops Sky as recommended on the pattern. Thank you in advance!

21.05.2023 - 02:24

DROPS Design answered:

Dear Adriana, any of those could be the irritating factor. This itchiness is caused by the small threads of the natural wool (including Alpaca). So, in each person the irritating factor may be different, since it will depend on the person's own sensibility to those threads. While Alpaca is generally softer, it may still be the reason for you skin reaction. As personal advice, you could try working a small wristwarmer, like a bracelet, with your selected yarn, and wear it for a couple of days. If your skin doesn't react to it in that time, you should be fine to use it. Happy knitting!

21.05.2023 - 18:46

country flag Bianca wrote:

Buonasera, non riesco proprio a capire, gli aumenti vanno fatti prima del segnapunti o dopo? Se vanno fatti solo ai lati di A1 vuol dire che A2 rimane sempre con il stesso numero di maglie? Grazie

19.03.2023 - 19:18

DROPS Design answered:

Buonasera Bianca, deve incorporare gli aumenti in A.2. Buon lavoro!

23.03.2023 - 21:03

country flag Jeppe G wrote:

Når man starter med raglanen er det først 5 masker med mønster A.1. Det bemerkes at første merke (starten) er "mellom bakstykket og første erme ". Når jeg skal dele opp til ermer står det at jeg skal strikke 3 masker vanlig og så ta av 73 masker til ermet. Men vil ikke da A1 bli delt midt i, eller skal man strikke A1 ferdig først? De 3 første maskene er for meg de 3 første maskene i A1.

19.03.2023 - 08:17

DROPS Design answered:

Hei Jeppe. Jo, du strikker de 3 første maskene av A.1. (i str. S). Disse 3 maskene vil nå tilhøre bakstykket på bolen. Så strikker du 2 masker av A.1 + maskene på ermet (= 55 m) + 2 masker av A.1 = 1. erme / 59 masker. Deretter strikker du 3 masker av A.1 + alle maskene på forstykket + 3 masker av A.1 (= 81 masker til forstykket på bolen). Så strikker du 2 masker av A.1 + maskene på ermet (= 55 m) + 2 masker av A.1 = 2. erme / 59 masker. Og til slutt strikker du 3 masker av A.1 + de resterende maskene til 1. merke. Alle disse maskene + de 3 første du strikket = bakstykket. mvh DROPS Design

20.03.2023 - 13:34

country flag Arlette Dufour wrote:

Je comprend pas j'ai acheter la laine drops Sky pour faire le modele 224-1 j'ai fait l'echantillon avec des aigs 4 1/2 avec du 5 je n'ai pas mes 10 cm pour 20 mailles vous dite sivous n'avais pas assez de mailles pour 10 cm esssayez avec des aiguilles plus fine ce que j'ai fait je n'ai toujours pas mes 10cm comment je doit faire /tricoter la taille au dessus pour arriver aux cm que vous preconisé merci pour le renseignement Arlette

18.02.2023 - 08:50

DROPS Design answered:

Bonjour Mme Dufour, en fonction du nombre de mailles que vous avez (en plus ou en moins des 20 mailles de l'échantillon) vous devrez prendre soit des aiguilles plus fines (si vous avez moins de 20 mailles) soit des aiguilles plus grosses (si vous avez plus de 20 mailles) - vous pouvez également laver/bloquer votre échantillon (attention à bien suivre les indications de l'étiquette et + d'infos sur son nuancier), pour vérifier si cela peut vous aider. Retrouvez plus d'infos sur l'échantillon ici. Bon tricot!

20.02.2023 - 09:19

country flag Ulla Salzmann wrote:

Hallo, wo finde ich das Diagramm A1 und A 2??? Herzliche Grüße

11.02.2023 - 12:42

DROPS Design answered:

Hallo Ulla, beide Diagramme finden Sie rechts unter dem Ärmel. Viel Spaß beim Stricken!

11.02.2023 - 15:28