
Popular categories
Looking for a yarn?


|
||||||||||||||||||||||||||||
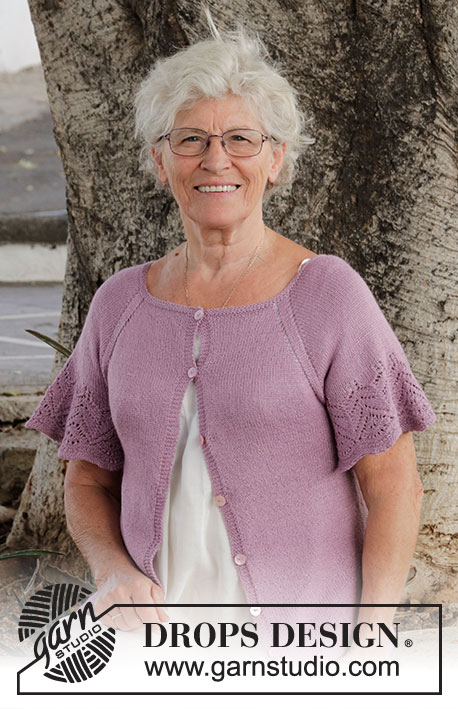
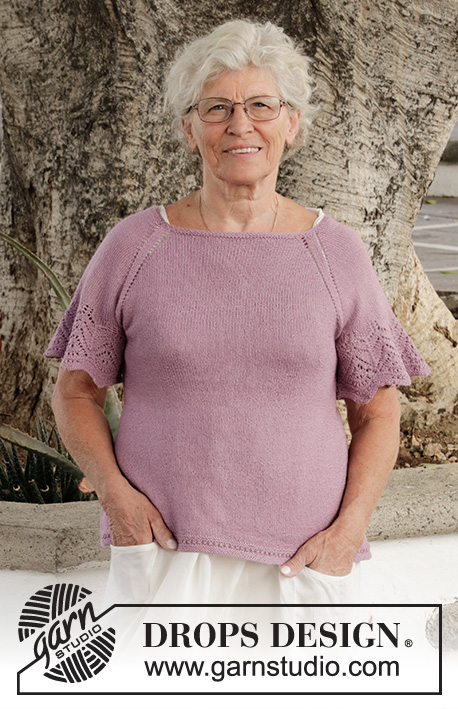
Luscious Lilacs |
||||||||||||||||||||||||||||
 |
 |
|||||||||||||||||||||||||||
Knitted jacket in DROPS Paris. Piece is knitted top down with leaf pattern and short sleeves. Size XS–XXL.
DROPS 220-36 |
||||||||||||||||||||||||||||
|
------------------------------------------------------- EXPLANATION FOR THE PATTERN: ------------------------------------------------------- GARTER STITCH (worked in the round): 1 ridge vertically = 2 rounds, i.e. knit 1 round and purl 1 round. GARTER STITCH (back and forth): Knit all rows. 1 ridge vertically = knit 2 rows. PATTERN: See diagrams A.1 to A.3. Diagrams show all rows in pattern seen from the right side. Choose diagram for your size. INCREASE TIP (evenly): To calculate how to increase evenly, use the total number of stitches on row (e.g. 82 stitches) minus bands (e.g. 8 stitches) and divide the remaining stitches by number of increases to be done (e.g. 9) = 8.2. In this example increase by making 1 yarn over after approx. every 8th stitch and do not increase over bands. On next row work yarn overs twisted to avoid holes RAGLAN: All increases are done from the right side. Increase 1 stitch in each side of sleeve inside marker thread and knit 1 (= 4 stitches increased on round - in addition stitches are increased on front and back piece, but these stitches are shown in diagram). Increase 1 stitch by making 1 yarn over. On next row purl yarn over to make a hole. Then work the new stitches in stocking stitch. BUTTONHOLES: Decrease for buttonholes on right band (when garment is worn). Decrease from right side when 3 stitches remain on row as follows: Make 1 yarn over, knit the next 2 stitches together, knit last stitch. On next row knit yarn over to make holes. Decrease first buttonhole when rib in neck measures approx. 2 cm. Then decrease the next 4-4-5-5-5-5 buttonholes, approx. 10-10-8½-9-9½-9½ cm between each. CAST-OFF TIP: To avoid a tight cast-off edge you may use a larger needle size. If this also is too tight, work a 1 yarn over after approx. every 6th stitch while casting off (cast off yarn overs as regular stitches). ------------------------------------------------------- START THE PIECE HERE: ------------------------------------------------------- JACKET - SHORT OVERVIEW OF THE PIECE: Work neck edge and yoke back and forth on circular needle from mid front, top down. Now divide yoke for body and sleeves. Work body back and forth on circular needle, top down. Work sleeves in the round on double pointed needles/short circular needle, top down. NECK EDGE: Cast on 82-82-86-90-94-94 stitches (including 4 band stitches in each side towards mid front) on circular needle size 4 mm with 1 strand Paris. Work 2 ridges in GARTER STITCH - read explanation above. Knit 1 row from right side while increasing 9-9-9-5-5-5 stitches evenly - read INCREASE TIP = 91-91-95-95-99-99 stitches. Purl 1 row from wrong side (purl yarn overs twisted and work bands in garter stitches until finished measurements). Switch to circular needle size 5 mm. Insert 1 marker after band at the beginning of row mid front, measure yoke from this marker! YOKE: Now work pattern as follows: 4 band stitches in garter stitch, knit 1, A.1a over the next 14 stitches, A.1b over the next 2 stitches, insert a marker thread here (= in transition between left front piece and left sleeve), knit 1, make 1 yarn over, knit 6-6-8-8-10-10, make 1 yarn over, knit 1, insert a marker thread here (= in transition between left sleeve and back piece), A.1c over the next 3 stitches, A.1a over the next 28 stitches (= 2 repetitions in width), A.1b over the next 2 stitches, insert a marker thread here (= in transition between back piece and right sleeve), knit 1, make 1 yarn over, knit 6-6-8-8-10-10, make 1 yarn over, knit 1, insert a marker thread here (= in transition between right sleeve and right front piece), A.1c over the next 3 stitches, A.1a over the next 14 stitches, 4 band stitches in garter stitch. Now insert 1 marker thread in every transition between body and sleeves (= 4 marker threads in piece - move marker threads upwards when working piece). In addition to increases in diagrams, 1 stitch have been increased in each side of sleeves threads for RAGLAN - read explanation above. REMEMBER THE KNITTING TENSION! Continue pattern back and forth like this. Increase for raglan on sleeve every other row (i.e. on every row from right side) 14-19-20-23-22-21 times in total, then every 4th row 4-2-2-2-3-5 times (= 18-21-22-25-25-26 increases in total in each side of sleeves). AT THE SAME TIME on 21st row in A.1a work as explained for white star after band stitches at the beginning of row (seen from right side) and as explained for black star before band stitches (seen from right side) – read explanation in symbol explanation. When A.1a, A.1b and A.1c have been worked vertically, continue pattern the same way. I.e. work A.1b and A.1c towards raglan in the side on front pieces and back piece, and work leaf pattern (= A.1a) as before between raglan and back piece (= A.1b and A.1c) and between raglan and bands on front pieces until 36-36-46-48-48-48 rows with pattern have been worked vertically, and there are 42-42-47-49-49-49 stitches on each front piece (including 4 band stitch in garter stitch) and 75-75-85-89-89-89 stitches on back piece. Now work in the different sizes as follows: Size M: Continue leaf pattern the same way, but towards marker threads in each raglan (on front pieces and back piece) work pattern A.2 (i.e. do not increase more stitches for raglan). There are now 47 stitches on each front piece (including 4 band stitches in garter stitch) and 85 stitches on back piece. When row with arrow in A.2 (= first row in diagram) has been worked (and increases on sleeves are done), there are 287 stitches on row. Piece now measures approx. 22 cm from marker. If the piece is shorter than this, continue with leaf pattern (without increasing for raglan) until the correct measurements. Size XS, S, L, XL and XXL: Continue leaf pattern the same way but towards marker threads in raglan (on front pieces and back piece) work pattern as shown in A.2b and A.2c. When all increases have been done, there are 45-45-52-53-57 stitches on each front piece (including 4 band stitches in garter stitch), and there are 81-81-95-97-105 stitches on back piece. When it has been worked up to and with row with arrow for your size in diagram (and all increases for sleeves are done), there are 259-271-319-327-347 stitches on needle. Piece should now measure approx. 21-21-25-25-28 cm from marker. If the piece is shorter than this, continue with leaf pattern (without increasing for raglan) until the correct measurements. ALL SIZES: Now divide piece for body and sleeves. Next row (= row after the one with arrow) work as follows from wrong side: In size XS work the outermost 3 stitch in the side on front pieces and back piece on to sleeves. In size S, M, L and XL divide the piece at the transition between sleeves and front pieces and back piece. In size XXL work the outermost stitch in each side of sleeve on to back piece/front pieces. Work the first 42-45-47-52-53-58 stitches (= right front piece), slip the next 50-50-54-60-62-62 stitches on a stitch holder for sleeve and cast on 4-4-8-8-12-14 new stitches on row (= in the side under sleeve), work the next 75-81-85-95-97-107 stitches (= back piece), slip the next 50-50-54-60-62-62 stitches on a stitch holder for sleeve and cast on 4-4-8-8-12-14 new stitches on row (= in the side under sleeve), work the last 42-45-47-52-53-58 stitches (= left front piece). Then finish body and sleeves separately. NOW MEASURE PIECE FROM HERE! BODY: There are now 167-179-195-215-227-251 stitches for body. Insert a marker thread in each side in the middle of the 4-4-8-8-12-14 new stitches cast-on under sleeves in each side (= 2-2-4-4-6-7 new stitches on each side of marker thread). Work pattern from right side as follows - NOTE: Pattern should fit pattern from yoke, adjust to begin on correct row in diagrams: Work 4 band stitches in garter stitch, leaf pattern as before over the next 15-15-29-29-29-36 stitches, A.3b over the next 16 stitches, 9-12-2-7-10-9 stitches in stocking stitch, marker thread is here, 9-12-2-7-10-9 stitches in stocking stitch, A.3a over the next 17 stitches, leaf pattern as before over the next 28-28-56-56-56-70 stitches (= 2-2-4-4-4-5 repetitions of A.1a in width), A.3b over the next 16 stitches, 9-12-2-7-10-9 stitches in stocking stitch, marker thread is here, 9-12-2-7-10-9 stitches in stocking stitch, A.3a over the next 17 stitches, leaf pattern as before over the next 14-14-28-28-28-35 stitches, 4 band stitches in garter stitch. Continue back and forth like this until piece measures approx. 28-30-30-29-30-29 cm – adjust to finish after a row that is 11th or 23rd row in A.1a. Switch to circular needle size 4 mm. Purl 1 row from wrong side (knit band stitches) while increasing 1-1-0-1-1-1 stitches evenly = 168-180-195-216-228-252 stitches. Work rib as follows: 4 band stitches in garter stitch, * knit 1, purl 2 *, work from *-* until 5 stitches remain, knit 1, 4 band stitches in garter stitch. Continue back and forth like this until rib measures 3 cm. Cast off with knit over knit and purl over purl - read CAST-OFF TIP. Jacket measures approx. 54-56-58-60-62-64 cm from shoulder and down. SLEEVE: Slip the 50-50-54-60-62-62 stitches from stitch holder in one side back on double pointed needles / circular needle size 5 mm, and pick in addition up 1 stitch in each of the 4-4-8-8-12-14 new stitches cast on under sleeve in the side = 54-54-62-68-74-76 stitches. Beginning of round is mid under sleeve. Work in stocking stitch in the round. When piece measures 4-4-4-5-5-5 cm from division, work next round as follows: Knit over the first 11-11-13-16-19-19 stitches, * knit 2 together, knit 1 *, work from *-* 11-11-12-12-12-13 times (= 11-11-12-12-12-13 stitches decreased), knit over the last 10-10-13-16-19-18 stitches = 43-43-50-56-62-63 stitches. Switch to double pointed needles size 4 mm. Work 2 ridges in GARTER STITCH in the round - read explanation above. Cast off - remember CAST-OFF TIP. Sleeve measures 6-6-6-7-7-7 cm in total from division. Work the other sleeve the same way. ASSEMBLY: Sew the buttons on to left band. |
||||||||||||||||||||||||||||
Diagram explanations |
||||||||||||||||||||||||||||
|
||||||||||||||||||||||||||||

|
||||||||||||||||||||||||||||

|
||||||||||||||||||||||||||||

|
||||||||||||||||||||||||||||

|
||||||||||||||||||||||||||||

|
||||||||||||||||||||||||||||
|
Have you made this or any other of our designs? Tag your pictures in social media with #dropsdesign so we can see them! Do you need help with this pattern?You'll find tutorial videos, a Comments/Questions area and more by visiting the pattern on garnstudio.com. © 1982-2024 DROPS Design A/S. We reserve all rights. This document, including all its sub-sections, has copyrights. Read more about what you can do with our patterns at the bottom of each pattern on our site. |
||||||||||||||||||||||||||||


With over 40 years in knitting and crochet design, DROPS Design offers one of the most extensive collections of free patterns on the internet - translated to 17 languages. As of today we count 304 catalogues and 11422 patterns - 11422 of which are translated into English (UK/cm).
We work hard to bring you the best knitting and crochet have to offer, inspiration and advice as well as great quality yarns at incredible prices! Would you like to use our patterns for other than personal use? You can read what you are allowed to do in the Copyright text at the bottom of all our patterns. Happy crafting!
Comments / Questions (13)
Als patroon 1x in de hoogte gebreid is, wordt gezegd ga verder zoals voorheen. Op een vraag hierover, van Toni, is van in het Engels antwoord gegeven. Misschien handig om deze uitleg in het patroon mee te nemen, omdat misschien niet voor iedereen duidelijk is dat patroon A1a, voor en na de raglan 2x gebreid moet/ kan worden en vervolgens A1b en A1c als patroon meegenomen moet worden. Ik heb het antwoord op de vraag van Toni zeker 3x moeten lezen voor ik het daadwerkelijk snapte.
23.04.2024 - 10:02Ved raglan udtag står der at man skal strikke omslaget drejet vrang på næste pind for at der ikke kommer hus. Men på nærbilledet er der vel netop et hul på hver side af de to retmasker. Eller har jeg misforstået noget?
24.08.2023 - 21:04DROPS Design answered:
Hej Hanne, det ser ud til at du har ret og at det er en fejl, men vi tjekker med design og laver en rettelse i så fald :)
08.09.2023 - 14:39I am still awaiting an answer to my question regarding placing of buttohoes. Thank you
03.07.2023 - 03:41DROPS Design answered:
See answer below :) Thanks for your patience!
03.07.2023 - 11:07I end up with the buttonhole at the beginning of the row!!! Cast On and knit 2 ridges 1sr row knit - right side 2nd row knit - wrong side 3rd row knit - right side 4th row knit - wrong side then knit one row right side then purl one row wrong side then start pattern on right side which is right front where buttonholes should be!
01.07.2023 - 16:47DROPS Design answered:
Dear Mrs McShane, when you work a jacket top down, you work from RS: left front piece, left sleeve, back piece, right sleeve and right front piece, so you will work the buttonholes at the end of a row from RS so that the buttonholes will be on the right front piece. Happy knitting!
03.07.2023 - 10:11Hej igen! Nu har jag löst förra problemet men har nu en ny fråga: Jag har stickat A.2 rätsida och gjort delningen fram- och bakstycke + armar på avigsidan men nu kommer problemet: det står: sticka bladmönstret som förrut??? betyder bladmönstret A1a eller? för alla diagram blir ju bladmönster. Jag är en van stickare men jösses vad man får fundera och klura för att förstå mönstret. Mvh Anita
01.02.2023 - 13:44DROPS Design answered:
Hej Anita, jo det er samme bladmønster som du har strikket på bolen du skal fortsætte med, du er færdig med alle dem som har formet til raglan :)
03.02.2023 - 11:24Jag förstår inte mönstret. När jag stuckit 46 v så ska jag sticka v 47 med A2 mot markörerna i varje raglan men det funkar ju bara mönster A1c som är 15 m vilket krävs för att sticka A2. A1a och A1b är 14 m men efter att ha stickat varv 47 så blir A1b 15 m och därmed blir det 48 m på framstycket istället för 47. ????? Mvh Anita
31.01.2023 - 20:42DROPS Design answered:
Hej Anita, vi forstår ikke dit spørgsmål... har du ikke A.1b og A.1c i hver side? Diagrammerne er lige store, så hvorfor kan du kun få det til at fungere i den ene side (A.1c)?
03.02.2023 - 11:09I am making pattern w-838 in Paris cotton. I am an experienced knitter, but cannot understand this: I knit the 24 rows in the charts (A. 1a, A.1b and A.1c). The then pattern states "When A.1a, A.1b and A.1c have been worked vertically, continue pattern the same way." "The same way" would restart the charts and be only 2 stitches on A.1b and 3 on A.1c. Where do I go from here? - i.e. row 25 onward? Thanks very much
01.03.2022 - 01:27DROPS Design answered:
Dear Toni, after you have worked the diagrams one time in height, work them again from the beginning: A.1a over the first 14 sts as before, then work A.1a one more time over the next 14 sts (= the increased sts in previous A.1b) and finish with A.1b (= left front piece); on back piece, work the same way: A.1c over the first 3 sts, then work A.1b 2 more times in width (over the last sts A.1c + the first sts A.1b) between A.1c and A.1b etc. Can this help?
01.03.2022 - 10:04Jeg er lidt forvirret!!! Skal der strikkes ret vrang på vrangsiden? Eller er det de lige rækker i diagrammet , jeg skal bruge og hvad ind imellem ? Sagt på en anden måde , jeg forstår ikke hvad jeg skal på vrang siden🙃 på forhånd tak
28.10.2021 - 21:57DROPS Design answered:
Hej Diana, du strikker hver 2.pind i diagrammet fra vrangen. Mønsterpinden strikkes fra retsiden. Se her hvordan man følger et diagram: Hvordan læses strikkediagrammer
29.10.2021 - 08:15En waar is blokje A3c in het schema? Dit staat wel in het patroon. Zijn de namen verwisseld?
07.06.2021 - 17:34DROPS Design answered:
Dag Jetje,
Er is inderdaad geen A.3c, dus wordt er A.3a bedoeld. Ik heb het doorgegeven aan de ontwerpafdeling om te controleren.
13.06.2021 - 10:40Op de schema's zie ik een blokje A.3a. Dit vind ik nergens terug in het patroon. Waar wordt het gebruikt?
07.06.2021 - 17:09