DROPS Safran
DROPS Safran
100% Cotton
from 1.30 £ /50g
Get the yarn to make this pattern from 5.20£.

The yarn cost is calculated from the pattern’s smallest size and the yarn’s cheapest product type. Looking for an even better price? You might find it on the DROPS Deals!

DROPS SS24

Red River Cave

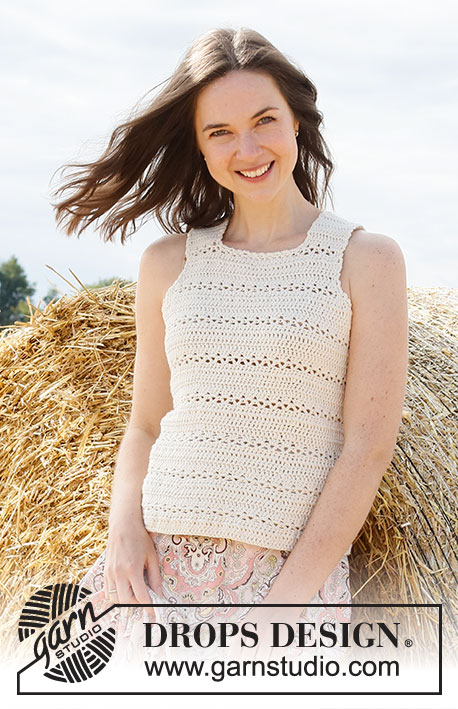
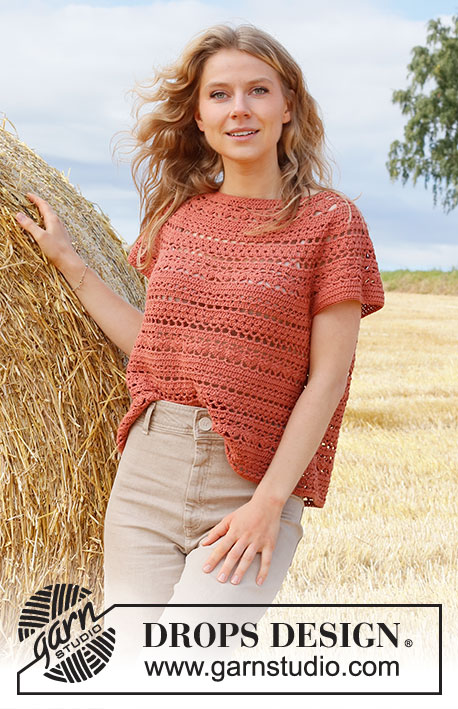
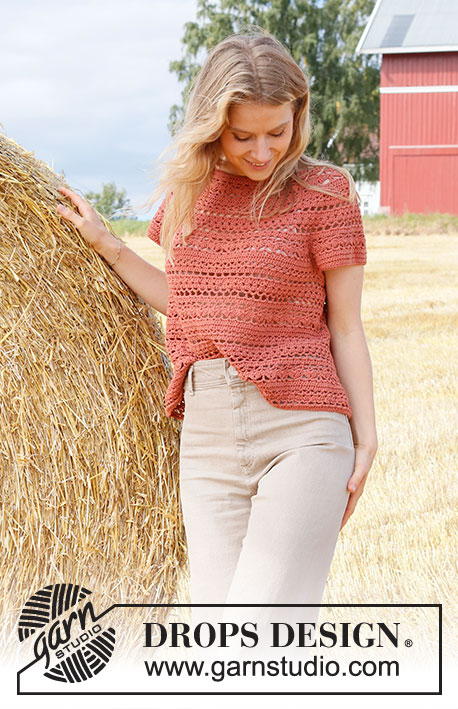
Crocheted top in DROPS Safran. Piece is crocheted top down with round yoke and lace pattern. Size XS–XXL.

DROPS 223-28
DROPS design: Pattern e-311
Yarn group A
-------------------------------------------------------

SIZE:
XS - S - M - L - XL - XXL

MATERIALS:
DROPS SAFRAN from Garnstudio (belongs to yarn group A)
200-250-250-300-300-350 g colour 59, red clay

CROCHET TENSION:
20 treble crochets in width and 11.5 rows vertically = 10 x 10 cm.

CROCHET HOOK:
DROPS CROCHET HOOK SIZE 4 mm
Hook size is only a suggestion! If you have too many stitches on 10 cm switch to larger hook. If you have too few stitches on 10 cm switch to smaller hook.

-------------------------------------------------------

Alternative Yarn – See how to change yarns here
Yarn Groups A to F – Use the same pattern and change the yarn here
Yarn usage using an alternative yarn – Use our yarn converter here

-------------------------------------------------------

DROPS Safran
DROPS Safran
100% Cotton
from 1.30 £ /50g
Get the yarn to make this pattern from 5.20£.

The yarn cost is calculated from the pattern’s smallest size and the yarn’s cheapest product type. Looking for an even better price? You might find it on the DROPS Deals!

Pattern instructions

NOTE: This pattern is written in British English. All measurements in charts are in cm. For conversion from cm to inches - click here. There are different terms for crocheting in British and American English. If this pattern includes crochet, click for "crochet terms" here. For this pattern in American English, please click here.
-------------------------------------------------------

EXPLANATION FOR THE PATTERN:

-------------------------------------------------------

CROCHET TIP FOR CHAIN STITCH:
If you work at the end of crochet hook the chain stitch will often be too tight. 
1 chain stitch should be just as long as 1 double crochet/treble crochet is wide. 

CROCHET INFORMATION:
At beginning of every round with treble crochets work 3 chain stitches. These chain stitches do not replace 1st treble crochet but are worked in addition to stitches on round.

PATTERN:
See diagrams A.1 to A.4.

INCREASE TIP (evenly):
To calculate how to increase evenly, count the stitches to be increased (e.g. 94 stitches), and divide by stitches of increases to be done (e.g. 18) = 5.2.
In this example increase by working 2 treble crochets in approx. every 5th stitch.

DECREASE TIP:
Decrease 1 treble crochet by working the next 2 treble crochets together as follows: Work 1 treble crochet but wait with last pull through (= 2 stitches on hook), then work next treble crochet but on last pull through pull yarn through all 3 stitches on hook.

-------------------------------------------------------

START THE PIECE HERE:

-------------------------------------------------------

TOP - SHORT OVERVIEW OF THE PIECE:
Work yoke in the round, top down. Now divide yoke for body and sleeves. Work body in the round, top down. Work sleeve edges in the round, top down.
NOTE: It is important to keep the crochet tension vertically so that the measurements on yoke will be correct.

YOKE:
Work 95-103-103-109-109-115 chain stitches - read CROCHET TIP FOR CHAIN STITCH on hook size 4 mm with Safran and form 1 ring with 1 slip stitch in first chain stitch. Work 3 chain stitches - read CROCHET INFORMATION, then work 1 treble crochet in each of the 94-102-102-108-108-114 chain stitches and increase at the same time 18-22-22-28-40-46 treble crochets evenly - read INCREASE TIP = 112-124-124-136-148-160 treble crochets.
Now insert 4 marker threads in the piece as follows:
1st marker thread: Insert 1st marker thread at beginning of round.
2nd marker thread: Skip the next 16 stitches, insert 2nd marker thread here.
3rd marker thread: Skip the next 40-46-46-52-58-64 stitches, insert 3rd marker thread here.
4th marker thread: Skip the next 16 stitches, insert 4th marker thread here.
40-46-46-52-58-64 stitches remain on round after last marker thread.
Move the marker threads upwards when working. They should be placed directly before every repetition of A.2 on round, and they are used when increasing evenly.

Now work pattern and increase as follows:
A.1 shows how round begins and ends.
Work A.2 over the first 4 treble crochets, A.3 over the next 12 treble crochets (= 2 repetitions of 6 stitches), A.2 over the next 4 treble crochets, work A.3 over the next 36-42-42-48-54-60 treble crochets (= 6-7-7-8-9-10 repetitions of 6 stitches), A.2 over the next 4 treble crochets, A.3 over the next 12 treble crochets, A.2 over the next 4 treble crochets, A.3 over the last 36-42-42-48-54-60 treble crochets.
REMEMBER THE CROCHET TENSION!
Continue the pattern in the round like this while increasing evenly:
On 6th round in pattern increase as follows:
Work * A.2 as before, work A.3 until next marker thread and increase at the same time 0-6-6-6-6-6 treble crochets evenly – remember INCREASE TIP (= 12-18-18-18-18-18 stitches), work A.2 as before, work A.3 until next marker thread and increase at the same time 6-6-12-12-12-12 stitches evenly (= 42-48-54-60-66-72 stitches) *, work from *-* 1 more time on round (= 12-24-36-36-36-36 stitches increased) = 180-204-216-228-240-252 stitches on round.
In size XS, S and M continue from ALL SIZES below.

In size L, XL and XXXL increase as follows:
On 10th round in pattern increase as follows:
Work * A.2 as before, work A.3 until next marker thread and increase at the same time 6-6-6 stitches evenly (= 24-24-24 stitches), A.2, work A.3 as before until next marker thread and increase at the same time 6-6-6 treble crochets evenly (= 66-72-78 stitches) *, work from *-* 1 more time on round (= 24-24-24 stitches increased) = 288-300-312 stitches on round.

ALL SIZES:
Work until A.2 has been worked vertically.
On last round in A.2 insert 1 new marker thread in the middle of each A.2 (i.e. 18 treble crochets on each side of marker thread in each of the 4 repetitions with A.2). Remove the old marker threads (= 4 marker threads remain in piece). Stitches between marker threads mark transition between front/back piece and sleeves (= 48-54-54-60-60-60 treble crochets on each sleeve). There are now 252-276-288-324-336-348 treble crochets on round.
Now work with pattern as follows: A.4 shows how round begins and ends. Continue with A.3 in the round, and over the 36 treble crochets in A.2 work 6 repetitions of A.3. When A.3 has been worked vertically 1 time, repeat pattern A.3a vertically.
Work like this until piece measures 20-20-22-24-26-28 cm from the beginning of the yoke – adjust to finish after 1st, 3rd, 7th, 12th or 13th round in A.3a! This is done to make it easier to work pattern on body and sleeves.

Now divide piece for body and sleeves. Work next round as follows:
Work A.3a until first marker thread (= 3 repetitions for back piece), work 8-8-8-10-10-10 chain stitches, skip stitches between the 2 marker threads (= 8-9-9-10-10-10 repetitions for sleeve), work A.3a until next marker thread (= 13-14-15-17-18-19 repetitions for front piece), work 8-8-8-10-10-10 chain stitches, skip stitches between the 2 marker threads (= 8-9-9-10-10-10 repetitions for sleeve), work A.3a the rest of the round (= 10-11-12-14-15-16 repetiotions - There are now 13-14-15-17-18-19 repetitions for back piece). Cut and fasten the yarn.

BODY:
Start in the 5th chain stitch of the 8-8-8-10-10-10 chain stitches under the sleeve in one side. Work 3 chain stitches - remember CROCHET INFORMATION, work 1 treble crochet in the same chain stitch. Now work 1 treble crochet in each of the next 3-3-3-5-5-5 chain stitches, work A.3a as before until chain stitches under the second sleeve, 1 treble crochet in each of the 8-8-8-10-10-10 chain stitches below sleeve. Work A.3a as before until chain stitches under sleeve, work 1 treble crochet in each of the last 4-4-4-4-4-4 chain stitches under sleeve = 172-184-196-224-236-248- stitches.
Work the 8-8-8-10-10-10 stitches under sleeve in treble crochets.
Insert 1 marker in the piece. NOW MEASURE PIECE FROM HERE!
On first round in A.3a worked with treble crochet decrease 4-4-4-2-2-2 treble crochet evenly – read DECREASE TIP = 168-180-192-222-234-246 stitches. Then work A.3a in the round (= 28-30-32-37-39-41 repetitions on round). Repeat A.3a vertically. When piece measures 12 cm, adjust so that next row is with treble crochets, decrease 6 treble crochets evenly = 162-174-186-216-228-240 treble crochets. Now repeat A.3a 27-29-31-36-38-40 times on round.
When piece measures 20-21-22-23-24-25 cm from marker – adjust so that next round is with treble crochet, increase 6 treble crochets evenly – read INCREASE TIP. Repeat increase on each of the next 3 rows with treble crochets (= 24 stitches increased) = 186-198-210-240-252-264 treble crochets. Repeat A.3a 1 more time in width on every increase. When all increases are done, repeat A.3a 31-33-35-40-42-44 times in width.
Work until piece measures 34-36-36-36-36-36 cm from division – adjust to finish after a round with treble crochets.
Cut and fasten the yarn. Top measures approx. 54-56-58-60-62-64 cm from shoulder and down.

SLEEVE EDGES:
Begin in the 4th chain stitch of the 8-8-8-10-10-10 chain stitches under sleeve. Work 3 chain stitches - remember CROCHET INFORMATION, work 1 treble crochet in the same chain stitch. Then work 1 treble crochet in each of the next 4-4-4-6-6-6 chain stitches, work next row in A.3a (i.e. a row with treble crochets) until 3 chain stitches remain on row, work 1 treble crochet in each of the last 3 chain stitches. Now 1 row with treble crochets and 1 row with double crochets/chain stitches remain - work if desired 1 treble crochet in every treble crochet until desired length.
Work 1 round with 1 treble crochet in every treble crochet and decrease at the same time 10-10-8-10-6-4 treble crochets evenly = 46-52-54-60-64-66 treble crochet.
Work * 1 double crochet in first/next treble crochet, 1 chain stitch, skip approx. 1 cm *, work from *-* around the entire sleeve. Cut and fasten the yarn. Work the other sleeve the same way.

Diagram

symbols = 1 chain stitch - if you work at the end of crochet hook the chain stitch will often be too tight 1 chain stitch should be just as long as 1 double crochet/treble crochet is wide.
symbols = 1 treble crochet in stitch below
symbols = 1 treble crochet around chain space or chain stitch below
symbols = 1 double crochet in stitch below
symbols = 1 double crochet around chain space below
symbols = 1 double crochet between 2 treble crochets below
symbols = this round has already been worked - begin on next round.
symbols = work 3 chain stitches at beginning of round. Finish round with 1 slip stitch in 3rd chain stitch from beginning of round.
symbols = Work 1 chain stitch at the beginning of round, finish round with 1 slip stitch in 1st chain stitch from beginning of round.
diagram
diagram
diagram
Do you have a question? See a list of frequently asked questions (FAQ)

Knitting tension is what determines the final measurements of your work, and is usually measured per 10 x 10 cm. It is provided like so: number of stitches in width x number of rows in height - eg: 19 stitches x 26 rows = 10 x 10 cm.

The knitting tension is very individual; some people knit/crochet loosely while others work tightly. You adjust the knitting tension with the needle size, which is why the suggested needle size is only meant as a guide! You need to adjust this (up or down) to ensure that YOUR knitting tension matches the knitting tension provided in the pattern. If you work with a different knitting tension than provided you will have a different yarn consumption, and your work will have different measurements than what the pattern suggests.

The knitting tension also determines which yarns can replace each other. As long as you achieve the same knitting tension you can replace one yarn with another.

See DROPS lesson: How to measure your tension/gauge

See DROPS video: How to make a gauge tension swatch

The required amount of yarn is provided in grams, eg: 450 g. To calculate how many balls you’ll need you first need to know how many grams are in 1 ball (25g, 50g or 100g). This information is available if you click on the individual yarn quality on our pages. Divide the amount required with the amount of each ball. For example, if each ball is 50g (the most common amount), the calculation will be as follows: 450 / 50 = 9 balls.

The important thing when changing from one yarn to another is that the knitting/crochet tension remains the same. This is so that the measurements of the finished piece will be the same as on the sketch provided. It is easier to achieve the same knitting tension using yarns from the same yarn group. It is also possible to work with multiple strands of a thinner yarn to achieve the knitting tension of a thicker one. Please try our yarn converter. We recommend you to always work a test swatch.

Please NOTE: when changing yarn the garment might have a different look and feel to the garment in the photo, due to individual properties and qualities of each yarn.

See DROPS lesson: Can I use a different yarn than the one mentioned in the pattern?

All our yarns are categorised into yarn groups (from A to F) according to thickness and knitting tension – group A contains the thinnest yarns and group F the thickest. This makes it easier for you to find alternative yarns to our patterns, should you wish to switch yarn. All yarns within the same group have a similar knitting tension and can easily replace each other. However, different yarn qualities have different structures and properties which will give the finished work a unique look and feel.

Click here for an overview of the yarns in each yarn group

At the top of all our patterns you’ll find a link to our yarn calculator, which is a helpful tool should you wish to use a different yarn than suggested. By filling in the yarn quality you wish to replace, the amount (in your size) and number of strands, the calculator will present good alternative yarns with the same knitting tension. Additionally it will tell you how much you’ll require in the new qualities and whether you’ll need to work with multiple strands. Most skeins are 50g (some are 25g or 100g).

If the pattern is worked with multiple colours, every colour will have to be calculated separately. Similarly, if the pattern is worked with several strands of different yarns (for example 1 strand Alpaca and 1 strand Kid-Silk) you will have to find alternatives for each, individually.

Click here to see our yarn calculator

Since different yarns have different qualities and textures we have chosen to keep the original yarn in our patterns. However, you can easily find options among our available qualities by using our yarn calculator, or simply pick a yarn from the same yarn group.

It is possible that some retailers still have discontinued yarns in stock, or that someone has a few skeins at home that they would like to find patterns for.

The yarn calculator will provide both alternative yarn as well as required amount in the new quality.

If you think it's hard to decide what size to make, it can be a good idea to measure a garment you own already and like the size of. Then you can pick the size by comparing those measures with the ones available in the pattern's size chart.

You'll find the size chart at the bottom of the pattern.

See DROPS lesson: How to read size chart

The needle size provided in the pattern serves only as a guide, the important thing is to follow the knitting tension. And since knitting tension is very individual, you will have to adjust the needle size to ensure that YOUR tension is the same as in the pattern – maybe you’ll have to adjust 1, or even 2 needle sizes, up or down to achieve the correct tension. For this, we recommend that you work test swatches.

Should you work with a different knitting tension than the one provided, the measurements of the finished garment might deviate from the measurement sketch.

See DROPS lesson: How to measure your tension/gauge

See DROPS video: How to make a tension/gauge swatch

Working a garment top-down provides more flexibility and room for personal adjustment. For example it is easier to try the garment on while working, as well as making adjustments to length of yoke and shoulder caps.

The instructions are carefully explaining every step, in the correct order. Diagrams are adjusted to the knitting direction and are worked as usual.

The diagram depicts all rows/rounds, and every stitch seen from the right side. It is read from bottom to top, from right to left. 1 square = 1 stitch.

When working back and forth, every other row is worked from the right side and every other row is worked from the wrong side. When working from the wrong side, the diagram will have to be worked reversed: from left to right, knit stitches are purled, purl stitches are knit etc.

When working in the round every round is worked from the right side and the diagram are worked from right to left on all rounds.

See DROPS lesson: How to read knitting diagrams

The diagram depicts all rows/rounds, and every stitch seen from the right side. It is worked from bottom to top, from right to left.

When working back and forth every other row is worked from the right side: from right to left and every other row is worked from the wrong side: from left to right.

When working in the round, every row in the diagram are worked from the right side, from right to left.

When working a circular diagram you start in the middle and work your way outwards, counter clockwise, row by row.

The rows usually start with a given number of chain stitches (equivalent to the height of the following stitch), this will either be depicted in the diagram or explained in the pattern.

See DROPS lesson: How to read crochet diagrams

Instructions for working several diagrams after each other on the same row/round, will often be written like so: “work A.1, A.2, A.3 a total of 0-0-2-3-4 times". This means you work A.1 once, then A.2 is worked once, and A.3 is repeated (in width) the number of times provided for your size – in this case like so: S = 0 times, M = 0 times, L=2 times, XL= 3 times and XXL = 4 times.

The diagrams are worked as usual: begin with the first row in A.1, then work the first row in A.2 etc.

See DROPS lesson: How to read knitting diagrams

See DROPS lesson: How to read crochet diagrams

The total width of the garment (from wrist-to-wrist) will be larger in the larger sizes, despite the actual sleeves being shorter. The larger sizes have longer sleeve caps and wider shoulders, so there will be a good fit in all sizes.

The measurement sketch/schematic drawing provides information regarding the full length of the garment. If it’s a jumper or a jacket the length is measured from the highest point on the shoulder closest to the neckline, and straight down to the bottom of the garment. It is NOT measured from the tip of shoulder. Similarly, the length of yoke is measured from the highest point on the shoulder and down to where yoke is split into body and sleeves.

On a jacket measures are never taken along bands, unless specifically stated. Always measure inside band stitches when measuring the length.

See DROPS lesson: How to read a schematic drawing

Diagrams are often repeated on the round or in height. 1 repeat is the diagram the way it appears in the pattern. If it says to work 5 repeats of A.1 in the round, then you work A.1 a total of 5 times after/next to each other in the round. If it says to work 2 repeats of A.1 vertically/in height you work the entire diagram once, then begin again at the start and work the entire diagram one more time.

Chain stitches are slightly narrower than other stitches and to avoid working the cast-on edge too tight, we simply chain more stitches to begin with. The stitch count will be adjusted on the following row to fit the pattern and measurement sketch.

The rib edge is more elastic and will contract slightly compared to, for example, stocking stitch. By increasing before the rib edge, you avoid a visible difference in width between the rib edge and the rest of the body.

It’s very easy to cast off too tightly, and by making yarn overs while casting off (and simultaneously casting these off) you avoid a too tight cast off edge.

See DROPS video: How to bind off with yarn overs (yo)

To achieve an even increase (or decrease) you can increase on, for example: every 3rd and 4th row alternately, like so: work 2 rows and increase on the 3rd row, work 3 rows and increase on the 4th. Repeat this until the increase is complete.

See DROPS lesson: Increase or decrease 1 st on every 3rd and 4th row alternately

Should you prefer to work in the round instead of back and forth, you may of course adjust the pattern. You’ll need to add steeks mid-front (usually 5 stitches), and follow the instructions. When you would normally turn and work from the wrong side, simply work across the steek and continue in the round. At the end you’ll cut the piece open, pick up stitches to work bands, and cover the cut edges.

See DROPS video: How to knit steeks and cut open

Should you prefer to work back and forth instead of in the round, you may of course adjust the pattern so you work the pieces separately and then assemble them at the end. Divide the stitches for the body in 2, add 1 edge stitch in each side (for sewing) and work the front and back pieces separately.

See DROPS lesson: Can I adapt a pattern for circular needles into straight needles?

Pattern repeats can vary slightly in the different sizes, in order to get the correct proportions. If you’re not working the exact same size as the garment in the photo, yours might deviate slightly. This has been carefully developed and adjusted so that the complete impression of the garment is the same in all sizes.

Make sure to follow instructions and diagrams for your size!

If you have found a pattern you like which is available in women’s size it’s not very difficult to convert it to men’s size. The biggest difference will be the length of sleeves and body. Start working on the women size that you think would fit across the chest. The additional length will be worked right before you cast off for the armhole/sleeve cap. If the pattern is worked top-down you can add the length right after the armhole or before the first decrease on sleeve.

Regarding additional yarn amount, this will depend on how much length you add, but it is better with a skein too many than too few.

All yarns will have excess fibres (from production) that might come off as lint or shedding. Brushed yarns (ie hairier yarns) have more of these loose, excess fibres, causing more shedding.

Shedding also depends on what is worn under or over the garment, and whether this pulls at the yarn fibres. It’s therefore not possible to guarantee that there will be no shedding

Below are some tips on how to get the best result when working with hairier yarns:

1. When the garment is finished (before you wash it) shake it vigorously so the looser hairs come off. NOTE: do NOT use a lint roller, brush or any method that pulls at the yarn.

2. Place the garment in a plastic bag and put it in your freezer - the temperature will cause the fibres to become less attached to each other, and excess fibres will come off easier.

3. Leave in the freezer for a few hours before taking it out and shaking it again.

4. Wash the garment according to the instructions on the yarn label.

Pilling is a natural process that happens to even the most exclusive of fibers. It's a natural sign of wear and tear that is hard to avoid, and that is most visible in high friction areas of your garment like a sweater's arms and cuffs.

You can make your garment look as new by removing the pilling, using a fabric comb or a pill/lint remover.

Still can't find the answer you need? Then scroll down and leave your question so one of our experts can try to help you. This will be done normally within 5 to 10 working days.
In the meantime, you can read the questions and answers that others have left to this pattern or join the DROPS Workshop on Facebook to get help from fellow knitters/crocheters!

You might also like...

Post a comment to pattern DROPS 223-28

We would love to hear what you have to say about this pattern!

If you want to leave a question, please make sure you select the correct category in the form below, to speed up the answering process. Required fields are marked *.

Comments / Questions (52)

country flag Asun wrote:

En la fila siete del cuerpo se hace la V cada dos puntos o cada un punto? Gracias por el patrón, es precioso!

14.06.2021 - 12:23

DROPS Design answered:

Hola Asun, se trabaja 2 puntos altos en 1 punto (V), se saltan dos puntos y en el siguiente se vuelve a trabajar la V.

27.06.2021 - 19:33

country flag Wil wrote:

Vanaf het begin eerste toer stokjes gemeerderd zoals aangegeven. Daarna telpatroon gevolgd op de tweede patroontoer zoals aangegeven (patroon met sterretje aan de voorkant niet haken A2 en A3, op de foto zie ik nu dat er bovenin volgens mij 2 stokjesranden zijn gehaakt vanaf de hals, klopt dit? Zoja is het echt noodzakelijk om dit dan uit te halen? Ik heb bijna A2 klaar. Of lost het zich later op als ik een pas lengte van 24cm aanhoudt voor maat L?.

14.06.2021 - 09:42

DROPS Design answered:

Dag Wil,

Het lijkt er inderdaad op dat er nog een toer met stokjes is en ik denk dat deze tijdens het invoegen van de markeerdraden had moeten worden gehaakt. Het is natuurlijk niet noodzakelijk om dit alsnog te doen, je kan gewoon de lengte van 24 cm aanhouden.

24.06.2021 - 09:54

country flag Rosenilda wrote:

Muita linda, porém não consigo entender essas numerações, por exemplo, no início crochetar 95.103.103.109.109.115 pontos correntes, o que significa?

08.06.2021 - 20:57

DROPS Design answered:

Bom dia, O número de pontos inficado depende do tamanho que estiver a fazer. 95 pontos corrente para o tamanhoX S.103 para o tamanho S.103 para o tamanho M.109 para o tamanho L.109 para o tamanho XL.115 para o tamanho XXL. Bons crochés!

09.06.2021 - 09:46

country flag Laurence Cornard wrote:

Bonjour, je ne comprend pas les explications : que faire lorsque sont réalisés les 6 premiers rangs A3 ? reprendre au début ? ou continuer A3a ? par rapport aux 14 rangs A2 ? merci de vos conseils; Cordialement

01.06.2021 - 21:00

DROPS Design answered:

Bonjour Mme Cornard, A.2 et A.3 sont les mêmes motifs, mais A.2 comporte des augmentations placées. Quand A.2 est terminé, on crochète alors A.3 (= plus d'augmentations pour l'instant), vous crochetez A.3 jusqu'à la hauteur indiquée pour votre taille en ajustant sur le rang indiqué et vous divisez ensuite l'ouvrage au rang suivant pour continuer séparément le dos/le devant et les manches. Bon crochet!

02.06.2021 - 07:42

country flag Lauranne Crickx wrote:

Bonjour, Juste pour être sûre : A3a comporte bien 14 rangs? Donc une fois arrivée à 24cm (taille L), je peux m'arrêter après le rang 7 donc le rang d'arceaux de ms,4ml et ensuite faire l'emmenchure au tour suivant (rang 8 : 1br,2ml) avec les 2x10ml pour les emmenchures ? Merci à vous

31.05.2021 - 18:36

DROPS Design answered:

Bonjour Mme Crickx, effectivement, le dernier rang de l'empiècement doit être un rang 1,3, 7, 12 ou 13 de A.3a, donc vous pouvez diviser l'ouvrage après un rang 7 pour crocheter le 8ème tour du diagramme pour la division des manches - avec la maille en l'air avant/après celles des emmanchures, 1 des mailles en l'air appartiendra à A.3a au 9ème tour. Bon crochet!

01.06.2021 - 08:15

country flag Ángela wrote:

Hola, he visto que se ha publicado el patrón en inglés, lo puedo encontrar en español en un algún sitio de la web?

12.05.2021 - 14:46

DROPS Design answered:

Hola Angela. El patrón está publicado en castellano: https://www.garnstudio.com/pattern.php?id=10254&cid=23

16.05.2021 - 17:23

country flag Mayte wrote:

Puedo encontrarlo en español?

12.05.2021 - 00:38

DROPS Design answered:

Hola Mayte, espera un momento, el patron esta traducido. Cordiales saludos!

13.05.2021 - 17:05

country flag Blanca wrote:

Me gusta. Creo que podré hacerlo!!

10.05.2021 - 11:09

country flag Ángela wrote:

¿Cuándo estará disponible este patrón? Compré el hilo Safran y estoy esperando para tejerlo cuanto antes.

07.05.2021 - 20:00

DROPS Design answered:

Hola Ángela, este patrón estará publicado proximamente.

09.05.2021 - 19:51

country flag Carina wrote:

Wanneer komt het online. Binnenkort is geen 4 maanden. Kunt u aangeven wanner dan wel?

28.04.2021 - 10:02