
Popular categories
Looking for a yarn?


|
||||||||||||||||||||||||||||
Red River Cave |
||||||||||||||||||||||||||||
 |
 |
|||||||||||||||||||||||||||
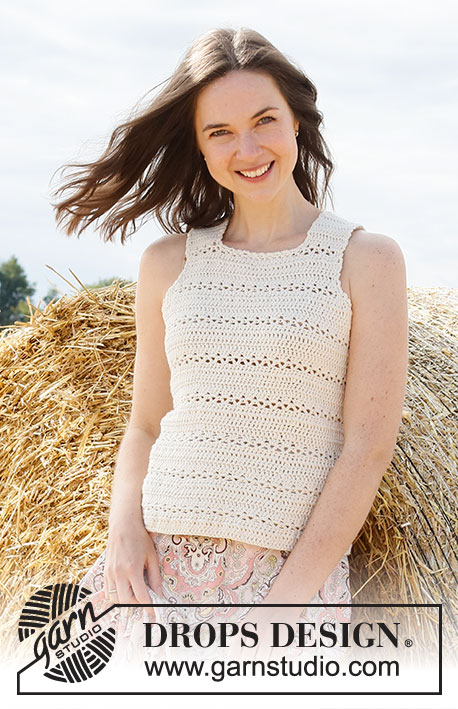
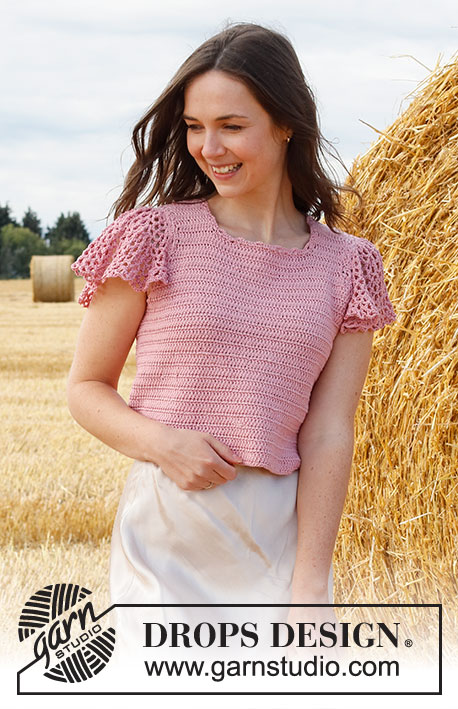
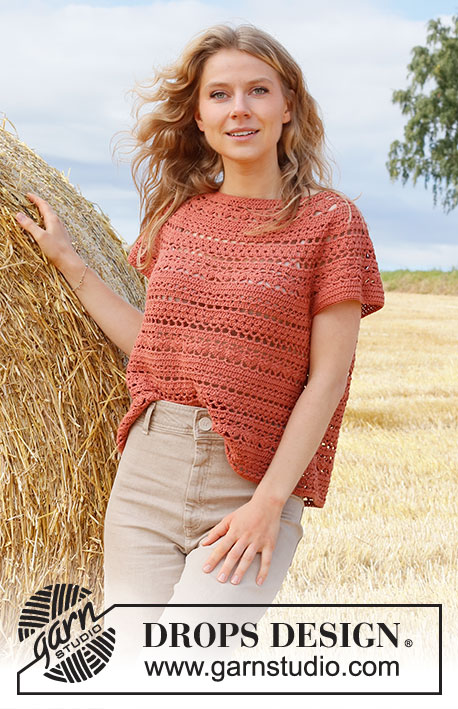
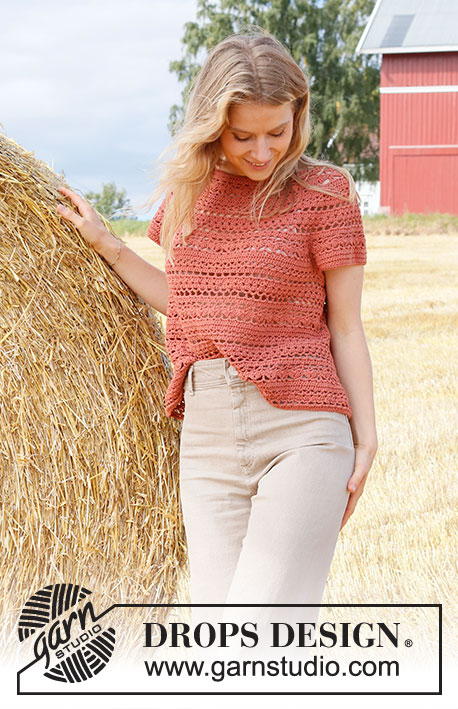
Crocheted top in DROPS Safran. Piece is crocheted top down with round yoke and lace pattern. Size XS–XXL.
DROPS 223-28 |
||||||||||||||||||||||||||||
|
------------------------------------------------------- EXPLANATION FOR THE PATTERN: ------------------------------------------------------- CROCHET TIP FOR CHAIN STITCH: If you work at the end of crochet hook the chain stitch will often be too tight. 1 chain stitch should be just as long as 1 double crochet/treble crochet is wide. CROCHET INFORMATION: At beginning of every round with treble crochets work 3 chain stitches. These chain stitches do not replace 1st treble crochet but are worked in addition to stitches on round. PATTERN: See diagrams A.1 to A.4. INCREASE TIP (evenly): To calculate how to increase evenly, count the stitches to be increased (e.g. 94 stitches), and divide by stitches of increases to be done (e.g. 18) = 5.2. In this example increase by working 2 treble crochets in approx. every 5th stitch. DECREASE TIP: Decrease 1 treble crochet by working the next 2 treble crochets together as follows: Work 1 treble crochet but wait with last pull through (= 2 stitches on hook), then work next treble crochet but on last pull through pull yarn through all 3 stitches on hook. ------------------------------------------------------- START THE PIECE HERE: ------------------------------------------------------- TOP - SHORT OVERVIEW OF THE PIECE: Work yoke in the round, top down. Now divide yoke for body and sleeves. Work body in the round, top down. Work sleeve edges in the round, top down. NOTE: It is important to keep the crochet tension vertically so that the measurements on yoke will be correct. YOKE: Work 95-103-103-109-109-115 chain stitches - read CROCHET TIP FOR CHAIN STITCH on hook size 4 mm with Safran and form 1 ring with 1 slip stitch in first chain stitch. Work 3 chain stitches - read CROCHET INFORMATION, then work 1 treble crochet in each of the 94-102-102-108-108-114 chain stitches and increase at the same time 18-22-22-28-40-46 treble crochets evenly - read INCREASE TIP = 112-124-124-136-148-160 treble crochets. Now insert 4 marker threads in the piece as follows: 1st marker thread: Insert 1st marker thread at beginning of round. 2nd marker thread: Skip the next 16 stitches, insert 2nd marker thread here. 3rd marker thread: Skip the next 40-46-46-52-58-64 stitches, insert 3rd marker thread here. 4th marker thread: Skip the next 16 stitches, insert 4th marker thread here. 40-46-46-52-58-64 stitches remain on round after last marker thread. Move the marker threads upwards when working. They should be placed directly before every repetition of A.2 on round, and they are used when increasing evenly. Now work pattern and increase as follows: A.1 shows how round begins and ends. Work A.2 over the first 4 treble crochets, A.3 over the next 12 treble crochets (= 2 repetitions of 6 stitches), A.2 over the next 4 treble crochets, work A.3 over the next 36-42-42-48-54-60 treble crochets (= 6-7-7-8-9-10 repetitions of 6 stitches), A.2 over the next 4 treble crochets, A.3 over the next 12 treble crochets, A.2 over the next 4 treble crochets, A.3 over the last 36-42-42-48-54-60 treble crochets. REMEMBER THE CROCHET TENSION! Continue the pattern in the round like this while increasing evenly: On 6th round in pattern increase as follows: Work * A.2 as before, work A.3 until next marker thread and increase at the same time 0-6-6-6-6-6 treble crochets evenly – remember INCREASE TIP (= 12-18-18-18-18-18 stitches), work A.2 as before, work A.3 until next marker thread and increase at the same time 6-6-12-12-12-12 stitches evenly (= 42-48-54-60-66-72 stitches) *, work from *-* 1 more time on round (= 12-24-36-36-36-36 stitches increased) = 180-204-216-228-240-252 stitches on round. In size XS, S and M continue from ALL SIZES below. In size L, XL and XXXL increase as follows: On 10th round in pattern increase as follows: Work * A.2 as before, work A.3 until next marker thread and increase at the same time 6-6-6 stitches evenly (= 24-24-24 stitches), A.2, work A.3 as before until next marker thread and increase at the same time 6-6-6 treble crochets evenly (= 66-72-78 stitches) *, work from *-* 1 more time on round (= 24-24-24 stitches increased) = 288-300-312 stitches on round. ALL SIZES: Work until A.2 has been worked vertically. On last round in A.2 insert 1 new marker thread in the middle of each A.2 (i.e. 18 treble crochets on each side of marker thread in each of the 4 repetitions with A.2). Remove the old marker threads (= 4 marker threads remain in piece). Stitches between marker threads mark transition between front/back piece and sleeves (= 48-54-54-60-60-60 treble crochets on each sleeve). There are now 252-276-288-324-336-348 treble crochets on round. Now work with pattern as follows: A.4 shows how round begins and ends. Continue with A.3 in the round, and over the 36 treble crochets in A.2 work 6 repetitions of A.3. When A.3 has been worked vertically 1 time, repeat pattern A.3a vertically. Work like this until piece measures 20-20-22-24-26-28 cm from the beginning of the yoke – adjust to finish after 1st, 3rd, 7th, 12th or 13th round in A.3a! This is done to make it easier to work pattern on body and sleeves. Now divide piece for body and sleeves. Work next round as follows: Work A.3a until first marker thread (= 3 repetitions for back piece), work 8-8-8-10-10-10 chain stitches, skip stitches between the 2 marker threads (= 8-9-9-10-10-10 repetitions for sleeve), work A.3a until next marker thread (= 13-14-15-17-18-19 repetitions for front piece), work 8-8-8-10-10-10 chain stitches, skip stitches between the 2 marker threads (= 8-9-9-10-10-10 repetitions for sleeve), work A.3a the rest of the round (= 10-11-12-14-15-16 repetiotions - There are now 13-14-15-17-18-19 repetitions for back piece). Cut and fasten the yarn. BODY: Start in the 5th chain stitch of the 8-8-8-10-10-10 chain stitches under the sleeve in one side. Work 3 chain stitches - remember CROCHET INFORMATION, work 1 treble crochet in the same chain stitch. Now work 1 treble crochet in each of the next 3-3-3-5-5-5 chain stitches, work A.3a as before until chain stitches under the second sleeve, 1 treble crochet in each of the 8-8-8-10-10-10 chain stitches below sleeve. Work A.3a as before until chain stitches under sleeve, work 1 treble crochet in each of the last 4-4-4-4-4-4 chain stitches under sleeve = 172-184-196-224-236-248- stitches. Work the 8-8-8-10-10-10 stitches under sleeve in treble crochets. Insert 1 marker in the piece. NOW MEASURE PIECE FROM HERE! On first round in A.3a worked with treble crochet decrease 4-4-4-2-2-2 treble crochet evenly – read DECREASE TIP = 168-180-192-222-234-246 stitches. Then work A.3a in the round (= 28-30-32-37-39-41 repetitions on round). Repeat A.3a vertically. When piece measures 12 cm, adjust so that next row is with treble crochets, decrease 6 treble crochets evenly = 162-174-186-216-228-240 treble crochets. Now repeat A.3a 27-29-31-36-38-40 times on round. When piece measures 20-21-22-23-24-25 cm from marker – adjust so that next round is with treble crochet, increase 6 treble crochets evenly – read INCREASE TIP. Repeat increase on each of the next 3 rows with treble crochets (= 24 stitches increased) = 186-198-210-240-252-264 treble crochets. Repeat A.3a 1 more time in width on every increase. When all increases are done, repeat A.3a 31-33-35-40-42-44 times in width. Work until piece measures 34-36-36-36-36-36 cm from division – adjust to finish after a round with treble crochets. Cut and fasten the yarn. Top measures approx. 54-56-58-60-62-64 cm from shoulder and down. SLEEVE EDGES: Begin in the 4th chain stitch of the 8-8-8-10-10-10 chain stitches under sleeve. Work 3 chain stitches - remember CROCHET INFORMATION, work 1 treble crochet in the same chain stitch. Then work 1 treble crochet in each of the next 4-4-4-6-6-6 chain stitches, work next row in A.3a (i.e. a row with treble crochets) until 3 chain stitches remain on row, work 1 treble crochet in each of the last 3 chain stitches. Now 1 row with treble crochets and 1 row with double crochets/chain stitches remain - work if desired 1 treble crochet in every treble crochet until desired length. Work 1 round with 1 treble crochet in every treble crochet and decrease at the same time 10-10-8-10-6-4 treble crochets evenly = 46-52-54-60-64-66 treble crochet. Work * 1 double crochet in first/next treble crochet, 1 chain stitch, skip approx. 1 cm *, work from *-* around the entire sleeve. Cut and fasten the yarn. Work the other sleeve the same way. |
||||||||||||||||||||||||||||
Diagram explanations |
||||||||||||||||||||||||||||
|
||||||||||||||||||||||||||||

|
||||||||||||||||||||||||||||

|
||||||||||||||||||||||||||||

|
||||||||||||||||||||||||||||
|
Have you made this or any other of our designs? Tag your pictures in social media with #dropsdesign so we can see them! Do you need help with this pattern?You'll find tutorial videos, a Comments/Questions area and more by visiting the pattern on garnstudio.com. © 1982-2024 DROPS Design A/S. We reserve all rights. This document, including all its sub-sections, has copyrights. Read more about what you can do with our patterns at the bottom of each pattern on our site. |
||||||||||||||||||||||||||||


With over 40 years in knitting and crochet design, DROPS Design offers one of the most extensive collections of free patterns on the internet - translated to 17 languages. As of today we count 304 catalogues and 11422 patterns - 11422 of which are translated into English (UK/cm).
We work hard to bring you the best knitting and crochet have to offer, inspiration and advice as well as great quality yarns at incredible prices! Would you like to use our patterns for other than personal use? You can read what you are allowed to do in the Copyright text at the bottom of all our patterns. Happy crafting!
Comments / Questions (52)
Ich habe zu wenige Maschen nach den Zunahmen. Es sollten nach der Runde 6 252 Maschen sein. Ich habe aber nur 196 Maschen. Wo liegt denn mein Denkfehler? Ich habe für Größe XXL 115 Maschen angeschlagen, die Runde geschlossen und danach 46 Maschen zugenommen. In Runde 6 insg. 36 Maschen zugenommen. Was habe ich da falsch verstanden? Danke für die Hilfe. MfG
19.04.2024 - 11:52DROPS Design answered:
Liebe Frau Herrmann, nach der 6. Runde haben Sie: 18 M in A.2, 12+6 = 18 M A.3, 18 M A.2, 60+12= 72 M A.3, 18 M A.2, 12+6 = 18 M A.3, 18 M A.2 und 60+12=72 M A.3 = 18+18+18+72+18+18+18+72=252 Maschen. Hoffentlich kann das Ihnen helfen. Viel Spaß beim häkeln!
19.04.2024 - 12:33Non capisco il giro numero 6: lavoro A.2 come da schema/lavoro A 3 con 18 aumenti/lavoro A 2 come da schema/lavoro A . 3 con 60 aumenti. Mi sembra sproporzionato . Poi devo lavorare tutto un'altra volta sul giro con 36 aumenti.... non riesco a capire Giusi
07.04.2024 - 12:13Buongiorno. Ho iniziato il lavoro ma arrivata al giro numero 6 mi sono bloccata perché mi risulta incomprensibile. Ho riscontrato dalle domande delle altre signore che hanno Incontrato le mie stesse difficoltà . Sarò grata se potrete aiutarmi. Giusi
04.04.2024 - 23:22DROPS Design answered:
Buongiorno Giusi, può spiegarci meglio il suo problema? Buon lavoro!
06.04.2024 - 09:41Hallo liebes Team, ich versuche mich gerade an diesem Modell und habe ab Reihe 6 ein Problem. Die Markierer sitzen nicht mittig über dem Schulterbereich. Rapport, Maschen Zunahmen, alles habe ich mehrfach überprüft und alles stimmt. Wo könnte der Fehler liegen??? Viele liebe Grüße, Sandra
10.01.2024 - 12:08DROPS Design answered:
Liebe Sandra, die Markierer sollen genauso wie zuvor sein, als die Zunahmen in A.3 gehäkelt werden, je nach der Grösse wird man entweder 0 (Größe S, Armel), oder 1 Rapport (6 Zunahmen) oder 2 Rapporter (12 Zunahmen) zunehmen, so gibt es 0-1-1-1-1-1 Rapport zwischen Anfang der Runde und 1. Markierer / 2. und 3. Markierer und 1-1-2-2-2-2 Rapporter mehr zwischen 1. und 2. + zwischen 3. und 4. Markierer. Viel Spaß beim häkeln!
10.01.2024 - 16:15Hei. Slik jeg tolker oppskriften så er det kunne 1 rad med staver før man går på første omg med luftmaskebuer i diagrammet, men på bildet så er det 2 rader med staver før første rad på mønsteret. Er det bare 1 rad staver før man begynner på diagram eller 2?
30.05.2023 - 18:01DROPS Design answered:
Hej Mette, jeg tror du har ret i at der skal være 2 rader med staver - tak for info :)
01.06.2023 - 14:13Salve, vorrei fare questo modello con un filato più sottile utilizzando al massimo uncino n. 3. ho fatto un rapido conto di quante maglie dovrei aggiungere e come suddividerle ( il mio campione è 25 ma x 14 giri = 10cm x10cm ) ma seguendo lo schema come faccio a calcolare quanti giri in più devo fare per ottenere la stessa lunghezza ?, grazie per la vostra attenzione
15.05.2023 - 18:09DROPS Design answered:
Buonasera Maririta, per un aiuto così personalizzato può rivolgersi al suo rivenditore DROPS di fiducia. Buon lavoro!
15.05.2023 - 21:37Hei! Når en skal øke antall masker i rad 6 i diagrammet skjønar eg ikkje korleis eg skal auke, ettersom aukinga skal skje i A.3. A.2 har stavmasker i maska under i rad 6, men A.3 har ingen rad 6 og eg byrjer då på botnen av diagrammet, der rad ein er fastmasker, luftmasker og stavar, skal eg auke i denne rada? Eller hekle stavmasker slik som ein har i rad 6 i A.2?
11.05.2023 - 12:43DROPS Design answered:
Hei Thea. Jo, 6. rad i A.3 består bare av staver, samme som 6. rad i A.2. mvh DROPS Design
15.05.2023 - 11:31Bonjour au rang 4 dans A 2 commence par 2 bride s espacée d’une maille en l’air puis un arceau de 4mailles en l’air ,une maille serrés et 4 mailles en l’air alors que dans A3 c’est 1 bride et les arceaux ont 3 mailles en l’air..est ce une erreur ou dois je bien repérer ou ce situe la section A2sur tous le rang pour faire le nombre exact de brides.merci
01.04.2023 - 22:30DROPS Design answered:
Bonjour Mme Rivière, le diagramme A.2 permet les augmentations, il est donc normal qu'il soit différent de A.3. Pensez à bien suivre les diagrammes tels qu'ils sont, n'hésitez pas à ajouter des marqueurs pour bien les délimiter si besoin. Bon crochet!
11.04.2023 - 10:22Thank you for your response, Through a few trials and errors, I managed to figure it out. Your response to Larraine confirmed my final trial. I find your original instructions not detailed enough and are very hard to follow. I love the photo of the finished project, so I am persevering.
07.11.2022 - 04:17Hi! I am making Drops crochet top for my first time.....DROPS 223-28. So far so good! I have finished the increase round 6 and am making size M. It says to work until A.2 has been worked vertically....does that mean for this section I am not doing A.3 at all until after round 14?? Hope this question makes sense ? Thank you so much!
05.11.2022 - 14:41DROPS Design answered:
Dear Larraine, you continue with the pattern established with A.2 and A.3 as before, until you have worked the last row of A.2 (the top row in the diagram). Then, continue as explained later. Happy crocheting!
07.11.2022 - 00:03