
Popular categories
Looking for a yarn?


|
||||||||||||||||||||||
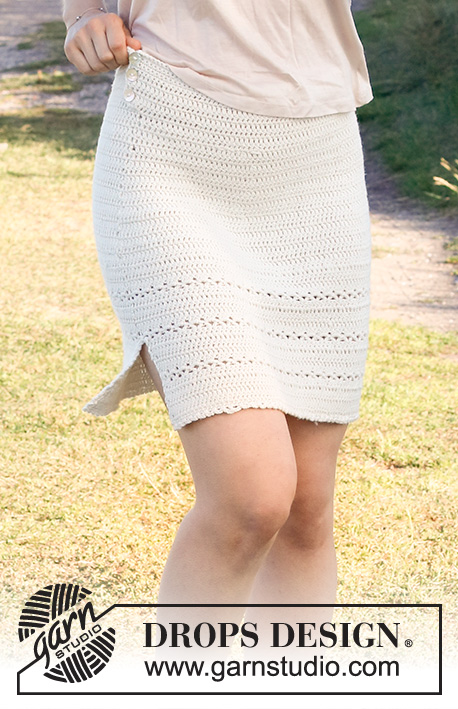
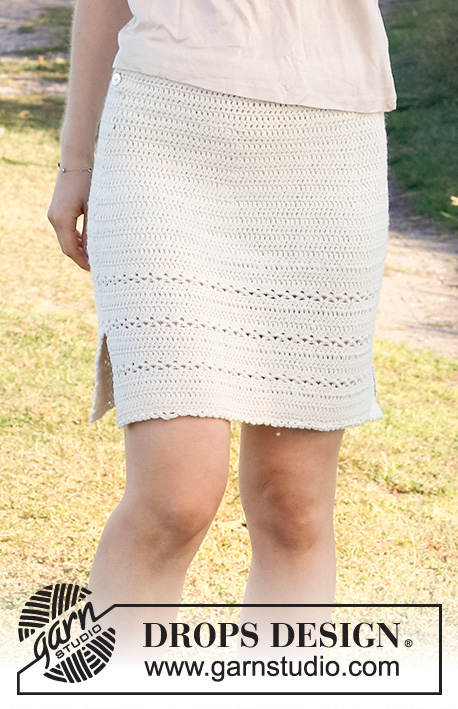
Open Country Skirt |
||||||||||||||||||||||
 |
 |
|||||||||||||||||||||
Crocheted skirt with textured pattern in DROPS Muskat. Size: S - XXXL
DROPS 220-31 |
||||||||||||||||||||||
|
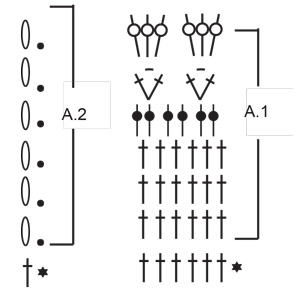
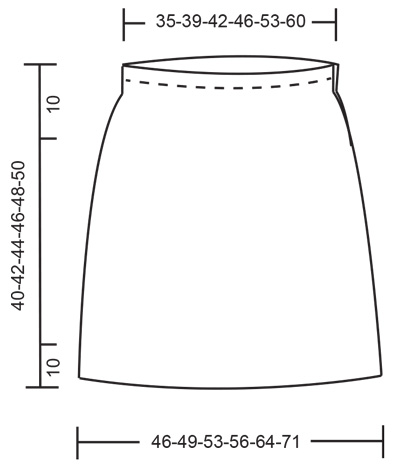
------------------------------------------------------- EXPLANATION FOR THE PATTERN: ------------------------------------------------------- PATTERN: See diagrams A.1 and A.2. A.2 shows how round begins/ends when working in the round. CROCHET TIP FOR CHAIN STITCH: If you work at the end of crochet hook the chain stitch will often be too tight. 1 chain stitch should be just as long as 1 double crochet/treble crochet is wide. CROCHET INFO - applies when working back and forth: At beginning of every row with double crochet begin with 1 chain stitch (this does not replace first double crochet). At beginning of every row with treble crochet begin with 3 chain stitches (these do not replace first treble crochet). Finish row with 1 treble crochet in 3rd chain stitch, this treble crochet is worked so that the pattern is the same in each side and is skipped on next row. DECREASE TIP-1: Decrease 1 treble crochet by working 2 treble crochets together as follows: Work 1 treble crochet in first stitch, but wait with last yarn over and pull through (= 2 loops on hook), work 1 treble crochet in next treble crochet, on last pull through pull yarn through all 3 loops on hook (= 1 treble crochet decreased). DECREASE TIP-2 (evenly): To calculate how to decrease/increase evenly, use the total number of (e.g. 156 stitches) and divide stitches by number of decreased/increases to be done (e.g. 6) = 26. In this example work approx. every 25th and 26th stitch together. ------------------------------------------------------- START THE PIECE HERE: ------------------------------------------------------- SKIRT – SHORT OVERVIEW OF THE PIECE: There is a 10 cm vent at the bottom of skirt, first work piece back and forth in 2 parts until vent is done, then work piece in the round but turn on every round and work back and forth on round to make the texture the same all the way. Finally work a button band. FRONT PIECE: Work 78-84-90-96-108-120 chain stitches - read CROCHET TIP FOR CHAIN STITCH with Muskat on hook size 4 mm. ALL MEASUREMENTS ARE MADE FROM HERE! Turn and work as follows: Work 1 chain stitch, work 1 double crochet in 2nd chain stitch from hook, then work 1 double crochet in every chain stitch - read CROCHET INFO = 78-84-90-96-108-120 double crochets. Turn and work 1 treble crochet in every double crochet. Then work according to diagram A.1. REMEMBER THE CROCHET TENSION! After approx. 10 cm place piece aside and work back piece, adjust so that last row worked is 2nd, 4th or 6th row in diagram, this is important to get the pattern correct from the right side when working in the round. BACK PIECE: Work 78-84-90-96-108-120 chain stitches with Muskat on hook size 4 mm. Turn and work as follows: Work 1 chain stitch, work 1 double crochet in 2nd chain stitch from hook, then work 1 double crochet in every chain stitch = 78-84-90-96-108-120 double crochets. Turn and work 1 treble crochet in every double crochet. Then work according to diagram A.1. Continue until piece measures 10 cm - finish on the same row as on front piece. SKIRT after vent: Continue the pattern- first work stitches from right side over front piece, then work stitches from right side over back piece, then work round together with a slip stitch in 3rd chain stitch at the beginning of round, work chain stitches in A.2, turn piece and work back from wrong side. Continue piece in the round, but turn piece for every round to work from both right side and wrong side. This is done so that the pattern is the same on the entire garment. Insert 1 marker thread in transitions between front and back piece = sides. Continue like this back and forth with pattern according to diagram A.1 and A.2 = 156-168-180-192-216-240 stitches on round (A.2 is not counted in number of stitches). When A.1 has been worked 3 times vertically, continue with 1 treble crochet in every treble crochet. When piece measures 18-19-20-21-22-23 cm, decrease 6 treble crochets evenly - read DECREASE TIP-1 AND DECREASE TIP-2 (evenly). Decrease like this every 2 cm 6 times in total = 120-132-144-156-180-204 treble crochets. When piece measures 30-32-34-36-38-40 cm, work back and forth, then work a button band over the top 10 cm. The piece is not turned with A.2 but worked back and forth to get a vent in one side at the top - remember CROCHET INFO! Continue back and forth with treble crochets until piece measures 36-38-40-42-44-46 cm. Then work back and forth with double crochets. Continue until piece measures 40-42-44-46-48-50 cm. Cut and fasten the yarn. BUTTONHOLE LOOPS: Along the opening on front piece work 3 buttonhole loops as follows (begin at the bottom): 4 double crochets around the 2 first rows with treble crochets, 3 chain stitches, skip 1 cm, * work 4 double crochets around the 2 next treble crochet rows/in the 4 next double crochet rows, 3 chain stitches, skip 1 cm *, repeat from *-* 1 more time and finish with 2 double crochets in the last 2 double crochet rows at the top, turn and work as follows: 1 double crochet in every double crochet and 3 double crochets around every chain space. Cut and fasten the yarn. BUTTON FOLDING EDGE: Along the other side of opening work 5 rows with double crochets back and forth (on 1st row work 2 double crochets around every treble crochet row and 1 double crochet around every double crochet row). Cut and fasten the yarn. Sew the buttons on to the button folding edge. DECORATIVE EDGE: Work a decorative edge at the bottom edge - as well as up and down each vent. Work decorative edge on hook size 4 mm with Cotton Merino as follows: 1 double crochet, * 3 chain stitches, 1 treble crochet in 3rd chain stitch from hook, skip approx. 1 cm and work 1 double crochet *. Work from *-* and finish with 1 slip stitch in first double crochet from beginning of round. |
||||||||||||||||||||||
Diagram explanations |
||||||||||||||||||||||
|
||||||||||||||||||||||
|
||||||||||||||||||||||
|
||||||||||||||||||||||
|
Have you made this or any other of our designs? Tag your pictures in social media with #dropsdesign so we can see them! Do you need help with this pattern?You'll find tutorial videos, a Comments/Questions area and more by visiting the pattern on garnstudio.com. © 1982-2024 DROPS Design A/S. We reserve all rights. This document, including all its sub-sections, has copyrights. Read more about what you can do with our patterns at the bottom of each pattern on our site. |
||||||||||||||||||||||


With over 40 years in knitting and crochet design, DROPS Design offers one of the most extensive collections of free patterns on the internet - translated to 17 languages. As of today we count 304 catalogues and 11422 patterns - 11422 of which are translated into English (UK/cm).
We work hard to bring you the best knitting and crochet have to offer, inspiration and advice as well as great quality yarns at incredible prices! Would you like to use our patterns for other than personal use? You can read what you are allowed to do in the Copyright text at the bottom of all our patterns. Happy crafting!
Comments / Questions (4)
Hei, hvor finner jeg diagram A1?
14.06.2023 - 22:16DROPS Design answered:
Hei Randi, Diagram og målskissen er på bunn av sida. God fornøyelse!
15.06.2023 - 08:32Ik snap niet hoe ik a2 moet doen van dit patroon
08.11.2022 - 21:48DROPS Design answered:
Dag Cheyenne,
A.2 geeft aan hoe de toeren beginnen en eindigen. Nadat je A.1 hebt gebreid, brei je een halve vaste in de 3e losse van het begin van de toer om de toer te sluiten en dan brei je 3 lossen om de volgende toer te beginnen. Vervolgens haak je weer A.1 in de rondte.
10.11.2022 - 17:11Hei. Er det ikke mulig å få en hekleoppskrift på dette skjørtet og ikke i diagram?
11.08.2021 - 19:42DROPS Design answered:
Hei Elin, Dessverre, har vi den oppskriften bare i diagram for øyeblikket, . Hilsen Drops Team.
16.08.2021 - 09:10Var ser jag måtten till varje storlek?
05.05.2021 - 10:26DROPS Design answered:
Hej Gunilla. Du hittar en måttskiss längst ner på mönstret, under diagrammet som visar mått i alla storlekar i cm. Mvh DROPS Design
05.05.2021 - 11:01