DROPS Belle
DROPS Belle
53% Cotton, 33% Viscose, 14% Linen
from 1.85 £ /50g
Get the yarn to make this pattern from 11.10£.

The yarn cost is calculated from the pattern’s smallest size and the yarn’s cheapest product type. Looking for an even better price? You might find it on the DROPS Deals!

DROPS SS24

Fern Feast

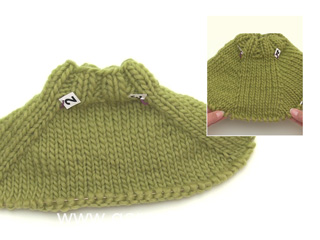
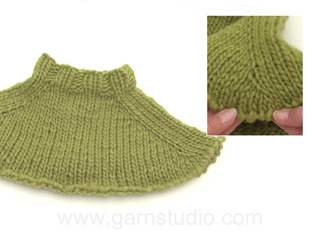
Knitted jumper in DROPS Belle or DROPS Sky. The piece is worked top down with saddle shoulders and short sleeves. Sizes S - XXXL.

DROPS 220-26
DROPS Design: Pattern no vs-070
Yarn group B
-------------------------------------------------------

SIZES:
S - M - L - XL - XXL - XXXL

MATERIALS:
DROPS BELLE from Garnstudio (belongs to yarn group B)
300-300-350-350-400-450 g colour 10, moss green
Or:
DROPS SKY from Garnstudio (belongs to yarn group B)
200-200-200-250-250-300 g colour 07, light sea green

KNITTING TENSION:
20 stitches in width and 26 rows in height with stocking stitch = 10 x 10 cm.

NEEDLES:
DROPS DOUBLE POINTED NEEDLES SIZE 4.5 MM.
DROPS CIRCULAR NEEDLE SIZE 4.5 MM: Length 40 cm and 80 cm for stocking stitch.
DROPS DOUBLE POINTED NEEDLES SIZE 3.5 MM.
DROPS CIRCULAR NEEDLE SIZE 3.5 MM: Length 40 cm and 80 cm for rib.
Needle size is only a guide. If you get too many stitches on 10 cm, change to a larger needle size. If you get too few stitches on 10 cm, change to a smaller needle size.

-------------------------------------------------------

Alternative Yarn – See how to change yarns here
Yarn Groups A to F – Use the same pattern and change the yarn here
Yarn usage using an alternative yarn – Use our yarn converter here

-------------------------------------------------------

DROPS Belle
DROPS Belle
53% Cotton, 33% Viscose, 14% Linen
from 1.85 £ /50g
Get the yarn to make this pattern from 11.10£.

The yarn cost is calculated from the pattern’s smallest size and the yarn’s cheapest product type. Looking for an even better price? You might find it on the DROPS Deals!

Pattern instructions

NOTE: This pattern is written in British English. All measurements in charts are in cm. For conversion from cm to inches - click here. There are different terms for crocheting in British and American English. If this pattern includes crochet, click for "crochet terms" here. For this pattern in American English, please click here.
-------------------------------------------------------

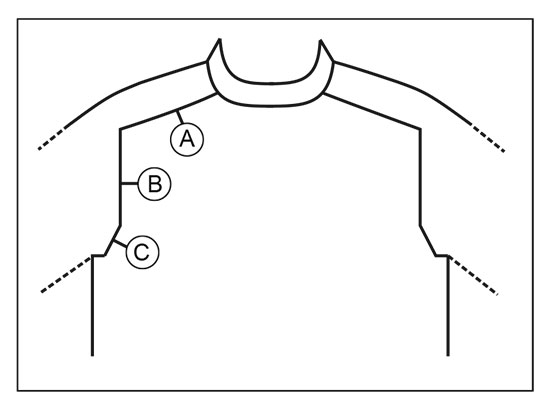
EXPLANATIONS FOR THE PATTERN:

-------------------------------------------------------

INCREASE TIP-1 (evenly spaced):
To work out how to increase evenly, count the total number of stitches on the needle (e.g. 92 stitches) and divide by the number of increases to be made (e.g. 12) = 7.7. 
In this example, increase by making 1 yarn over after alternately each 7th and 8th stitch (approx.). On the next round work the yarn overs twisted to avoid holes.

INCREASE TIP-2:
BEFORE MARKER:
The new stitch twists towards the right.
Use the left needle to pick up the strand between 2 stitches from the previous round, picking it up from the back and then knitting in the front loop.
AFTER MARKER:
The new stitch twists towards the left.
Use the left needle to pick up the strand between 2 stitches from the previous round, picking it up from the front and knitting in the back loop.

DECREASE TIP (for sides of body and under sleeves):
Decrease 1 stitch on each side of the marker as follows:
Work until there are 3 stitches left before the marker, knit 2 together, knit 2, slip 1 stitch as if to knit, knit 1 and pass the slipped stitch over the knitted stitch.

CASTING-OFF TIP:
To avoid the cast-off edge being tight you can cast off with a larger size needle. If the edge is still tight, make 1 yarn over after approx. each 4th stitch at the same time as casting off; the yarn overs are cast off as normal stitches.

-------------------------------------------------------

START THE PIECE HERE:

-------------------------------------------------------

JUMPER – SHORT OVERVIEW OF THE PIECE:
The piece is worked in the round, top down.
Stitches are increased on the yoke for the saddle shoulders and then stitches are increased for the sleeves.
The yoke is divided for body and sleeves and the body continued in the round with circular needle. The sleeves are worked in the round with double pointed needles, top down.

NECK:
Cast on 92-96-100-108-112-116 stitches with circular needle size 3.5 mm and Belle or Sky.
Knit 1 round, then work rib (knit 2, purl 2) in the round for 2 cm.
Knit 1 round where you increase 12-12-20-20-24-28 stitches evenly spaced – read INCREASE TIP-1 = 104-108-120-128-136-144 stitches.
YOKE:
Change to circular needle size 4.5 mm and insert a marker at the beginning of the round (mid-back) – THE PIECE IS MEASURED FROM HERE!
In addition, insert 4 new markers in the piece as described below – without working the stitches and inserting the markers between 2 stitches; the markers are used when increasing for the shoulders and should have a different colour from the marker on the neck.
Marker-1: Start mid-back and count 18-19-20-22-22-24 stitches (= ½ back piece), insert the marker before the next stitch.
Marker-2: Count 16-16-20-20-24-24 stitches from marker-1 (= shoulder), insert the marker before the next stitch.
Marker-3: Count 36-38-40-44-44-48 stitches from marker-2 (= front piece), insert the marker before the next stitch.
Marker-4: Count 16-16-20-20-24-24 stitches from marker-3 (= shoulder), insert the marker before the next stitch.
There are 18-19-20-22-24-24 stitches left on the back piece after marker-4. Allow these 4 markers to follow your work onwards.

INCREASES FOR SADDLE-SHOULDER:
Work stocking stitch in the round.
AT THE SAME TIME, on the first round, increase 4 stitches for the shoulders as follows:
Increase BEFORE markers 1 and 3 and AFTER markers 2 and 4 – read INCREASE TIP-2. Here you only increase on the front and back pieces, so the number of shoulder stitches remains the same.
Continue working in the round and increase like this every round a total of 21-21-24-24-26-26 times = 188-192-216-224-240-248 stitches. REMEMBER THE KNITTING TENSION!
After the last increase the piece measures 8-8-9-9-10-10 from the marker on the neck. Then increase for the sleeves as described below.

INCREASES FOR SLEEVE:
Work stocking stitch in the round.
AT THE SAME TIME, on the next round, increase 4 stitches for the sleeves as follows:
Increase AFTER markers 1 and 3 and increase BEFORE markers 2 and 4 – remember INCREASE TIP-2.
Here you only increase on the shoulders, so the number of stitches on the front and back pieces remains the same (the increased stitches are worked in stocking stitch).
Increase like this every 2nd round a total of 17-18-18-17-17-17 times = 256-264-288-292-308-316 stitches.
The piece now measures 21-22-23-22-23-23 cm from the marker on the neck. Continue with stocking stitch if necessary, without further increases, until the piece measures 21-22-23-22-23-23 cm. Then increase for the yoke as described below.

INCREASES FOR YOKE:
Move the 4 markers so each marker sits in the outermost stitch on each side of the front piece and the back piece. There are now 50-52-56-54-58-58 stitches between the marker-stitches on each sleeve.
On the next round increase 8 stitches by increasing both before and after each marker-stitch – remember INCREASE TIP-2. Here you increase on both the front and back pieces and on the sleeves.
Increase like this every 2nd round a total of 4-5-6-10-11-14 times = 288-304-336-372-396-428 stitches.
When the increases are finished, the piece measures 24-26-28-30-31-34 cm from the marker on the neck. Continue with stocking stitch if necessary, without further increases, to the correct length.

Now divide the yoke for body and sleeves as follows:
Work the first 42-45-49-54-59-65 stitches as before (= ½ back piece), place the next 60-62-70-78-80-84 stitches on a thread for the sleeve, cast on 8-10-10-10-12-12 new stitches on the needle (= in side under sleeve), work 84-90-98-108-118-130 stitches as before (= front piece), place the next 60-62-70-78-80-84 stitches on a thread for the sleeve, cast on 8-10-10-10-12-12 new stitches on the needle (= in side under sleeve), work as before over the last 42-45-49-54-59-65 stitches (= ½ back piece).
Body and sleeves are finished separately. THE PIECE IS NOW MEASURED FROM HERE.

BODY:
= 184-200-216-236-260-284 stitches. Insert 1 marker in the middle of the 8-10-10-10-12-12 stitches under each sleeve; these markers are used when decreasing in the sides.
Work stocking stitch in the round.
When the piece measures 3 cm from the division, decrease 1 stitch on each side of both markers – read DECREASE TIP (= 4 stitches decreased).
Decrease like this every 3-3-2½-2½-2½-2½ cm a total of 4 times = 168-184-200-220-244-268 stitches.
When the piece measures 14-14-13-13-12-12 cm from the division, knit 1 round where you increase 32-36-40-44-48-56 stitches evenly spaced = 200-220-240-264-292-324 stitches.
Change to circular needle size 3.5 mm and work rib (knit 2, purl 2) in the round for 3 cm. Cast off with knit over knit and purl over purl – read CASTING-OFF TIP!
The jumper measures approx. 44-46-48-50-52-54 cm from the shoulder down.

SLEEVE:
Place the 60-62-70-78-80-84 stitches from the thread on the one side of the piece on double pointed needles/short circular needle size 4.5 mm and knit up 1 stitch in each of the 8-10-10-10-12-12 stitches cast on under the sleeve = 68-72-80-88-92-96 stitches.
Work stocking stitch in the round. When the piece measures 5 cm from the division, change to circular needle size 3.5 mm.
Work rib (knit 2, purl 2) in the round for 2 cm. Cast off with knit over knit and purl over purl – remember CASTING-OFF TIP. The sleeve measures 7 cm from the division in all sizes. Work the other sleeve in the same way.

Diagram

symbols = knitting direction
symbols = saddle-shoulder increase
symbols = sleeve increase
symbols = yoke increase
diagram
diagram

Each of our patterns has specific tutorial videos to help you.

Do you have a question? See a list of frequently asked questions (FAQ)

Knitting tension is what determines the final measurements of your work, and is usually measured per 10 x 10 cm. It is provided like so: number of stitches in width x number of rows in height - eg: 19 stitches x 26 rows = 10 x 10 cm.

The knitting tension is very individual; some people knit/crochet loosely while others work tightly. You adjust the knitting tension with the needle size, which is why the suggested needle size is only meant as a guide! You need to adjust this (up or down) to ensure that YOUR knitting tension matches the knitting tension provided in the pattern. If you work with a different knitting tension than provided you will have a different yarn consumption, and your work will have different measurements than what the pattern suggests.

The knitting tension also determines which yarns can replace each other. As long as you achieve the same knitting tension you can replace one yarn with another.

See DROPS lesson: How to measure your tension/gauge

See DROPS video: How to make a gauge tension swatch

The required amount of yarn is provided in grams, eg: 450 g. To calculate how many balls you’ll need you first need to know how many grams are in 1 ball (25g, 50g or 100g). This information is available if you click on the individual yarn quality on our pages. Divide the amount required with the amount of each ball. For example, if each ball is 50g (the most common amount), the calculation will be as follows: 450 / 50 = 9 balls.

The important thing when changing from one yarn to another is that the knitting/crochet tension remains the same. This is so that the measurements of the finished piece will be the same as on the sketch provided. It is easier to achieve the same knitting tension using yarns from the same yarn group. It is also possible to work with multiple strands of a thinner yarn to achieve the knitting tension of a thicker one. Please try our yarn converter. We recommend you to always work a test swatch.

Please NOTE: when changing yarn the garment might have a different look and feel to the garment in the photo, due to individual properties and qualities of each yarn.

See DROPS lesson: Can I use a different yarn than the one mentioned in the pattern?

All our yarns are categorised into yarn groups (from A to F) according to thickness and knitting tension – group A contains the thinnest yarns and group F the thickest. This makes it easier for you to find alternative yarns to our patterns, should you wish to switch yarn. All yarns within the same group have a similar knitting tension and can easily replace each other. However, different yarn qualities have different structures and properties which will give the finished work a unique look and feel.

Click here for an overview of the yarns in each yarn group

At the top of all our patterns you’ll find a link to our yarn calculator, which is a helpful tool should you wish to use a different yarn than suggested. By filling in the yarn quality you wish to replace, the amount (in your size) and number of strands, the calculator will present good alternative yarns with the same knitting tension. Additionally it will tell you how much you’ll require in the new qualities and whether you’ll need to work with multiple strands. Most skeins are 50g (some are 25g or 100g).

If the pattern is worked with multiple colours, every colour will have to be calculated separately. Similarly, if the pattern is worked with several strands of different yarns (for example 1 strand Alpaca and 1 strand Kid-Silk) you will have to find alternatives for each, individually.

Click here to see our yarn calculator

Since different yarns have different qualities and textures we have chosen to keep the original yarn in our patterns. However, you can easily find options among our available qualities by using our yarn calculator, or simply pick a yarn from the same yarn group.

It is possible that some retailers still have discontinued yarns in stock, or that someone has a few skeins at home that they would like to find patterns for.

The yarn calculator will provide both alternative yarn as well as required amount in the new quality.

If you think it's hard to decide what size to make, it can be a good idea to measure a garment you own already and like the size of. Then you can pick the size by comparing those measures with the ones available in the pattern's size chart.

You'll find the size chart at the bottom of the pattern.

See DROPS lesson: How to read size chart

The needle size provided in the pattern serves only as a guide, the important thing is to follow the knitting tension. And since knitting tension is very individual, you will have to adjust the needle size to ensure that YOUR tension is the same as in the pattern – maybe you’ll have to adjust 1, or even 2 needle sizes, up or down to achieve the correct tension. For this, we recommend that you work test swatches.

Should you work with a different knitting tension than the one provided, the measurements of the finished garment might deviate from the measurement sketch.

See DROPS lesson: How to measure your tension/gauge

See DROPS video: How to make a tension/gauge swatch

Working a garment top-down provides more flexibility and room for personal adjustment. For example it is easier to try the garment on while working, as well as making adjustments to length of yoke and shoulder caps.

The instructions are carefully explaining every step, in the correct order. Diagrams are adjusted to the knitting direction and are worked as usual.

The diagram depicts all rows/rounds, and every stitch seen from the right side. It is read from bottom to top, from right to left. 1 square = 1 stitch.

When working back and forth, every other row is worked from the right side and every other row is worked from the wrong side. When working from the wrong side, the diagram will have to be worked reversed: from left to right, knit stitches are purled, purl stitches are knit etc.

When working in the round every round is worked from the right side and the diagram are worked from right to left on all rounds.

See DROPS lesson: How to read knitting diagrams

The diagram depicts all rows/rounds, and every stitch seen from the right side. It is worked from bottom to top, from right to left.

When working back and forth every other row is worked from the right side: from right to left and every other row is worked from the wrong side: from left to right.

When working in the round, every row in the diagram are worked from the right side, from right to left.

When working a circular diagram you start in the middle and work your way outwards, counter clockwise, row by row.

The rows usually start with a given number of chain stitches (equivalent to the height of the following stitch), this will either be depicted in the diagram or explained in the pattern.

See DROPS lesson: How to read crochet diagrams

Instructions for working several diagrams after each other on the same row/round, will often be written like so: “work A.1, A.2, A.3 a total of 0-0-2-3-4 times". This means you work A.1 once, then A.2 is worked once, and A.3 is repeated (in width) the number of times provided for your size – in this case like so: S = 0 times, M = 0 times, L=2 times, XL= 3 times and XXL = 4 times.

The diagrams are worked as usual: begin with the first row in A.1, then work the first row in A.2 etc.

See DROPS lesson: How to read knitting diagrams

See DROPS lesson: How to read crochet diagrams

The total width of the garment (from wrist-to-wrist) will be larger in the larger sizes, despite the actual sleeves being shorter. The larger sizes have longer sleeve caps and wider shoulders, so there will be a good fit in all sizes.

The measurement sketch/schematic drawing provides information regarding the full length of the garment. If it’s a jumper or a jacket the length is measured from the highest point on the shoulder closest to the neckline, and straight down to the bottom of the garment. It is NOT measured from the tip of shoulder. Similarly, the length of yoke is measured from the highest point on the shoulder and down to where yoke is split into body and sleeves.

On a jacket measures are never taken along bands, unless specifically stated. Always measure inside band stitches when measuring the length.

See DROPS lesson: How to read a schematic drawing

Diagrams are often repeated on the round or in height. 1 repeat is the diagram the way it appears in the pattern. If it says to work 5 repeats of A.1 in the round, then you work A.1 a total of 5 times after/next to each other in the round. If it says to work 2 repeats of A.1 vertically/in height you work the entire diagram once, then begin again at the start and work the entire diagram one more time.

Chain stitches are slightly narrower than other stitches and to avoid working the cast-on edge too tight, we simply chain more stitches to begin with. The stitch count will be adjusted on the following row to fit the pattern and measurement sketch.

The rib edge is more elastic and will contract slightly compared to, for example, stocking stitch. By increasing before the rib edge, you avoid a visible difference in width between the rib edge and the rest of the body.

It’s very easy to cast off too tightly, and by making yarn overs while casting off (and simultaneously casting these off) you avoid a too tight cast off edge.

See DROPS video: How to bind off with yarn overs (yo)

To achieve an even increase (or decrease) you can increase on, for example: every 3rd and 4th row alternately, like so: work 2 rows and increase on the 3rd row, work 3 rows and increase on the 4th. Repeat this until the increase is complete.

See DROPS lesson: Increase or decrease 1 st on every 3rd and 4th row alternately

Should you prefer to work in the round instead of back and forth, you may of course adjust the pattern. You’ll need to add steeks mid-front (usually 5 stitches), and follow the instructions. When you would normally turn and work from the wrong side, simply work across the steek and continue in the round. At the end you’ll cut the piece open, pick up stitches to work bands, and cover the cut edges.

See DROPS video: How to knit steeks and cut open

Should you prefer to work back and forth instead of in the round, you may of course adjust the pattern so you work the pieces separately and then assemble them at the end. Divide the stitches for the body in 2, add 1 edge stitch in each side (for sewing) and work the front and back pieces separately.

See DROPS lesson: Can I adapt a pattern for circular needles into straight needles?

Pattern repeats can vary slightly in the different sizes, in order to get the correct proportions. If you’re not working the exact same size as the garment in the photo, yours might deviate slightly. This has been carefully developed and adjusted so that the complete impression of the garment is the same in all sizes.

Make sure to follow instructions and diagrams for your size!

If you have found a pattern you like which is available in women’s size it’s not very difficult to convert it to men’s size. The biggest difference will be the length of sleeves and body. Start working on the women size that you think would fit across the chest. The additional length will be worked right before you cast off for the armhole/sleeve cap. If the pattern is worked top-down you can add the length right after the armhole or before the first decrease on sleeve.

Regarding additional yarn amount, this will depend on how much length you add, but it is better with a skein too many than too few.

All yarns will have excess fibres (from production) that might come off as lint or shedding. Brushed yarns (ie hairier yarns) have more of these loose, excess fibres, causing more shedding.

Shedding also depends on what is worn under or over the garment, and whether this pulls at the yarn fibres. It’s therefore not possible to guarantee that there will be no shedding

Below are some tips on how to get the best result when working with hairier yarns:

1. When the garment is finished (before you wash it) shake it vigorously so the looser hairs come off. NOTE: do NOT use a lint roller, brush or any method that pulls at the yarn.

2. Place the garment in a plastic bag and put it in your freezer - the temperature will cause the fibres to become less attached to each other, and excess fibres will come off easier.

3. Leave in the freezer for a few hours before taking it out and shaking it again.

4. Wash the garment according to the instructions on the yarn label.

Pilling is a natural process that happens to even the most exclusive of fibers. It's a natural sign of wear and tear that is hard to avoid, and that is most visible in high friction areas of your garment like a sweater's arms and cuffs.

You can make your garment look as new by removing the pilling, using a fabric comb or a pill/lint remover.

Still can't find the answer you need? Then scroll down and leave your question so one of our experts can try to help you. This will be done normally within 5 to 10 working days.
In the meantime, you can read the questions and answers that others have left to this pattern or join the DROPS Workshop on Facebook to get help from fellow knitters/crocheters!

You might also like...

Post a comment to pattern DROPS 220-26

We would love to hear what you have to say about this pattern!

If you want to leave a question, please make sure you select the correct category in the form below, to speed up the answering process. Required fields are marked *.

Comments / Questions (28)

country flag Lena wrote:

Hei! På side 4, ermeøkning: str xl. - øk slik på hver 2.omgang totalt 17(xl)=292 masker. Hvordan gjør jeg det ? Når 18 omganger er 288? (L)

08.04.2024 - 10:24

DROPS Design answered:

Hej Lena, du har 224 masker, tager ud på 4 steder 17 gange=68 = totalt 292 masker :)

09.04.2024 - 11:47

country flag Molly wrote:

Hi, I’m making the largest size and I’ve done the increases for the yoke. I’m on the 13th increase and I already have 84 stitches between the stitch markers for the arms. Do some of the shoulder stitches belong to the body by the time I separate for the sleeves?

24.03.2023 - 21:18

DROPS Design answered:

Dear Molly, by the time you finish the increases for the yoke and the sleeves, and you are separating the stitches for the body and the sleeves, you should have 130 stitches (both for the front and the bacl) and 84-84 stitches for both sleeves (for the largest size). Check if you increased the amounth of stitches for the size you are knitting. Happy Knitting!

24.03.2023 - 23:43

country flag Debby Van Der Ven wrote:

Ik vraag me af of die 13 centimeter vanaf de scheiding wel klopt? Ik brei met Belle en alle maten klopte tot dusver maar als ik maar 13 centimeter aanhoud komt hij tot boven mijn navel. Ik zit momenteel al op 21 centimeter en dan zit ik nog op een totaal lengte vanaf de schouders gemeten op 47 cm terwijl ik 50 moet hebben

09.05.2022 - 17:18

country flag Marjana wrote:

I refer to my today's question regarding re-positioning of the 4 markers before increasing for the yoke. Sorry to take your time, I've just discovered the video, all clear now.

14.07.2021 - 22:38

country flag Riggi wrote:

Hei….I mønster står det at når det er 13 cm etter deling skal det økes jevnt fordelt ,forså videre å strikke vrangborden nederst etterpå… Men i all videste verden.. da er jo genseren midt på magen ..???

14.07.2021 - 22:17

DROPS Design answered:

Hej Riggi. I storlek M ska den då mäta 28+13 cm från märket vid halsen. Det är en kort modell, men vill du göra den lite längre kan du bara fortsätta till den längd du önskar. Du ser de totala måtten på måttskissen längst ner på oppskriften. Mvh DROPS Design

15.07.2021 - 08:05

country flag Marjana wrote:

Sorry, I do not understand how to move, and why, the 4 markers before increasing the yoke. I do understand that I have to increase both sides, the saddle + front/back sections but do not the markers stay in the position as before ? Thank you for your kind reply.

14.07.2021 - 21:59

DROPS Design answered:

Dear Marjana, the markers are moved, because from that point you increase 8 stitches by increasing both before and after each marker-stitch (while before you only increased at one side -either bedore OR after each marker). I hope this helps. Happy Stitching!

15.07.2021 - 00:54

country flag Barbara Neri wrote:

Buonasera Devo fare le diminuzioni anche sulle maniche? Se si quanti punti ? Grazie

14.07.2021 - 20:52

DROPS Design answered:

Buonasera Barbara, non ci sono diminuzioni per la manica, come riportato nelle spiegazioni. Buon lavoro!

20.07.2021 - 17:30

country flag Sara wrote:

Hei. Dette er kanskje et dumt spørsmål. Jeg lurer på hva er delingen? Skal man legge ut masker 13 cm etter at man har satt av armene? Eller skal man legge ut rett før vrangborden nederst?

30.06.2021 - 00:13

DROPS Design answered:

Hej Sara, når du har sæt ærmemaskerne på hver sin tråd, så er arbejdet delt og selve bolen strikkes ned til ribben. Se gerne videoerne nederst i opskriften, hver vi ser vi bla hvordan man deler arbejdet :)

30.06.2021 - 14:59

country flag Zuzana wrote:

Ďakujem za zaujímavý návod. Naučila som sa pliesť v jednom kuse bez zošívania. Spôsob ako sú urobené ramená sa mi veľmi páči. Priadza ktorú ste navrhli je veľmi jemná, prekvapilo ma, že je ľahká.

15.06.2021 - 16:52

country flag Galerand wrote:

Je pense qu'il y a une petite erreur concernant les augmentations 2 Après le marqueur il faut prendre dans le brin arrière et non dans le brin avant,maille inclinée à gauche, Ceci est pour aider Sinon jusqu'à présent pas de difficulté c'est bien expliqué, j'en suis aux augmentations manches

29.05.2021 - 19:24

DROPS Design answered:

Bonjour Mme Galerand et merci pour votre retour, la correction a été faite. Bonne continuation!

31.05.2021 - 08:30