
Popular categories
Looking for a yarn?


|
|||||||||||||||||||||||||
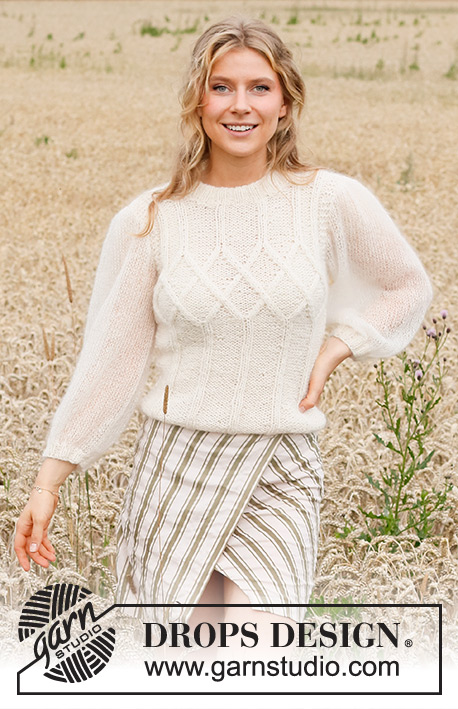
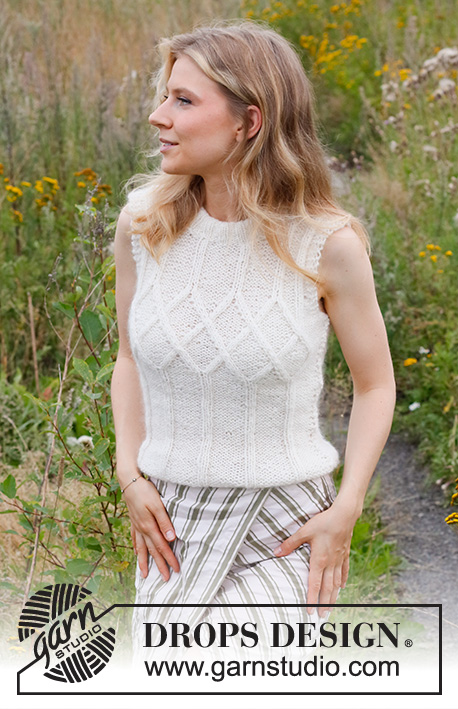
White Meadow Top |
|||||||||||||||||||||||||
 |
 |
||||||||||||||||||||||||
Knitted top in DROPS Sky and DROPS Kid-Silk. The piece is worked with cables and double neck. Sizes S - XXXL.
DROPS 220-8 |
|||||||||||||||||||||||||
|
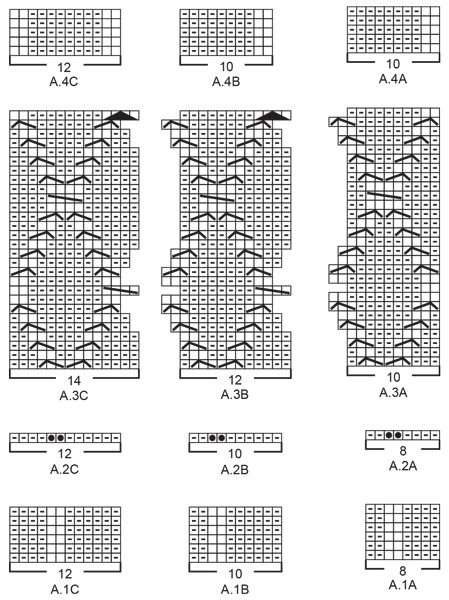
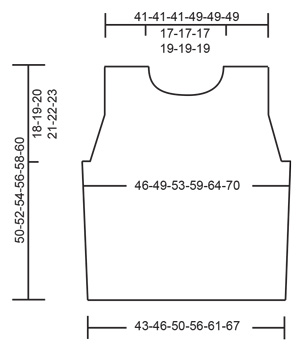
------------------------------------------------------- EXPLANATIONS FOR THE PATTERN: ------------------------------------------------------- RIDGE/GARTER STITCH (worked back and forth): Knit all rows. 1 ridge in height = Knit 2 rows. PATTERN: See diagrams A.1 to A.4. The diagrams show all rows in the pattern from the right side. INCREASE TIP (for sides): All increases are worked from the right side! Increase on the inside of the 2 edge stitches by making 1 yarn over. On the next row (wrong side) knit the yarn over twisted to avoid a hole. Then purl the new stitch on the right side and knit it on the wrong side. DECREASE TIP (for armholes): All decreases are worked from the right side! Decrease on the inside of the 3 edge stitches. After the 3 edge stitches: Purl 2 stitches twisted together Before the 3 edge stitches: Work until there are 2 stitches left before the 3 edge stitches and purl 2 together. ------------------------------------------------------- START THE PIECE HERE: ------------------------------------------------------- TOP – SHORT OVERVIEW OF THE PIECE: The back and front pieces are worked separately, back and forth and bottom up. The piece is sewn together and the neck is worked to finish. BACK PIECE: Cast on 60-64-70-78-86-94 stitches with circular needle size 6 mm and 1 strand Sky and 1 strand Kid-Silk (= 2 strands). Purl 1 row (= wrong side). The next row is worked as follows from the right side: 2 edge stitches in GARTER STITCH – read description above, purl from right side/knit from wrong side 3-5-8-7-11-15 stitches, work A.1A (= 8 stitches), work A.1B over the next 30-30-30-40-40-40 stitches (= 3-3-3-4-4-4 repeats of 10 stitches), A.1C (= 12 stitches), purl from right side/knit from wrong side 3-5-8-7-11-15 stitches and finish with 2 edge stitches in garter stitch. Continue this pattern. REMEMBER THE KNITTING TENSION! When the piece measures 3 cm, change to circular needle size 7 mm. Continue the pattern. When the piece measures 10-10-10-12-12-12 cm, increase 1 stitch on each side – read INCREASE TIP. Repeat this increase when the piece measures 21-22-23-24-25-26 cm = 64-68-74-82-90-98 stitches. When the piece measures 22-23-24-25-26-27 cm, before starting the cables, increase stitches as follows – from the wrong side: 2 edge stitches in garter stitch, knit 5-7-10-9-13-17, work A.2C (= 12 stitches – the diagram is read from left to right when working from the wrong side), A.2B over the next 30-30-30-40-40-40 stitches (= 3-3-3-4-4-4 repeats of 10 stitches), A.2A (= 8 stitches), knit 5-7-10-9-13-17 and finish with 2 edge stitches in garter stitch = 74-78-84-94-102-110 stitches. The next row is worked as follows from the right side: 2 edge stitches in garter stitch, purl 5-7-10-9-13-17, work A.3A (= 10 stitches), A.3B over the next 36-36-36-48-48-48 stitches (= 3-3-3-4-4-4 repeats of 12 stitches), A.3C (= 14 stitches), purl 5-7-10-9-13-17 and finish with 2 edge stitches in garter stitch. Continue this pattern until A.3 has been completed in height; NOTE! The armholes are worked at the same time. ARMHOLES: AT THE SAME TIME when the piece measures 30-31-32-33-34-35 cm work 2 ridges over the outermost 6-6-6-6-7-8 stitches on each side (the other stitches worked as before). After the 2 ridges, cast off 3-3-3-3-4-5 stitches for the armholes at the beginning of the next 2 rows. Continue the pattern with 3 edge stitches in garter stitch on each side towards the armholes. AT THE SAME TIME, on the first row from the right side, decrease 1 stitch on each side for the armholes – read DECREASE TIP. Decrease like this every 2nd row (each row from the right side) a total of 1-3-6-5-8-11 times. NOTE! In sizes XXL and XXXL decreases for armhole continues even after A.3 has been completed. Continue with A.4 over A.3 until all stitches for armholes have been decreased - the stitches that are not decreased yet are purled from the right side and knitted from the wrong side until they are decreased, then continue the pattern as described below. PATTERN AFTER THE ARMHOLES: When A.3 has been completed in height and all the decreases for the armholes are finished, there are 58-58-58-68-68-68 stitches and the pattern is continued from the right side as follows: 3 edge stitches in garter stitch, work A.4A (= 10 stitches), A.4B over the next 30-30-30-40-40-40 stitches (= 3-3-3-4-4-4 repeats of 10 stitches), A.4C (= 12 stitches) and finish with 3 edge stitches in garter stitch. Continue this pattern. NECKLINE: When the piece measures 48-50-52-54-56-58 cm, cast off the middle 20-20-20-22-22-22 stitches for the neck and each shoulder is finished separately. Continue the pattern and cast off 2 stitches on the next row from the neck = 17-17-17-21-21-21 stitches on the shoulder. Work until the piece measures 50-52-54-56-58-60 cm. Cast off with knit from the right side. Work the other shoulder in the same way. FRONT PIECE: Cast on the same number of stitches as for the back piece and work in the same way until the piece measures 42-44-46-47-49-51 cm. Now place the middle 14-14-14-16-16-16 stitches on 1 thread for the neck and each shoulder is finished separately. Continue the pattern and cast off at the beginning of each row from the neck as follows: Cast of 2 stitches 1 time and 1 stitch 3 times = 17-17-17-21-21-21 stitches on the shoulder. Work until the piece measures 50-52-54-56-58-60 cm. Cast off with knit from the right side. Work the other shoulder in the same way. ASSEMBLY: Sew the shoulder seams inside the cast-off edges. Sew the side seams in the outermost loop of the outermost stitch so the seam is flat. NECK: Start on one shoulder and knit up 72 to 80 stitches around the neck (including the stitches from the thread in front) with short circular needle size 6 mm and 1 strand Sky and 1 strand Kid-Silk (= 2 strands). The number of stitches should be divisible by 4. Work rib in the round (knit 2, purl 2) for 8 cm. Cast off with knit over knit and purl over purl. Fold the neck double to the inside and sew down; to avoid the neck being tight and rolling outwards, it is important the seam is elastic. |
|||||||||||||||||||||||||
Diagram explanations |
|||||||||||||||||||||||||
|
|||||||||||||||||||||||||
|
|||||||||||||||||||||||||
|
|||||||||||||||||||||||||
|
Have you made this or any other of our designs? Tag your pictures in social media with #dropsdesign so we can see them! Do you need help with this pattern?You'll find tutorial videos, a Comments/Questions area and more by visiting the pattern on garnstudio.com. © 1982-2024 DROPS Design A/S. We reserve all rights. This document, including all its sub-sections, has copyrights. Read more about what you can do with our patterns at the bottom of each pattern on our site. |
|||||||||||||||||||||||||


With over 40 years in knitting and crochet design, DROPS Design offers one of the most extensive collections of free patterns on the internet - translated to 17 languages. As of today we count 304 catalogues and 11422 patterns - 11422 of which are translated into English (UK/cm).
We work hard to bring you the best knitting and crochet have to offer, inspiration and advice as well as great quality yarns at incredible prices! Would you like to use our patterns for other than personal use? You can read what you are allowed to do in the Copyright text at the bottom of all our patterns. Happy crafting!
Comments / Questions (12)
Jag stickar västen i storlek S. Har avmaskning enligt beskrivning från 74 till 60 maskor och i 3A i sista raden så behövs det avmaskas. Ni skriver att då borde jag ha 58 maskor kvar, hur är det möjligt?
20.03.2024 - 20:42DROPS Design answered:
Hej Ritva. Du avmaskar 6 m till ärmhål (3 m i varje sida), minskar 2 m till ärmhål (1 m i varje sida), minskar 2 maskor i diagram A.3C och A.3B (dvs 8 maskor minskade från diagram). 74-6-2-8 = 58 m. Mvh DROPS Design
22.03.2024 - 09:25Tak. Na schemacie kreska jest w drugą stronę.
20.09.2023 - 20:29Na schemacie w miejscu : umieścić 2 oczka na drucie pomocniczym przed robótką, przerobić 2 oczka prawe, 2 oczka z drutu pomocniczego przerobić na prawo (ostatni symbol w opisie) został umieszczony zły symbol (odwrotne przerobienie oczek)?
18.09.2023 - 11:24DROPS Design answered:
Witaj Olu, nie wiem czy dobrze rozumiem: ostatni opis w legendzie jest poprawny, ale symbol jest niewłaściwy?
19.09.2023 - 13:39Mais la loupe ne fonctionne pas !
30.11.2021 - 15:37DROPS Design answered:
Bonjour, cliquez sur la loupe et 'Find a pattern' s'affiche :)
30.11.2021 - 15:48Bonjour Madame, Je voudrais trouver un certain modèle avec son numéro. Avant j’avais un emplacement en haut à droite avec la loupe. Maintenant je ne retrouve plus cet endroit. Pourriez vous m’indiquer comment je dois procéder pour retrouver un modèle. Merci pour votre aide.
30.11.2021 - 11:12DROPS Design answered:
Bonjour Madame, vous avez toujours la loupe en haut à droite (a cote du coeur et de l'enveloppe). Cordialement!
30.11.2021 - 12:03Can you recommend a single yarn for this pattern?
15.07.2021 - 16:26DROPS Design answered:
Dear Annie, the piece is designed with two different yarn on purpouse, to combine the advantages of both. In substituting you have to decise what effect do you want to achieve (do you want the lightness? the halo effect? the color? etc) to effectively choose a substitute. Happy Stitching!
15.07.2021 - 21:04Can I use 1 strand SKY for this pattern?
15.07.2021 - 14:34DROPS Design answered:
Dear Mrs Pang, to get the correct tension and finished measurements (as in the chart), you need to work here with 1 strand Sky + 1 strand Kid-Silk (or any other yarn group A). Happy knitting!
15.07.2021 - 15:57Silke mohair
17.04.2021 - 13:36Piękny sweterek! Czekam na opis z niecierpliwością!
12.04.2021 - 15:41När kommer mönstret? Vilket garn är den stickad i ? Väldigt fint mönster
11.04.2021 - 20:28DROPS Design answered:
Hej Annika, den er strikket i DROPS Sky og DROPS Kid-Silk og opskriften kommer snart, den er lige om hjørnet :)
12.04.2021 - 13:41