
Popular categories
Looking for a yarn?


|
|||||||
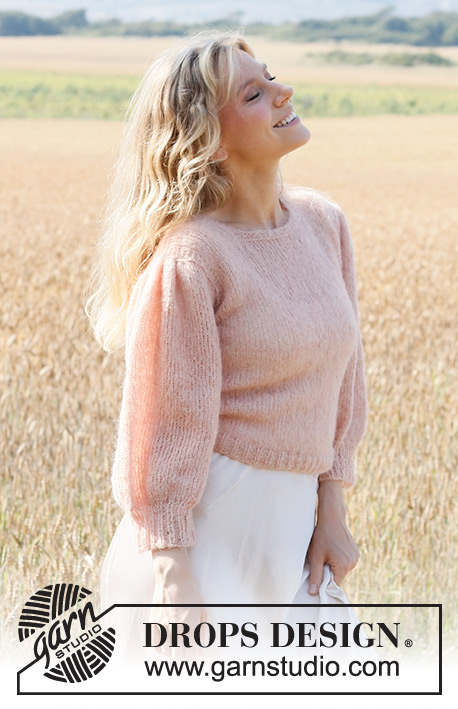
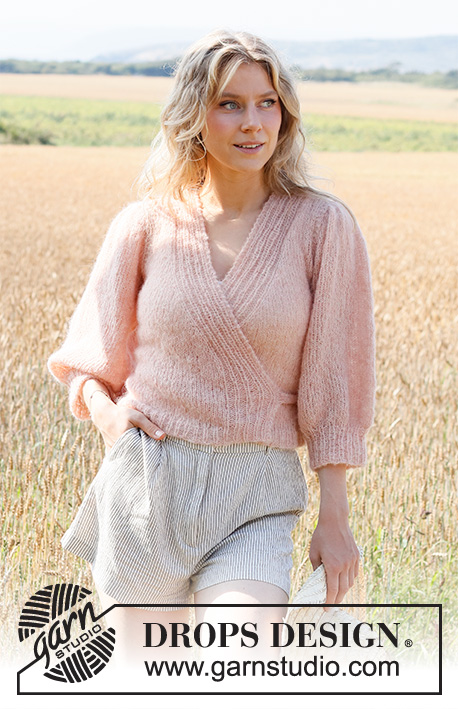
Peaches and Cream Jacket |
|||||||
 |
 |
||||||
Knitted wrap-around jacket in DROPS Brushed Alpaca Silk. Piece is knitted top down with ¾ puff sleeves. Size: S - XXXL
DROPS 222-8 |
|||||||
|
------------------------------------------------------- EXPLANATION FOR THE PATTERN: ------------------------------------------------------- GARTER STITCH (back and forth): Knit all rows. 1 ridge vertically = knit 2 rows. PATTERN: See diagrams A.1 and A.2. Diagrams show all rows in pattern seen from the right side. INCREASE TIP-1 (applies to armholes): All increases are done from the right side. Increase inside 3 edge stitches in garter stitch. Increase 1 stitch by making 1 yarn over. On next row (wrong side) purl yarn overs twisted to avoid holes. Then work the increased stitches in stocking stitch. INCREASE TIP-2 (applies to sides of body): All increases are done from the right side. Increase 1 stitch inside 1 edge stitch in garter stitch in the side by making 1 yarn over. On next row (wrong side) purl yarn overs twisted to avoid holes. INCREASE TIP-3 (applies to neckline at the front): All increases are done from the right side. Increase for neck 1 stitch by making 1 yarn over. On next row (wrong side) purl yarn over twisted to avoid holes - increase after last stitch in stocking stitch before A.1 and before first stitch in stocking stitch after A.2. Work the increased stitches in stocking stitch. INCREASE/DECREASE TIP (evenly): To calculate how to increase/decrease evenly, count the stitches to be increased/decreased (e.g. 18 stitches), and divide by stitches of increases/decreases to be done (e.g. 7) = 2.6. In this example increase by making 1 yarn over after alternately approx. every 2nd and 3rd stitch. On next row work yarn overs twisted to avoid holes If decreasing knit in this example alternately approx. every 1st and 2nd stitch and every 2nd and 3rd stitch together. DECREASE TIP-1 (applies to sides of body): All decreases are done from the right side! Decrease inside 1 edge stitch in garter stitch. Decrease as follows after 1 edge stitch in garter stitch: Slip 1 stitch knitwise, knit 1, pass slipped stitch over stitch worked (= 1 stitch decreased). Decrease as follows before 1 edge stitch in garter stitch: Work until 2 stitches remain before edge stitch, knit 2 together(= 1 stitch decreased). DECREASE TIP-2 (applies to mid under sleeves): Work until 3 stitches remain before marker thread, knit 2 together, knit 2 stitches (marker thread is between these 2 stitches), slip 1 stitch knitwise, knit 1, pass slipped stitch over stitch worked (= 2 stitches decreased). CAST-OFF TIP: To avoid a tight cast-off edge you may use a larger needle size. If this also is too tight, work a 1 yarn over after approx. every 3rd stitch while casting off (cast off yarn overs as regular stitches). ------------------------------------------------------- START THE PIECE HERE: ------------------------------------------------------- WRAP-AROUND JACKET - SHORT OVERVIEW OF THE PIECE: Work back piece and front pieces back and forth in parts separately, top down. Then pick up stitches for ties. Sleeve cap is worked back and forth on circular needle, top down. Then work the rest of sleeve in the round on circular needle/double pointed needles. RIGHT SHOULDER BACK (when garment is worn): Cast on 22-22-22-22-22-22 stitches on circular needle size 4 mm with Brushed Alpaca Silk. Work 1 ridge in GARTER STITCH - read explanation above, over all stitches. Switch to circular needle size 5 mm. Then work the outermost 3 stitches in each side of piece in garter stitch and work the remaining stitches in stocking stitch. When piece measures 3 cm, work, next row from wrong side as follows: Work as before over all stitches and cast on 16-18-18-20-22-24 new stitches at the end of row for neck = 38-40-40-42-44-46 stitches. Cut the yarn. Put piece aside and work the left shoulder at the back. LEFT SHOULDER BACK (when garment is worn): Cast on 22-22-22-22-22-22 stitches on circular needle size 4 mm with Brushed Alpaca Silk. Work 1 ridge over all stitches. Switch to circular needle size 5 mm. Then work the outermost 3 stitches in each side of piece in garter stitch and work the remaining stitches in stocking stitch. Continue like this until piece measures 3 cm– adjust to finish with last row from wrong side. Then work back piece as explained below. BACK PIECE: Slip left and right shoulder on to same circular needle so that the 16-18-18-20-22-24 new stitches cast on for neck are in the middle of needle = 60-62-62-64-66-68 stitches. READ ALL OF THE FOLLOWING SECTION BEFORE CONTINUING! Work pattern from the right side as follows: 3 stitches in garter stitch, stocking over the next 16-16-16-16-16-16 stitches, garter stitch over the next 22-24-24-26-28-30 stitches, stocking stitch over the next 16-16-16-16-16-16 stitches, 3 stitches in garter stitch. Continue back and forth like this until 3 ridges have been worked over stitches for neck. Then work in stocking stitch with 3 edge stitches in garter stitch in each side towards armholes. REMEMBER THE KNITTING TENSION. AT THE SAME TIME when piece measures 17-14-8-12-10-7 cm from cast-on edge on shoulders, increase 1 stitch in each side for armholes – read INCREASE TIP-1. Increase like this every 4th-4th-4th-2nd-2nd-2nd row, 2-4-8-11-15-19 times in total in each side= 64-70-78-86-96-106 stitches. Piece measures approx. 19-20-21-22-23-24 cm from cast-on edge. Now cast on 3 new stitches for armholes at the end of the next 2 rows = 70-76-84-92-102-112 stitches. NOW MEASURE PIECE FROM HERE! Work 4 rows in stocking stitch with 6 stitches in garter stitch in each side. Then work in stocking stitch with 1 edge stitch in garter stitch in each side. When piece measures 4 cm from armhole, decrease 1 stitch in each side - read DECREASE TIP-1 (= 2 stitches decreased). Repeat decrease when piece measures 8-8-9-9-10-10 cm and 12-13-14-15-16-17 cm = 64-70-78-86-96-106 stitches. When piece measures 15-16-17-18-19-20 cm, increase 1 stitch inside 1 edge stitch in garter stitch in each side - READ INCREASE TIP-2 (= 2 stitches increased). Repeat increase when piece measures 19-20-21-22-23-24 cm and 23-24-25-26-27-28 cm = 70-76-84-92-102-112 stitches. Continue until piece measures 24-25-26-27-28-29 cm from armhole and increase 8-8-9-10-12-14 stitches evenly on last row from wrong side = 78-84-93-102-114-126 stitches. Switch to circular needle size 4 mm and work next row from right side as follows: 1 edge stitch in garter stitch, * knit 1, purl 2 *, repeat from *-* until 2 stitches remain on needle, knit 1, 1 edge stitch in garter stitch. Continue rib like this for 3 cm. Cast off with knit over knit and purl over purl - read CAST-OFF TIP. Back piece measures approx. 46-48-50-52-54-56 cm from shoulder and down. RIGHT FRONT PIECE (when garment is worn): Cast on 22-22-22-22-22-22 stitches on circular needle size 4 mm with Brushed Alpaca Silk. Work 1 ridge over all stitches. Switch to circular needle size 5 mm. Work next row from right side as follows: 3 edge stitches in garter stitch towards armhole, 4-4-4-4-4-4 stitches in stocking stitch, A.1 (= 15 stitches). Continue pattern back and stocking stitch back and forth like this. When piece measures 4 cm, increase for neck line before A.1 (seen from right side) - read INCREASE TIP-3. Increase like this on every other row (i.e. every row from right side) 4 times in all sizes, then every 4th row (i.e. every other row from right side) 8-8-9-11-12-13 times in total, every other row (i.e. every row from right side) 11-12-11-10-10-10 times in total and finally very 4th row 2-2-2-2-2-2 times. AT THE SAME TIME when piece measures 17-14-8-12-10-7 cm, increase for armhole the same way as on back piece, i.e. increase inside 3 stitches in garter stitch towards armhole at the beginning of row (seen from right side). When increase for armhole is done (2-4-8-11-15-19 stitches have been increased for armhole) piece approx. 19-20-21-22-23-24 cm from cast-on edge on shoulder. At the end of next row from wrong side cast on 3 new stitches for armhole. Continue as before with A.1 towards mid front, increase for neck line and stocking stitch but over the outermost 6 stitches towards the side work 2 ridges (i.e. this is done on the next 4 rows). Then work in stocking stitch with 1 edge stitch in garter stitch towards the side, and A.1 towards mid front (continue increase as before). When piece measures 4 cm from armhole, decrease 1 stitch in the side - remember DECREASE TIP-1. Repeat decrease when piece measures 8-8-9-9-10-10 and 12-13-14-15-16-17 cm. When piece measures 15-16-17-18-19-20 cm, increase 1 stitch inside 1 edge stitch in garter stitch in each side - remember INCREASE TIP-2. Repeat increase when piece measures 19-20-21-22-23-24 cm and 23-24-25-26-27-28 cm. When all increases towards mid front are done, continue pattern as before until increases in the side are done. When all increases and decreases are done there are 52-55-59-63-68-73 stitches on row. Work until piece measures 24-25-26-27-28-29 cm from armhole. On next row increase 6-9-8-7-8-9 stitches evenly = 58-64-67-70-76-82 stitches. Switch to circular needle size 4 mm. Now work rib as follows: 1 edge stitch in garter stitch, * purl 2, knit 1 *, repeat from *-* until 15 stitches remain on needle, work A.1 over the last 15 stitches (rib should fit A.1). Continue rib like this for 3 cm. Cast off with knit over knit and purl over purl - remember CAST-OFF TIP. Front piece measures approx. 46-48-50-52-54-56 cm from shoulder. LEFT FRONT PIECE: Cast on 22-22-22-22-22-22 stitches on circular needle size 4 mm with Brushed Alpaca Silk. Work 1 ridge over all stitches. Switch to circular needle size 5 mm. Work next row from right side as follows: A.2 (= 15 stitches), 4-4-4-4-4-4 stitches in stocking stitch, 3 stitches in garter stitch towards armhole. Continue pattern back and stocking stitch back and forth like this. When piece measures 4 cm, increase for neck line after A.2 (seen from right side) - remember INCREASE TIP-3. Increase like this on every other row 4 times in all sizes, then every 4th row (i.e. every other row from right side) 8-8-9-11-12-13 times in total, every other row (i.e. every row from right side) 11-12-11-10-10-10 times in total and finally every 4th row 2-2-2-2-2-2 times. AT THE SAME TIME when piece measures 17-14-8-12-10-7 cm, increase for armhole the same way as on back piece piece and right front piece, i.e. increase inside 3 stitches in garter stitch towards armhole at the end of row (seen from right side). When increase for armhole is done (2-4-8-11-15-19 stitches have been increased for armhole) piece approx. 19-20-21-22-23-24 cm from cast-on edge on shoulder. At the end of next row from right side cast on 3 new stitches for armhole. Continue as before with A.2 towards mid front, increase for neck line and stocking stitch but over the outermost 6 stitches towards the side work 2 ridges (i.e. this is done on the next 4 rows). Then work in stocking stitch with 1 edge stitch in garter stitch towards the side, , and A.2 towards mid front (continue increase as before). When piece measures 4 cm from armhole, decrease 1 stitch in the side - remember DECREASE TIP-1. Repeat decrease when piece measures 8-8-9-9-10-10 and 12-13-14-15-16-17 cm. When piece measures 15-16-17-18-19-20 cm, increase 1 stitch inside 1 edge stitch in garter stitch in the side - remember INCREASE TIP-2. Repeat increase when piece measures 19-20-21-22-23-24 cm and 23-24-25-26-27-28 cm. When all increases and decreases are done there are 52-55-59-63-68-73 stitches on row. Work until piece measures 24-25-26-27-28-29 cm from armhole. On next row increase 6-9-8-7-8-9 stitches evenly = 58-64-67-70-76-82 stitches. Switch to circular needle size 4 mm. Now work rib as follows: A.2 over the first 15 stitches, * knit 1, purl 2 *, work from *-* until 3 stitches remain, purl 2, 1 edge stitch in garter stitch. Continue rib like this for 3 cm. Cast off with knit over knit and purl over purl - remember CAST-OFF TIP. Front piece measures approx. 46-48-50-52-54-56 cm from shoulder. SLEEVE: Cast on 20-20-20-22-22-22 stitches on circular needle size 5 mm. Knit 1 row from right side while increasing 7-8-9-8-8-8 stitches evenly (but do not increase over the outermost stitch in each side) - read INCREASE/DECREASE TIP = 27-28-29-30-30-30 stitches. Purl 1 row from wrong side. Work next row as follows from right side: Knit 1, work 2 stitches in each of the next 25-26-27-28-28-28 stitches (i.e. work in front and back loop of stitch), knit 1 = 52-54-56-58-58-58 stitches. Work stocking stitch back and forth to sleeve cap, and cast at the same time on new stitches at the end of every row in each side as follows: Cast on 3 stitches 1 time in each side, 2 stitches 3-3-3-3-4-4 times in each side, 1 stitch 0-1-2-3-3-6 times in each side, 2 stitches 3-3-3-3-3-3 times in each side, and then 3 stitches 1 time in each side = 88-92-96-100-104-110 stitches. Work in stocking stitch in the round. When piece measures 4 cm from where it was put together, decrease 2 stitches mid under sleeve - read DECREASE TIP-2. Decrease like this every 4-4-3-3-2-2 cm 3-3-4-4-5-6 times in total = 82-86-88-92-94-98 stitches. Work until piece measures 38-37-37-39-40-40 cm from cast-on edge. Knit 1 round while decreasing 14-14-12-12-14-14 stitches evenly = 68-72-76-80-80-84 stitches. Work next round as follows: * Knit 2, knit 2 together(= 1 stitch decreased) *, work from *-* the entire round= 51-54-57-60-60-63 stitches. Switch to double pointed needles size 4 mm and work rib in the round = knit 1/purl 2 for 7 cm. Loosely cast off with knit over knit and purl over purl – remember CAST-OFF TIP. Sleeve measures approx. 45-45-46-46-47-47 cm from cast-on edge and down. Work another sleeve the same way. ASSEMBLY: Sew shoulder seams inside cast-off edge. Sew side seam inside 1 edge stitch but leave an opening in each side to thread the ties through - place opening approx. 8 cm from bottom edge and 2½-3 cm up towards armholes. Sew sleeves to body by placing sleeves under edge in garter stitch along armholes and sewing small stitches from right side (there should not be a loose edge when sewing, and sew in outermost stitch in garter stitch from right side, so that the edge in garter stitch lies nicely outside sleeve). TIES: RIGHT FRONT PIECE AT THE FRONT: Start with needle size 4 mm and Brushed Alpaca Silk, and pick up 7 stitches from the right side along right front piece approx. 8 cm from cast-off edge at the bottom. Work first row on tie from wrong side as follows: 1 edge stitch in garter stitch, purl 1, knit 1, purl 1, knit 1, purl 1, 1 edge stitch in garter stitch. Work until tie measures approx. 84 to 94 cm. Cast off. LEFT FRONT PIECE AT THE FRONT: Start with needle size 4 mm and Brushed Alpaca Silk, and pick up 7 stitches from the right side along left front piece approx. 8 cm from cast-off edge at the bottom. Work first row on tie as follows: 1 edge stitch in garter stitch, purl 1, knit 1, purl 1, knit 1, purl 1, 1 edge stitch in garter stitch. Work until tie measures approx. 40 cm. Cast off. |
|||||||
Diagram explanations |
|||||||
|
|||||||

|
|||||||

|
|||||||
|
Have you made this or any other of our designs? Tag your pictures in social media with #dropsdesign so we can see them! Do you need help with this pattern?You'll find tutorial videos, a Comments/Questions area and more by visiting the pattern on garnstudio.com. © 1982-2024 DROPS Design A/S. We reserve all rights. This document, including all its sub-sections, has copyrights. Read more about what you can do with our patterns at the bottom of each pattern on our site. |
|||||||


With over 40 years in knitting and crochet design, DROPS Design offers one of the most extensive collections of free patterns on the internet - translated to 17 languages. As of today we count 304 catalogues and 11422 patterns - 11422 of which are translated into English (UK/cm).
We work hard to bring you the best knitting and crochet have to offer, inspiration and advice as well as great quality yarns at incredible prices! Would you like to use our patterns for other than personal use? You can read what you are allowed to do in the Copyright text at the bottom of all our patterns. Happy crafting!
Comments / Questions (17)
Ermer: Det står at eg skal legge opp 3 masker i kvar ende, på kvar pinne. Og etterkvart 2 masker, deretter 1 maske i kvar ende. Meinast det på kvar rettpinne og kun det, eller meinast det både på rett- og vrangpinner?
16.09.2022 - 14:00DROPS Design answered:
Hei Lise. Det skal legges opp på hver pinne (på slutten av hver pinne), både fra retten og fra vrangen. mvh DROPS Design
19.09.2022 - 09:55Hi, Does the recipe knit with two threads of Brushed alpaca silk or is it only one thread?
24.10.2021 - 11:23DROPS Design answered:
Dear Ulrikke, this is knitted with only one thread of Brushed Alpaca Silk. Happy knitting!
24.10.2021 - 12:05Good morning, I am struggling to understand where I need to carry on increasing, "Continue as before with A.1 towards mid front, increase for neck line and stocking stitch but over the outermost 6 stitches towards the side work 2 ridges (i.e. this is done on the next 4 rows)." Sorry if i am being a bit thick, but can you explain which are the outer most 6sts? Thank you
13.10.2021 - 09:42DROPS Design answered:
Dear Liz, this means that for the next 4 rows you will have to work as before over all stiches but knit the last 6 sts from RS/first 6 stitches from WS (= towards armhole/side). Can this help?
13.10.2021 - 14:02Bonjour, est ce que ce modèle se réalise avec un seul fil en alpaca silk ou 2 fils? merci
17.09.2021 - 17:21DROPS Design answered:
Bonjour Landy, ce modèle se réalise avec un seul fil en Alpaca Silk.
19.09.2021 - 22:35Ben ik de enige die de patroonuitleg ingewikkeld vind?
01.09.2021 - 16:34Translated into Finnish please
27.04.2021 - 11:25Si può realizzare con lana mohair?
10.03.2021 - 22:37J'aime ce modèle j'attends les explications avec impatience
15.02.2021 - 13:12Cœur de danseuse
15.01.2021 - 13:48"Rose petals"
11.01.2021 - 22:53