DROPS BabyAlpaca Silk
70% Alpaca, 30% Silk
Discontinued
find alternatives
DROPS Kid-Silk
DROPS Kid-Silk
75% Mohair, 25% Silk
from 6.75 $ /25g
DROPS SS24

Spring Hive

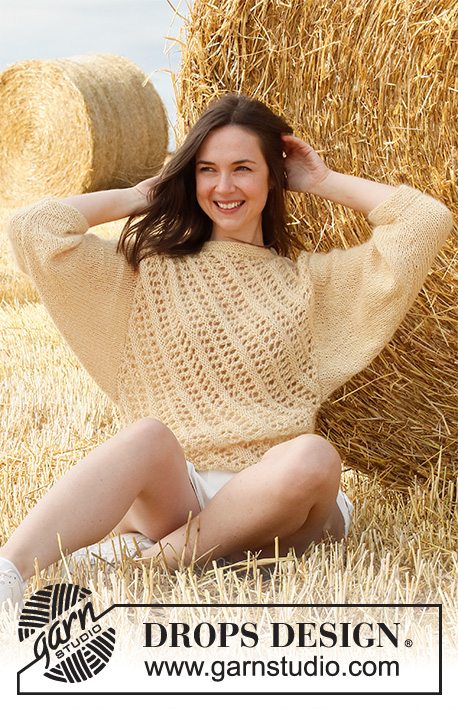
Knitted sweater in DROPS Baby Alpaca Silk and DROPS Kid-Silk. The piece is worked with lace pattern and ¾-length sleeves in stockinette stitch and with garter stitch edges. Sizes S - XXXL.

DROPS 223-26
DROPS Design: Pattern no bs-163
Yarn group A + A or C
-------------------------------------------------------

SIZES:
S - M - L - XL - XXL – XXXL

Finished measurements:
Chest measurements: 92-100-108-116-128-140 cm = 36¼"-39⅜"-42½"-45¾"-50⅜"-55"
Full length: 44-46-48-50-52-54 cm = 17¼"-18"-19"-19¾"-20½"-21¼"
All measurements in charts are in cm.

MATERIALS:
DROPS BABY ALPACA SILK from Garnstudio (belongs to the group A)
250-300-300-350-350-400 g color 2110, light yellow
And use:
DROPS KID-SILK from Garnstudio (belongs to yarn group A)
100-125-125-150-150-175 g color 29, vanilla

KNITTING GAUGE:
17 stitches in width and 22 rows in height with stockinette stitch and 1 strand of each quality = 10 x 10 cm = 4" x 4".

NEEDLES:
DROPS CIRCULAR NEEDLE SIZE 5 MM = US 8: Length 60 cm = 24" or 80 cm = 32" for stockinette stitch and lace pattern.
DROPS CIRCULAR NEEDLE SIZE 4 MM = US 6: Length 60 cm = 24" or 80 cm = 32" for garter stitch.
Needle size is only a guide. If you get too many stitches on 10 cm = 4", change to a larger needle size. If you get too few stitches on 10 cm = 4", change to a smaller needle size.

DROPS MOTHER OF PEARL BUTTONS, Loop (white) NO 524: 3 items in all sizes.

-------------------------------------------------------

Alternative Yarn – See how to change yarns here
Yarn Groups A to F – Use the same pattern and change the yarn here
Yarn usage using an alternative yarn – Use our yarn converter here

-------------------------------------------------------

DROPS BabyAlpaca Silk
70% Alpaca, 30% Silk
Discontinued
find alternatives
DROPS Kid-Silk
DROPS Kid-Silk
75% Mohair, 25% Silk
from 6.75 $ /25g

Pattern instructions

NOTE: This pattern is written in American English. All measurements in charts are in cm. For conversion from inches to cm - click here. There are different terms for crocheting in American and British English. If this pattern includes crochet, click for "crochet terms" here. For this pattern in British English, please click here.
-------------------------------------------------------

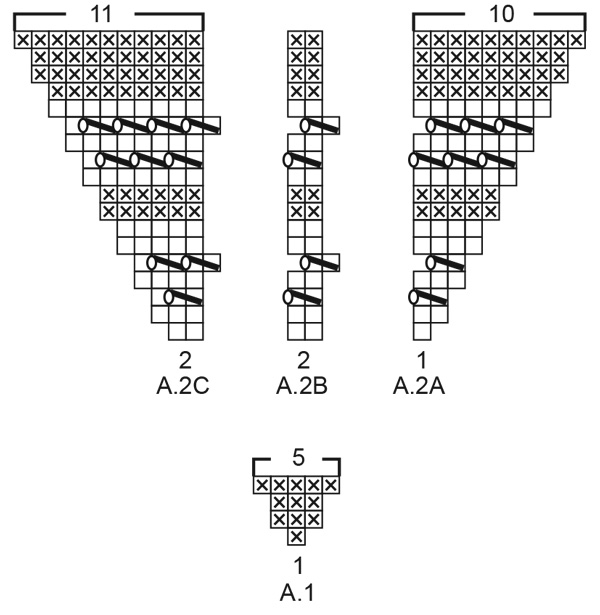
EXPLANATIONS FOR THE PATTERN:

-------------------------------------------------------

RIDGE/GARTER STITCH (worked back and forth):
Knit all rows.
1 ridge in height = Knit 2 rows.

PATTERN:
See diagrams A.1 and A.2. The diagrams show all the rows in the pattern from the right side.

INCREASE TIP-1 (for each side of the front and back pieces and for the sleeves):
All increases are worked from the right side!
Increase 1 stitch on the inside of the 1 edge stitch by making 1 yarn over. On the next row work the yarn over twisted to avoid a hole. Then work the new stitch into A.1/A.2 on the front and back piece and in stockinette stitch on the sleeves.

DECREASE TIP (for each side of the front and back pieces):
All decreases are worked from the right side!
DECREASE AS FOLLOWS AFTER THE 1 EDGE STITCH:
Slip 1 stitch as if to knit, knit 1 and pass the slipped stitch over the knitted stitch.
DECREASE AS FOLLOWS BEFORE THE 1 EDGE STITCH:
Work until there are 2 stitches left before the edge stitch and knit these 2 stitches together.

MEASURING TIP:
It is important that the measurements are taken when the piece lays flat. The structure may tighten the piece in height - pull slightly when measuring, and make sure the front and the back piece are the same size.

INCREASE TIP-2 (evenly spaced):
To work out how to increase evenly, count the total number of stitches on the needle (e.g. 42 stitches) minus the edge stitches (e.g. 2 stitches) and divide the remaining stitches by the number of increases to be made (e.g. 8) = 5.
In this example, increase by making 1 yarn over after each 5th stitch. On the next row work the yarn overs twisted to avoid holes.

BINDING-OFF TIP:
To avoid the bind-off edge being tight you can bind off with a larger size needle. If the edge is still tight, make 1 yarn over after approx. each 4th stitch at the same time as binding off; the yarn overs are bind off as normal stitches.

-------------------------------------------------------

START THE PIECE HERE:

-------------------------------------------------------

SWEATER – SHORT OVERVIEW OF THE PIECE:
The piece is worked in sections, back and forth. The front and back pieces are worked diagonally, from corner to corner. The sleeves are worked bottom up. The piece is sewn together, then edges are worked in garter stitch on the one shoulder, around the neck and at the bottom of the body.

FRONT PIECE:
The front piece is worked from the bottom left corner to the top right corner, seen from the right side.
Cast on 3 stitches with circular needle size 5 MM = US 8 and 1 strand of each quality (= 2 strands).
The first row is worked as follows from the right side: 1 edge stitch in GARTER STITCH – read description above, increase 1 stitch – read INCREASE TIP-1, work A.1 (= 1 stitch), increase 1 stitch and finish with 1 edge stitch in garter stitch.
Continue this pattern and increase on each side every 2nd row (every row from the right side).
When A.1 has been completed in height (there are now 7 stitches on the row), work the next row as follows from the right side: 1 edge stitch in garter stitch, increase 1 stitch as before, work A.2A (= 1 stitch), A.2B (= 2 stitches), A.2C (= 2 stitches), increase 1 stitch and finish with 1 edge stitch in garter stitch. Continue this pattern and continue increasing on each side. A.2 is repeated in height; each time A.2 has been completed, there is room for 9 more repeats of A.2B between A.2A and A.2C. REMEMBER THE KNITTING GAUGE!
Continue working until the piece measures 44-46-48-50-52-54 cm = 17¼"-18"-19"-19¾"-20½"-21¼" along the edges (do not measure in the knitting direction) – read MEASURING TIP. Insert 1 marker in each side.
Continue increasing as before at the beginning of each row from the right side, but now decrease at the end of each row from the right side (number of stitches remains the same) - read DECREASE TIP. Increase and decrease like this until the piece measures 2-4-6-8-12-16 cm = ¾"-1½"-2⅜"-3⅛"-4¾"-6¼" from the markers in the sides.
Then decrease 1 stitch on each side, inside both edge stitches. Decrease like this every 2nd row (each row from the right side) until there are 3 stitches left. Knit these 3 stitches together. Cut the strand and pull it through the last stitch. The front piece measures approx. 44-46-48-50-52-54 cm = 17¼"-18"-19"-19¾"-20½"-21¼" along the shortest sides (= length of sweater) and 46-50-54-58-64-70 cm = 18"-19¾"-21¼"-22¾"-25¼"-27½" along the longest sides (= width of sweater). An edge of 4 cm = 1½" will be worked on the front and back pieces to finish and comes in addition to the 44-46-48-50-52-54 cm = 17¼"-18"-19"-19¾"-20½"-21¼" in length.

BACK PIECE:
Work in the same way as the front piece.

SLEEVES:
Cast on 42-44-46-48-50-52 stitches (including 1 edge stitch on each side) with circular needle size 4 MM = US 6 and 1 strand of each quality (= 2 strands). Work garter stitch back and forth for 4 cm = 1½". Change to circular needle size 5 MM = US 8. Work stockinette stitch with 1 edge stitch in garter stitch on each side – AT THE SAME TIME, on the first row from the right side, increase 10-14-18-18-22-26 stitches evenly spaced – read INCREASE TIP-2 = 52-58-64-66-72-78 stitches.
When the piece measures 6 cm = 2⅜" in all sizes, increase 1 stitch on each side – read INCREASE TIP-1. Increase like this every 1½ cm = ½" a total of 23-22-21-21-20-19 times on each side = 98-102-106-108-112-116 stitches.
Continue working until the sleeve measures 40-39-38-38-36-34 cm = 15¾"-15¼"-15"-15"-14¼"-13⅜" (shorter measurements in larger sizes due to broader shoulders). Now bind off 16-16-16-18-18-18 stitches at the beginning of each row a total of 2 times on each side = 34-38-42-36-40-44 stitches left. Bind off – read BINDING-OFF TIP! The sleeve measures approx. 42-41-40-40-38-36 cm = 16½" -16⅛"-15¾"-15¾"-15"-14¼" from the top down. Work the other sleeve in the same way.

ASSEMBLY-1:
Lay the front and back pieces together. Mark a neck of approx. 24-26-26-28-28-30 cm = 9½"-10¼"-10¼"-11"-11"-11¾". There will be 11-12-14-15-18-20 cm = 4⅜"-4¾"-5½"-6"-7"-8" left on each side for the shoulders.
Sew one shoulder inside the 1 edge stitch – sew from the marker on the neck out to the side.

BUTTON BAND ON SHOULDER:
Work a garter stitch edge along the other shoulder, both on the front and back pieces for the button-bands as follows:
Start on the front piece and knit up from the right side, inside the 1 edge stitch, 20-22-26-26-32-36 stitches along the shoulder with circular needle size 4 MM = US 6 and 1 strand of each quality. Knit 1 row from the wrong side. Knit 1 row from the right side where you work 2 buttonholes evenly spaced. 1 BUTTONHOLE = Bind off 2 stitches and cast on 2 stitches over these stitches on the next row. Knit 1 row from the wrong side. Bind off with knit from the right side.
Work a similar edge on the back piece, but without buttonholes.

NECK:
Start from the right side on the shoulder and knit up inside the 1 edge stitch 90 to 112 stitches around the neck and along the edge of the button bands, with circular needle size 4 MM = US 6 and 1 strand of each quality. Work garter stitch back and forth for 2 cm = ¾", but after ½ cm = ⅛", work 1 buttonhole when there are 4 stitches left on the row from the right side. When the neck is finished bind off with knit from the right side – read BINDING-OFF TIP!
Sew on the buttons.

EDGE AT BOTTOM OF SWEATER:
Start on the front piece and knit up from the right side inside the 1 edge stitch 86-94-102-110-122-132s stitches along the bottom edge with circular needle size 4 MM = US 6 and 1 strand of each quality. Work garter stitch back and forth for 4 cm = 1½". Bind off with knit from the right side – remember BINDING-OFF TIP!
Work a similar edge along the back piece.

ASSEMBLY-2:
Insert 1 marker 29-30-31-32-33-34 cm = 11⅜"-11¾"-12¼"-12½"-13"-13⅜" down from the shoulder on each side of the front and back pieces; they mark the armholes. Sew the sleeves into the marked armholes – sew inside the 1 edge stitch and make sure the seam is not tight.
Sew the sleeve and side seams in one go, inside the 1 edge stitch – start at the bottom of the sleeve, work up the sleeve and then down the side, stopping at the garter stitch edge at the bottom of the sweater, leaving a small split.
The sweater measures approx. 48-50-52-54-56-58 cm = 19"-19¾"-20½"-21¼"-22"-22¾" from the shoulder down.

Diagram

All measurements in charts are in cm.

symbols = knit from right side, purl from wrong side
symbols = purl from right side, knit from wrong side
symbols = between 2 stitches make 1 yarn over; on the next row purl the yarn over to leave a hole
symbols = knit 2 stitches twisted together
symbols = knitting direction
diagram
diagram
Do you have a question? See a list of frequently asked questions (FAQ)

Knitting tension is what determines the final measurements of your work, and is usually measured per 10 x 10 cm. It is provided like so: number of stitches in width x number of rows in height - eg: 19 stitches x 26 rows = 10 x 10 cm.

The knitting tension is very individual; some people knit/crochet loosely while others work tightly. You adjust the knitting tension with the needle size, which is why the suggested needle size only serve as a guide! You need to adjust this (up or down) to ensure that YOUR knitting tension matches the knitting tension provided in the pattern. If you work with a different knitting tension than provided you will have a different yarn consumption, and your work will have different measurements than what the pattern suggests.

The knitting tension also determines which yarns can replace each other. As long as you achieve the same knitting tension you can replace one yarn with another.

See DROPS lesson: How to measure your tension/gauge

See DROPS video: How to make a gauge tension swatch

The required amount of yarn is provided in grams, eg: 450 g. To calculate how many balls you’ll need you first need to know how many grams are in 1 ball (25g, 50g or 100g). This information is available if you click on the individual yarn quality on our pages. Divide the amount required with the amount of each ball. For example, if each ball is 50g (the most common amount), the calculation will be as follows: 450 / 50 = 9 balls.

The important thing when changing from one yarn to another is that the knitting/crochet tension remains the same. This is so that the measurements of the finished piece will be the same as on the sketch provided. It is easier to achieve the same knitting tension using yarns from the same yarn group. It is also possible to work with multiple strands of a thinner yarn to achieve the knitting tension of a thicker one. Please try our yarn converter. We recommend you to always work a test swatch.

Please NOTE: when changing yarn the garment might have a different look and feel to the garment in the photo, due to individual properties and qualities of each yarn.

See DROPS lesson: Can I use a different yarn than the one mentioned in the pattern?

All our yarns are categorised into yarn groups (from A to F) according to thickness and knitting tension – group A contains the thinnest yarns and group F the thickest. This makes it easier for you to find alternative yarns to our patterns, should you wish to switch yarn. All yarns within the same group have a similar knitting tension and can easily replace each other. However, different yarn qualities have different structures and properties which will give the finished work a unique look and feel.

Click here for an overview of the yarns in each yarn group

At the top of all our patterns you’ll find a link to our yarn converter, which is a helpful tool should you wish to use a different yarn than suggested. By filling in the yarn quality you wish to replace, the amount (in your size) and number of strands, the converter will present good alternative yarns with the same knitting tension. Additionally it will tell you how much you’ll require in the new qualities and whether you’ll need to work with multiple strands. Most skeins are 50g (some are 25g or 100g).

If the pattern is worked with multiple colours, every colour will have to be converted separately. Similarly, if the pattern is worked with several strands of different yarns (for example 1 strand Alpaca and 1 strand Kid-Silk) you will have to find alternatives for each, individually.

Click here to see our yarn converter

Since different yarns have different qualities and textures we have chosen to keep the original yarn in our patterns. However, you can easily find options among our available qualities by using our yarn converter, or simply pick a yarn from the same yarn group.

It is possible that some retailers still have discontinued yarns in stock, or that someone has a few skeins at home that they would like to find patterns for.

The yarn converter will provide both alternative yarn as well as required amount in the new quality.

If you think it's hard to decide what size to make, it can be a good idea to measure a garment you own already and like the size of. Then you can pick the size by comparing those measures with the ones available in the pattern's size chart.

You'll find the size chart at the bottom of the pattern.

See DROPS lesson: How to read size chart

The needle size provided in the pattern serves only as a guide, the important thing is to follow the knitting tension. And since knitting tension is very individual, you will have to adjust the needle size to ensure that YOUR tension is the same as in the pattern – maybe you’ll have to adjust 1, or even 2 needle sizes, up or down to achieve the correct tension. For this, we recommend that you work test swatches.

Should you work with a different knitting tension than the one provided, the measurements of the finished garment might deviate from the measurement sketch.

See DROPS lesson: How to measure your tension/gauge

See DROPS video: How to make a gauge tension swatch

Working a garment top-down provides more flexibility and room for personal adjustment. For example it is easier to try the garment on while working, as well as making adjustments to length of yoke and shoulder caps.

The instructions are carefully explaining every step, in the correct order. Diagrams are adjusted to the knitting direction and are worked as usual.

The diagram depicts all rows/rounds, and every stitch seen from the right side. It is read from bottom to top, from right to left. 1 square = 1 stitch.

When working back and forth, every other row is worked from the right side and every other row is worked from the wrong side. When working from the wrong side, the diagram will have to be worked reversed: from left to right, knit stitches are purled, purl stitches are knit etc.

When working in the round every round is worked from the right side and the diagram are worked from right to left on all rounds.

See DROPS lesson: How to read knitting diagrams

The diagram depicts all rows/rounds, and every stitch seen from the right side. It is worked from bottom to top, from right to left.

When working back and forth every other row is worked from the right side: from right to left and every other row is worked from the wrong side: from left to right.

When working in the round, every row in the diagram are worked from the right side, from right to left.

When working a circular diagram you start in the middle and work your way outwards, counter clockwise, row by row.

The rows usually start with a given number of chain stitches (equivalent to the height of the following stitch), this will either be depicted in the diagram or explained in the pattern.

See DROPS lesson: How to read crochet diagrams

Instructions for working several diagrams after each other on the same row/round, will often be written like so: “work A.1, A.2, A.3 a total of 0-0-2-3-4 times". This means you work A.1 once, then A.2 is worked once, and A.3 is repeated (in width) the number of times provided for your size – in this case like so: S = 0 times, M = 0 times, L=2 times, XL= 3 times and XXL = 4 times.

The diagrams are worked as usual: begin with the first row in A.1, then work the first row in A.2 etc.

See DROPS lesson: How to read knitting diagrams

See DROPS lesson: How to read crochet diagrams

The total width of the garment (from wrist-to-wrist) will be larger in the larger sizes, despite the actual sleeves being shorter. The larger sizes have longer sleeve caps and wider shoulders, so there will be a good fit in all sizes.

The measurement sketch/schematic drawing provides information regarding the full length of the garment. If it’s a jumper or a jacket the length is measured from the highest point on the shoulder (usually closest to the neckline), and straight down to the bottom of the garment. It is NOT measured from the tip of shoulder. Similarly, the length of yoke is measured from the highest point on the shoulder and down to where yoke is split into body and sleeves.

See DROPS lesson: How to read a schematic drawing

Diagrams are often repeated on the round or in height. 1 repeat is the diagram the way it appears in the pattern. If it says to work 5 repeats of A.1 in the round, then you work A.1 a total of 5 times after/next to each other in the round. If it says to work 2 repeats of A.1 vertically/in height you work the entire diagram once, then begin again at the start and work the entire diagram one more time.

Chain stitches are slightly narrower than other stitches and to avoid working the cast-on edge too tight, we simply chain more stitches to begin with. The stitch count will be adjusted on the following row to fit the pattern and measurement sketch.

The rib edge is more elastic and will contract slightly compared to, for example, stocking stitch. By increasing before the rib edge, you avoid a visible difference in width between the rib edge and the rest of the body.

It’s very easy to cast off too tightly, and by making yarn overs while casting off (and simultaneously casting these off) you avoid a too tight cast off edge.

See DROPS video: How to bind off with yarn overs (yo)

To achieve an even increase (or decrease) you can increase on, for example: every 3rd and 4th row alternately, like so: work 2 rows and increase on the 3rd row, work 3 rows and increase on the 4th. Repeat this until the increase is complete.

See DROPS lesson: Increase or decrease 1 st on every 3rd and 4th row alternately

Should you prefer to work in the round instead of back and forth, you may of course adjust the pattern. You’ll need to add steeks mid-front (usually 5 stitches), and follow the instructions. When you would normally turn and work from the wrong side, simply work across the steek and continue in the round. At the end you’ll cut the piece open, pick up stitches to work bands, and cover the cut edges.

See DROPS video: How to knit steeks and cut open

Should you prefer to work back and forth instead of in the round, you may of course adjust the pattern so you work the pieces separately and then assemble them at the end. Divide the stitches for the body in 2, add 1 edge stitch in each side (for sewing) and work the front and back pieces separately.

See DROPS lesson: Can I adapt a pattern for circular needles into straight needles?

Pattern repeats can vary slightly in the different sizes, in order to get the correct proportions. If you’re not working the exact same size as the garment in the photo, yours might deviate slightly. This has been carefully developed and adjusted so that the complete impression of the garment is the same in all sizes.

Make sure to follow instructions and diagrams for your size!

If you have found a pattern you like which is available in women’s size it’s not very difficult to convert it to men’s size. The biggest difference will be the length of sleeves and body. Start working on the women size that you think would fit across the chest. The additional length will be worked right before you cast off for the armhole/sleeve cap. If the pattern is worked top-down you can add the length right after the armhole or before the first decrease on sleeve.

Regarding additional yarn amount, this will depend on how much length you add, but it is better with a skein too many than too few.

All yarns will have excess fibres (from production) that might come off as lint or shedding. Brushed yarns (ie hairier yarns) have more of these loose, excess fibres, causing more shedding.

Shedding also depends on what is worn under or over the garment, and whether this pulls at the yarn fibres. It’s therefore not possible to guarantee that there will be no shedding

Below are some tips on how to get the best result when working with hairier yarns:

1. When the garment is finished (before you wash it) shake it vigorously so the looser hairs come off. NOTE: do NOT use a lint roller, brush or any method that pulls at the yarn.

2. Place the garment in a plastic bag and put it in your freezer - the temperature will cause the fibres to become less attached to each other, and excess fibres will come off easier.

3. Leave in the freezer for a few hours before taking it out and shaking it again.

4. Wash the garment according to the instructions on the yarn label.

Pilling is a natural process that happens to even the most exclusive of fibers. It's a natural sign of wear and tear that is hard to avoid, and that is most visible in high friction areas of your garment like a sweater's arms and cuffs.

You can make your garment look as new by removing the pilling, using a fabric comb or a pill/lint remover.

Still can't find the answer you need? Then scroll down and leave your question so one of our experts can try to help you. This will be done normally within 5 to 10 working days.
In the meantime, you can read the questions and answers that others have left to this pattern or join the DROPS Workshop on Facebook to get help from fellow knitters/crocheters!

Post a comment to pattern DROPS 223-26

We would love to hear what you have to say about this pattern!

If you want to leave a question, please make sure you select the correct category in the form below, to speed up the answering process. Required fields are marked *.

Comments / Questions (8)

country flag Dee wrote:

Hallo, er staat dat garengroep C ook kan gebruikt worden. kan ook bv. Drops Brushed alpaca silk? Of welke andere geeft hetzelfde effect als baby Alpaca silk (deze is uitverkocht). dank u wel

05.03.2024 - 10:11

DROPS Design answered:

Dag Dee,

De trui wordt met 2 draden Baby Alpaca Silk gebreid, dus 2 draden van dikte A. Waarschijnlijk komt Alpca of Flora het meest in de buurt. Brushed Alpaca Silk heeft een ander effect.

05.03.2024 - 22:29

country flag Valentina wrote:

Cosa significa capo di qualità? È sinonimo di maglia a vivagno? Grazie dell'attenzione, cordiali saluti. Valentina

18.10.2021 - 22:25

DROPS Design answered:

Buonasera Valentina, con 1 capo di ogni qualità si intende 1 filo per ognuno dei 2 filati utilizzati. Buon lavoro!

19.10.2021 - 23:14

country flag Ranjana wrote:

Hi, how can I convert the pattern to a XS size? I want to knit this beautiful sweater for my 12 yr grand daughter. Thanks for your help.

13.05.2021 - 04:21

DROPS Design answered:

Hi Ranjana, unfortunately we are not able to adjust our patterns to any individual requests. Should you need any individual assistance, please contact the store where you bought the yarn, even per mail or telephone. Happy knitting!

13.05.2021 - 15:46

country flag Silvia wrote:

è molto bello! Peccato che, per il momento, non si veda il diagramma da seguire e l'immagine del modello con le misure

09.04.2021 - 09:49

DROPS Design answered:

Buonasera Silvia, durante la giornata ci sono stati alcuni problemi di visualizzazione delle immagini, al momento per fortuna risolti. Buon lavoro!

09.04.2021 - 22:48

country flag Christina Zeidler wrote:

Sommerwind

20.01.2021 - 13:03

country flag Eva wrote:

Rejoice

10.01.2021 - 23:37

country flag Valeria wrote:

Fresco ed originale. Sarà il prossimo che realizzerò

08.01.2021 - 09:16

country flag Anna wrote:

Elegant Sky

07.01.2021 - 20:09