
Popular categories
Looking for a yarn?


|
||||||||||||||||
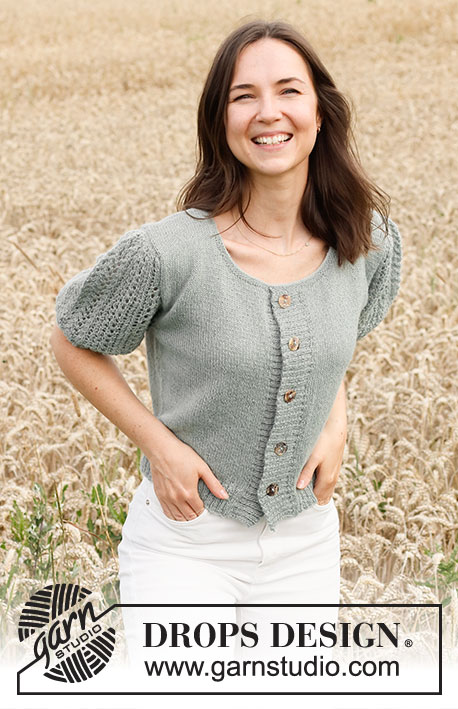
Mint Breeze Jacket |
||||||||||||||||
 |
 |
|||||||||||||||
Knitted jacket in DROPS Alpaca. The piece is knitted bottom down with lace pattern on sleeves. Size: S - XXXL
DROPS 220-22 |
||||||||||||||||
|
------------------------------------------------------- EXPLANATION FOR THE PATTERN: ------------------------------------------------------- GARTER STITCH (back and forth): Knit all rows. 1 ridge vertically = knit 2 rows. PATTERN: See diagrams A.1, A.2 and A.3. Diagrams show all rows in pattern seen from the right side. DECREASE TIP (evenly): To calculate how to decrease evenly, use the total number of stitches on row (e.g. 216 stitches) minus edge stitches (e.g. 2 stitches), and divide the remaining stitches by number of decreases to be done (e.g. 34) = 6.3. In this example decrease by knitting approx. every 5th and 6th stitch together. INCREASE TIP (applies to sides of body): Work until 2 stitches remain before marker thread, make 1 yarn over, knit 4 (marker thread is in the middle of these 4 stitches), make 1 yarn over. On next row purl yarn overs twisted to avoid holes. Then work the new stitches in stocking stitch. BUTTONHOLES: Decrease for 5-5-5-6-6-6 buttonholes on right band. 1 buttonhole = work 2 stitches together, make 1 yarn over - NOTE: It will look nicer if you decrease for buttonhole by purling 2 together in a section with 2 purl stitches (seen from right side). On next row knit yarn over to make holes. Bottom buttonhole should be approx. 4-6 cm from bottom edge, and top buttonhole approx. 1 cm from neck edge. Place the remaining 3-3-3-4-4-4 buttonholes evenly, approx. 7-7½-8-6½-7-7½ cm between each buttonhole. ------------------------------------------------------- START THE PIECE HERE: ------------------------------------------------------- JACKET - SHORT OVERVIEW OF THE PIECE: Work body back and forth on circular needle, bottom up to armholes. Cast off for armholes. Then work back piece and front pieces back and forth on circular needle separately. Work the sleeves in the round on double pointed needles / a short circular bottom up to where sleeve cap begins. Then work sleeve cap back and forth on circular needle. Sew piece together on the shoulders and sew sleeves in. Work bands in rib and a neck edge in garter stitch at the end. BODY: Cast on 216-240-260-288-328-360 stitches (including 1 edge stitch in each side towards mid front) on circular needle size 2.5 mm with Alpaca. Purl 1 row (= wrong side). Work next row as follows from right side: Work 1 edge stitch in GARTER STITCH – read explanation above, * knit 2, purl 2 *, work from *-* until 3 stitches remain, knit 2, and finish with 1 edge stitch in garter stitch. Continue rib like this for 6 cm. When rib has been worked, switch to circular needle size 3 mm. Knit 1 row from right side while decreasing 34-38-42-46-54-58 stitches evenly - read DECREASE TIP = 182-202-218-242-274-302 stitches. Insert 1 marker thread after 43-48-52-58-66-73 stitches in from each side. There are 96-106-114-126-142-156 stitches on back piece between marker threads. Move the marker threads upwards when working; they should be used for increases later in the sides on body. Work in stocking stitch with 1 stitch in garter stitch in each side. REMEMBER THE KNITTING TENSION! When piece measures 8 cm, increase 1 stitch on each side of both marker threads - READ INCREASE TIP (= 4 stitches increased). Increase like this every 4-4-4-4-5-5 cm 5 times vertically in total in each side = 202-222-238-262-294-322 stitches. Continue to work until piece measures 26-27-28-29-30-31 cm. Now cast off for armholes, i.e. work next row as follows from right side: Work 45-50-54-59-67-74 stitches as before (= front piece), cast off 6-6-6-8-8-8 stitches for armholes (marker thread is in the middle of these stitches), work 100-110-118-128-144-158 stitches as before, cast off 6-6-6-8-8-8 stitches for armhole (marker thread is in the middle of these stitches), and then work the remaining 45-50-54-59-67-75 stitches as before (= front piece). Finish back and front pieces separately as explained below. BACK PIECE: = 100-110-118-128-144-158 stitches. Continue with stocking stitch back and forth on circular needle, and cast off for armholes at the beginning of every row in each side as follows: Cast off 0-0-0-3-3-3 stitches 0-0-0-1-2-3 times, 2 stitches 2-3-4-4-6-7 times and 1 stitch 2-3-4-5-5-6 times = 88-92-94-96-98-100 stitches remain. When piece measures 44-46-48-50-52-54 cm, cast off the middle 42-44-46-48-50-52 stitches for neck and finish each shoulder separately. Continue with stocking stitch and cast off 1 stitch on next row from the neck = 22-23-23-23-23-23 stitches remain on shoulder. Work until piece measures 46-48-50-52-54-56 cm. Loosely cast off by knitting from right side. Work the other shoulder the same way. RIGHT FRONT PIECE: = 45-50-54-59-67-74 stitches. Continue back and forth in stocking stitch with 1 edge stitch in garter stitch towards mid front. AT THE SAME TIME cast off for armholes at the beginning of every row from the side as follows: Cast off 0-0-0-3-3-3 stitches 0-0-0-1-2-3 times, 2 stitches 2-3-4-4-6-7 times and 1 stitch 2-3-4-5-5-6 times = 39-41-42-43-44-45 stitches. When piece measures 34-36-38-40-42-44 cm, slip the outermost 10-11-12-13-14-15 stitches towards mid front on 1 stitch holder for neck (work them before slipping them on stitch holder to avoid cutting the yarn). Cast off for neck at the beginning of every row from neck as follows: Cast off 2 stitches 2 times and 1 stitch 3 times = 22-23-23-23-23-23 stitches remain on shoulder. Work until piece measures 46-48-50-52-54-56 cm. Loosely cast off by knitting from right side. LEFT FRONT PIECE: = 45-50-54-59-67-74 stitches. Continue back and forth in stocking stitch with 1 edge stitch in garter stitch towards mid front. AT THE SAME TIME cast off for armholes at the beginning of every row from the side as follows: Cast off 0-0-0-3-3-3 stitches 0-0-0-1-2-3 times, 2 stitches 2-3-4-4-6-7 times and 1 stitch 2-3-4-5-5-6 times = 39-41-42-43-44-45 stitches. When piece measures 34-36-38-40-42-44 cm, slip the outermost 10-11-12-13-14-15 stitches towards mid front on 1 stitch holder for neck (work them before slipping them on stitch holder to avoid cutting the yarn). Cast off for neck at the beginning of every row from neck as follows: Cast off 2 stitches 2 times and 1 stitch 3 times = 22-23-23-23-23-23 stitches remain on shoulder. Work until piece measures 46-48-50-52-54-56 cm. Loosely cast off by knitting from right side. SLEEVE: Cast on 80-88-88-96-96-96 stitches on double pointed needles size 2.5 mm with Alpaca. Knit 1 round. Then work rib in the round (= knit 2/purl 2) for 6 cm. Switch to double pointed needles size 3 mm. Knit 1 round while increasing 1-1-1-5-5-5 stitches evenly = 81-89-89-101-101-101 stitches. Insert 1 marker thread at beginning of round = mid under sleeve. Work pattern as follows: 4-8-8-1-1-1 stitches stocking stitch, A.1 over the next 26-26-26-39-39-39 stitches (= 2-2-2-3-3-3 repetitions of 13 stitches), A.2 (= 4 stitches), A.3 (= 13 stitches), A.1 over the next 26-26-26-39-39-39 stitches (= 2-2-2-3-3-3 repetitions of 13 stitches), A.2, 4-8-8-1-1-1 stitch in stocking stitch. Continue this pattern until sleeve measures 21-22-21-21-19-18 cm, but finish round when 3 stitches remain before marker thread. NOTE: Shorter measurements in the larger sizes because of wider shoulders and longer sleeve cap. On next round cast off the first 6-6-6-6-6-6 stitches, then work pattern as before the rest of row. Then sleeve cap back and forth on circular needle as follows: Continue A.1, A.2 and A.3 as before and cast off for sleeve cap at the beginning of every row in each side as follows: Cast off 1 stitch 12 times in each side = 51-59-59-71-71-71 stitches. Continue with A.1, A.2 and A.3 until piece measures 29-30-30-31-31-32 cm. Work all stitches together 2 by 2, on next row cast off all stitches. Sleeve measures approx. 30-31-31-32-32-33 cm from top and down. Work the other sleeve the same way. ASSEMBLY: Sew shoulder seams inside cast-off edge. Sew in sleeves inside 1 edge stitch. LEFT BAND: Begin at the top of neck on left front piece, pick up stitches inside 1 edge stitch in garter stitch. Pick up approx. 100-128 stitches (adjust to that number of stitches is divisible by 4) from right side on circular needle 2.5 mm with Alpaca. Work rib, begin from wrong side as follows: Work 1 stitch in garter stitch, * purl 2, knit 2 *, repeat from *-* until 3 stitches remain, and finish with purl 2 and 1 edge stitch in garter stitch. Continue rib like this until piece measures approx. 6 cm. Cast off stitches with knit over knit and purl over purl. RIGHT BAND: Begin at the bottom of jacket on right front piece and pick up stitches inside 1 edge stitch in garter stitch. Pick up same number of stitches that were picked up on left band from right side on circular needle size 2.5 mm with Alpaca. Work rib, begin from wrong side as follows: Work 1 stitch in garter stitch, * purl 2, knit 2 *, repeat from *-* until 3 stitches remain, and finish with purl 2 and 1 edge stitch in garter stitch. When rib measures approx. 3 cm, decrease for BUTTONHOLES - see explanation above. Continue rib until band measures 6 cm, adjust measurement with left band. Cast off stitches with knit over knit and purl over purl. NECK EDGE: Pick up from right side approx. 120 to 140 stitches around the neck (including stitches on stitch holders at the front, and over bands) on circular needle size 2.5 mm with Alpaca. Work 3 ridges over all stitches loosely cast off. ASSEMBLY-2: Sew the buttons on to left band. |
||||||||||||||||
Diagram explanations |
||||||||||||||||
|
||||||||||||||||

|
||||||||||||||||
|
Have you made this or any other of our designs? Tag your pictures in social media with #dropsdesign so we can see them! Do you need help with this pattern?You'll find tutorial videos, a Comments/Questions area and more by visiting the pattern on garnstudio.com. © 1982-2024 DROPS Design A/S. We reserve all rights. This document, including all its sub-sections, has copyrights. Read more about what you can do with our patterns at the bottom of each pattern on our site. |
||||||||||||||||


With over 40 years in knitting and crochet design, DROPS Design offers one of the most extensive collections of free patterns on the internet - translated to 17 languages. As of today we count 304 catalogues and 11422 patterns - 11422 of which are translated into English (UK/cm).
We work hard to bring you the best knitting and crochet have to offer, inspiration and advice as well as great quality yarns at incredible prices! Would you like to use our patterns for other than personal use? You can read what you are allowed to do in the Copyright text at the bottom of all our patterns. Happy crafting!
Comments / Questions (11)
Buongiorno volevo chiedere per il bordo del collo quanti giri devo fare a punto legaccio ? Quanto deve essere alto il bordo? Grazie.
18.02.2024 - 10:13DROPS Design answered:
Buonasera Loretta, deve lavorare 3 coste a legaccio per il bordo del collo, come indicato nelle spirgazioni, quindi 6 ferri a legaccio. Buon lavoro!
20.02.2024 - 16:21Buona sera , per il bordo del collo che punti vanno utilizzati il punto legaccio? O punto coste non e' chiaro nelle spiegazioni. Grazie
16.02.2024 - 21:50DROPS Design answered:
Buongiorno Loretta, deve lavorare a legaccio su tutte le maglie del collo come indicato. Buon lavoro!
17.02.2024 - 13:28Buongiorno volevo chiedere come si fa a lavorare il davanti e il dietro in modo separato, bisogna usare due ferri circolari o posso lasciare le maglie in sospeso mentre lavoro il davanti? Grazie.
25.09.2023 - 19:44DROPS Design answered:
Buonasera Loretta, può mettere le maglie della parte che non lavora in sospeso su un fermamaglie o un filo di scarto. Buon lavoro!
25.09.2023 - 23:02Liebes Drops-Team, meine Maschenprobe ergibt 5 Maschen und 4 Reihen mehr als angegeben. Ich möchte das Strickbild aber beibehalten und nicht lockerer stricken. Kann ich mir das Umrechnen ersparen und statt der Größe S die Größe L stricken (bei ersten Umrechen-Tests bin ich auf die Machenzahlen für Größe L gekommen) Vielen Dank im Voraus für eine Antwort!
30.08.2023 - 23:38DROPS Design answered:
Liebe Frau Flath, dann sollen Sie nach Ihrer Maschenprobe, ob die Angaben die richtigen Maßen haben würden - beachten Sie, daß Sie dann mehr Garn brauchen würden. Viel Spaß beim stricken!
31.08.2023 - 09:26Buongiorno di nuovo, ecco il mio ultimo conteggio lace maniche:\r\n1 più A1 X 2 (26) più A2 (4) più A3 X 3 (39) più A2 (4) piu A1 X2 (26) più 1 totale 101 - taglia XXXL. Mi rimane il problema di due gettati consecutivi tra la fine del secondo A2 e l\'inizio della prima ripetizione della sequenza finale di A1. Grazie a chi potrà perfezionare il modello.
08.05.2023 - 20:58DROPS Design answered:
Buonasera Claudia Carolina, seguendo le spiegazioni per la taglia XXXL deve lavorare: 1 maglia a maglia rasata, A.1 su 39 maglie, A.2 (= 4 maglie), A.3 (= 13 maglie), A.1 su 39 maglie, A.2, 1 maglia a maglia rasata, per un totale di 1+39+4+13+4+1=101 maglie. Buon lavoro!
11.05.2023 - 22:27Buongiorno e grazie per i modelli e filati meravigliosi. Credo che c'è un errore nella spiegazione delle maniche, sto lavorando la taglia XXXL, al conteggio lace dice li lavorare : 1+39+4+39+4+1... A me viene 88, credo che dopo il secondo 4 (A2) ci Deva essere un'altra rip 39 di A1... Così raggiungerei le 101 maglie. Giusto? Grazie ancora Claudia
08.05.2023 - 18:14DROPS Design answered:
Buonasera Claudia Carolina, seguendo le spiegazioni per la taglia XXXL deve lavorare: 1 maglia a maglia rasata, A.1 su 39 maglie, A.2 (= 4 maglie), A.3 (= 13 maglie), A.1 su 39 maglie, A.2, 1 maglia a maglia rasata, per un totale di 1+39+4+13+4+1=101 maglie. Buon lavoro!
11.05.2023 - 22:26Wat wordt er bedoeld met : LET OP : Minder voor de grote maten vanwege bredere schouders en een langere mouwkop? Ik brei dit vestje op 2 naalden en nu heb ik het eerste mouwtje af, maar klopt dit wel? Bij de mouw heb je om de mouw in te zetten 10 cm, terwijl dit bij het voor- en achterpand 23 cm is, klopt dit wel? Of heb ik iets fout gedaan. Ik hoop dat mijn vraag duidelijk is en dat jullie mij kunnen helpen.
04.04.2022 - 16:24DROPS Design answered:
Dag Sonja,
Als je met de centimeter de ronding mouwkop helemaal rondom opmeet, dan zou deze maat ongeveer overeen moeten komen met de ronding van het armsgat. In de grotere maten is de mouwkop (dus het stuk vanaf het armsgat tot waar de bovenkant van de mouw aan de schouder komt) langer, waardoor het stuk eronder, dus van de oksel tot de manchet, korter is. Die 10 cm klopt wel.
07.04.2022 - 23:46Ik ben begonnen met de eerste mouw en nu is mijn vraag als je gaat afkanten hoe brei je dan in patroon verder. Hou je rekening met de afgekante steek/steken. Bijvoorbeeld je moet 3 steken afkanten dan pak je daar het patroon op. Of begin je na het afkanten gewoon bij het begin van het patroon? Ik hoop dat mijn vraag duidelijk is.
24.02.2022 - 15:43DROPS Design answered:
Dag Sonja,
Je laat het patroon zo goed mogelijk door lopen in de hoogte. Als er geen genoeg steken meer zijn om bijvoorbeeld samen te breien en een omslag te maken, dan brei je die steken in tricotsteek. Zorg er altijd voor dat het aantal omslagen en minderingen (dus samen breien of steek over halen) in evenwicht zijn. Dus als je bijvoorbeeld steken samenbreit moet daar een omslag tegenover staan en vice versa.
26.02.2022 - 14:38Maat M. van de mouw heeft na het boord 89 steken. Daarna patroon breien met aan het begin en eind van de naald 8 steken tricotsteek. Dit zijn totaal 85 steken en geen 89, je hebt dus 4 steken teveel. Dus aan het begin en eind van de naald 10 steken in tricotsteek, dan klopt het patroon.
24.06.2021 - 13:49Hebben jullie voor mij dit breipatroon om met 2 breipennen te breien. Of tips voor hoe ik dat kan doen..
20.06.2021 - 15:10DROPS Design answered:
Dag Sonja,
Je kunt dit patroon inderdaad ook met 2 pennen breien.
Om een patroon aan te passen om op rechte naalden te breien hebben we een instructie gemaakt. Deze vind je hier.
20.06.2021 - 19:51