
Popular categories
Looking for a yarn?


|
|||||||||||||
Rocky Trails |
|||||||||||||
 |
 |
||||||||||||
Crocheted sweater in DROPS Fabel. The piece is worked top down, with round yoke and lace pattern. Sizes XS - XXL.
DROPS 220-20 |
|||||||||||||
|
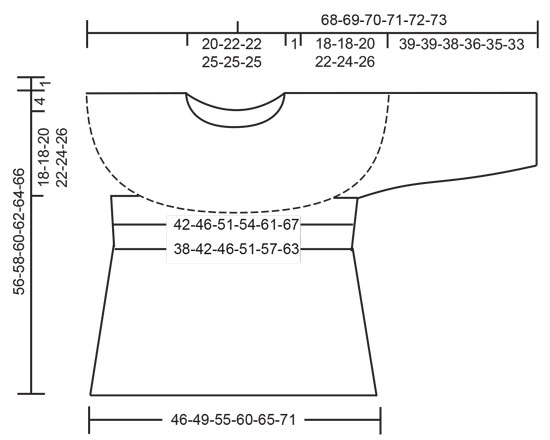
------------------------------------------------------- EXPLANATIONS FOR THE PATTERN: ------------------------------------------------------- CHAIN STITCH: If you work outermost on the hook the chain stitch will often be too tight; 1 chain stitch should be as long as 1 double crochet is wide. CROCHET TIP: The piece is turned after each round; every other round is therefore worked from the right and wrong side. The first round is from the right side. Finish the round with 1 slip stitch in the 3rd chain stitch at the beginning of the round. Turn and work the next round from the wrong side. Finish the round with 1 slip stitch in the 3rd chain stitch at the beginning of the round. Turn and work the next round from the right side. Continue like this back and forth. CROCHET INFORMATION: At the beginning of each round of double crochets, work 3 chain stitches; they do not replace the first double crochet but are worked in addition. Finish the round with 1 slip stitch in the 3rd chain stitch at the beginning of the round. PATTERN: See diagrams A.1 and A.2. INCREASE/DECREASE TIP (evenly spaced): To work out how to increase/decrease evenly, count the total number of stitches to be increased/decreased over (e.g. 18 stitches) and divide by the number of increases/decreases to be made (e.g. 3) = 6. n this example, increase by working 2 double crochets in each 6th stitch. When decreasing, work each 5th and 6th stitch together as follows: * Make 1 yarn over, insert the hook through the next stitch, pick up the strand, make 1 yarn over and pull it through the first 2 loops on the hook *, work from *-* 1 more time, make 1 yarn over and pull it through all 3 loops on the hook (= 1 stitch decreased). ------------------------------------------------------- START THE PIECE HERE: ------------------------------------------------------- SWEATER – SHORT OVERVIEW OF THE PIECE: The neck and yoke are worked top down, from mid back. The yoke is divided for the body and sleeves and the body continued in the round. The sleeves are worked in the round, top down. The neck is worked to finish. The whole piece is worked in the round, but turned after each round – read CROCHET TIP. YOKE: Work 123-132-135-144-144-147 chain stitches – read CHAIN STITCH, with hook size 3.5 MM = US E/4 and Fabel, form them into a ring with 1 slip stitch in the first chain stitch. Work the first round as follows: 3 chain stitches – read CROCHET INFORMATION, 1 double crochet in each chain stitch = 122-131-134-143-143-146 double crochets. Insert a marker at the beginning of the round. The yoke is measured from this marker! The next round is worked as follows: Work 1 double crochet in each of the first 19-22-22-25-25-25 double crochets, * 2 double crochets in the next double crochet, 1 double crochet in the next double crochet *, work from *-* over the next 22 double crochets (= 11 stitches increased), 1 double crochet in each of the next 40-43-46-49-49-52 double crochets, * 2 double crochets in the next double crochet, 1 double crochet in the next double crochet *, work from *-* over the next 22 double crochets (= 11 stitches increased), 1 double crochet in each of the last 19-22-22-25-25-25 double crochets = 144-153-156-165-165-168 double crochets. REMEMBER THE CROCHET GAUGE! Now insert 4 marker threads in the piece, each one between 2 stitches, as follows: Marker thread 1: Skip the first 24-27-27-30-30-30 stitches, insert the thread here (= transition between half back piece and sleeve). Marker thread 2: Skip the next 24 stitches, insert the thread here (= transition between sleeve and front piece). Marker thread 3: Skip the next 48-51-54-57-57-60 stitches, insert the thread here (= transition between front piece and sleeve). Marker thread 4: Skip the next 24 stitches, insert the thread here (= transition between sleeve and half back piece). There are 24-27-27-30-30-30 stitches left on the round after marker thread 4. Allow the threads to follow your work onwards; they are used when increasing. Now work pattern 1 as follows: Work * A.1 until there are 6 stitches left before the marker thread, work A.2 over the next 12 stitches (= 4 repeats of 3 stitches) *, work from *-* a total of 4 times, work A.1 to the end of the round. On the last round in the diagrams increase 0-12-12-12-12-24 double crochets evenly spaced as follows: Increase 0-6-6-6-6-12 stitches evenly on the back piece (i.e. 0-3-3-3-3-6 double crochets on the half back piece at the beginning of the round and 0-3-3-3-3-6 double crochets on the half back piece at the end of the round) and increase 0-6-6-6-6-12 double crochets evenly spaced over the front piece– read INCREASE/DECREASE TIP = 192-213-216-225-225-240 double crochets. Now work pattern 2 as follows: Work * A.1 until there are 6 stitches left before the marker thread, work A.2 over the next 12 stitches (= 4 repeats of 3 stitches) *, work from *-* a total of 4 times, work A.1 to the end of the round. When the diagrams have been completed in height there are 240-261-264-273-273-288 stitches on the round. Now work pattern 3 as follows: Work * A.1 until there are 6-6-6-6-6-6 stitches left before the marker thread, work A.2 over the next 9-12-12-12-12-12 stitches (= 3-4-4-4-4-4 repeats of 3 stitches), work A.1 until there are 3-6-6-6-6-6 stitches left before the marker thread, A.2 over the next 9-12-12-12-12-12 stitches, A.1 until there are 6-6-6-6-6-6 stitches left before the marker thread, A.2 over the next 9-12-12-12-12-12 stitches (= 3-4-4-4-4-4 repeats of 3 stitches), A.1 until there are 3-6-6-6-6-6 stitches left before the marker thread, A.2 over the next 9-12-12-12-12-12 stitches and A.1 to the end of the round. When the diagrams have been completed in height there are 276-309-312-321-321-336 stitches on the round. The increases in sizes XS and S are finished – go to ALL SIZES. Sizes M, L, XL and XXL, continue to increase as follows: Now work pattern 4 as follows (applies to sizes M, L, XL and XXL): Work A.1 until there are 6-6-6-6 stitches left before the marker thread, work A.2 over the next 9-12-12-12 stitches (= 3-4-4-4 repeats of 3 stitches), A.1 until there are 3-6-6-6 stitches left before the marker thread, A.2 over the next 9-12-12-12 stitches, A.1 until there are 6-6-6-6 stitches left before the marker thread, A.2 over the next 9-12-12-12 stitches (= 3-4-4-4 repeats of 3 stitches), A.1 until there are 3-6-6-6 stitches left before the marker thread, A.2 over the next 9-12-12-12 stitches and A.1 to the end of the round. On the last round in the diagrams increase 0-6-6-18 double crochets as follows: Increase 0-3-3-9 double crochets evenly spaced over each sleeve. When the diagrams have been completed in height there are 348-375-375-402 stitches. The increases in sizes M and L are finished – go to ALL SIZES. Sizes XL and XXL, continue to increase as follows: Now work pattern 5 as follows (applies to sizes XL and XXL): Work A.1 until there are 6-6 stitches left before the marker thread, work A.2 over the next 9-12 stitches (= 3-4 repeats of 3 stitches), A.1 until there are 3-6 stitches left before the marker thread, A.2 over the next 9-12 stitches, A.1 until there are 6-6 stitches left before the marker thread, A.2 over the next 9-12 stitches (= 3-4 repeats of 3 stitches), A.1 until there are 3-6 stitches left before the marker thread, A.2 over the next 9-12 stitches and A.1 to the end of the round = 411-450 stitches. The increases in sizes XL and XXL are finished – go to ALL SIZES. ALL SIZES: After all the increases there are 276-309-348-375-411-450 stitches on the round. Continue with pattern A.1 in the round until the piece measures 18-18-20-22-24-26 cm = 7"-7"-8"-8¾"-9½"-10¼" from the marker on the neck – adjust so you finish after round 2 in A.1. Now divide the yoke for the body and sleeves on the next round as follows: Work A.1 over the first 39-45-48-54-60-66 stitches (= 13-15-16-18-20-22 repeats of A.1 = half back piece), skip the next 57-66-75-81-84-90 stitches (= 19-22-25-27-28-30 repeats of A.1 = sleeve), work 12 chain stitches under the sleeve, work A.1 over the next 84-87-102-105-123-138 stitches (= 28-29-34-35-41-46 repeats of A.1 = front piece), skip the next 57-66-75-81-84-90 stitches (= 19-22-25-27-28-30 repeats of A.1 = sleeve), work 12 chain stitches under the sleeve, work A.1 over the next 39-45-48-54-60-66 stitches (= 13-15-16-18-20-22 repeats of A.1 = half back piece). Body and sleeves are finished separately. THE PIECE IS NOW MEASURED FROM HERE. BODY: = 186-201-222-237-267-294 stitches. Work A.1 as before, back and forth from mid-back (= 62-67-74-79-89-98 repeats of A.1). The next time you work round 3 in A.1, begin to decrease – remember INCREASE/DECREASE TIP. Decrease like this on every round 3 in A.1 as follows: Decrease 6 double crochets a total of 3-3-3-2-2-2 times and 0-0-3-0-3-3 double crochets a total of 0-0-1-0-1-1 time = 168-183-201-225-252-279 stitches. A.1 is now repeated 56-61-67-75-84-93 times on the round. When the piece measures 14 cm = 5½" from the division, increase evenly spaced on each round 3 in A.1 as follows: Increase 15 double crochets a total of 0-0-1-1-0-0 times, increase 9 double crochets a total of 3-3-3-2-4-3 times, increase 6 double crochets a total of 1-1-0-1-0-1 time = 201-216-243-264-288-312 stitches. The increased stitches are worked into A.1. Diagram A.1 is repeated a total of 67-72-81-88-96-104 times on the round. Continue working until the piece measures 34-36-36-36-36-36 cm = 13⅜"-14¼"-14¼"-14¼"-14¼"-14¼" from the division – finish after a round of double crochets. The sweater measures approx. 56-58-60-62-64-66 cm = 22"-22¾"-23⅝"-24⅜"-25¼"-26" from the shoulder down. Cut and fasten the strand. SLEEVES: The sleeve is worked in the round, top down. Start working mid-under the sleeve as follows: Work 1 single crochet in the 7th chain stitch worked under the sleeve, work 3 chain stitches (= first double crochet), work 1 double crochet in each of the next 5 chain stitches, A.1 as before over the next 57-66-75-81-84-90 stitches and finish with 1 double crochet in each of the last 6 chain stitches under the sleeve = 69-78-87-93-96-102 stitches. Continue with A.1 in the round (= 23-26-29-31-32-34 repeats of 3 stitches). When the sleeve measures 4 cm = 1½" from the division, decrease evenly spaced each time you work round 3 in A.1 as follows: Decrease 6 double crochets a total of 0-1-3-5-6-6 times and 3 double crochets a total of 5-6-4-2-0-0 times = 54-54-57-57-60-66 double crochets. Diagram A.1 is repeated a total of 18-18-19-19-20-22 times in width. Work A.1 until the sleeve measures 39-39-38-36-35-33 cm = 15¼"-15¼"-15"-14¼"-13¾"-13" from the division (try the sweater on and work to desired length). Make sure the last round is a round of double crochets. Then work an edge around the sleeve as follows: Work 1 chain stitch, * 1 single crochet in the first/next double crochet, 4 chain stitches, skip 1 cm = ⅜" *, work from *-* around the whole sleeve and finish with 1 slip stitch in the first single crochet at the beginning of the round. Cut and fasten the strand. Work the other sleeve in the same way. NECK-EDGE: Start from the right side, mid back and work a neck-edge with Fabel and hook size 3.5 MM = US E/4 as follows: Work 1 single crochet in each chain stitch. Cut and fasten the strand. |
|||||||||||||
Diagram explanations |
|||||||||||||
|
|||||||||||||

|
|||||||||||||
|
|||||||||||||
|
Have you made this or any other of our designs? Tag your pictures in social media with #dropsdesign so we can see them! Do you need help with this pattern?You'll find tutorial videos, a Comments/Questions area and more by visiting the pattern on garnstudio.com. © 1982-2024 DROPS Design A/S. We reserve all rights. This document, including all its sub-sections, has copyrights. Read more about what you can do with our patterns at the bottom of each pattern on our site. |
|||||||||||||


With over 40 years in knitting and crochet design, DROPS Design offers one of the most extensive collections of free patterns on the internet - translated to 17 languages. As of today we count 304 catalogs and 11422 patterns - 11417 of which are translated into English (US/in).
We work hard to bring you the best knitting and crochet have to offer, inspiration and advice as well as great quality yarns at incredible prices! Would you like to use our patterns for other than personal use? You can read what you are allowed to do in the Copyright text at the bottom of all our patterns. Happy crafting!
Comments / Questions (24)
Goedemiddag, Ik ben begonnen met deze leuke trui voor mijn dochter in maat xs, ik begrijp dat ik na de pas niet hoef te meerderen (moest even opzoeken wat de pas was), maar ik kom niet uit het patroon a.1 en a.2. In de 1ste toer snap ik namelijk wel, 1 overslaan en dan 2 stokjes met een losse en 1 overslaan. Maar naar de volgende toe moet ik dan 1 overslaan of 2? Had met 1 overslaan gedaan maar dan heb ik veels te veel steken. Help, ik kom er niet uit!
06.09.2023 - 17:46DROPS Design answered:
Dag Mariska,
Op de tweede toer haak je om en om lossen en stokjes en het stokje haak je steeds om de losse die je tussen de 2 stokjes van de vorige toer had gehaakt.
07.09.2023 - 19:46Ik kom niet uit met de meerderingen, ik kom telkens aan het eind van het patroon 16 meerderingen te kort. In de laatste 2 toeren van A2 zitten in totaal 32 (16+16) meerderingen. Waar of hoe maak ik die resterende 16 meerderingen? Niet door het patroon (bijv. patroon 1) te herhalen, dan heb ik aan het eind immers nog eens 32 steken gemeerderd in plaats van 16. Alvast dank!
30.06.2023 - 18:00DROPS Design answered:
Dag Romana,
Om eerlijk te zijn snap ik niet precies wat je bedoelt met dat je 16 meerderingen te kort komt. Waar wordt aangegeven dat er 32 meerderingen zijn? Welke maat ben je aan het haken?
01.08.2023 - 19:59Ik kom bij patroon 1 op het inde van de toer uit op 21 steken. Dus 3 steken te kort. Wat doe ik verkeerd?
05.10.2022 - 16:09DROPS Design answered:
Dag Addy,
Als ik het goed heb brei je maat S en heb je 24 steken voordat je met patroon 1 begint. Je breit in totaal . Je haakt A.2 en A.1 en dus in totaal 7 herhalingen van 3 steken. Hierdoor kom je op 24 stkeen uit.
08.10.2022 - 16:43Ich möchte die Anleitung gerne häkeln, verstehe aber die Anweisungen nicht so ganz. Wenn ich das 1. Muster häkeln soll, * A.1 bis noch 6 Maschen vor dem Markierungsfaden übrig sind, A.2 über die nächsten 12 Maschen (= 4 Rapporte à 3 Maschen) *, von *-* insgesamt 4 x arbeiten, A.1 bis Rundenende. Was bedeutet das? Muss ich 1. Reihe von A1 bis zum 1. Markiere arbeiten und dann 1. Reihe A2 oder den ganzen rapport von A1? Bitte um Hilfe
15.09.2022 - 21:01DROPS Design answered:
Liebe Jennifer, jede Reihe wird zuerst in jedem Diagram gehäkelt: die 1. Reihe A.1 bis 6 Maschen vor der Markierung übrig sind, dann die 1. Reihe A.2 über die nächsten 12 Maschen häkeln, und so weiterhäkeln, dh bei der nächsten Runde häkeln Sie 2. Runde usw. Hier lesen Sie mehr über Diagramme. Viel Spaß beim häkeln!
16.09.2022 - 09:33Hallo, ik haak patroon 220 20 en ik begrijp er niet veel van. Bij patroon 1 wordt gezegd dat ik tot 6 steken voor de markeerdraad A1 moet volgen daarna A2 over 12 steken?? Is dat bij elke toer of alleen de laatste?? Dat zou betekenen dat ik bij 1 mouw elke 3e steek vermeerder!! Graag makkelijke uitleg. Groetjes Annemiek
01.09.2022 - 15:18DROPS Design answered:
Dag Annemiek,
Je haakt inderdaad op elke toer A.2 tussen de mouwen en het pand. Op de 4e toer (ik reken de eerste toer met het sterretje niet mee) in A.2 meerder je 1 stokje. Dat betekent dus 2 stokjes per raglanlijn en 8 stokjes in totaal op de toer.
14.09.2022 - 20:54Bonjour, Pourriez vous juste me confirmer qu'une fois les augmentations faites on continue en rond jusqu'au emmenchures avec juste A1 et non plus A1 et A2 ? Merci
07.06.2022 - 15:10DROPS Design answered:
Bonjour Lauranne, tout à fait, quand toutes les augmentations (faites dans les A.2 précédents) sont terminées, continuez jusqu'à la hauteur indiquée pour votre taille avec juste A.1. Bon crochet!
07.06.2022 - 16:53Hello, Thank you for the pattern. I wanted to confirm if we are turning the piece after each round? So, I worked the first round (of the yoke) from the right side. Then, for the second round, I turn the piece and work from the wrong side, but this would mean that the wrong side of the treble crochets in the second round are visible on the outside (right side). Is that right? This is also creating a ridge from the second round on the right side, which is something we don't need?
07.05.2022 - 08:28DROPS Design answered:
Dear Gsiyag, yes, the pattern is correct, you turn after each round. First is the cast-on round, with the chain stitches, after which you don't turn. You work the treble crochet round and then you start turning after each round. The increase round is worked on the wrong side. Happy crocheting!
08.05.2022 - 19:25Bonjour, pour faire un échantillon vous dites, si vous avez trop de mailles essayez avec un crochet plus gros. Si vous n'avez pas assez de mailles pour 10 cm, essayez avec un crochet plus fin. Je l’ai fait, et je crois que c’est tout le contraire, quand on augment la taille du crochet ça fait beaucoup plus grand. Merci de vérifier vos propos. Bonne soirée.
27.01.2022 - 16:54DROPS Design answered:
Bonjour Mme Krentner, si vous avez trop de mailles pour 10 cm, cela veut dire que vous crochetez trop serré et que vos mailles sont trop petites, il vous faut donc essayer avec un crochet plus gros pour que vos mailles prennent "plus de place" et que vous ayez ainsi la bonne largeur. À contrario, si vous n'avez pas assez de mailles, vous crochetez trop lâche, vos mailles sont trop larges, essayez à nouveau avec un crochet plus fin pour les "rétrécir" et ainsi avoir le bon nombre pour 10 cm. Bon crochet!
27.01.2022 - 17:39I don't understand the increase in the 1st and 2nd round of the diagram. A1 and A2 are the same pattern. After placing the markers I did have the required 144 stitches. After working the round for pattern 1 and was 14 stitches short of the required 192 stitches. After working Pattern 2 I have 222 stitches instead of 240. I assume I am missing increases in the 1st two rounds of the diagram.
31.12.2021 - 15:30DROPS Design answered:
Dear Mrs Manhartsberger, on the 3rd row in A.1 you have still 3 sts but in the 3rd row in A.2 you are supposed to increased (= 2 sts around the chain, 1 st in the st, 2 sts around the chain = 2 sts increased). After A.1/A.2 are worked one time in height you have increased 3 sts 16 times = 192 sts. Then work A.1 and A.2 as explained and increase again 3 sts a total of 16 times = 240 sts. Can this help?
03.01.2022 - 10:29Moet de mouw ook bij elke toer gekeerd worden?
18.11.2021 - 16:00DROPS Design answered:
Dag Jet,
Je vraag begrijp ik niet precies, maar je haakt het werk van boven naar beneden, waarbij je dus eerst de pas breit. Na de pas splits je het werk voor het lijf en de mouwen.
23.11.2021 - 12:35