
Popular categories
Looking for a yarn?


|
|
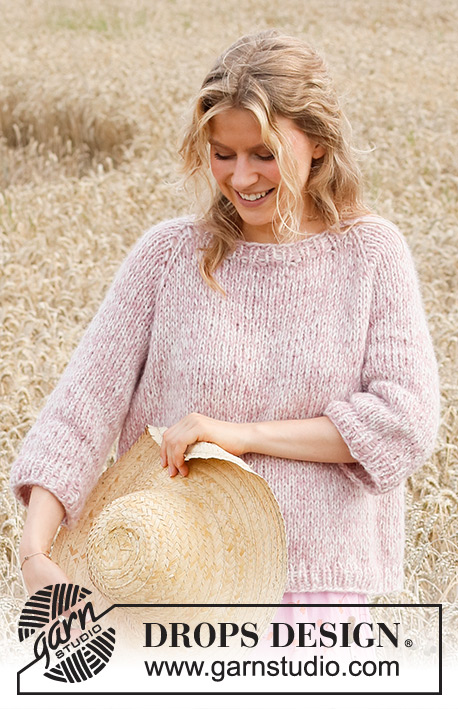
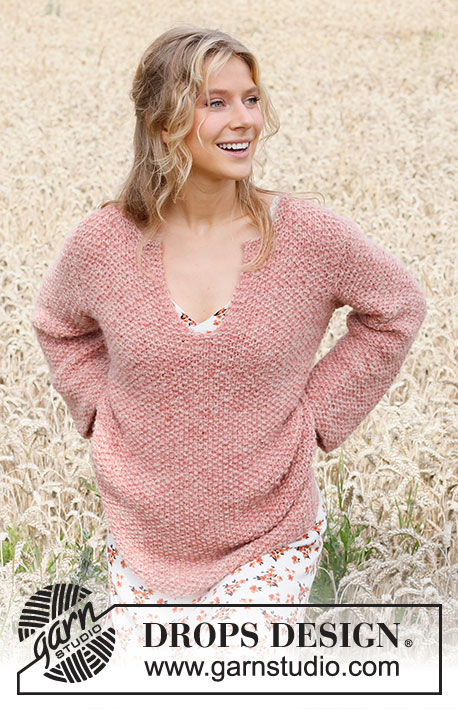
Magnolia Dream |
|
 |
 |
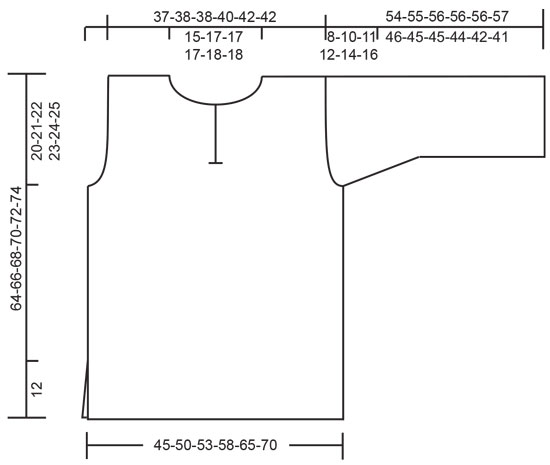
Knitted sweater in DROPS Sky and DROPS Brushed Alpaca Silk. Piece is knitted in moss stitch with vent in the neck and vents in the sides. Size: S - XXXL
DROPS 220-13 |
|
|
------------------------------------------------------- EXPLANATION FOR THE PATTERN: ------------------------------------------------------- GARTER STITCH (back and forth): Knit all rows. 1 ridge vertically = knit 2 rows. MOSS STITCH: ROW 1: * Knit 1, purl 1 *, repeat from *-*. ROW 2: Purl over knit and knit over purl. Repeat 2nd row upwards. INCREASE TIP (applies to sleeves): Increase 1 stitch by knitting 1 stitch in front and back loop of same stitch. Then work the increased stitches in moss stitch. ------------------------------------------------------- START THE PIECE HERE: ------------------------------------------------------- SWEATER - SHORT OVERVIEW OF THE PIECE: Work back and front piece bottom up in parts, and work back and forth on circular needle. Divide front piece mid front for neck vent. Work sleeves back and forth on circular needle, bottom up. Sew piece together as explained in pattern. Then work in a neck edge. Work the entire garment with 1 strand of each quality. BACK PIECE: Cast on 54-60-64-70-78-84 stitches on circular needle size 8 MM = US 11 with 1 strand Sky and 1 strand Brushed Alpaca Silk (= 2 strands). Work in MOSS STITCH - read explanation above. REMEMBER THE KNITTING GAUGE! When piece measures 44-45-46-47-48-49 cm = 17¼"-17¾"-18"-18½"-19"-19¼", bind off stitches for armholes at beginning of every row in each side as follows: Bind off 3 stitches 1-1-1-1-2-2 times, 2 stitches 0-1-2-2-2-3 times and 1 stitch 2-2-2-4-4-5 times in each side = 44-46-46-48-50-50 stitches. When piece measures 62-64-66-68-70-72 cm = 24⅜"-25¼"-26"-26¾"-27½"-28⅜", bind off the middle 16-18-18-18-20-20 stitches for neck and finish each shoulder separately. Then work and bind off 1 stitch on next row from the neck = 13-13-13-14-14-14 stitches remain on shoulder. Continue to work until piece measures 64-66-68-70-72-74 cm = 25¼"-26"-26¾"-27½"-28⅜"-29⅛". Bind off. Work the other shoulder the same way. FRONT PIECE: Cast on 54-60-64-70-78-84 stitches on circular needle size 8 MM = US 11 with 1 strand Sky and 1 strand Brushed Alpaca Silk (= 2 strands). Work in moss stitch. Then bind off for armhole, divide the piece for neck vent and bind off for neck as explained below: ARMHOLE: When piece measures 44-45-46-47-48-49 cm = 17¼"-17¾"-18"-18½"-19"-19¼", bind off stitches for armholes at beginning of every row in each side as follows: Bind off 3 stitches 1-1-1-1-2-2 times, 2 stitches 0-1-2-2-2-3 times and 1 stitch 2-2-2-4-4-5 times in each side. NECK VENT: AT THE SAME TIME when piece measures 45-46-47-48-49-50 cm = 17¾"-18"-18½"-19"-19¼"-19¾" and next row is worked from right side, work 2 ridges in GARTER STITCH - read explanation above, over the middle 6 stitches on row (work the other stitches as before). After the 2 ridges divide the piece mid front. Slip stitches on right front piece (when worn) on a thread or stitch holder. Work moss stitch over the stitches on left front piece with 3 stitch in garter stitch towards mid front (continue decrease for armhole as before). NECK LINE: When piece measures 56-58-59-61-62-64 cm = 22"-22¾"-23¼"-24"-24⅜"-25¼" and next row is worked from wrong side, slip the outermost 4-5-5-5-6-6 stitches towards mid front on a stitch holder for neck - work them before slipping them on stitch holder to avoid cutting the yarn. Continue to bind off for neck at beginning of every row from wrong side as follows: Bind off 2 stitches 1 time and 1 stitch 3 times = 13-13-13-14-14-14 stitches remain on shoulder. Continue to work until piece measures 64-66-68-70-72-74 cm = 25¼"-26"-26¾"-27½"-28⅜"-29⅛". Bind off. RIGHT FRONT PIECE: Slip stitches from stitch holder/extra needle back on circular needle size 8 MM = US 11. Work first row from mid front (right side). Begin by picking up 1 stitch in outermost stitch from left front piece, and knit this stitch together with first stitch on left needle. This is done to avoid a nick at the bottom of vent. Work moss stitch over the stitches on right front piece with 3 stitches in garter stitch towards mid front (continue decrease for armhole as before). When piece measures 56-58-59-61-62-64 cm = 22"-22¾"-23¼"-24"-24⅜"-25¼" and next row is worked from right side, slip the outermost 4-5-5-5-6-6 stitches towards mid front on a stitch holder for neck but work stitches before slipping them on stitch holder. Continue to bind off for neck at beginning of every row from right side as follows: Bind off 2 stitches 1 time and 1 stitch 3 times = 13-13-13-14-14-14 stitches remain on shoulder. Continue to work until piece measures 64-66-68-70-72-74 cm = 25¼"-26"-26¾"-27½"-28⅜"-29⅛". Bind off. SLEEVE: Cast on 38-40-42-46-48-50 stitches on circular needle size 8 MM = US 11 with 1 strand Sky and 1 strand Brushed Alpaca Silk (= 2 strands). Work in moss stitch. When sleeve measures 37-36-36-35-33-29 cm = 14½"-14¼"-14¼"-13¾"-13"-11⅜", increase 1 stitch on each side – read INCREASE TIP. Increase like this every 3 cm = 1⅛" 3-3-3-3-3-4 times in total in each side = 44-46-48-52-54-58 stitches. When sleeve measures 46-45-45-44-42-41 cm = 18"-17¾"-17¾"-17¼"-16½"-16⅛", bind off stitches for sleeve cap at beginning of every row in each side as follows: Bind off 3 stitches 1 time, 2 stitches 1-1-2-2-2-2 times and 1 stitch 2-5-6-6-8-9 times in each side. Then bind off 2 stitches in each side until sleeve measures 53-54-55-55-55-56 cm = 21"-21¼"-21⅝"-21⅝"-21⅝"-22". Bind off 3 stitches 1 time in each side, and then bind off the remaining stitches. Sleeve measures approx. 54-55-56-56-56-57 cm = 21¼"-21⅝"-22"-22"-22"-22½" from top and down. Work the other sleeve the same way. ASSEMBLY: Sew shoulder seams inside bind-off edge. Sew sleeves inside 1 edge stitch. Sew under sleeve and side seams in one - sew in outer loops of edge stitch to get a flat seam but stop seam when approx. 12 cm = 4¾" remain at the bottom on front/back piece = vent. NECK EDGE: Begin from right side mid front and pick up approx. 50 to 70 stitches around the neck (including stitches on stitch holders at the front) on circular needle size 7 MM = US 10.75 with 1 strand in each quality. Knit 1 row from wrong side, knit 1 row from right side and knit 1 row from wrong side. Bind off knitting from right side. |
|
|
|
|
Have you made this or any other of our designs? Tag your pictures in social media with #dropsdesign so we can see them! Do you need help with this pattern?You'll find tutorial videos, a Comments/Questions area and more by visiting the pattern on garnstudio.com. © 1982-2024 DROPS Design A/S. We reserve all rights. This document, including all its sub-sections, has copyrights. Read more about what you can do with our patterns at the bottom of each pattern on our site. |
|


With over 40 years in knitting and crochet design, DROPS Design offers one of the most extensive collections of free patterns on the internet - translated to 17 languages. As of today we count 304 catalogs and 11422 patterns - 11417 of which are translated into English (US/in).
We work hard to bring you the best knitting and crochet have to offer, inspiration and advice as well as great quality yarns at incredible prices! Would you like to use our patterns for other than personal use? You can read what you are allowed to do in the Copyright text at the bottom of all our patterns. Happy crafting!
Comments / Questions (7)
Bonjour, Pensez-vous que je peux tricoter ce modèle en moins long qu'il n'est prévu sans le "déséquilibrer"? Merci.
03.10.2022 - 15:04DROPS Design answered:
Bonjour Mme Buffet, pas forcément, pensez à bien vérifier la longueur du modèle et celle que vous souhaitez en vérifiant les mesures sur la base d'un pull similaire que vous avez et dont vous aimez la forme. Pour tout conseil et assistance personnalisée, vous pouvez vous adresser à votre magasin ou bien à notre groupe DROPS Workshop où vous pourrez demander l'avis d'autres tricoteuses. Bon tricot!
03.10.2022 - 15:23Hello Could this be worked in stocking stitch rather than moss st ?
16.01.2022 - 17:21DROPS Design answered:
Dear Amanda, you can't work everything in stocking stitch, since it tends to roll up. So you would need to work some edges in rib, garter stitch, or moss stitch, which are not necessary for the original pattern. Happy knitting!
16.01.2022 - 23:46De uitleg van het patroon voor zowel de voor- als achterzijde geeft aan dat er 54-60-64-70-78-84 steken op rondbreinaald 8 mm moeten worden gezet. Maar als ik naar maattabel kijk staat er onderaan dat dit stuk 45-50-53-58-65-70 steken zou moeten tellen. Welke moet ik volgen? Of zijn beide correct.
04.12.2021 - 15:25DROPS Design answered:
Dag Marissa,
In de maattekening staan de maten aangegeven in centimeters en niet het aantal steken. Bij een stekenverhouding van 12 steken = 10 cm, zou je dus (als voorbeeld) bij een breedte van 5 cm, 60 steken op moeten zetten. En bij een breedte van 45 cm zet je dus (12x4,5=) 54 steken op.
09.12.2021 - 11:12Malli sk-125. Ohjeessa kavennukset kädentietä varten: päätä jokaisen kerroksen ALUSTA kummastakin reunasta... siis päätetäänkö alusta VAI alussa ja lopussa? Jos vain alussa, niin silmukoita kavennetaan vain puolet määrästä ohjeen määrästä. Ja miten kavennukset tehdään helmineuleessa ?
22.05.2021 - 21:01DROPS Design answered:
Hei, silmukat päätetään työn kummastakin reunasta, eli ne päätetään sekä oikean että nurjan puolen kerroksen alusta.
09.07.2021 - 14:20Ein sehr schöner Pullover mit gelungenem Ausschnitt. Die perfekte Mischung aus bequem-leger und feminin.
07.01.2021 - 21:50I like this model! She is ready for a little car trip! I like the too-low neck to put over something else interesting. The knitting looks simple, quick to finish.
07.01.2021 - 19:58I suggest "Campfire Breakfast"
07.01.2021 - 16:36