DROPS Sky
DROPS Sky
74% Alpaca, 18% Polyamide, 8% Wool
from 5.40 € /50g
Get the yarn to make this pattern from 27.00€.

The yarn cost is calculated from the pattern’s smallest size and the yarn’s cheapest product type. Looking for an even better price? You might find it on the DROPS Deals!

DROPS SS24

Renaissance Memories

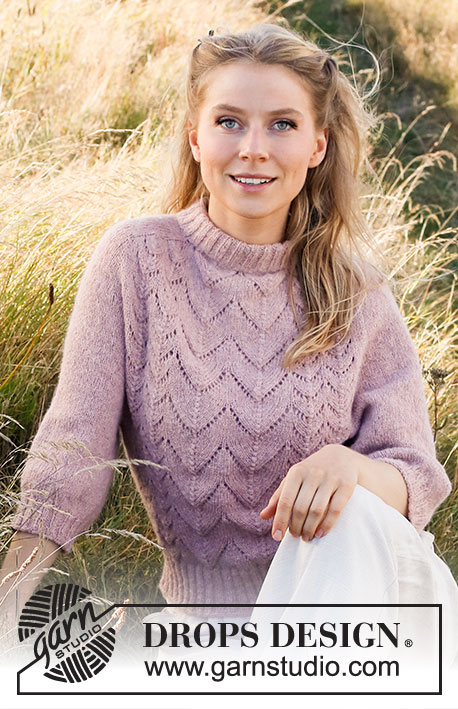
Knitted jumper in DROPS Sky. The piece is worked with V-neck, cables and trumpet sleeves. Sizes S - XXXL.

DROPS 222-41
DROPS Design: Pattern no sk-122
Yarn group B
-------------------------------------------------------

SIZES:
S - M - L - XL - XXL - XXXL

MATERIALS:
DROPS SKY from Garnstudio (belongs to yarn group B)
250-300-300-350-350-400 g colour 18, dusty pink

KNITTING TENSION:
21 stitches in width and 28 rows in height with stocking stitch = 10 x 10 cm.

NEEDLES:
DROPS DOUBLE POINTED NEEDLES SIZE 4 MM.
DROPS CIRCULAR NEEDLE SIZE 4 MM: Length 40 cm and 60 cm or 80 cm for stocking stitch.
DROPS CIRCULAR NEEDLE SIZE 3 MM: Length 80 cm for rib.
DROPS CABLE NEEDLE – for cables.
Needle size is only a guide. If you get too many stitches on 10 cm, change to a larger needle size. If you get too few stitches on 10 cm, change to a smaller needle size.

-------------------------------------------------------

Alternative Yarn – See how to change yarns here
Yarn Groups A to F – Use the same pattern and change the yarn here
Yarn usage using an alternative yarn – Use our yarn converter here

-------------------------------------------------------

DROPS Sky
DROPS Sky
74% Alpaca, 18% Polyamide, 8% Wool
from 5.40 € /50g
Get the yarn to make this pattern from 27.00€.

The yarn cost is calculated from the pattern’s smallest size and the yarn’s cheapest product type. Looking for an even better price? You might find it on the DROPS Deals!

Pattern instructions

-------------------------------------------------------

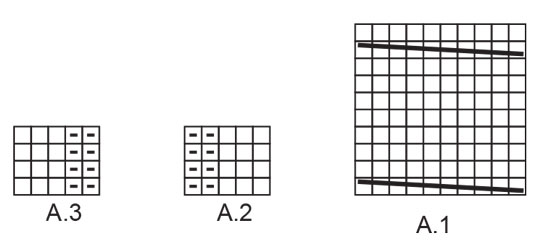
EXPLANATIONS FOR THE PATTERN:

-------------------------------------------------------

PATTERN: 
See diagrams A.1 to A.3. The diagrams show all rows/rounds in the pattern from the right side.

DECREASE TIP-1 (evenly spaced):
To work out how to decrease evenly, count the total number of stitches on the needle (e.g. 220 stitches) and divide by the number of decreases to be made (e.g. 36) = 6.1. 
In this example, decrease by knitting together each 5th and 6th stitch (approx.).

DECREASE TIP-2:
Decrease 1 purled stitch by purling 2 together.

INCREASE TIP (for sleeves):
Work until there are 2 stitches left before the marker thread, 1 yarn over, knit 4 (marker thread sits between these 4 stitches), 1 yarn over. On the next round knit the yarn overs twisted to avoid holes. Then work the new stitches in stocking stitch

RAGLAN:
All decreases are worked from the right side!
Decrease 1 stitch on each side of the marker thread as follows: Work until there are 2 stitches left before marker thread, knit 2 together, marker thread sits here, slip 1 stitch as if to knit, knit 1 and pass the slipped stitch over. Repeat at the other marker threads (= 8 stitches decreased).

V-NECK:
Decrease for the neck on the front piece. All decreases are worked from the right side!
Decrease as follows after A.2: Slip 1 stitch as if to knit, knit 1 and pass the slipped stitch over (= 1 stitch decreased).
Decrease as follows before A.3: Work until there are 2 stitches left before A.3, knit 2 together (= 1 stitch decreased).

-------------------------------------------------------

START THE PIECE HERE:

-------------------------------------------------------

JUMPER – SHORT OVERVIEW OF THE PIECE:
The body and sleeves are worked in the round, with circular needle, as far as the armholes. Then all sections are placed on the same needle. The yoke is continued in the round as far as the V-neck, then finished back and forth on the needle. A neck-edge is worked at the back to finish.

BODY:
Cast on 220-240-264-284-312-348 stitches with circular needle size 3 mm and Sky. Knit 1 round. Then work rib (knit 2, purl 2) in the round for 3 cm. Knit 1 round where you decrease 36-40-44-48-52-60 stitches evenly spaced - read DECREASE TIP-1 = 184-200-220-236-260-288 stitches. Change to circular needle size 4 mm.
Continue with stocking stitch. REMEMBER THE KNITTING TENSION!
When the piece measures 27-27-27-27-26-26 cm, cast off for the armholes on both sides as follows: Work the first 42-46-50-54-59-64 stitches (= half back piece), cast off 8-8-10-10-12-16 stitches, work the next 84-92-100-108-118-128 stitches (= front piece), cast off 8-8-10-10-12-16 stitches and work the remaining 42-46-50-54-59-64 stitches. Lay the piece to one side and work the sleeves.

SLEEVES:
Cast on 112-112-119-119-126-133 stitches with circular needle size 4 mm and Sky. Knit 1 round. Change to circular needle size 3 mm.
ROUND 1: (Knit 2 / purl 5) the whole round.
ROUND 2: Knit.
ROUND 3: (Knit 2 / purl 5) and, at the same time, decrease all purl 5 to purl 4 - read DECREASE TIP-2 = 96-96-102-102-108-114 stitches.
Continue with knit over knit and purl over purl. When the piece measures 5 cm decrease all purl 4 to purl 3 = 80-80-85-85-90-95 stitches.
Continue with knit over knit and purl over purl. When the piece measures 9 cm decrease all purl 3 to purl 2 = 64-64-68-68-72-76 stitches.
Continue with knit over knit and purl over purl. When the piece measures 12 cm decrease all purl 2 to purl 1 = 48-48-51-51-54-57 stitches.
On the next round adjust the number of stitches to 48-50-54-58-58-60 stitches.
Change to double pointed needles 4 mm.
Work stocking stitch for 1-1-1-1-3-2 cm. Insert a marker thread at the beginning of the round (= mid under sleeve).
On the next round start to increase under the sleeve - read INCREASE TIP. Increase like this every 2½-2-1½-1½-1-1 cm a total of 11-14-16-16-17-18 times = 70-78-86-90-92-96 stitches. When the sleeve measures 42-43-39-38-36-34 cm, cast off 8-8-10-10-12-16 stitches under the sleeve (= 4-4-5-5-6-8 stitches on each side of the marker thread) = 62-70-76-80-80-80 stitches. Lay the piece to one side and work the other sleeve in the same way.

YOKE:
Place the sleeves on the same circular needle size 4 mm as the body, where stitches were cast off for the armholes = 292-324-352-376-396-416 stitches. Now insert 4 marker threads between the front/back pieces and the sleeves, but insert the threads so 1-1-1-2-4-6 stitches on each side of the front and back pieces are now on the sleeves; i.e. there are 82-90-98-104-110-116 stitches on the front/back pieces and 64-72-78-84-88-92 stitches on each sleeve. Start the round mid back and continue in the round with stocking stitch. AT THE SAME TIME on round 3 start to decrease to raglan as described below and on round 3-3-6-8-14-16 work the V-neck as described below:

RAGLAN:
Read description above. Decrease like this every 4th round 2-1-1-1-3-4 times and every 2nd round/row 22-27-30-33-33-34 times (= a total of 24-28-31-34-36-38 times).

V-NECK:
On round 3-3-6-8-14-16, work A.1 over the middle 10 stitches on the front piece – adjust so the first round in A.1 is worked on a round of raglan decreases; this is important to avoid working cables from the wrong side when working back and forth later.
When A.1 has been completed in height work to the end of the round and cut the strand.
Now divide the front piece in the middle of A.1 (= mid-front) and continue back and forth, starting from the right side at the V-neck as follows:
Work A.2 over the first 5 stitches, decrease 1 stitch for the V-NECK – read description above, work stocking stitch (continue the decreases to raglan as before) until there are 7 stitches left on the row, decrease 1 stitch – remember V-NECK, work A.3 over the last 5 stitches.
Continue back and forth like this and decrease for the V-neck every 2nd row 6-3-4-2-3-3 times and every 4th row 6-9-9-11-11-12 times (= a total of 12-12-13-13-14-15 stitches decreased for the V-neck on both sides).

When all the decreases for the neck and raglan are finished, there are 76-76-78-78-80-82 stitches on the row. The next row is worked from the right side as follows: Knit the first 3 stitches, purl 2 together (= 1 stitch decreased), knit 16, knit the next 34-34-36-36-38-40 stitches on the back piece at the same time as you decrease 11 stitches evenly over these stitches, knit 16, purl 2 together (= 1 stitch decreased), knit 3 = 63-63-65-65-67-69 stitches. Work back from the wrong side with knit over knit and purl over purl. The jumper measures approx. 50-52-54-56-58-60 cm from the shoulder down. Change to circular needles size 3 mm.

NECK-EDGE:
Insert a marker thread mid-back. Place the last 4 stitches on the row on a thread. Work back and forth over the first 4 stitches, at the same time as the neck-edge is attached to the yoke as follows:
Work as follows from the right side:
ROW 1: Knit the first 3 stitches and knit 2 together (= 1 stitch decreased).
ROW 2: Turn and purl the 4 stitches.
ROW 3: Knit the first 3 stitches and knit 3 together (= 2 stitches decreased).
ROW 4: Turn and purl the 4 stitches.
ROWS 5-8: Repeat rows 3 and 4 two more times.
Repeat rows 1-8 until you have worked to the marker thread mid-back. Cast off the 4 stitches.

Place the 4 stitches from the thread back on needle size 3 mm and work from the wrong side as follows:
ROW 1: Purl the first 3 stitches, purl 2 together (= 1 stitch decreased).
ROW 2: Turn and knit the 4 stitches.
ROW 3: Purl the first 3 stitches, purl 3 together (= 2 stitches decreased).
ROW 4: Turn and knit the 4 stitches.
ROWS 5-8: Repeat rows 3 and 4 two more times.
Repeat rows 1-8 until you have worked to the marker thread mid-back. Cast off the 4 stitches. Sew the cast-off edges together mid-back. Cut and fasten the strands.

ASSEMBLY:
Sew the openings under each sleeve.

This pattern has been corrected.

Updated online: 30.11.2021
V-Neck: ... The next row is worked from the right side as follows: Knit the first 3 stitches, purl 2 together (= 1 stitch decreased), knit 16, knit the next 34-34-36-36-38-40 stitches on the back piece at the same time as you decrease 11 stitches evenly over these stitches, knit 16, purl 2 together (= 1 stitch decreased), knit 3 = 63-63-65-65-67-69 stitches...

Diagram

symbols = knit from right side, purl from wrong side
symbols = purl from right side, knit from wrong side
symbols = place 5 stitches on cable needle in front of piece, knit 5, knit 5 from cable needle
diagram
diagram

Each of our patterns has specific tutorial videos to help you.

Do you have a question? See a list of frequently asked questions (FAQ)

Knitting tension is what determines the final measurements of your work, and is usually measured per 10 x 10 cm. It is provided like so: number of stitches in width x number of rows in height - eg: 19 stitches x 26 rows = 10 x 10 cm.

The knitting tension is very individual; some people knit/crochet loosely while others work tightly. You adjust the knitting tension with the needle size, which is why the suggested needle size is only meant as a guide! You need to adjust this (up or down) to ensure that YOUR knitting tension matches the knitting tension provided in the pattern. If you work with a different knitting tension than provided you will have a different yarn consumption, and your work will have different measurements than what the pattern suggests.

The knitting tension also determines which yarns can replace each other. As long as you achieve the same knitting tension you can replace one yarn with another.

See DROPS lesson: How to measure your tension/gauge

See DROPS video: How to make a gauge tension swatch

The required amount of yarn is provided in grams, eg: 450 g. To calculate how many balls you’ll need you first need to know how many grams are in 1 ball (25g, 50g or 100g). This information is available if you click on the individual yarn quality on our pages. Divide the amount required with the amount of each ball. For example, if each ball is 50g (the most common amount), the calculation will be as follows: 450 / 50 = 9 balls.

The important thing when changing from one yarn to another is that the knitting/crochet tension remains the same. This is so that the measurements of the finished piece will be the same as on the sketch provided. It is easier to achieve the same knitting tension using yarns from the same yarn group. It is also possible to work with multiple strands of a thinner yarn to achieve the knitting tension of a thicker one. Please try our yarn converter. We recommend you to always work a test swatch.

Please NOTE: when changing yarn the garment might have a different look and feel to the garment in the photo, due to individual properties and qualities of each yarn.

See DROPS lesson: Can I use a different yarn than the one mentioned in the pattern?

All our yarns are categorised into yarn groups (from A to F) according to thickness and knitting tension – group A contains the thinnest yarns and group F the thickest. This makes it easier for you to find alternative yarns to our patterns, should you wish to switch yarn. All yarns within the same group have a similar knitting tension and can easily replace each other. However, different yarn qualities have different structures and properties which will give the finished work a unique look and feel.

Click here for an overview of the yarns in each yarn group

At the top of all our patterns you’ll find a link to our yarn calculator, which is a helpful tool should you wish to use a different yarn than suggested. By filling in the yarn quality you wish to replace, the amount (in your size) and number of strands, the calculator will present good alternative yarns with the same knitting tension. Additionally it will tell you how much you’ll require in the new qualities and whether you’ll need to work with multiple strands. Most skeins are 50g (some are 25g or 100g).

If the pattern is worked with multiple colours, every colour will have to be calculated separately. Similarly, if the pattern is worked with several strands of different yarns (for example 1 strand Alpaca and 1 strand Kid-Silk) you will have to find alternatives for each, individually.

Click here to see our yarn calculator

Since different yarns have different qualities and textures we have chosen to keep the original yarn in our patterns. However, you can easily find options among our available qualities by using our yarn calculator, or simply pick a yarn from the same yarn group.

It is possible that some retailers still have discontinued yarns in stock, or that someone has a few skeins at home that they would like to find patterns for.

The yarn calculator will provide both alternative yarn as well as required amount in the new quality.

If you think it's hard to decide what size to make, it can be a good idea to measure a garment you own already and like the size of. Then you can pick the size by comparing those measures with the ones available in the pattern's size chart.

You'll find the size chart at the bottom of the pattern.

See DROPS lesson: How to read size chart

The needle size provided in the pattern serves only as a guide, the important thing is to follow the knitting tension. And since knitting tension is very individual, you will have to adjust the needle size to ensure that YOUR tension is the same as in the pattern – maybe you’ll have to adjust 1, or even 2 needle sizes, up or down to achieve the correct tension. For this, we recommend that you work test swatches.

Should you work with a different knitting tension than the one provided, the measurements of the finished garment might deviate from the measurement sketch.

See DROPS lesson: How to measure your tension/gauge

See DROPS video: How to make a tension/gauge swatch

Working a garment top-down provides more flexibility and room for personal adjustment. For example it is easier to try the garment on while working, as well as making adjustments to length of yoke and shoulder caps.

The instructions are carefully explaining every step, in the correct order. Diagrams are adjusted to the knitting direction and are worked as usual.

The diagram depicts all rows/rounds, and every stitch seen from the right side. It is read from bottom to top, from right to left. 1 square = 1 stitch.

When working back and forth, every other row is worked from the right side and every other row is worked from the wrong side. When working from the wrong side, the diagram will have to be worked reversed: from left to right, knit stitches are purled, purl stitches are knit etc.

When working in the round every round is worked from the right side and the diagram are worked from right to left on all rounds.

See DROPS lesson: How to read knitting diagrams

The diagram depicts all rows/rounds, and every stitch seen from the right side. It is worked from bottom to top, from right to left.

When working back and forth every other row is worked from the right side: from right to left and every other row is worked from the wrong side: from left to right.

When working in the round, every row in the diagram are worked from the right side, from right to left.

When working a circular diagram you start in the middle and work your way outwards, counter clockwise, row by row.

The rows usually start with a given number of chain stitches (equivalent to the height of the following stitch), this will either be depicted in the diagram or explained in the pattern.

See DROPS lesson: How to read crochet diagrams

Instructions for working several diagrams after each other on the same row/round, will often be written like so: “work A.1, A.2, A.3 a total of 0-0-2-3-4 times". This means you work A.1 once, then A.2 is worked once, and A.3 is repeated (in width) the number of times provided for your size – in this case like so: S = 0 times, M = 0 times, L=2 times, XL= 3 times and XXL = 4 times.

The diagrams are worked as usual: begin with the first row in A.1, then work the first row in A.2 etc.

See DROPS lesson: How to read knitting diagrams

See DROPS lesson: How to read crochet diagrams

The total width of the garment (from wrist-to-wrist) will be larger in the larger sizes, despite the actual sleeves being shorter. The larger sizes have longer sleeve caps and wider shoulders, so there will be a good fit in all sizes.

The measurement sketch/schematic drawing provides information regarding the full length of the garment. If it’s a jumper or a jacket the length is measured from the highest point on the shoulder closest to the neckline, and straight down to the bottom of the garment. It is NOT measured from the tip of shoulder. Similarly, the length of yoke is measured from the highest point on the shoulder and down to where yoke is split into body and sleeves.

On a jacket measures are never taken along bands, unless specifically stated. Always measure inside band stitches when measuring the length.

See DROPS lesson: How to read a schematic drawing

Diagrams are often repeated on the round or in height. 1 repeat is the diagram the way it appears in the pattern. If it says to work 5 repeats of A.1 in the round, then you work A.1 a total of 5 times after/next to each other in the round. If it says to work 2 repeats of A.1 vertically/in height you work the entire diagram once, then begin again at the start and work the entire diagram one more time.

Chain stitches are slightly narrower than other stitches and to avoid working the cast-on edge too tight, we simply chain more stitches to begin with. The stitch count will be adjusted on the following row to fit the pattern and measurement sketch.

The rib edge is more elastic and will contract slightly compared to, for example, stocking stitch. By increasing before the rib edge, you avoid a visible difference in width between the rib edge and the rest of the body.

It’s very easy to cast off too tightly, and by making yarn overs while casting off (and simultaneously casting these off) you avoid a too tight cast off edge.

See DROPS video: How to bind off with yarn overs (yo)

To achieve an even increase (or decrease) you can increase on, for example: every 3rd and 4th row alternately, like so: work 2 rows and increase on the 3rd row, work 3 rows and increase on the 4th. Repeat this until the increase is complete.

See DROPS lesson: Increase or decrease 1 st on every 3rd and 4th row alternately

Should you prefer to work in the round instead of back and forth, you may of course adjust the pattern. You’ll need to add steeks mid-front (usually 5 stitches), and follow the instructions. When you would normally turn and work from the wrong side, simply work across the steek and continue in the round. At the end you’ll cut the piece open, pick up stitches to work bands, and cover the cut edges.

See DROPS video: How to knit steeks and cut open

Should you prefer to work back and forth instead of in the round, you may of course adjust the pattern so you work the pieces separately and then assemble them at the end. Divide the stitches for the body in 2, add 1 edge stitch in each side (for sewing) and work the front and back pieces separately.

See DROPS lesson: Can I adapt a pattern for circular needles into straight needles?

Pattern repeats can vary slightly in the different sizes, in order to get the correct proportions. If you’re not working the exact same size as the garment in the photo, yours might deviate slightly. This has been carefully developed and adjusted so that the complete impression of the garment is the same in all sizes.

Make sure to follow instructions and diagrams for your size!

If you have found a pattern you like which is available in women’s size it’s not very difficult to convert it to men’s size. The biggest difference will be the length of sleeves and body. Start working on the women size that you think would fit across the chest. The additional length will be worked right before you cast off for the armhole/sleeve cap. If the pattern is worked top-down you can add the length right after the armhole or before the first decrease on sleeve.

Regarding additional yarn amount, this will depend on how much length you add, but it is better with a skein too many than too few.

All yarns will have excess fibres (from production) that might come off as lint or shedding. Brushed yarns (ie hairier yarns) have more of these loose, excess fibres, causing more shedding.

Shedding also depends on what is worn under or over the garment, and whether this pulls at the yarn fibres. It’s therefore not possible to guarantee that there will be no shedding

Below are some tips on how to get the best result when working with hairier yarns:

1. When the garment is finished (before you wash it) shake it vigorously so the looser hairs come off. NOTE: do NOT use a lint roller, brush or any method that pulls at the yarn.

2. Place the garment in a plastic bag and put it in your freezer - the temperature will cause the fibres to become less attached to each other, and excess fibres will come off easier.

3. Leave in the freezer for a few hours before taking it out and shaking it again.

4. Wash the garment according to the instructions on the yarn label.

Pilling is a natural process that happens to even the most exclusive of fibers. It's a natural sign of wear and tear that is hard to avoid, and that is most visible in high friction areas of your garment like a sweater's arms and cuffs.

You can make your garment look as new by removing the pilling, using a fabric comb or a pill/lint remover.

Still can't find the answer you need? Then scroll down and leave your question so one of our experts can try to help you. This will be done normally within 5 to 10 working days.
In the meantime, you can read the questions and answers that others have left to this pattern or join the DROPS Workshop on Facebook to get help from fellow knitters/crocheters!

You might also like...

Post a comment to pattern DROPS 222-41

We would love to hear what you have to say about this pattern!

If you want to leave a question, please make sure you select the correct category in the form below, to speed up the answering process. Required fields are marked *.

Comments / Questions (15)

country flag Ines Biernath wrote:

Hallo!\r\nIch habe alle Kommentare gelesen, verstehe aber immer noch nicht, wie das mit der Halsblende funktionieren soll. Gibt es ein Video dazu? Anhand der geschriebenen Anleitung kann ich den schönen Pullover nicht zu Ende führen.\r\nLieben Gruß, \r\nInes

29.04.2023 - 18:42

country flag Ursula wrote:

Hallo, ich stricke den Pullover in Gr. M. Bei der Maschenprobe habe ich 31 Reihen anstatt 28 Reihen. Damit der Raglan und Halsauschnitt stimmt, stricke ich dann 3 jeweils zusätzliche Reihen auf 10 cm? Viele Grüße Ursula

18.02.2023 - 17:19

DROPS Design answered:

Liebe Ursula, also ja genau, Sie sollen regelmäßig verteilt extra Reihen zwischen den Reihen mit den Abnahmen stricken stricken. Viel Spaß beim stricken!

20.02.2023 - 09:36

country flag Susi wrote:

Wird die Halsblende bei diesem Ausschnitt etwa wie eine I-Cord Kante gestrickt ? \r\nSonst verstehe ich es einfach nicht. :-(

16.02.2023 - 13:06

DROPS Design answered:

Liebe Susi, ja genauso wird die Halsblende mit der I-Cord Technikk abgekettet/gestrickt. Viel Spaß beim stricken!

16.02.2023 - 14:04

country flag Riky wrote:

Hallo, leider komme ich nicht mit der Anleitung der Halsblende klar. 4 Maschen über 8 Reihen aber doch die Maschen für die Ärmel bis zur hinteren Mitte mitstricken? Ich bin völlig 😕

20.09.2022 - 20:37

DROPS Design answered:

Liebe Riky, diese 4Maschen stricken Sie als Halsblende bis zur hinteren Mitten, dh die 8 Reihen wiederholen Sie so daß alle Maschen auf der Nadel werden zusammen mit den 4 Maschen der Halsblende gestrickt. Viel Spaß beim stricken!

21.09.2022 - 09:33

country flag Leonie wrote:

Ik snap de uitleg van de hals rand niet, kunnen jullie het wat beter voor mij omschrijven?

14.12.2021 - 17:58

DROPS Design answered:

Dag Leonie,

Het is denk ik een beetje verwarrend doordat er eerst staat dat je de laatste 4 steken op een hulpdraad moet zetten. Volgens mij kun je dit achterwege laten en gelijk met 'NAALD 1" beginnen. Op de goede kant brei je dan eigenlijk steeds de 4e en 5e steek samen, je keert het werk en breit terug aan de verkeerde kant (naald 2). Dit doe je tot de markeerdraad midden achter en daarna pak je de andere kant, waarbij je steeds op de verkeerde kant steek 4 en 5 samen breit.

15.12.2021 - 17:16

country flag Leonie wrote:

Ik snap het punt in de v hals niet. NA A1 moet je verder met A2 maar dan staat er ga zo verder heen en weer en minder voor de v hals iedere 2e naald 4 keer en iedere 4e naald 9 keer in totaal 13 steken vermindert aan beide kanten. Ik snap hier niks van

03.12.2021 - 21:06

DROPS Design answered:

Dag Leonie

Nadat je A.1 hebt gebreid, brei je niet langer in de rondte, maar brei je heen en weer. Je breit dan aan het begin van de naald (aan de goede kant gezien) A.2 en aan het eind van de naald brei je A.3. Hierdoor heb je in de halslijn aan de goede kant steeds 3 recht en 2 averecht. (De rest van het werk is in tricotsteek)

08.12.2021 - 10:44

country flag Leonie De Lang wrote:

Bij de v hals start ik met 306 steken en brei je de volgende naalden:\r\n1. A2 mindering, verder recht en raglan A3\r\n2. A3, verder averechts, A2\r\n3. A2 mindering, verder recht en erg kan A3\r\n4. A3, averechts, A2\r\nHoe ga ik verder? Ik snap de zin niet minder iedere 2e naald 4 keer en iedere 4e naald 9 keer =13 steken reminders voor de v hals aan beide kanten. Hoe kom ik uiteindelijk op 78 steken over? Doe ik het wel goed?

01.12.2021 - 16:06

country flag Marie wrote:

N'y a-t-il pas une erreur dans la fin des explications de l'encolure V ? Si on diminue les 11mailles comme indiqué il reste alors 64 mailles et non 74. Faut-il ou non diminuer ces 11 mailles ? Merci de bien vouloir m'éclairer.

28.11.2021 - 21:41

DROPS Design answered:

Bonjour Marie, merci pour votre retour, il restera effectivement 63-63-65-65-67-69 mailles (on diminue 13 mailles au total). La correction a été faite, bonne continuation!

30.11.2021 - 09:10

country flag Nicole wrote:

Ihr Lieben! Wenn ich nach allen Ausschnitt- und Raglanabnahmen (74 M auf der Nadel) den Anweisungen für die nächste Hinreihe folge, habe ich aber nicht wie angegeben 74 Maschen sondern nur noch 63 auf der Nadel (76-1-11-1=63). Kann es sein, dass ihr da einen Fehler drin habt oder habe ich einen Denkfehler? Liebe Grüße von Nicole

06.10.2021 - 13:06

Nicole answered:

Sorry, 76 Maschen natürlich! 76 minus 1 minus 11 minus 1 = 64 statt 74 wie angegeben.

06.10.2021 - 13:09

country flag Ingrid wrote:

Tack för snabbt svar

10.05.2021 - 15:55