DROPS Alpaca
DROPS Alpaca
100% Alpaca
from 4.85 $ /50g
Get the yarn to make this pattern from 29.10$.

The yarn cost is calculated from the pattern’s smallest size and the yarn’s cheapest product type. Looking for an even better price? You might find it on the DROPS Deals!

DROPS SS24

Copper Harbor Sweater

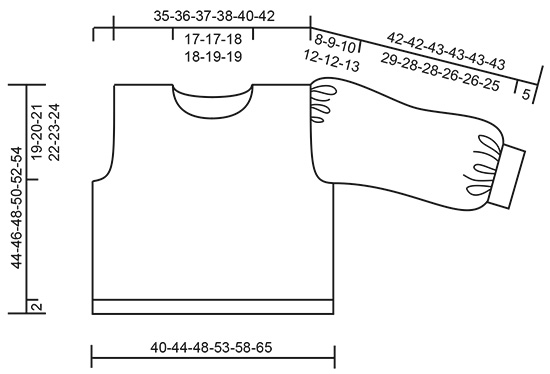
Knitted sweater in DROPS Alpaca. The piece is worked with knotted pattern and ¾-length balloon sleeves. Sizes S - XXXL.

DROPS 221-39
DROPS Design: Pattern no z-922
Yarn group A
-------------------------------------------------------

SIZES:
S - M - L - XL - XXL – XXXL

Finished measurements:
Chest measurements: 80-88-96-106-116-130 cm = 31½"-34⅝"-37¾"-41¾"-45¾"-51¼"
Full length: 44-46-48-50-52-54 cm = 17¼"-18"-19"-19¾"-20½"-21¼"
All measurements in charts are in cm.

MATERIALS:
DROPS ALPACA from Garnstudio (belongs to yarn group A)
300-350-400-400-450-500 g color 9026, blush

KNITTING GAUGE:
24 stitches in width and 32 rows in height with stockinette stitch = 10 x 10 cm = 4" x 4".

NEEDLES:
DROPS DOUBLE POINTED NEEDLES SIZE 3 MM = US 2.5.
DROPS CIRCULAR NEEDLE SIZE 3 MM = US 2.5: Length 40 cm = 16" and 60 cm = 24" or 80 cm = 32" for stockinette stitch and knotted pattern.
DROPS DOUBLE POINTED NEEDLES SIZE 2.5 MM = US 1.5.
DROPS CIRCULAR NEEDLE SIZE 2.5 MM = US 1.5: Length 40 cm = 16" and 80 cm = 32" for the edges.
Needle size is only a guide. If you get too many stitches on 10 cm = 4", change to a larger needle size. If you get too few stitches on 10 cm = 4", change to a smaller needle size.

-------------------------------------------------------

Alternative Yarn – See how to change yarns here
Yarn Groups A to F – Use the same pattern and change the yarn here
Yarn usage using an alternative yarn – Use our yarn converter here

-------------------------------------------------------

DROPS Alpaca
DROPS Alpaca
100% Alpaca
from 4.85 $ /50g
Get the yarn to make this pattern from 29.10$.

The yarn cost is calculated from the pattern’s smallest size and the yarn’s cheapest product type. Looking for an even better price? You might find it on the DROPS Deals!

Pattern instructions

NOTE: This pattern is written in American English. All measurements in charts are in cm. For conversion from inches to cm - click here. There are different terms for crocheting in American and British English. If this pattern includes crochet, click for "crochet terms" here. For this pattern in British English, please click here.
-------------------------------------------------------

EXPLANATIONS FOR THE PATTERN:

-------------------------------------------------------

MOSS STITCH:
ROUND 1: * Knit 1, purl 1 *, work from *-*.
ROUND 2: Knit over purl and purl over knit.
Repeat round 2.

PATTERN:
See diagrams A.1 and A.2. The diagrams show all rows in the pattern from the right side.

DECREASE TIP (for sleeves):
Decrease 1 stitch on either side of the marker thread as follows: Work until there are 3 stitches left before the marker thread, knit 2 together, knit 2 (marker thread sits between these 2 stitches), slip 1 stitch as if to knit, knit 1 and pass the slipped stitch over the knitted stitch (2 stitches decreased).

INCREASE TIP (evenly spaced):
To work out how to increase evenly, count the total number of stitches on the needle (e.g. 80 stitches) and divide by the number of increases to be made (e.g. 16) = 5.
In this example, increase by making 1 yarn over after each 5th stitch. On the next round knit the yarn overs twisted to avoid holes.

-------------------------------------------------------

START THE PIECE HERE:

-------------------------------------------------------

SWEATER – SHORT OVERVIEW OF THE PIECE:
The body is worked in the round with circular needle as far as the armholes. The front and back pieces are then finished separately, back and forth on the needle. The sleeves are worked in the round with double pointed needles/short circular needle, bottom up. The sleeve cap is worked back and forth to finish. The shoulder seams are sewn together and the sleeves are sewn in. A neck is worked in moss stitch to finish.

BODY:
Cast on 195-211-231-255-279-311 stitches with circular needle size 2.5 MM = US 1.5 and Alpaca.
Work MOSS STITCH in the round for 2 cm = ¾" – read description above.
Change to circular needle size 3 MM = US 2.5. Work 2 rounds of stockinette stitch and decrease 1 stitch on the first round = 194-210-230-254-278-310 stitches.
Insert 1 marker thread at the beginning of the round and 1 marker thread after 97-105-115-127-139-155 stitches (= sides of body). Allow the threads to follow you work onwards.
The next round is worked as follows: 6-2-7-5-3-3 stitches in stockinette stitch, work A.1A (= 12 stitches), A.1B over the next 64-80-80-96-112-128 stitches (= 4-5-5-6-7-8 repeats of 16 stitches), A.1C (= 9 stitches), 12-4-14-10-6-6 stitches in stockinette stitch (marker thread sits in the middle of these stitches), work A.1A (= 12 stitches), A.1B over the next 64-80-80-96-112-128 stitches (= 4-5-5-6-7-8 repeats of 16 stitches), A.1C (= 9 stitches) and finish with 6-2-7-5-3-3 stitches in stockinette stitch.
Continue this pattern. REMEMBER THE KNITTING GAUGE!
When A.1 has been worked 2 times in height, the piece measures approx. 20 cm = 8" from the cast-on edge.
The next round is worked as follows: 6-2-7-5-3-3 stitches in stockinette stitch, work A.2A (= 4 stitches), A.2B over the next 72-88-88-104-120-136 stitches (= 9-11-11-13-15-17 repeats of 8 stitches), A.2C (= 9 stitches), 12-4-14-10-6-6 stitches in stockinette stitch (marker thread sits in the middle of these stitches), work A.2A (= 4 stitches), A.2B over the next 72-88-88-104-120-136 stitches (= 9-11-11-13-15-17 repeats of 8 stitches), A.2C (= 9 stitches) and finish with 6-2-7-5-3-3 stitches in stockinette stitch.
Continue this pattern – A.2 is repeated in height to finished length.
AT THE SAME TIME when the piece measures 25-26-27-28-29-30 cm = 9¾"-10¼"-10⅝"-11"-11⅜"-11¾", bind off for the armholes on the next round as follows – make sure this in an odd round in A.2 (this is important to avoid working knots from the wrong side when the front and back pieces are continued back and forth): Start 3 stitches before the marker thread at the beginning of the round and bind off 6 stitches for the armhole, work 91-99-109-121-133-149 stitches as before (= front piece), bind off 6 stitches for the armhole and work the last 91-99-109-121-133-149 stitches as before (= back piece). The front and back pieces are finished separately.

BACK PIECE:
= 91-99-109-121-133-149 stitches. Continue the pattern back and forth (start from the wrong side), and bind off for the armholes at the beginning of each row on both sides as follows: 3 stitches 0-0-0-1-2-2 times, 2 stitches 1-2-3-4-4-6 time and 1 stitch 1-2-4-4-4-6 times on each side = 85-87-89-91-97-101 stitches. NOTE: The stitches which are not enough to make a knot on each side are worked in stockinette stitch.
Continue working until the piece measures 42-44-46-48-50-52 cm = 16½"-17¼"-18"-19"-19¾"-20½". On the next row bind off the middle 37-37-39-39-41-41 stitches for the neck and each shoulder is finished separately. Continue the pattern and bind off 2 stitches on the next row from the neck = 22-23-23-24-26-28 stitches.
Work until the piece measures 44-46-48-50-52-54 cm = 17¼"-18"-19"-19¾"-20½"-21¼" from the shoulder down. Bind off. Work the other shoulder in the same way.

FRONT PIECE:
= 91-99-109-121-133-149 stitches. Continue the pattern back and forth (start from the wrong side), and bind off for the armholes at the beginning of each row on both sides as follows: 3 stitches 0-0-0-1-2-2 times, 2 stitches 1-2-3-4-4-6 times and 1 stitch 1-2-4-4-4-6 times = 85-87-89-91-97-101 stitches.
Continue working until the piece measures 36-38-39-41-42-44 cm = 14¼"-15"-15¼"-16⅛"-16½"-17¼". On the next row place the middle 19-19-21-21-23-23 stitches on 1 thread for the neck and each shoulder is finished separately. Continue the pattern and bind off on each row from the neck as follows: 3 stitches 1 time, 2 stitches 2 times and 1 stitch 4 times = 22-23-23-24-26-28 stitches on the shoulder.
Work until the piece measures 44-46-48-50-52-54 cm = 17¼"-18"-19"-19¾"-20½"-21¼" from the shoulder down. Bind off. Work the other shoulder in the same way.
SLEEVE:
Cast on 57-61-65-69-73-77 stitches with double pointed needles size 2.5 MM = US 1.5 and Alpaca. Work moss stitch in the round for 5 cm = 2".
Knit 1 round where you knit 1 stitch in both the front and back loops of all stitches (doubles the number of stitches) = 114-122-130-138-146-154 stitches.
Change to short circular needle size 3 MM = US 2.5 and insert 1 marker thread at the beginning of the round = mid under sleeve. Allow the thread to follow your work onwards; it is used when decreasing under the sleeve.
Work stockinette stitch in the round. When the sleeve measures 6 cm = 2⅜" in all sizes, decrease 2 stitches under the sleeve – read DECREASE TIP. Decrease like this every 4th-4th-4th-3rd-3rd-3rd round a total of 17-19-20-21-21-22 times = 80-84-90-96-104-110 stitches.
AT THE SAME TIME when the sleeve measures 25-24-24-23-23-22 cm = 9¾"-9½"-9½"-9"-9"-8¾", increase 16-16-18-18-20-20 stitches evenly on the round – read INCREASE TIP.
After all the decreases and increases there are 96-100-108-114-124-130 stitches.
When the sleeve measures 34-33-33-31-31-30 cm = 13⅜"-13"-13"-12¼"-12¼"-11¾", work the next round as follows: Start 3 stitches before the marker thread, bind off 6 stitches and knit to end of the round. Now work the sleeve cap back and forth with circular needle as follows.
Work stockinette stitch and bind off at the beginning of each row on each side as follows: 3 stitches 0-0-0-0-1-1 time, 2 stitches 3-4-4-4-4-4 times, 1 stitch 4-4-7-10-9-10 times, 2 stitches 4-4-3-3-3-4 times and then 3 stitches 1-1-1-1-1-1 time on each side = 48-48-54-54-60-60 stitches. The next row is worked as follows from the right side: Work 8-8-9-9-10-10 stitches in stockinette stitch, knit together the next 32-32-36-36-40-40 stitches 2 and 2 (= 16-16-18-18-20-20 stitches decreased) and work 8-8-9-9-10-10 stitches in stockinette stitch = 32-32-36-36-40-40 stitches left. Bind off. The sleeve measures approx. 42-42-43-43-43-43 cm = 16½"-16½"-17"-17"-17"-17". Work the other sleeve in the same way.

ASSEMBLY:
Sew the shoulder seams and sew in the sleeves, inside the 1 edge stitch.

NECK:
Start on one shoulder and knit up from the right side 99 to 117 stitches around the neck (including the stitches on the thread in front) with short circular needle size 2.5 MM = US 1.5 and Alpaca. The number of stitches should be divisible by 2 + 1. Work moss stitch in the round for 2 cm = ¾". Bind off with moss stitch.

Diagram

All measurements in charts are in cm.

symbols = knit from right side, purl from wrong side
symbols = knot: Purl 3 stitches together but do not slip them from the left needle, now knit the same 3 sitches together and then purl them together one more time. Now slip all 3 stitches from the left needle
diagram
diagram

Each of our patterns has specific tutorial videos to help you.

Do you have a question? See a list of frequently asked questions (FAQ)

Knitting tension is what determines the final measurements of your work, and is usually measured per 10 x 10 cm. It is provided like so: number of stitches in width x number of rows in height - eg: 19 stitches x 26 rows = 10 x 10 cm.

The knitting tension is very individual; some people knit/crochet loosely while others work tightly. You adjust the knitting tension with the needle size, which is why the suggested needle size only serve as a guide! You need to adjust this (up or down) to ensure that YOUR knitting tension matches the knitting tension provided in the pattern. If you work with a different knitting tension than provided you will have a different yarn consumption, and your work will have different measurements than what the pattern suggests.

The knitting tension also determines which yarns can replace each other. As long as you achieve the same knitting tension you can replace one yarn with another.

See DROPS lesson: How to measure your tension/gauge

See DROPS video: How to make a gauge tension swatch

The required amount of yarn is provided in grams, eg: 450 g. To calculate how many balls you’ll need you first need to know how many grams are in 1 ball (25g, 50g or 100g). This information is available if you click on the individual yarn quality on our pages. Divide the amount required with the amount of each ball. For example, if each ball is 50g (the most common amount), the calculation will be as follows: 450 / 50 = 9 balls.

The important thing when changing from one yarn to another is that the knitting/crochet tension remains the same. This is so that the measurements of the finished piece will be the same as on the sketch provided. It is easier to achieve the same knitting tension using yarns from the same yarn group. It is also possible to work with multiple strands of a thinner yarn to achieve the knitting tension of a thicker one. Please try our yarn converter. We recommend you to always work a test swatch.

Please NOTE: when changing yarn the garment might have a different look and feel to the garment in the photo, due to individual properties and qualities of each yarn.

See DROPS lesson: Can I use a different yarn than the one mentioned in the pattern?

All our yarns are categorised into yarn groups (from A to F) according to thickness and knitting tension – group A contains the thinnest yarns and group F the thickest. This makes it easier for you to find alternative yarns to our patterns, should you wish to switch yarn. All yarns within the same group have a similar knitting tension and can easily replace each other. However, different yarn qualities have different structures and properties which will give the finished work a unique look and feel.

Click here for an overview of the yarns in each yarn group

At the top of all our patterns you’ll find a link to our yarn converter, which is a helpful tool should you wish to use a different yarn than suggested. By filling in the yarn quality you wish to replace, the amount (in your size) and number of strands, the converter will present good alternative yarns with the same knitting tension. Additionally it will tell you how much you’ll require in the new qualities and whether you’ll need to work with multiple strands. Most skeins are 50g (some are 25g or 100g).

If the pattern is worked with multiple colours, every colour will have to be converted separately. Similarly, if the pattern is worked with several strands of different yarns (for example 1 strand Alpaca and 1 strand Kid-Silk) you will have to find alternatives for each, individually.

Click here to see our yarn converter

Since different yarns have different qualities and textures we have chosen to keep the original yarn in our patterns. However, you can easily find options among our available qualities by using our yarn converter, or simply pick a yarn from the same yarn group.

It is possible that some retailers still have discontinued yarns in stock, or that someone has a few skeins at home that they would like to find patterns for.

The yarn converter will provide both alternative yarn as well as required amount in the new quality.

If you think it's hard to decide what size to make, it can be a good idea to measure a garment you own already and like the size of. Then you can pick the size by comparing those measures with the ones available in the pattern's size chart.

You'll find the size chart at the bottom of the pattern.

See DROPS lesson: How to read size chart

The needle size provided in the pattern serves only as a guide, the important thing is to follow the knitting tension. And since knitting tension is very individual, you will have to adjust the needle size to ensure that YOUR tension is the same as in the pattern – maybe you’ll have to adjust 1, or even 2 needle sizes, up or down to achieve the correct tension. For this, we recommend that you work test swatches.

Should you work with a different knitting tension than the one provided, the measurements of the finished garment might deviate from the measurement sketch.

See DROPS lesson: How to measure your tension/gauge

See DROPS video: How to make a gauge tension swatch

Working a garment top-down provides more flexibility and room for personal adjustment. For example it is easier to try the garment on while working, as well as making adjustments to length of yoke and shoulder caps.

The instructions are carefully explaining every step, in the correct order. Diagrams are adjusted to the knitting direction and are worked as usual.

The diagram depicts all rows/rounds, and every stitch seen from the right side. It is read from bottom to top, from right to left. 1 square = 1 stitch.

When working back and forth, every other row is worked from the right side and every other row is worked from the wrong side. When working from the wrong side, the diagram will have to be worked reversed: from left to right, knit stitches are purled, purl stitches are knit etc.

When working in the round every round is worked from the right side and the diagram are worked from right to left on all rounds.

See DROPS lesson: How to read knitting diagrams

The diagram depicts all rows/rounds, and every stitch seen from the right side. It is worked from bottom to top, from right to left.

When working back and forth every other row is worked from the right side: from right to left and every other row is worked from the wrong side: from left to right.

When working in the round, every row in the diagram are worked from the right side, from right to left.

When working a circular diagram you start in the middle and work your way outwards, counter clockwise, row by row.

The rows usually start with a given number of chain stitches (equivalent to the height of the following stitch), this will either be depicted in the diagram or explained in the pattern.

See DROPS lesson: How to read crochet diagrams

Instructions for working several diagrams after each other on the same row/round, will often be written like so: “work A.1, A.2, A.3 a total of 0-0-2-3-4 times". This means you work A.1 once, then A.2 is worked once, and A.3 is repeated (in width) the number of times provided for your size – in this case like so: S = 0 times, M = 0 times, L=2 times, XL= 3 times and XXL = 4 times.

The diagrams are worked as usual: begin with the first row in A.1, then work the first row in A.2 etc.

See DROPS lesson: How to read knitting diagrams

See DROPS lesson: How to read crochet diagrams

The total width of the garment (from wrist-to-wrist) will be larger in the larger sizes, despite the actual sleeves being shorter. The larger sizes have longer sleeve caps and wider shoulders, so there will be a good fit in all sizes.

The measurement sketch/schematic drawing provides information regarding the full length of the garment. If it’s a jumper or a jacket the length is measured from the highest point on the shoulder (usually closest to the neckline), and straight down to the bottom of the garment. It is NOT measured from the tip of shoulder. Similarly, the length of yoke is measured from the highest point on the shoulder and down to where yoke is split into body and sleeves.

See DROPS lesson: How to read a schematic drawing

Diagrams are often repeated on the round or in height. 1 repeat is the diagram the way it appears in the pattern. If it says to work 5 repeats of A.1 in the round, then you work A.1 a total of 5 times after/next to each other in the round. If it says to work 2 repeats of A.1 vertically/in height you work the entire diagram once, then begin again at the start and work the entire diagram one more time.

Chain stitches are slightly narrower than other stitches and to avoid working the cast-on edge too tight, we simply chain more stitches to begin with. The stitch count will be adjusted on the following row to fit the pattern and measurement sketch.

The rib edge is more elastic and will contract slightly compared to, for example, stocking stitch. By increasing before the rib edge, you avoid a visible difference in width between the rib edge and the rest of the body.

It’s very easy to cast off too tightly, and by making yarn overs while casting off (and simultaneously casting these off) you avoid a too tight cast off edge.

See DROPS video: How to bind off with yarn overs (yo)

To achieve an even increase (or decrease) you can increase on, for example: every 3rd and 4th row alternately, like so: work 2 rows and increase on the 3rd row, work 3 rows and increase on the 4th. Repeat this until the increase is complete.

See DROPS lesson: Increase or decrease 1 st on every 3rd and 4th row alternately

Should you prefer to work in the round instead of back and forth, you may of course adjust the pattern. You’ll need to add steeks mid-front (usually 5 stitches), and follow the instructions. When you would normally turn and work from the wrong side, simply work across the steek and continue in the round. At the end you’ll cut the piece open, pick up stitches to work bands, and cover the cut edges.

See DROPS video: How to knit steeks and cut open

Should you prefer to work back and forth instead of in the round, you may of course adjust the pattern so you work the pieces separately and then assemble them at the end. Divide the stitches for the body in 2, add 1 edge stitch in each side (for sewing) and work the front and back pieces separately.

See DROPS lesson: Can I adapt a pattern for circular needles into straight needles?

Pattern repeats can vary slightly in the different sizes, in order to get the correct proportions. If you’re not working the exact same size as the garment in the photo, yours might deviate slightly. This has been carefully developed and adjusted so that the complete impression of the garment is the same in all sizes.

Make sure to follow instructions and diagrams for your size!

If you have found a pattern you like which is available in women’s size it’s not very difficult to convert it to men’s size. The biggest difference will be the length of sleeves and body. Start working on the women size that you think would fit across the chest. The additional length will be worked right before you cast off for the armhole/sleeve cap. If the pattern is worked top-down you can add the length right after the armhole or before the first decrease on sleeve.

Regarding additional yarn amount, this will depend on how much length you add, but it is better with a skein too many than too few.

All yarns will have excess fibres (from production) that might come off as lint or shedding. Brushed yarns (ie hairier yarns) have more of these loose, excess fibres, causing more shedding.

Shedding also depends on what is worn under or over the garment, and whether this pulls at the yarn fibres. It’s therefore not possible to guarantee that there will be no shedding

Below are some tips on how to get the best result when working with hairier yarns:

1. When the garment is finished (before you wash it) shake it vigorously so the looser hairs come off. NOTE: do NOT use a lint roller, brush or any method that pulls at the yarn.

2. Place the garment in a plastic bag and put it in your freezer - the temperature will cause the fibres to become less attached to each other, and excess fibres will come off easier.

3. Leave in the freezer for a few hours before taking it out and shaking it again.

4. Wash the garment according to the instructions on the yarn label.

Pilling is a natural process that happens to even the most exclusive of fibers. It's a natural sign of wear and tear that is hard to avoid, and that is most visible in high friction areas of your garment like a sweater's arms and cuffs.

You can make your garment look as new by removing the pilling, using a fabric comb or a pill/lint remover.

Still can't find the answer you need? Then scroll down and leave your question so one of our experts can try to help you. This will be done normally within 5 to 10 working days.
In the meantime, you can read the questions and answers that others have left to this pattern or join the DROPS Workshop on Facebook to get help from fellow knitters/crocheters!

You might also like...

Post a comment to pattern DROPS 221-39

We would love to hear what you have to say about this pattern!

If you want to leave a question, please make sure you select the correct category in the form below, to speed up the answering process. Required fields are marked *.

Comments / Questions (13)

country flag Martina Rumposch wrote:

Ich habe unten 2 cm im Perlmuster gestrickt. Jetzt rollt sich das Bündchen. Was kann ich im Nachhinein tun, um dies zu beseitigen?

18.07.2022 - 19:05

DROPS Design answered:

Liebe Martina, wenn Sie den Pullover nach dem Fertigstellen anfeuchten und dann liegend trocknen lassen oder die betreffenden Stellen unter ein feuchtes Handtuch legen und das dann trocknen lassen, sollte sich nichts mehr rollen.

28.07.2022 - 08:03

country flag Anne Berit Fjelstad wrote:

Hei, jeg lurer på når man lager knutene, så slippes jo tre masker ut, hvordan skal disse erstattes? Det står ingen forklaring på det…..

13.03.2022 - 15:31

DROPS Design answered:

Hej, Du strikker de samme 3 masker sammen ialt 3 gange, til du har 3 nye masker på højre pind, nu kan du slippe dem af venstre pind :)

15.03.2022 - 15:25

country flag Maja Gørschel wrote:

Hej, Jeg er igang med en M og er ved semi starten. Er ved ryg og forstykket. Jeg har strikket A1- 2 gange og det måler kun 9 cm. Skal jeg forsætte A1 til det måler 20 cm?

07.08.2021 - 22:46

DROPS Design answered:

Hej Maja. A.1 består av 28 p, och den ska stickas 2 gånger (=56 p totalt) så om du har riktig strikkefasthet så bör arbetet måle ca 20 cm.. Är du säker på att din strikkefasthet är riktig? Mvh DROPS Design

17.08.2021 - 14:26

country flag Anna wrote:

Hi. Can you explain this section again so I can understand? "On the next row place the middle 19-19-21-21-23-23 stitches on 1 thread for the neck and each shoulder is finished separately. Continue the pattern and cast off on each row from the neck as follows: 3 stitches 1 time, 2 stitches 2 times and 1 stitch 4 times = 22-23-23-24-26-28 stitches on the shoulder."

06.07.2021 - 05:05

DROPS Design answered:

Dear Anna, put the middle stitches on a spare needle, stitch holder, or a piece of thread, then continue with one shoulder. On every other row (the rows that are knitted AWAY from the neck) ast off further 3 stitches once, , 2 stitches twice and then 1 stitch in every 2nd row, 4 times = you will have 22-23-23-24-26 stitches on the shoulder. Happy stitching!

06.07.2021 - 07:16

country flag Esperanza wrote:

Me está costando un poco entender el patrón. El remate para el escote es 3 puntos 1 vez, 2 puntos 2 veces y 1 punto 4 veces, no queda el cuello bien, queda demasiado estrecho y nada redondeado. ¿qué puedo hacer?

10.04.2021 - 19:34

DROPS Design answered:

Hola Esperanza, las disminuciones para el escote están correctas, lo único tienes que asegurarte de cerrar los puntos flojo. Si esto no soluciona tu problema, lo mejor sería contactar con tu tienda DROPS más cercana, para que pueda ofrecerte ayuda más personalizada.

11.04.2021 - 20:44

country flag Laura wrote:

Peaches & Cream

17.01.2021 - 22:35

country flag Laura wrote:

Golden Hour

17.01.2021 - 22:27

country flag Laura wrote:

Marmelade Dreams

17.01.2021 - 22:27

country flag Nastassia wrote:

"Morning Blush"

08.01.2021 - 14:15

country flag Jan Beck wrote:

Poppy barley

07.01.2021 - 23:01