DROPS Belle
DROPS Belle
53% Cotton, 33% Viscose, 14% Linen
from 2.20 € /50g
Get the yarn to make this pattern from 17.60€.

The yarn cost is calculated from the pattern’s smallest size and the yarn’s cheapest product type. Looking for an even better price? You might find it on the DROPS Deals!

DROPS SS24

Yellow Tulip

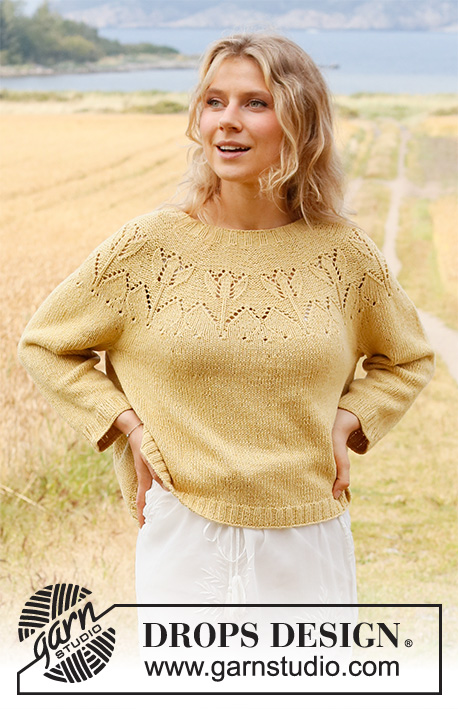
Knitted jumper in DROPS Belle or DROPS Merino Extra Fine. The piece is worked with round yoke, lace pattern and ¾-length sleeves. Sizes S - XXXL.

DROPS 222-4
DROPS Design: Pattern no vs-072
Yarn group B
-------------------------------------------------------

SIZES:
S - M - L - XL - XXL - XXXL

MATERIALS:
DROPS BELLE from Garnstudio (belongs to yarn group B)
400-450-500-500-550-600 g colour 04, dandelion
Or use:
DROPS MERINO EXTRA FINE from Garnstudio (belongs to yarn group B)
450-500-550-600-650-700 g colour 24, light yellow

KNITTING TENSION:
21 stitches in width and 28 rows in height with stocking stitch = 10 x 10 cm.

NEEDLES:
DROPS DOUBLE POINTED NEEDLES SIZE 4 MM.
DROPS CIRCULAR NEEDLE SIZE 4 MM: Length 40 cm and 80 cm for stocking stitch.
DROPS DOUBLE POINTED NEEDLES SIZE 3 MM.
DROPS CIRCULAR NEEDLE SIZE 3 MM: Length 40 cm and 80 cm for rib.
Needle size is only a guide. If you get too many stitches on 10 cm, change to a larger needle size. If you get too few stitches on 10 cm, change to a smaller needle size.

-------------------------------------------------------

Alternative Yarn – See how to change yarns here
Yarn Groups A to F – Use the same pattern and change the yarn here
Yarn usage using an alternative yarn – Use our yarn converter here

-------------------------------------------------------

DROPS Belle
DROPS Belle
53% Cotton, 33% Viscose, 14% Linen
from 2.20 € /50g
Get the yarn to make this pattern from 17.60€.

The yarn cost is calculated from the pattern’s smallest size and the yarn’s cheapest product type. Looking for an even better price? You might find it on the DROPS Deals!

Pattern instructions

-------------------------------------------------------

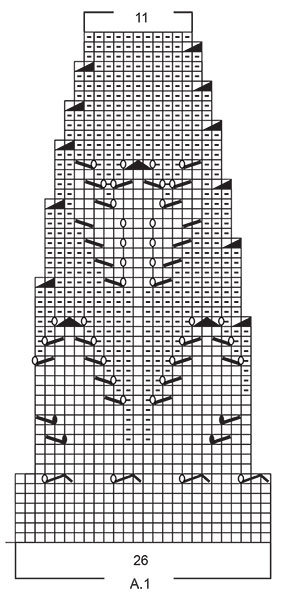
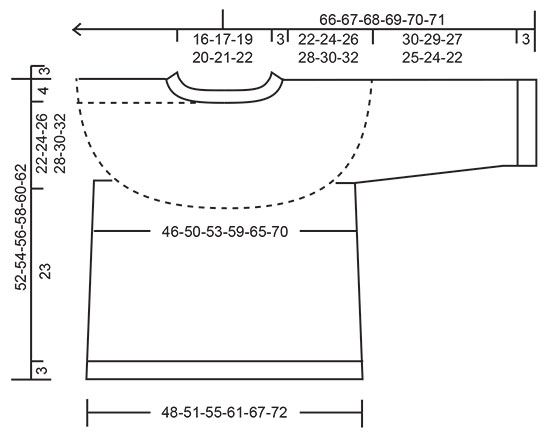
EXPLANATIONS FOR THE PATTERN:

-------------------------------------------------------

PATTERN:
See diagram A.1.

DECREASE/INCREASE TIP (evenly spaced):
To work out how to decrease/increase evenly, count the total number of stitches on needle (e.g. 248 stitches) and divide by number of decreases/increases to be made (e.g. 48) = 5.2. In this example, decrease by knitting together approx. each 4th and 5th stitch.
When increasing, make 1 yarn over after approx. each 5th stitch. On the next round knit the yarn overs twisted to avoid holes.

DECREASE TIP-1 (for sides of body): 
Decrease 1 stitch on each side of the marker thread as follows: Work until there are 3 stitches left before the marker thread, knit 2 together, knit 2 (marker thread sits between these 2 stitches) slip 1 stitch as if to knit, knit 1 and pass the slipped stitch over the knitted stitch (= 2 stitches decreased and a total of 4 stitches decreased on the row).

DECREASE TIP-2 (for yoke):
Decrease evenly spaced in the same way as described under DECREASE/INCREASE TIP, but now decrease by purling 2 together.

INCREASE TIP (for sleeves):
Work until there are 2 stitches left before the marker thread, 1 yarn over, knit 4 (marker thread sits between these 4 stitches), 1 yarn over. On the next round knit the yarn overs twisted to avoid holes. Then work the new stitches in stocking stitch

-------------------------------------------------------

START THE PIECE HERE:

-------------------------------------------------------

JUMPER – SHORT OVERVIEW OF THE PIECE:
The body is worked in the round with circular needle, bottom up as far as the armholes. The sleeves are worked in the round with double pointed needles/short circular needle. The sleeves are placed on the same circular needle as the body and the yoke is finished in the round.

BODY:
Cast on 248-268-288-312-344-376 stitches with circular needle size 3 mm and Belle or Merino Extra Fine. Knit 1 round, then work rib (knit 2, purl 2) in the round for 3 cm.
Knit 1 round where you decrease 48-52-56-56-64-72 stitches evenly spaced – read DECREASE/INCREASE TIP = 200-216-232-256-280-304 stitches. Change to circular needle size 4 mm. Now work stocking stitch. REMEMBER THE KNITTING TENSION! When the piece measures 11 cm, insert 1 marker thread in each side: Count 50-54-58-64-70-76 stitches (= ½ back piece) insert 1 marker thread here, count 100-108-116-128-140-152 stitches (= front piece), insert 1 marker thread here, there are 50-54-58-62-70-76 stitches left on the round (= ½ back piece). Allow the threads to follow your work onwards.
On the next round decrease 1 stitch on each side of both marker threads – read DECREASE TIP-1. Repeat this decrease when the piece measures 20 cm = 192-208-224-248-272-296 stitches. When the piece measures 26 cm cast off for the armholes on the next round as follows: Work the first 44-48-51-57-62-68 stitches, cast off 8-8-10-10-12-12 stitches (4-4-5-5-6-6 stitches on each side of the marker thread), work the next 88-96-102-114-124-136 stitches, cast off 8-8-10-10-12-12 stitches (4-4-5-5-6-6 stitches on each side of the marker thread) and work the remaining 44-48-51-57-62-68 stitches. Lay the piece to one side and work the sleeves.

SLEEVES:
Cast on 60-64-68-68-72-76 stitches with double pointed needles size 3 mm and Belle or Merino Extra Fine. Knit 1 round. Then work rib (knit 2, purl 2) in the round for 3 cm. Knit 1 round where you decrease 9-12-13-12-14-15 stitches evenly spaced = 51-52-55-56-58-61 stitches. Change to double pointed needles size 4 mm. Insert a marker thread at the beginning of the round; allow the thread to follow your work onwards. Work stocking stitch. When the piece measures 8 cm increase 2 stitches under the sleeve – read INCREASE TIP. Increase as follows in the different sizes:
S: Increase every 9th round a total of 8 times.
M: Increase every 5th round a total of 12 times.
L: Increase alternately every 4th and 3rd round a total of 15 times.
XL: Increase every 3rd round a total of 16 times.
XXL: Increase alternately every 3rd and 2nd round a total of 17 times.
XXXL: Increase every 2nd round a total of 18 times.
When all the increases are finished there are 67-76-85-88-92-97 stitches on the round. Continue working until the sleeve measures 33-31-29-28-26-24 cm. Now cast off 8-8-10-10-12-12 stitches under the sleeve for the armhole (=4-4-5-5-6-6 stitches on each side of the marker thread) = 59-68-75-78-80-85 stitches. Lay the piece to one side and work the other sleeve in the same way.

YOKE:
Place the sleeves on the same circular needle as the body, where stitches were cast off for the armholes = 294-328-354-384-408-442 stitches. THE PIECE IS NOW MEASURED FROM HERE! Work stocking stitch in the round. AT THE SAME TIME decrease evenly in the different sizes as follows:

Sizes S, M and L:
When the piece measures 1-3-5 cm decrease 8-16-16 stitches evenly spaced = 286-312-338 stitches.

Sizes XL, XXL and XXXL:
When the piece measures 3-4-5 cm decrease 10-9-13 stitches evenly spaced. Repeat when the piece measures 6-7-8 cm = 364-390-416 stitches.

When the piece measures 3-5-7-9-11-13 cm, work pattern A.1 in the round (= 11-12-13-14-15-16 repeats of 26 stitches). Continue until the diagram has been completed in height = 121-132-143-154-165-176 stitches. Knit 1 round where you decrease 21-28-31-38-45-48 stitches evenly spaced – read DECREASE TIP-2 = 100-104-112-116-120-128 stitches. Knit 1 round. Change to circular needle size 3 mm and work rib (knit 2, purl 2) for 3 cm. Cast off with knit over knit and purl over purl.
The jumper measures approx. 52-54-56-58-60-62 cm from the shoulder down .

ASSEMBLY:
Sew the openings under the sleeves.

This pattern has been corrected.

Updated online: 05.04.2024
The pattern is updated. Correction neckline before rib in size M.

Diagram

symbols = knit
symbols = purl
symbols = between 2 stitches make 1 yarn over; on the next round knit/purl the yarn over as shown in the diagram (leaves a hole)
symbols = between 2 stitches make 1 yarn over; on the next round knit the yarn over twisted to avoid a hole
symbols = knit 2 together
symbols = slip 1 stitch as if to knit, knit 1 and pass the slipped stitch over the knitted stitch
symbols = slip 1 stitch as if to knit, knit 2 together and pass the slipped stitch over the knitted-together stitches
symbols = knit 3 together (= 2 stitches decreased)
symbols = purl 2 together
diagram
diagram

Each of our patterns has specific tutorial videos to help you.

Do you have a question? See a list of frequently asked questions (FAQ)

Knitting tension is what determines the final measurements of your work, and is usually measured per 10 x 10 cm. It is provided like so: number of stitches in width x number of rows in height - eg: 19 stitches x 26 rows = 10 x 10 cm.

The knitting tension is very individual; some people knit/crochet loosely while others work tightly. You adjust the knitting tension with the needle size, which is why the suggested needle size is only meant as a guide! You need to adjust this (up or down) to ensure that YOUR knitting tension matches the knitting tension provided in the pattern. If you work with a different knitting tension than provided you will have a different yarn consumption, and your work will have different measurements than what the pattern suggests.

The knitting tension also determines which yarns can replace each other. As long as you achieve the same knitting tension you can replace one yarn with another.

See DROPS lesson: How to measure your tension/gauge

See DROPS video: How to make a gauge tension swatch

The required amount of yarn is provided in grams, eg: 450 g. To calculate how many balls you’ll need you first need to know how many grams are in 1 ball (25g, 50g or 100g). This information is available if you click on the individual yarn quality on our pages. Divide the amount required with the amount of each ball. For example, if each ball is 50g (the most common amount), the calculation will be as follows: 450 / 50 = 9 balls.

The important thing when changing from one yarn to another is that the knitting/crochet tension remains the same. This is so that the measurements of the finished piece will be the same as on the sketch provided. It is easier to achieve the same knitting tension using yarns from the same yarn group. It is also possible to work with multiple strands of a thinner yarn to achieve the knitting tension of a thicker one. Please try our yarn converter. We recommend you to always work a test swatch.

Please NOTE: when changing yarn the garment might have a different look and feel to the garment in the photo, due to individual properties and qualities of each yarn.

See DROPS lesson: Can I use a different yarn than the one mentioned in the pattern?

All our yarns are categorised into yarn groups (from A to F) according to thickness and knitting tension – group A contains the thinnest yarns and group F the thickest. This makes it easier for you to find alternative yarns to our patterns, should you wish to switch yarn. All yarns within the same group have a similar knitting tension and can easily replace each other. However, different yarn qualities have different structures and properties which will give the finished work a unique look and feel.

Click here for an overview of the yarns in each yarn group

At the top of all our patterns you’ll find a link to our yarn calculator, which is a helpful tool should you wish to use a different yarn than suggested. By filling in the yarn quality you wish to replace, the amount (in your size) and number of strands, the calculator will present good alternative yarns with the same knitting tension. Additionally it will tell you how much you’ll require in the new qualities and whether you’ll need to work with multiple strands. Most skeins are 50g (some are 25g or 100g).

If the pattern is worked with multiple colours, every colour will have to be calculated separately. Similarly, if the pattern is worked with several strands of different yarns (for example 1 strand Alpaca and 1 strand Kid-Silk) you will have to find alternatives for each, individually.

Click here to see our yarn calculator

Since different yarns have different qualities and textures we have chosen to keep the original yarn in our patterns. However, you can easily find options among our available qualities by using our yarn calculator, or simply pick a yarn from the same yarn group.

It is possible that some retailers still have discontinued yarns in stock, or that someone has a few skeins at home that they would like to find patterns for.

The yarn calculator will provide both alternative yarn as well as required amount in the new quality.

If you think it's hard to decide what size to make, it can be a good idea to measure a garment you own already and like the size of. Then you can pick the size by comparing those measures with the ones available in the pattern's size chart.

You'll find the size chart at the bottom of the pattern.

See DROPS lesson: How to read size chart

The needle size provided in the pattern serves only as a guide, the important thing is to follow the knitting tension. And since knitting tension is very individual, you will have to adjust the needle size to ensure that YOUR tension is the same as in the pattern – maybe you’ll have to adjust 1, or even 2 needle sizes, up or down to achieve the correct tension. For this, we recommend that you work test swatches.

Should you work with a different knitting tension than the one provided, the measurements of the finished garment might deviate from the measurement sketch.

See DROPS lesson: How to measure your tension/gauge

See DROPS video: How to make a tension/gauge swatch

Working a garment top-down provides more flexibility and room for personal adjustment. For example it is easier to try the garment on while working, as well as making adjustments to length of yoke and shoulder caps.

The instructions are carefully explaining every step, in the correct order. Diagrams are adjusted to the knitting direction and are worked as usual.

The diagram depicts all rows/rounds, and every stitch seen from the right side. It is read from bottom to top, from right to left. 1 square = 1 stitch.

When working back and forth, every other row is worked from the right side and every other row is worked from the wrong side. When working from the wrong side, the diagram will have to be worked reversed: from left to right, knit stitches are purled, purl stitches are knit etc.

When working in the round every round is worked from the right side and the diagram are worked from right to left on all rounds.

See DROPS lesson: How to read knitting diagrams

The diagram depicts all rows/rounds, and every stitch seen from the right side. It is worked from bottom to top, from right to left.

When working back and forth every other row is worked from the right side: from right to left and every other row is worked from the wrong side: from left to right.

When working in the round, every row in the diagram are worked from the right side, from right to left.

When working a circular diagram you start in the middle and work your way outwards, counter clockwise, row by row.

The rows usually start with a given number of chain stitches (equivalent to the height of the following stitch), this will either be depicted in the diagram or explained in the pattern.

See DROPS lesson: How to read crochet diagrams

Instructions for working several diagrams after each other on the same row/round, will often be written like so: “work A.1, A.2, A.3 a total of 0-0-2-3-4 times". This means you work A.1 once, then A.2 is worked once, and A.3 is repeated (in width) the number of times provided for your size – in this case like so: S = 0 times, M = 0 times, L=2 times, XL= 3 times and XXL = 4 times.

The diagrams are worked as usual: begin with the first row in A.1, then work the first row in A.2 etc.

See DROPS lesson: How to read knitting diagrams

See DROPS lesson: How to read crochet diagrams

The total width of the garment (from wrist-to-wrist) will be larger in the larger sizes, despite the actual sleeves being shorter. The larger sizes have longer sleeve caps and wider shoulders, so there will be a good fit in all sizes.

The measurement sketch/schematic drawing provides information regarding the full length of the garment. If it’s a jumper or a jacket the length is measured from the highest point on the shoulder closest to the neckline, and straight down to the bottom of the garment. It is NOT measured from the tip of shoulder. Similarly, the length of yoke is measured from the highest point on the shoulder and down to where yoke is split into body and sleeves.

On a jacket measures are never taken along bands, unless specifically stated. Always measure inside band stitches when measuring the length.

See DROPS lesson: How to read a schematic drawing

Diagrams are often repeated on the round or in height. 1 repeat is the diagram the way it appears in the pattern. If it says to work 5 repeats of A.1 in the round, then you work A.1 a total of 5 times after/next to each other in the round. If it says to work 2 repeats of A.1 vertically/in height you work the entire diagram once, then begin again at the start and work the entire diagram one more time.

Chain stitches are slightly narrower than other stitches and to avoid working the cast-on edge too tight, we simply chain more stitches to begin with. The stitch count will be adjusted on the following row to fit the pattern and measurement sketch.

The rib edge is more elastic and will contract slightly compared to, for example, stocking stitch. By increasing before the rib edge, you avoid a visible difference in width between the rib edge and the rest of the body.

It’s very easy to cast off too tightly, and by making yarn overs while casting off (and simultaneously casting these off) you avoid a too tight cast off edge.

See DROPS video: How to bind off with yarn overs (yo)

To achieve an even increase (or decrease) you can increase on, for example: every 3rd and 4th row alternately, like so: work 2 rows and increase on the 3rd row, work 3 rows and increase on the 4th. Repeat this until the increase is complete.

See DROPS lesson: Increase or decrease 1 st on every 3rd and 4th row alternately

Should you prefer to work in the round instead of back and forth, you may of course adjust the pattern. You’ll need to add steeks mid-front (usually 5 stitches), and follow the instructions. When you would normally turn and work from the wrong side, simply work across the steek and continue in the round. At the end you’ll cut the piece open, pick up stitches to work bands, and cover the cut edges.

See DROPS video: How to knit steeks and cut open

Should you prefer to work back and forth instead of in the round, you may of course adjust the pattern so you work the pieces separately and then assemble them at the end. Divide the stitches for the body in 2, add 1 edge stitch in each side (for sewing) and work the front and back pieces separately.

See DROPS lesson: Can I adapt a pattern for circular needles into straight needles?

Pattern repeats can vary slightly in the different sizes, in order to get the correct proportions. If you’re not working the exact same size as the garment in the photo, yours might deviate slightly. This has been carefully developed and adjusted so that the complete impression of the garment is the same in all sizes.

Make sure to follow instructions and diagrams for your size!

If you have found a pattern you like which is available in women’s size it’s not very difficult to convert it to men’s size. The biggest difference will be the length of sleeves and body. Start working on the women size that you think would fit across the chest. The additional length will be worked right before you cast off for the armhole/sleeve cap. If the pattern is worked top-down you can add the length right after the armhole or before the first decrease on sleeve.

Regarding additional yarn amount, this will depend on how much length you add, but it is better with a skein too many than too few.

All yarns will have excess fibres (from production) that might come off as lint or shedding. Brushed yarns (ie hairier yarns) have more of these loose, excess fibres, causing more shedding.

Shedding also depends on what is worn under or over the garment, and whether this pulls at the yarn fibres. It’s therefore not possible to guarantee that there will be no shedding

Below are some tips on how to get the best result when working with hairier yarns:

1. When the garment is finished (before you wash it) shake it vigorously so the looser hairs come off. NOTE: do NOT use a lint roller, brush or any method that pulls at the yarn.

2. Place the garment in a plastic bag and put it in your freezer - the temperature will cause the fibres to become less attached to each other, and excess fibres will come off easier.

3. Leave in the freezer for a few hours before taking it out and shaking it again.

4. Wash the garment according to the instructions on the yarn label.

Pilling is a natural process that happens to even the most exclusive of fibers. It's a natural sign of wear and tear that is hard to avoid, and that is most visible in high friction areas of your garment like a sweater's arms and cuffs.

You can make your garment look as new by removing the pilling, using a fabric comb or a pill/lint remover.

Still can't find the answer you need? Then scroll down and leave your question so one of our experts can try to help you. This will be done normally within 5 to 10 working days.
In the meantime, you can read the questions and answers that others have left to this pattern or join the DROPS Workshop on Facebook to get help from fellow knitters/crocheters!

You might also like...

Yellow Tulip

Catherina, Ireland

Yellow Tulip

Yuliya, Russian Federation

Yellow Tulip

Esperanza Navarro Andrades, Spain

Yellow Tulip

Kathie Ling, Canada

DROPS 222-4

Елена Смоловик, Ukraine

Post a comment to pattern DROPS 222-4

We would love to hear what you have to say about this pattern!

If you want to leave a question, please make sure you select the correct category in the form below, to speed up the answering process. Required fields are marked *.

Comments / Questions (40)

country flag Kinou wrote:

Bonjour, modèle superbe, j’ai pris beaucoup de plaisir à le faire. Merci :) Il faudrait juste apporter une petite correction : je fais la taille M et à la fin de empiècement lorsque le col débute, 106 mailles n’est pas un multiple de 4, nécessaire pour les cotes 2/2. Donc il manque ou il y’a 2 mailles en trop en moins :)) rien de grave. Bonne journée

30.03.2024 - 13:40

country flag Inge wrote:

Som jeg skrev 12/6 måtte jeg strikke trøjen i Small og ikke large . Den er fin og færdig nu i small, som jeg forlængede både i ærme og selve trøjen. Det er altså ikke første gang jeg må gå 1 elle 2 størrelser ned. Som om I har problemer størrelsen . Skal tilføjes at strikkegastheden er overholdt

03.07.2022 - 17:04

country flag Inge wrote:

Hvad mon jeg gør forkert. Havde strikket ribben og første indtagning. Strikkefastheden passede. Det blev kæmpestort. Så nu er det trævlet op og jeg starter med small i stedet for large

12.06.2022 - 13:39

country flag Ms Lucia White wrote:

My previous question was about this sweater, so long as keep count will I be able to manage it. I have knitted socks in the round and hats and ordinary cardigans and jumpers.

11.06.2022 - 17:00

DROPS Design answered:

Dear Mrs White, the sweater is worked the same way as the jacket, ie bottom up: you first work body in the round to the armhole and put aside, you then work both sleeves separately then finally will slip sleeves on the same needle as body - this video might help you understanding how it is done. Happy knitting!

13.06.2022 - 09:02

country flag Gro wrote:

Takk for svar ang felling. Jeg har gjort slik dere skriver, men det betyr altså at det er feil i oppskriften, etter at man er ferdig med diagrammet: "Strikk 1 omgang rett der det felles 21-26-31-38-45-48 masker jevnt fordelt – les FELLETIPS-2" I FELLETIPS 2 står der at man skal felle ved å strikke vrang, ikke rett.

18.05.2022 - 19:58

country flag Gro wrote:

I bærestykket skal man strikke en omgang rett, hvor man feller jevnt fordelt. Det henvises til FELLETIPS 2. Men her står det at man skal felle ved å strikke to masker vrang sammen. Er ikke dette feil, siden fellingen skjer i en omfang med rette masker?

17.05.2022 - 22:21

DROPS Design answered:

Hej Gro, i det øverste glatstrikkede stykke feller du ved at strikke ret sammen. Når du feller i diagrammet feller du ved at strikke 2 vrang sammen. God fornøjelse!

18.05.2022 - 11:56

country flag Moh Moh Oo wrote:

I want to shorten this jumper to about 46cm (instead of 52) for small size. How do I calculate how many ball of yarns I will need?

21.04.2022 - 22:43

DROPS Design answered:

Dear Moh Moh Oo, we are unfortunately not able to adjust every pattern to every single request, please contact your DROPS store, they will help you even per mail or telephone - thanks for your comprehension. Happy knitting!

22.04.2022 - 07:45

country flag Esperanza wrote:

Para cerrar el cuello, derecho sobre derecho y en la siguiente vuelta se cierra? O derecho sobre derecho, revés sobre revés y se cierra en la misma fila? Gracias

22.08.2021 - 13:11

DROPS Design answered:

Hola Esperanza, se cierra en la misma fila en la que se trabaja derecho sobre derecho y revés sobre revés.

23.08.2021 - 13:30

country flag Vigdis Marie Pettersen wrote:

Får ikke rapport og masker til å stemme. Hvor begynner jeg rapport strikking på arbeidet. For og bakstykke bli ikke riktig. Strikker XXL. 15 rapporter fordelt på for og bakstykke? Det blir feil

31.07.2021 - 14:33

DROPS Design answered:

Hei Vigdis Marie, A.1 skal strikkes både på for/bakstykke og på ermene. Det er 26 masker i hver rapport av A.1. 390/ 26 = 15, gir 15 rapporter. God fornøyelse!

02.08.2021 - 09:27

country flag Milu Rosas wrote:

Fiz as costas e a frente com a agulha circular,e deixei em espera, depots fiz as mangas com as 4 agulhas e deixei em espera,mas agora n compreendo como se juntas as mangas na agulha circular q tem as costas e frente! Já experimentei de várias maneiras e nunca consigo, Poderá dar- me uma ajuda? Muito obrigada.

09.07.2021 - 03:03

DROPS Design answered:

Bom dia, Primeiro, coloca-se as costas na agulha, depois, uma manga, depois, a frente e, por fim, a outra mangam e une-se em redondo. Ao princípio, nas primeiras carreiras, pode parecer difícil tricotar as mangas já fechadas, mas à medida que se vai tricotando, vai ganhando a forma do encaixe. Bons tricôs!

09.07.2021 - 08:16