DROPS Air
DROPS Air
65% Alpaca, 28% Polyamide, 7% Wool
from 4.80 £ /50g
Get the yarn to make this pattern from 28.80£.

The yarn cost is calculated from the pattern’s smallest size and the yarn’s cheapest product type. Looking for an even better price? You might find it on the DROPS Deals!

DROPS SS24

Low Tide

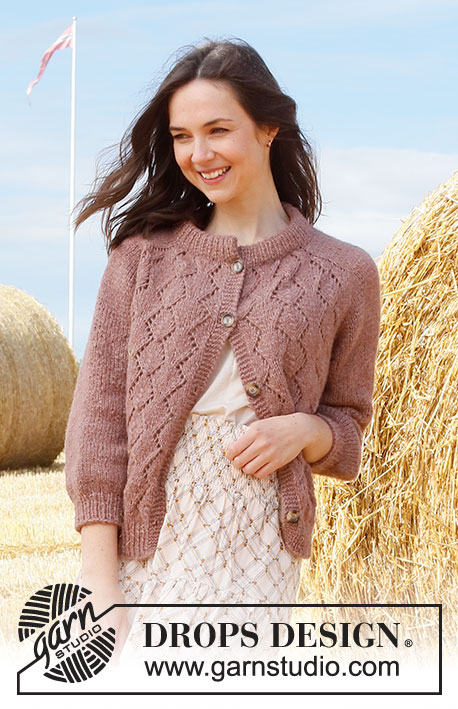
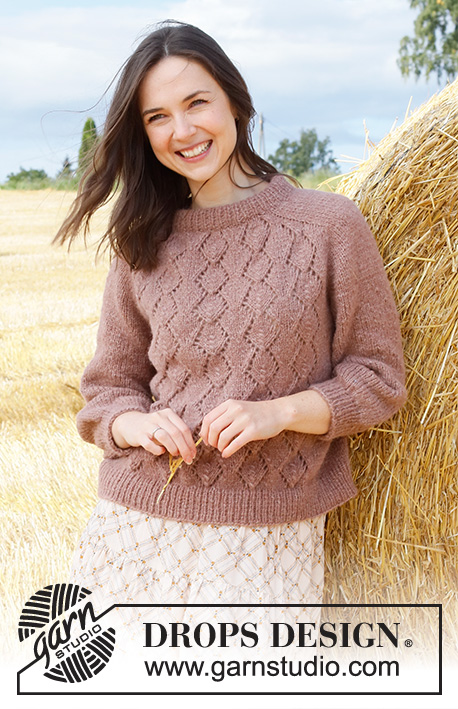
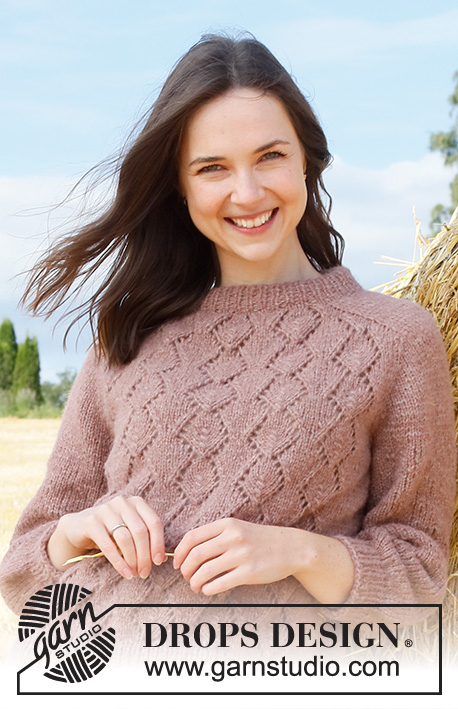
Knitted jumper in DROPS Air. Piece is knitted top down with saddle shoulder, lace pattern, double neck edge and ¾ sleeves. Size: S - XXXL

DROPS 223-3
DROPS design: Pattern ai-327
Yarn group C or A + A
-------------------------------------------------------

SIZE:
S - M - L - XL - XXL - XXXL

MATERIALS:
DROPS AIR from Garnstudio (belongs to yarn group C)
300-300-350-400-400-450 g colour no 29, old pink

KNITTING TENSION:
17 stitches in width and 22 rows vertically in stocking stitch = 10 x 10 cm.

NEEDLES:
DROPS DOUBLE POINTED NEEDLES SIZE 5 mm
DROPS CIRCULAR NEEDLE SIZE 5 mm : Length 40 and 80 cm for stocking stitch.
DROPS DOUBLE POINTED NEEDLES SIZE 4 mm
DROPS CIRCULAR NEEDLE SIZE 4 mm : Length 40 and 80 cm for rib.
Needle size is only a suggestion! If you have too many stitches on 10 cm switch to a larger needle size. If you have too few stitches on 10 cm switch to a smaller needle size.

-------------------------------------------------------

Alternative Yarn – See how to change yarns here
Yarn Groups A to F – Use the same pattern and change the yarn here
Yarn usage using an alternative yarn – Use our yarn converter here

-------------------------------------------------------

DROPS Air
DROPS Air
65% Alpaca, 28% Polyamide, 7% Wool
from 4.80 £ /50g
Get the yarn to make this pattern from 28.80£.

The yarn cost is calculated from the pattern’s smallest size and the yarn’s cheapest product type. Looking for an even better price? You might find it on the DROPS Deals!

Pattern instructions

NOTE: This pattern is written in British English. All measurements in charts are in cm. For conversion from cm to inches - click here. There are different terms for crocheting in British and American English. If this pattern includes crochet, click for "crochet terms" here. For this pattern in American English, please click here.
-------------------------------------------------------

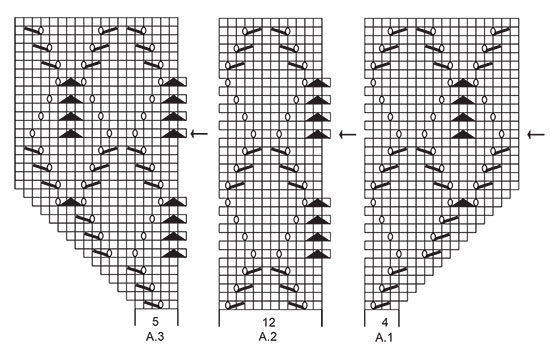
EXPLANATION FOR THE PATTERN:

-------------------------------------------------------

PATTERN:
See diagrams A.1 to A.3.

INCREASE/DECREASE TIP (evenly):
To calculate how to increase/decrease evenly, use the total number of stitches on row (e.g. 82 stitches) and divide stitches by number of increases/decreases to be done (e.g. 16) = 5.1.
In this example increase by making 1 yarn over after approx. every 5th stitch. On next round work yarn overs twisted to avoid holes.
To decrease in this example knit approx. every 4th and 5th stitch together.

INCREASE TIP:
BEFORE MARKER:
The stitch is twisted towards the right.
Use left needle to pick up thread between 2 stitches from round below, pick up thread from behind and knit stitch in front loop.
AFTER MARKER:
The stitch is twisted towards the left.
Use left needle to pick up thread between 2 stitches from round below, pick up thread from from front and knit stitch in back loop.

DECREASE TIP (applies to mid under sleeves):
Decrease 1 stitch on each side of marker as follows: Work until 3 stitches remain before marker, knit 2 together, knit 2 (marker is between these 2 stitches), slip 1 stitch knitwise, knit 1, pass slipped stitch over stitch worked.

CAST-OFF TIP:
To avoid a tight cast-off edge you may use a larger needle size. If this also is too tight, work a 1 yarn over after approx. every 4th stitch while casting off (cast off yarn overs as regular stitches).

-------------------------------------------------------

START THE PIECE HERE:

-------------------------------------------------------

JUMPER - SHORT OVERVIEW OF THE PIECE:
Work neck edge and yoke in the round on circular needle from transition between back piece and right sleeve, top down. Now divide yoke for body and sleeves. Body is worked in the round on circular needle, top down. Work sleeves in the round on double pointed needles/short circular needle, top down.

NECK EDGE:
Cast on 82-88-92-98-102-104 stitches on circular needle size 4 mm with Air. Knit 1 round. Then work rib = knit 1/purl 1. Continue rib like this for 8½-9 cm.
When rib is done, knit 1 round while increasing 16-14-10-36-32-30 stitches evenly = 98-102-102-134-134-134 stitches.
Knit 1 round (work yarn overs twisted). Switch to circular needle size 5 mm.

YOKE:
Insert 1 marker here - NOW MEASURE PIECE FROM HERE!
In addition, insert 4 new markers in piece as explained below - this is done without working the stitches, and insert each of these 4 markers between 2 stitches. Use markers when increasing for saddle shoulder.
1st marker: Insert first marker at beginning of round.
2nd marker: Count 16-18-18-22-22-22 stitches from 1st marker (= shoulder stitches), insert 2nd marker before next stitch.
3rd marker: Count 33-33-33-45-45-45 stitches from 2nd marker (= front piece), insert 3rd marker before next stitch.
4th marker: Count 16-18-18-22-22-22 stitches from 3rd marker (= shoulder stitches), insert 4th marker before next stitch.
33-33-33-45-45-45 stitches remain on back piece after 4th marker.
Move these 4 markers upwards when working; increase at each of these markers.

SADDLE SHOULDER INCREASE:
Read all of the following section before working!
Work pattern and increase at the same time as explained below:
Marker is here, knit 16-18-18-22-22-22, marker is here, work A.1 over the next 4 stitches, A.2 over the next 24-24-24-36-36-36 stitches, A.3 over the next 5 stitches, marker is here, knit 16-18-18-22-22-22, marker is here, work A.1 over the next 4 stitches, A.2 over the next 24-24-24-36-36-36 stitches, A.3 over the next 5 stitches.
AT THE SAME TIME on first round increase 4 stitches for saddle shoulder as follows:
Increase BEFORE 1st and 3rd marker and increase AFTER 2nd and 4th marker – read INCREASE TIP. Now increase only on front piece and back piece, and number of shoulder stitches remains the same.
Continue in the round like this, and increase the same way on every round 15-16-18-20-22-25 times in total = 158-166-174-214-222-234 stitches (work the first 14 stitches in A.1/A.3, then work the rest of the increased stitches in stocking stitch). REMEMBER THE KNITTING TENSION!
After last increase piece measures approx. 7-7-8-9-10-11 cm from marker by the neck. Then increase for sleeves as explained below.

SLEEVE INCREASE:
Continue in the round with pattern as before, AT THE SAME TIME on next round increase 4 stitches for sleeve as follows:
Increase AFTER 1st and 3rd marker and increase BEFORE 2nd and 4th marker – remember INCREASE TIP.
Now increase only on sleeve, and number of stitches on front pieces and back piece stays the same.
Increase like this every round 2-0-2-4-2-4 times in total, and every other round 7-9-9-9-11-8 times in total and every round 2-0-0-2-2-2 times in total = 202-202-218-274-282-290 stitches.
Piece measures approx. 15-15-17-20-22-21 cm from marker at the neck. Then increase for yoke as explained below.

YOKE INCREASE:
Move the 4 markers from sleeve increase so each marker sits in the outermost sleeve stitches on each side. There are now 36-34-38-50-50-48 stitches between the marker-stitches on each sleeve.  
On next round increase 8 stitches for yoke by increasing both before and after each of the 4 stitches with markers - remember INCREASE TIP.
Increase stitches on front pieces, back piece and on both sleeves, and work the increased stitches in stocking stitch.
Increase like this every other round 5-8-8-6-6-9 times in total = 242-266-282-322-330-362 stitches.
When all increases are done, the piece measures approx. 20-22-24-25-27-29 cm from marker at the neck. If the piece is shorter than this, work as before without increases until correct measurements.

Now divide piece for body and sleeves. Work next round as follows:
Slip the first 48-52-56-64-64-68 stitches on a stitch holder for sleeve, cast on 8-8-10-10-12-12 new stitches on needle (= in the side under sleeve), work the next 73-81-85-97-101-113 stitches (= front piece), slip the next 48-52-56-64-64-68 stitches on a stitch holder for sleeve, cast on 8-8-10-10-12-12 new stitches on needle (= in the side under sleeve), work the last 73-81-85-97-101-113 stitches (= back piece).
Now finish body and sleeves separately. NOW MEASURE PIECE FROM HERE!

BODY:
= 162-178-190-214-226-250 stitches. Continue with pattern as before. Work the new 8-8-10-10-12-12 stitches in stocking stitch. Work until piece measures approx. 20 cm from division- adjust to finish after a round that is as last round in diagrams or 7 rounds before.
Now increase 26-28-30-34-36-40 stitches evenly = 188-206-220-248-262-290 stitches.
Switch to circular needle size 4 mm. Work rib (knit 1/purl 1) in the round for 5 cm. Cast off with knit over knit and purl over purl - read CAST-OFF TIP. Jumper measures approx. 50-52-54-56-58-60 cm from shoulder and down.

SLEEVES:
Slip the 48-52-56-64-64-68 stitches from stitch holder in one side of piece back on a short circular needle/double pointed needles size 5 mm. Pick in addition up 1 stitch in each of the 8-8-10-10-12-12 new stitches cast on under sleeve = 56-60-66-74-76-80 stitches.
Insert a marker the middle of the new stitches cast on in the side under the sleeve (= 4-4-5-5-6-6 new stitches on each side of marker). Work in stocking stitch in the round. When sleeve measures 3 cm from division, decrease 1 stitch on each side of marker – read DECREASE TIP. Decrease like this every 0-2-1½-1½-1-1 cm 1-2-3-4-5-6 times in total = 54-56-60-66-66-68 stitches. Continue to work until sleeve measures 29-27-26-26-24-23 cm. Knit 1 round while decreasing 16-16-18-20-20-20 stitches evenly = 38-40-42-46-46-48 stitches. Switch to double pointed needles size 4 mm. Work rib (knit 1/purl 1) in the round for 5 cm. Cast off - remember CAST-OFF TIP. Sleeve measures 34-32-31-31-29-28 cm from division. Work the other sleeve the same way.

ASSEMBLY:
Fold rib at the top of neck down on the inside of garment. Fasten rib to form a double neck edge. To avoid a tight neck edge and avoiding the edge to tip outwards, it is important to make the seam elastic.

This pattern has been corrected.

Updated online: 28.02.2023
SLEEVE INCREASE:... Increase like this every round 2-0-2-4-2-4 times in total,...

Diagram

symbols = knit
symbols = between 2 stitches make 1 yarn over, on next round knit yarn over to make a hole
symbols = knit 2 together (= 1 stitch decreased)
symbols = slip 1 stitch knitwise, knit 1, pass slipped stitch over stitch worked (= 1 stitch decreased)
symbols = slip 1 stitch knitwise, knit 2 together, pass slipped stitch over stitches worked together (= 2 stitches decreased).
symbols = when diagrams have been worked vertically, continue pattern from this round.
symbols = saddle shoulder increase
symbols = sleeve increase
symbols = yoke increase
diagram
diagram
diagram

Each of our patterns has specific tutorial videos to help you.

Do you have a question? See a list of frequently asked questions (FAQ)

Knitting tension is what determines the final measurements of your work, and is usually measured per 10 x 10 cm. It is provided like so: number of stitches in width x number of rows in height - eg: 19 stitches x 26 rows = 10 x 10 cm.

The knitting tension is very individual; some people knit/crochet loosely while others work tightly. You adjust the knitting tension with the needle size, which is why the suggested needle size is only meant as a guide! You need to adjust this (up or down) to ensure that YOUR knitting tension matches the knitting tension provided in the pattern. If you work with a different knitting tension than provided you will have a different yarn consumption, and your work will have different measurements than what the pattern suggests.

The knitting tension also determines which yarns can replace each other. As long as you achieve the same knitting tension you can replace one yarn with another.

See DROPS lesson: How to measure your tension/gauge

See DROPS video: How to make a gauge tension swatch

The required amount of yarn is provided in grams, eg: 450 g. To calculate how many balls you’ll need you first need to know how many grams are in 1 ball (25g, 50g or 100g). This information is available if you click on the individual yarn quality on our pages. Divide the amount required with the amount of each ball. For example, if each ball is 50g (the most common amount), the calculation will be as follows: 450 / 50 = 9 balls.

The important thing when changing from one yarn to another is that the knitting/crochet tension remains the same. This is so that the measurements of the finished piece will be the same as on the sketch provided. It is easier to achieve the same knitting tension using yarns from the same yarn group. It is also possible to work with multiple strands of a thinner yarn to achieve the knitting tension of a thicker one. Please try our yarn converter. We recommend you to always work a test swatch.

Please NOTE: when changing yarn the garment might have a different look and feel to the garment in the photo, due to individual properties and qualities of each yarn.

See DROPS lesson: Can I use a different yarn than the one mentioned in the pattern?

All our yarns are categorised into yarn groups (from A to F) according to thickness and knitting tension – group A contains the thinnest yarns and group F the thickest. This makes it easier for you to find alternative yarns to our patterns, should you wish to switch yarn. All yarns within the same group have a similar knitting tension and can easily replace each other. However, different yarn qualities have different structures and properties which will give the finished work a unique look and feel.

Click here for an overview of the yarns in each yarn group

At the top of all our patterns you’ll find a link to our yarn calculator, which is a helpful tool should you wish to use a different yarn than suggested. By filling in the yarn quality you wish to replace, the amount (in your size) and number of strands, the calculator will present good alternative yarns with the same knitting tension. Additionally it will tell you how much you’ll require in the new qualities and whether you’ll need to work with multiple strands. Most skeins are 50g (some are 25g or 100g).

If the pattern is worked with multiple colours, every colour will have to be calculated separately. Similarly, if the pattern is worked with several strands of different yarns (for example 1 strand Alpaca and 1 strand Kid-Silk) you will have to find alternatives for each, individually.

Click here to see our yarn calculator

Since different yarns have different qualities and textures we have chosen to keep the original yarn in our patterns. However, you can easily find options among our available qualities by using our yarn calculator, or simply pick a yarn from the same yarn group.

It is possible that some retailers still have discontinued yarns in stock, or that someone has a few skeins at home that they would like to find patterns for.

The yarn calculator will provide both alternative yarn as well as required amount in the new quality.

If you think it's hard to decide what size to make, it can be a good idea to measure a garment you own already and like the size of. Then you can pick the size by comparing those measures with the ones available in the pattern's size chart.

You'll find the size chart at the bottom of the pattern.

See DROPS lesson: How to read size chart

The needle size provided in the pattern serves only as a guide, the important thing is to follow the knitting tension. And since knitting tension is very individual, you will have to adjust the needle size to ensure that YOUR tension is the same as in the pattern – maybe you’ll have to adjust 1, or even 2 needle sizes, up or down to achieve the correct tension. For this, we recommend that you work test swatches.

Should you work with a different knitting tension than the one provided, the measurements of the finished garment might deviate from the measurement sketch.

See DROPS lesson: How to measure your tension/gauge

See DROPS video: How to make a tension/gauge swatch

Working a garment top-down provides more flexibility and room for personal adjustment. For example it is easier to try the garment on while working, as well as making adjustments to length of yoke and shoulder caps.

The instructions are carefully explaining every step, in the correct order. Diagrams are adjusted to the knitting direction and are worked as usual.

The diagram depicts all rows/rounds, and every stitch seen from the right side. It is read from bottom to top, from right to left. 1 square = 1 stitch.

When working back and forth, every other row is worked from the right side and every other row is worked from the wrong side. When working from the wrong side, the diagram will have to be worked reversed: from left to right, knit stitches are purled, purl stitches are knit etc.

When working in the round every round is worked from the right side and the diagram are worked from right to left on all rounds.

See DROPS lesson: How to read knitting diagrams

The diagram depicts all rows/rounds, and every stitch seen from the right side. It is worked from bottom to top, from right to left.

When working back and forth every other row is worked from the right side: from right to left and every other row is worked from the wrong side: from left to right.

When working in the round, every row in the diagram are worked from the right side, from right to left.

When working a circular diagram you start in the middle and work your way outwards, counter clockwise, row by row.

The rows usually start with a given number of chain stitches (equivalent to the height of the following stitch), this will either be depicted in the diagram or explained in the pattern.

See DROPS lesson: How to read crochet diagrams

Instructions for working several diagrams after each other on the same row/round, will often be written like so: “work A.1, A.2, A.3 a total of 0-0-2-3-4 times". This means you work A.1 once, then A.2 is worked once, and A.3 is repeated (in width) the number of times provided for your size – in this case like so: S = 0 times, M = 0 times, L=2 times, XL= 3 times and XXL = 4 times.

The diagrams are worked as usual: begin with the first row in A.1, then work the first row in A.2 etc.

See DROPS lesson: How to read knitting diagrams

See DROPS lesson: How to read crochet diagrams

The total width of the garment (from wrist-to-wrist) will be larger in the larger sizes, despite the actual sleeves being shorter. The larger sizes have longer sleeve caps and wider shoulders, so there will be a good fit in all sizes.

The measurement sketch/schematic drawing provides information regarding the full length of the garment. If it’s a jumper or a jacket the length is measured from the highest point on the shoulder closest to the neckline, and straight down to the bottom of the garment. It is NOT measured from the tip of shoulder. Similarly, the length of yoke is measured from the highest point on the shoulder and down to where yoke is split into body and sleeves.

On a jacket measures are never taken along bands, unless specifically stated. Always measure inside band stitches when measuring the length.

See DROPS lesson: How to read a schematic drawing

Diagrams are often repeated on the round or in height. 1 repeat is the diagram the way it appears in the pattern. If it says to work 5 repeats of A.1 in the round, then you work A.1 a total of 5 times after/next to each other in the round. If it says to work 2 repeats of A.1 vertically/in height you work the entire diagram once, then begin again at the start and work the entire diagram one more time.

Chain stitches are slightly narrower than other stitches and to avoid working the cast-on edge too tight, we simply chain more stitches to begin with. The stitch count will be adjusted on the following row to fit the pattern and measurement sketch.

The rib edge is more elastic and will contract slightly compared to, for example, stocking stitch. By increasing before the rib edge, you avoid a visible difference in width between the rib edge and the rest of the body.

It’s very easy to cast off too tightly, and by making yarn overs while casting off (and simultaneously casting these off) you avoid a too tight cast off edge.

See DROPS video: How to bind off with yarn overs (yo)

To achieve an even increase (or decrease) you can increase on, for example: every 3rd and 4th row alternately, like so: work 2 rows and increase on the 3rd row, work 3 rows and increase on the 4th. Repeat this until the increase is complete.

See DROPS lesson: Increase or decrease 1 st on every 3rd and 4th row alternately

Should you prefer to work in the round instead of back and forth, you may of course adjust the pattern. You’ll need to add steeks mid-front (usually 5 stitches), and follow the instructions. When you would normally turn and work from the wrong side, simply work across the steek and continue in the round. At the end you’ll cut the piece open, pick up stitches to work bands, and cover the cut edges.

See DROPS video: How to knit steeks and cut open

Should you prefer to work back and forth instead of in the round, you may of course adjust the pattern so you work the pieces separately and then assemble them at the end. Divide the stitches for the body in 2, add 1 edge stitch in each side (for sewing) and work the front and back pieces separately.

See DROPS lesson: Can I adapt a pattern for circular needles into straight needles?

Pattern repeats can vary slightly in the different sizes, in order to get the correct proportions. If you’re not working the exact same size as the garment in the photo, yours might deviate slightly. This has been carefully developed and adjusted so that the complete impression of the garment is the same in all sizes.

Make sure to follow instructions and diagrams for your size!

If you have found a pattern you like which is available in women’s size it’s not very difficult to convert it to men’s size. The biggest difference will be the length of sleeves and body. Start working on the women size that you think would fit across the chest. The additional length will be worked right before you cast off for the armhole/sleeve cap. If the pattern is worked top-down you can add the length right after the armhole or before the first decrease on sleeve.

Regarding additional yarn amount, this will depend on how much length you add, but it is better with a skein too many than too few.

All yarns will have excess fibres (from production) that might come off as lint or shedding. Brushed yarns (ie hairier yarns) have more of these loose, excess fibres, causing more shedding.

Shedding also depends on what is worn under or over the garment, and whether this pulls at the yarn fibres. It’s therefore not possible to guarantee that there will be no shedding

Below are some tips on how to get the best result when working with hairier yarns:

1. When the garment is finished (before you wash it) shake it vigorously so the looser hairs come off. NOTE: do NOT use a lint roller, brush or any method that pulls at the yarn.

2. Place the garment in a plastic bag and put it in your freezer - the temperature will cause the fibres to become less attached to each other, and excess fibres will come off easier.

3. Leave in the freezer for a few hours before taking it out and shaking it again.

4. Wash the garment according to the instructions on the yarn label.

Pilling is a natural process that happens to even the most exclusive of fibers. It's a natural sign of wear and tear that is hard to avoid, and that is most visible in high friction areas of your garment like a sweater's arms and cuffs.

You can make your garment look as new by removing the pilling, using a fabric comb or a pill/lint remover.

Still can't find the answer you need? Then scroll down and leave your question so one of our experts can try to help you. This will be done normally within 5 to 10 working days.
In the meantime, you can read the questions and answers that others have left to this pattern or join the DROPS Workshop on Facebook to get help from fellow knitters/crocheters!

You might also like...

Low Tide

Denielle Widener, United States

Low Tide

Alfarroba, Portugal

Post a comment to pattern DROPS 223-3

We would love to hear what you have to say about this pattern!

If you want to leave a question, please make sure you select the correct category in the form below, to speed up the answering process. Required fields are marked *.

Comments / Questions (13)

country flag Sara wrote:

Buongiorno Sono arrivata a 158 maglie (taglia S) ma non riesco a capire come andare avanti. Grazie

06.02.2024 - 23:10

DROPS Design answered:

Buonasera Sara, a quel punto deve lavorare gli aumenti sulle maniche e sullo sprone come indicato. Buon lavoro!

10.02.2024 - 19:15

country flag Belig wrote:

Bonjour, Pour l'augmentation des manches en taille M : comment comprendre "augmenter 0 fois au total tous les 2 tours, puis 9 fois tous les 2 tours, puis 0 fois tous les tours (=202 mailles) ? Combien de rangs dois-je faire et quand dois-je faire les augmentations ? Dois-je faire seulement 18 rangs ? Merci

27.02.2023 - 15:13

DROPS Design answered:

Bonjour Mme Belig, en taille M vous augmenter pour les manches 9 fois tous les 2 tours, donc effectivement sur 18 tours au total.. Bon tricot!

28.02.2023 - 10:13

country flag LEFRANCOIS wrote:

Bonjour. Malgré votre retour très rapide et vos explications, je ne comprends toujours pas la poursuite du diagramme. J'ai détricoté plusieurs fois. Mais rien à faire. Je suis arrivée à la fin du 14ème rg des augmentations, J'ai 75 m pour le dos et le devant et 22 m pour chaque manche, taille XL. Que faire après ? Pouvez-vous expliquer avec plus de détails le rg suivant, svp ? Je vous remercie beaucoup en espérant arriver au bout de ce tricot.

27.09.2022 - 10:50

DROPS Design answered:

Bonjour Mme Lefrancois, quand vous avez augmenté 14 fois pour les épaules/les manches marteau, vous devez avoir 73 mailles pour le devant/le dos (45 m + 2x14 augmentations) et votre ouvrage se présente ainsi: A.1 (= 18 m), 2 x A.2 (36m), A.3 (=19 m) - continuez à augmenter comme avant, mais tricotez maintenant les 6 augmentations suivantes en jersey, vous aurez ainsi: 6 m jersey (A.1 = 18m), 3 x A.2 (36m), A.3 (19m), 6 m jersey = 85 mailles pour le devant/le dos et 214 m au total. En espérant que ce soit plus clair ainsi. Bon tricot!

27.09.2022 - 13:54

country flag LEFRANCOIS wrote:

Merci pour votre retour très rapide. Je ne suis pas sûre de comprendre votre réponse. Vous voulez dire que je dois tricoter les 6 rgs suivants en jersey à la suite des diagrammes A1 et A3 et continuer en point fantaisie sur les 36 m. correspondant au diagramme A2. Pour info, je tricote la taille XL. Au rg 14, j'ai 22 m pour chaque manche et 76 m pour les dos et devant. Merci pour votre aide et votre réponse

14.09.2022 - 21:15

DROPS Design answered:

Bonjour Mme Lefrancois, je me suis mal exprimée, le panneau central est terminé en largeur = vous avez votre bon nombre de mailles pour le point ajouré, en XL il vous reste 6 augmentations à faire quand toutes les augmentations ont été tricotées en point ajouré , les augmentations suivantes (et seulement elles) vont se tricoter en jersey, les autres mailles se tricote dans le point fantaisie comme avant. En espérant que ce soit plus clair ainsi, n'hésitez pas si ce n'est pas le cas. Bonne continuation!

15.09.2022 - 09:52

country flag LEFRANCOIS wrote:

Bonjour Je suis en train de réaliser le modèle 223-3 Low Tide . Je suis arrivée au rang 14 du diagramme : tricoter les 14 premières augmentations en A1/A3 (ok). Je ne comprends pas : augmentations suivantes en jersey. Pourriez-vous m'expliquer, svp ? Je vous remercie. Bonne journée.

14.09.2022 - 15:53

DROPS Design answered:

Bonjour Mme Lefrancois, vous devez augmenter 15-16-18-20-22-25 fois tous les tours, les 14 premières fois, vous allez augmenter en suivant les diagrammes A.1/A.3, il va vous rester 1-2-4-6-8-11 augmentations à faire, ces augmentations seront à tricoter en jersey (autrement dit le panneau du point fantaisie est terminé). Bon tricot!

14.09.2022 - 16:34

country flag María wrote:

Es genial

09.02.2022 - 16:18

country flag Catherine wrote:

Impossible de trouver vos tutos en français, j ai pourtant bien sélectionner la langue... comment faire pour celui ci par exemple.... merci

07.01.2022 - 16:11

DROPS Design answered:

Bonjour Catherine, cliquez sur le menu déroulant sous la photo pour afficher d'autres langues et retrouvez notamment le français ici. Bon tricot!

07.01.2022 - 16:16

country flag Stine wrote:

Har et spørsmål, har fulgt økningen i forhold til mønstret og økt 15 ganger får jeg det rette maskeantallet altså 158 m str S. Men dette stemmer ikke i henhold te mønstret da det er kun 61 masker i mønstret og man får 63 masker i hver mønster seksjon med den økningen.

02.04.2021 - 19:54

DROPS Design answered:

Hei Stine. De første 14 økte maskene strikkes fortløpende inn i diagram A.1 og A.3, deretter strikkes resten av de økte maskene i glattstrikk. mvh DROPS design

19.04.2021 - 14:01

country flag Raffaella wrote:

Scusatemi! Ho contato le maglie sull ultima riga dello schema e la somma mi da 154 m. La taglia s, alla fine degli aumenti per l spalla ne indica 158...ho fatto questo calcolo perché non mi trovo con il numero delle maglie indicate in A.1A.2 e A.3 e gli aumenti: questi ultimi entrano nel conto delle maglie dello schema? Grazie per la pazienza!

25.03.2021 - 09:06

DROPS Design answered:

Buonasera Raffaella, gli aumenti sono incorporati nel diagramma e si aumentano 4 maglie per giro per 15 volte per un totale di 60 maglie, arrivando così a 158. Buon lavoro!

26.03.2021 - 00:05

country flag Raffaella wrote:

Il primo giro dello schema non si fanno aumenti, si inizia ad aumentare al primo giro successivo. Giusto? Comunque bellissimo modello!

24.03.2021 - 14:01

DROPS Design answered:

Buonasera Raffaella, se fa riferimento ai diagrammi A.1, A.2 e A.3 gli aumenti iniziano sul 1° giro. Buon lavoro!

24.03.2021 - 20:09