DROPS Baby Merino
DROPS Baby Merino
100% Wool
from 4.55 $ /50g
Get the yarn to make this pattern from 13.65$.

The yarn cost is calculated from the pattern’s smallest size and the yarn’s cheapest product type. Looking for an even better price? You might find it on the DROPS Deals!

DROPS SS24

Sweet Marigold

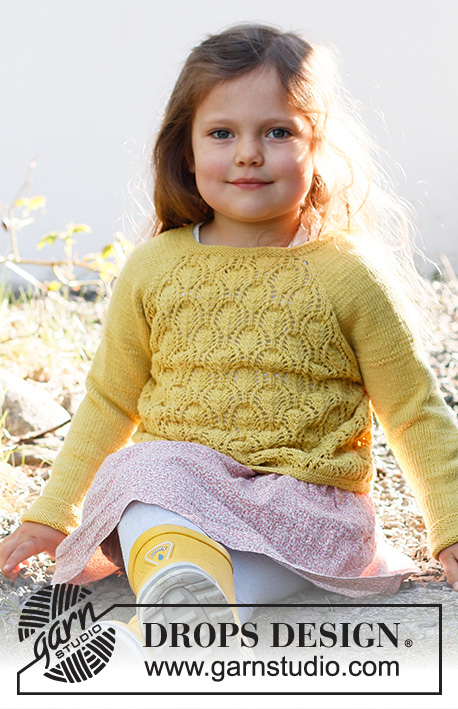
Knitted jacket for baby and kids in DROPS BabyMerino. Piece is knitted top down with raglan pattern and lace pattern. Size 6 month - 8 years

DROPS Baby & Children 38-11
DROPS design: Pattern no bm-021-bn
Yarn group A
-------------------------------------------------------

SIZE:
Size: 6/9 - 12/18 months (2 - 3/4 - 5/6 - 7/8 years)
Size equals approx. kid’s height in cm:
68/74 - 80/86 (92 - 98/104 - 110/116 - 122/128)
Size equals approx. kid’s height in feet:
2ft3/2ft5 - 2ft7/2ft9 (3ft - 3ft3/3ft5 - 3ft3/3ft5 – 3ft7/3ft9)

Finished measurements:
Chest measurements: 58-58 (70-70-82-82) cm = 22¾"-22¾" (27½"-27½"-32¼"-32¼")
Full length: 27-29 (32-35-39-43) cm = 10⅝"-11⅜" (12½"-13¾"-15¼"-17")
All measurements in charts are in cm.

MATERIALS:
DROPS BABY MERINO from Garnstudio (belongs to yarn group A)
150-150 (150-200-200-200) g color 45, lemon

KNITTING GAUGE:
24 stitches in width and 32 rows vertically in stockinette stitch = 10 x 10 cm = 4" x 4".

NEEDLES:
DROPS DOUBLE POINTED NEEDLES SIZE 3 MM = US 2.5
DROPS CIRCULAR NEEDLE SIZE 3 MM = US 2.5: Length 60 = 24" or 80 cm = 32" for stockinette stitch/lace pattern.
DROPS DOUBLE POINTED NEEDLES SIZE 2.5 MM = US 1.5
DROPS CIRCULAR NEEDLE SIZE 2.5 MM = US 1.5: Length 60 = 24" or 80 cm = 32" for edges in garter stitch.
Needle size is only a suggestion! If you have too many stitches on 10 cm = 4" switch to a larger needle size. If you have too few stitches on 10 cm = 4" switch to a smaller needle size.

DROPS MOTHER-OF-PEARL BUTTON ARCHED (white), NO 521: 5-5 (5-5-6-6) pieces.

-------------------------------------------------------

Alternative Yarn – See how to change yarns here
Yarn Groups A to F – Use the same pattern and change the yarn here
Yarn usage using an alternative yarn – Use our yarn converter here

-------------------------------------------------------

DROPS Baby Merino
DROPS Baby Merino
100% Wool
from 4.55 $ /50g
Get the yarn to make this pattern from 13.65$.

The yarn cost is calculated from the pattern’s smallest size and the yarn’s cheapest product type. Looking for an even better price? You might find it on the DROPS Deals!

Pattern instructions

NOTE: This pattern is written in American English. All measurements in charts are in cm. For conversion from inches to cm - click here. There are different terms for crocheting in American and British English. If this pattern includes crochet, click for "crochet terms" here. For this pattern in British English, please click here.
-------------------------------------------------------

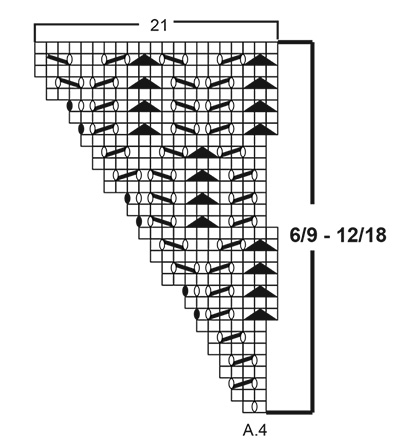
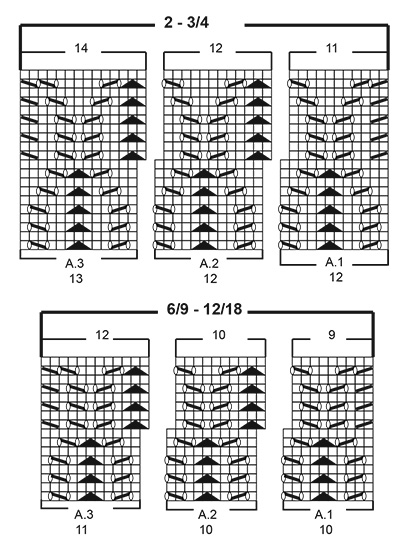
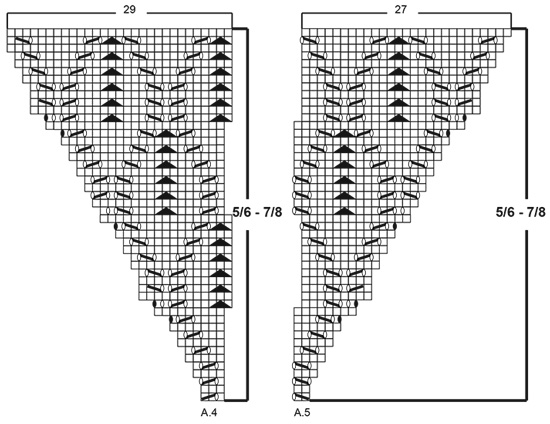
EXPLANATION FOR THE PATTERN:

-------------------------------------------------------

GARTER STITCH (back and forth):
1 ridge = knit 2 rows.

GARTER STITCH (in the round - applies to sleeves):
1 ridge = 2 rounds. Knit 1 round and purl 1 round.

PATTERN:
See diagrams A.1 to A.5. Choose diagram for your size.

INCREASE TIP (evenly):
To calculate how to increase evenly, use the total number of stitches on row (e.g. 82 stitches), minus bands (e.g. 10 stitches) , and divide the stitches by number of increases to be done (e.g. 7) = 10.3.
In this example increase by making 1 yarn over after approx. every 10th stitch. Do not increase over band stitches. On next row knit yarn over twisted to avoid holes.

RAGLAN:
All increases are done on a row from right side!
On front and back piece raglan increase is shown in diagrams.
Increase for raglan on each of the sleeves as follows:
Increase 1 stitch after 1st and 3rd marker and before 2nd and 4th marker by making a yarn over. Purl yarn overs twisted on next row (= from wrong side).
Then work the new stitches in stockinette stitch.

DECREASE TIP (applies to sleeves):
Decrease 1 stitch on each side of marker thread as follows: Work until 3 stitches remain before stitch with marker thread, knit 2 together, knit 3, slip 1 stitch knitwise, knit 1, pass slipped stitch over stitch worked.

BUTTONHOLES:
Decrease for buttonholes on right band (when garment is worn). Decrease from right side when 3 stitches remain on row as follows: Make 1 yarn over, knit the next 2 stitches together, knit last stitch. On next row knit yarn over to make hole.
Decrease for first buttonhole when rib in neck measures approx. 1-1½ cm = ⅜"-½". Then decrease the next 4-4 (4-4-5-5) buttonholes, approx. 6- 6½ (7-7½-7-7½) cm = 2⅜"- 2½"(2¾"-2⅞"-2¾"-2⅞") between each.

BIND-OFF TIP:
To avoid a tight bind-off edge you may use a larger needle size. If this also is too tight, work a 1 yarn over after approx. every 4th stitch while binding off (bind off yarn overs as regular stitches).

-------------------------------------------------------

START THE PIECE HERE:

-------------------------------------------------------

JACKET - SHORT OVERVIEW OF THE GARMENT:
Work back and forth on circular needle from mid front, work top down. Work sleeves in the round on double pointed needles, top down.

NECK EDGE:
Cast on 82-86 (92-95-100-104) stitches (including 5 band stitches in each side towards mid front) on circular needle size 2.5 MM = US 1.5 with Baby Merino. Work 4 ridges in GARTER STITCH - read explanation above. Decrease for BUTTONHOLES on right band - read explanation above.
Knit 1 row from right side while increasing 7-3 (3-0-9-5) stitches evenly - read INCREASE TIP = 89-89 (95-95-109-109) stitches.
Purl 1 row from wrong side inside with 5 band stitches in garter stitch towards mid front. Insert 1 marker thread inside 5 band stitches. NOW MEASURE PIECE FROM HERE!
Switch to circular needle size 3 MM = US 2.5 and work yoke as explained below. REMEMBER THE KNITTING GAUGE!

YOKE:
Work next row as follows from right side:
Left front piece: Work 5 band stiches in garter stitch, A.1 (= 10-10 (12-12-14-14) stitches), A.4 (= 2-2 (1-1-3-3) stitches).
Left sleeve: Work 1 stitch in stockinette stitch, insert 1st marker, make 1 yarn over, work 14 stitches in stockinette stitch, make 1 yarn over, insert 2nd marker, 1 stitch in stockinette stitch.
Back piece: Work A.5 (= 1-1 (1-1-2-2) stitches), A.2 over 20-20 (24-24-28-28) stitches, A.4 over 2-2 (1-1-3-3) stitches.
Right sleeve: Work 1 stitch in stockinette stitch, insert 3rd marker, make 1 yarn over, work 14 stitches in stockinette stitch, make 1 yarn over, insert 4th marker, 1 stitch in stockinette stitch.
Right front piece: Work A.5 over 1-1 (1-1-2-2) stitches, A.3 (= 11-11 (13-13-15-15) stitches) and finish with 5 band stitches in garter stitch = 97-97 (103-103-113-113) stitches (including all yarn overs).
Continue pattern like this and increase for RAGLAN - read explanation above on every row from right side 14-16 (17-18-19-20) times in total (including increases on first row from right side after neck edge). When increase for sleeves are finished, continue in stockinette stitch and pattern as before.
After last increase for raglan and A.4/A.5 have been worked 1 time vertically, there are 219-227 (255-259-287-291) stitches on needle.
Piece measures approx. 10-10 (12-12-15-15) cm = 4"-4" (4¾"-4¾"-6"-6") from neck edge.
Now work pattern as follows (from right side):
Left front piece: Work 5 band stitches in garter stitch, A.1 over 10-10 (12-12-14-14) stitches, A.2 over 10-10 (12-12-14-14) stitches, A.3 over 11-11 (13-13-15-15) stitches.
Left sleeve: Work 43-47 (49-51-53-55) stitches in stockinette stitch.
Back piece: Work A.1 over 10-10 (12-12-14-14) stitches, A.2 over 40-40 (48-48-56-56) stitches (= 4 times in width), A.3 over 11-11 (13-13-15-15) stitches.
Right sleeve: Work 43-47 (49-51-53-55) stitches in stockinette stitch.
Right front piece: Work A.1 over 10-10 (12-12-14-14) stitches, A.2 over 10-10 (12-12-14-14) stitches, A.3 over 11-11 (13-13-15-15) stitches and finish with 5 band stitches in garter stitch.
Continue pattern like this until piece measures 12-13 (14-15-16-17) cm = 4¾"-5⅛" (5½"-6"-6¼"-6¾") from marker thread after neck edge - adjust so that last row is from right side.
Work next row as follows from wrong side:
Continue with band and pattern as before over the first 36-36 (42-42-48-48) stitches (= front piece), slip the next 43-47 (49-51-53-55) stitches on 1 stitch holder for sleeve, cast on 9-9 (11-11-13-13) new stitches on needle (= in the side under sleeve), continue with pattern as before over the next 61-61 (73-73-85-85) stitches (= back piece), slip the next 43-47 (49-51-53-55) stitches on 1 stitch holder for sleeve, cast on 9-9 (11-11-13-13) new stitches on needle (= in the side under sleeve) and continue with pattern as before over the last 36-36 (42-42-48-48) stitches (= front piece).
Finish body and sleeves separately.

BODY:
= 151-151 (179-179-207-207) stitches.
On next row as follows from right side (continue on correct row in diagram): Work 5 band stiches in garter stitch, A.1 over 10-10 (12-12-14-14) stitches, A.2 over 120-120 (144-144-168-168) stitches (= 12 times in width), A.3 over 11-11 (13-13-15-15) stitches and 5 band stitches in garter stitch.
Continue the pattern like this until piece measures 14-15 (17-19-22-25) cm = 5½"-6" (6¾"-7½"-8¾"-9¾") from division - adjust so that next row is worked from right side. Switch to circular needle size 2.5 MM = US 1.5. Work 3 ridges back and forth over all stitches. Bind off by knitting– read BIND-OFF TIP.

SLEEVES:
Slip the 43-47 (49-51-53-55) stitches from stitch holder in one side of piece on double pointed needles size 3 MM = US 2.5 and pick in addition up 1 stitch in each of the 9-9 (11-11-13-13) new stitches cast on under sleeve = 52-56 (60-62-66-68) stitches. Insert 1 marker thread in the middle stitch under sleeve and begin round here.
Work in stockinette stitch in the round.
When piece measures 2 cm = ¾" from division, decrease 2 stitches mid under sleeve - read DECREASE TIP.
Decrease like this every 1½-1½ (2-3-3-3) cm = ½"-½" (3/4"-1⅛"-1⅛"-1⅛") 8-9 (9-8-9-9) times in total = 36-38 (42-46-48-50) stitches.
Work until sleeve measures 16-19 (22-28-32-33) cm = 6¼"-7½" (8¾"-11"-12½"-13").
Switch to double pointed needles size 2.5 MM = US 1.5.
Work 3 ridges in GARTER STITCH - read explanation above.
Bind off by knitting. Sleeve measures approx. 17-20 (23-29-33-34) cm = 6¾"-8" (9"-11⅜"-13"-13⅜") from division. Work the other sleeve the same way.

ASSEMBLY:
Sew the buttons on to the left band.

Diagram

All measurements in charts are in cm.

symbols = knit from the right side, purl from the wrong side
symbols = knit 2 together
symbols = slip 1 stitch knitwise, knit 1, pass slipped stitch over stitch worked
symbols = between 2 stitches make 1 yarn over
symbols = between 2 stitches make 1 yarn over, work yarn over twisted on next row to avoid holes
symbols = slip 1 stitch knitwise, knit 2 stitches together, pass slipped stitch over stitches worked together
diagram
diagram
diagram
diagram
diagram
diagram

Each of our patterns has specific tutorial videos to help you.

Do you have a question? See a list of frequently asked questions (FAQ)

Knitting tension is what determines the final measurements of your work, and is usually measured per 10 x 10 cm. It is provided like so: number of stitches in width x number of rows in height - eg: 19 stitches x 26 rows = 10 x 10 cm.

The knitting tension is very individual; some people knit/crochet loosely while others work tightly. You adjust the knitting tension with the needle size, which is why the suggested needle size only serve as a guide! You need to adjust this (up or down) to ensure that YOUR knitting tension matches the knitting tension provided in the pattern. If you work with a different knitting tension than provided you will have a different yarn consumption, and your work will have different measurements than what the pattern suggests.

The knitting tension also determines which yarns can replace each other. As long as you achieve the same knitting tension you can replace one yarn with another.

See DROPS lesson: How to measure your tension/gauge

See DROPS video: How to make a gauge tension swatch

The required amount of yarn is provided in grams, eg: 450 g. To calculate how many balls you’ll need you first need to know how many grams are in 1 ball (25g, 50g or 100g). This information is available if you click on the individual yarn quality on our pages. Divide the amount required with the amount of each ball. For example, if each ball is 50g (the most common amount), the calculation will be as follows: 450 / 50 = 9 balls.

The important thing when changing from one yarn to another is that the knitting/crochet tension remains the same. This is so that the measurements of the finished piece will be the same as on the sketch provided. It is easier to achieve the same knitting tension using yarns from the same yarn group. It is also possible to work with multiple strands of a thinner yarn to achieve the knitting tension of a thicker one. Please try our yarn converter. We recommend you to always work a test swatch.

Please NOTE: when changing yarn the garment might have a different look and feel to the garment in the photo, due to individual properties and qualities of each yarn.

See DROPS lesson: Can I use a different yarn than the one mentioned in the pattern?

All our yarns are categorised into yarn groups (from A to F) according to thickness and knitting tension – group A contains the thinnest yarns and group F the thickest. This makes it easier for you to find alternative yarns to our patterns, should you wish to switch yarn. All yarns within the same group have a similar knitting tension and can easily replace each other. However, different yarn qualities have different structures and properties which will give the finished work a unique look and feel.

Click here for an overview of the yarns in each yarn group

At the top of all our patterns you’ll find a link to our yarn converter, which is a helpful tool should you wish to use a different yarn than suggested. By filling in the yarn quality you wish to replace, the amount (in your size) and number of strands, the converter will present good alternative yarns with the same knitting tension. Additionally it will tell you how much you’ll require in the new qualities and whether you’ll need to work with multiple strands. Most skeins are 50g (some are 25g or 100g).

If the pattern is worked with multiple colours, every colour will have to be converted separately. Similarly, if the pattern is worked with several strands of different yarns (for example 1 strand Alpaca and 1 strand Kid-Silk) you will have to find alternatives for each, individually.

Click here to see our yarn converter

Since different yarns have different qualities and textures we have chosen to keep the original yarn in our patterns. However, you can easily find options among our available qualities by using our yarn converter, or simply pick a yarn from the same yarn group.

It is possible that some retailers still have discontinued yarns in stock, or that someone has a few skeins at home that they would like to find patterns for.

The yarn converter will provide both alternative yarn as well as required amount in the new quality.

If you think it's hard to decide what size to make, it can be a good idea to measure a garment you own already and like the size of. Then you can pick the size by comparing those measures with the ones available in the pattern's size chart.

You'll find the size chart at the bottom of the pattern.

See DROPS lesson: How to read size chart

The needle size provided in the pattern serves only as a guide, the important thing is to follow the knitting tension. And since knitting tension is very individual, you will have to adjust the needle size to ensure that YOUR tension is the same as in the pattern – maybe you’ll have to adjust 1, or even 2 needle sizes, up or down to achieve the correct tension. For this, we recommend that you work test swatches.

Should you work with a different knitting tension than the one provided, the measurements of the finished garment might deviate from the measurement sketch.

See DROPS lesson: How to measure your tension/gauge

See DROPS video: How to make a gauge tension swatch

Working a garment top-down provides more flexibility and room for personal adjustment. For example it is easier to try the garment on while working, as well as making adjustments to length of yoke and shoulder caps.

The instructions are carefully explaining every step, in the correct order. Diagrams are adjusted to the knitting direction and are worked as usual.

The diagram depicts all rows/rounds, and every stitch seen from the right side. It is read from bottom to top, from right to left. 1 square = 1 stitch.

When working back and forth, every other row is worked from the right side and every other row is worked from the wrong side. When working from the wrong side, the diagram will have to be worked reversed: from left to right, knit stitches are purled, purl stitches are knit etc.

When working in the round every round is worked from the right side and the diagram are worked from right to left on all rounds.

See DROPS lesson: How to read knitting diagrams

The diagram depicts all rows/rounds, and every stitch seen from the right side. It is worked from bottom to top, from right to left.

When working back and forth every other row is worked from the right side: from right to left and every other row is worked from the wrong side: from left to right.

When working in the round, every row in the diagram are worked from the right side, from right to left.

When working a circular diagram you start in the middle and work your way outwards, counter clockwise, row by row.

The rows usually start with a given number of chain stitches (equivalent to the height of the following stitch), this will either be depicted in the diagram or explained in the pattern.

See DROPS lesson: How to read crochet diagrams

Instructions for working several diagrams after each other on the same row/round, will often be written like so: “work A.1, A.2, A.3 a total of 0-0-2-3-4 times". This means you work A.1 once, then A.2 is worked once, and A.3 is repeated (in width) the number of times provided for your size – in this case like so: S = 0 times, M = 0 times, L=2 times, XL= 3 times and XXL = 4 times.

The diagrams are worked as usual: begin with the first row in A.1, then work the first row in A.2 etc.

See DROPS lesson: How to read knitting diagrams

See DROPS lesson: How to read crochet diagrams

The total width of the garment (from wrist-to-wrist) will be larger in the larger sizes, despite the actual sleeves being shorter. The larger sizes have longer sleeve caps and wider shoulders, so there will be a good fit in all sizes.

The measurement sketch/schematic drawing provides information regarding the full length of the garment. If it’s a jumper or a jacket the length is measured from the highest point on the shoulder (usually closest to the neckline), and straight down to the bottom of the garment. It is NOT measured from the tip of shoulder. Similarly, the length of yoke is measured from the highest point on the shoulder and down to where yoke is split into body and sleeves.

See DROPS lesson: How to read a schematic drawing

Diagrams are often repeated on the round or in height. 1 repeat is the diagram the way it appears in the pattern. If it says to work 5 repeats of A.1 in the round, then you work A.1 a total of 5 times after/next to each other in the round. If it says to work 2 repeats of A.1 vertically/in height you work the entire diagram once, then begin again at the start and work the entire diagram one more time.

Chain stitches are slightly narrower than other stitches and to avoid working the cast-on edge too tight, we simply chain more stitches to begin with. The stitch count will be adjusted on the following row to fit the pattern and measurement sketch.

The rib edge is more elastic and will contract slightly compared to, for example, stocking stitch. By increasing before the rib edge, you avoid a visible difference in width between the rib edge and the rest of the body.

It’s very easy to cast off too tightly, and by making yarn overs while casting off (and simultaneously casting these off) you avoid a too tight cast off edge.

See DROPS video: How to bind off with yarn overs (yo)

To achieve an even increase (or decrease) you can increase on, for example: every 3rd and 4th row alternately, like so: work 2 rows and increase on the 3rd row, work 3 rows and increase on the 4th. Repeat this until the increase is complete.

See DROPS lesson: Increase or decrease 1 st on every 3rd and 4th row alternately

Should you prefer to work in the round instead of back and forth, you may of course adjust the pattern. You’ll need to add steeks mid-front (usually 5 stitches), and follow the instructions. When you would normally turn and work from the wrong side, simply work across the steek and continue in the round. At the end you’ll cut the piece open, pick up stitches to work bands, and cover the cut edges.

See DROPS video: How to knit steeks and cut open

Should you prefer to work back and forth instead of in the round, you may of course adjust the pattern so you work the pieces separately and then assemble them at the end. Divide the stitches for the body in 2, add 1 edge stitch in each side (for sewing) and work the front and back pieces separately.

See DROPS lesson: Can I adapt a pattern for circular needles into straight needles?

Pattern repeats can vary slightly in the different sizes, in order to get the correct proportions. If you’re not working the exact same size as the garment in the photo, yours might deviate slightly. This has been carefully developed and adjusted so that the complete impression of the garment is the same in all sizes.

Make sure to follow instructions and diagrams for your size!

If you have found a pattern you like which is available in women’s size it’s not very difficult to convert it to men’s size. The biggest difference will be the length of sleeves and body. Start working on the women size that you think would fit across the chest. The additional length will be worked right before you cast off for the armhole/sleeve cap. If the pattern is worked top-down you can add the length right after the armhole or before the first decrease on sleeve.

Regarding additional yarn amount, this will depend on how much length you add, but it is better with a skein too many than too few.

All yarns will have excess fibres (from production) that might come off as lint or shedding. Brushed yarns (ie hairier yarns) have more of these loose, excess fibres, causing more shedding.

Shedding also depends on what is worn under or over the garment, and whether this pulls at the yarn fibres. It’s therefore not possible to guarantee that there will be no shedding

Below are some tips on how to get the best result when working with hairier yarns:

1. When the garment is finished (before you wash it) shake it vigorously so the looser hairs come off. NOTE: do NOT use a lint roller, brush or any method that pulls at the yarn.

2. Place the garment in a plastic bag and put it in your freezer - the temperature will cause the fibres to become less attached to each other, and excess fibres will come off easier.

3. Leave in the freezer for a few hours before taking it out and shaking it again.

4. Wash the garment according to the instructions on the yarn label.

Pilling is a natural process that happens to even the most exclusive of fibers. It's a natural sign of wear and tear that is hard to avoid, and that is most visible in high friction areas of your garment like a sweater's arms and cuffs.

You can make your garment look as new by removing the pilling, using a fabric comb or a pill/lint remover.

Still can't find the answer you need? Then scroll down and leave your question so one of our experts can try to help you. This will be done normally within 5 to 10 working days.
In the meantime, you can read the questions and answers that others have left to this pattern or join the DROPS Workshop on Facebook to get help from fellow knitters/crocheters!

You might also like...

Sweet Marigold

Franmade, Italy

Sweet Marigold

Daniela, Slovakia

Post a comment to pattern DROPS Baby & Children 38-11

We would love to hear what you have to say about this pattern!

If you want to leave a question, please make sure you select the correct category in the form below, to speed up the answering process. Required fields are marked *.

Comments / Questions (33)

country flag Helen wrote:

Jag stickar efter 6/9-12/18. Var ska jag ta den extra maskan som behövs till v 9 i A4.

08.09.2021 - 19:40

DROPS Design answered:

Hei Helen. Bruk masken som er før du starter med A.4, altså i A.1 (siste maske "mangler" i A.1, rad 9). mvh DROPS design

15.09.2021 - 14:07

country flag Petronelle wrote:

Jeg laver en str. 98/104, og har lige strikket første retpind på bærestykket. Jeg får kun 101 masker i stedet for de 103, der står i opskriften. Jeg har talt efter, og synes at have lavet de omslag, der skal være, så hvad gør jeg forkert?

01.08.2021 - 13:36

DROPS Design answered:

Hej Petronelle, hvis du sætter et mærke mellem hver rapport, så kan du let kontrollere at du har det rigtige antal masker i hver rapport og derved kan du let se i hvilken rapport du kan have glemt at tage ud. God fornøjelse!

04.08.2021 - 12:31

country flag Mait Pettersson wrote:

Vilket A5 mönster skall användas till storlek 6/9-12/18. Det står på mönstret att man ska sticka 1 maska A5

17.07.2021 - 14:38

DROPS Design answered:

Hej Mait, det stemmer, du finder diagram A.5 til 6/9-12/18 lige over A.1 A.2og A.3 som er nederst i opskriften. Du starter med 1 ret, 1 omslag osv :)

04.08.2021 - 11:09

country flag Marketa wrote:

Hello, could you please advise how to adjust the pattern for XS women size? I would love to have the same sweater as my daughter (it would be great if more patterns were available in both children and adult sizes). Thank you in advance

12.07.2021 - 06:57

DROPS Design answered:

Dear Marketa, we are unfortunately not able to adjust every pattern to every single request - you can take inspiration from our jacket for woman, some of them are starting with size XS. Your yarn store should be able to help you - even per mail or telephone. Thanks for your comprehension. Happy knitting!

12.07.2021 - 08:16

country flag SELEM Annita wrote:

Bonjour, je tricote la taille 12/ 18 mois, il est dit d'augmenter 9 mailles sous la manche , je voudrais savoir comment le dois les tricoter, c'est 9 mailles. Merci

18.05.2021 - 17:20

DROPS Design answered:

Bonjour Mme Selem, ces 9 mailles sont relevées dans les 9 mailles montées lors de la division de l'empiècement, autrement dit, procédez comme dans la photo 18 B de cette leçon. Bon tricot!

19.05.2021 - 07:30

country flag Kirsten Iversen wrote:

Den er så fin.

13.05.2021 - 10:13

country flag Gabriele Sinclair wrote:

I'm attempting to make this cardigan and am having trouble beginning the yoke. I have 5 band stitches on the left and on the right of the 95 stitches between. The beginning of the yoke has left front with 13st, left sleeve with 18st, back with 26st, right sleeve with 18st and finally right front with 14st, which equals 89 st, not 103st as stated in the pattern. Am I missing something? Shouldn't the right front be equal to the left front. Any help would be appreciated, Thank you

06.05.2021 - 22:15

DROPS Design answered:

Dear Gabriele, You have not stated which size, so from the 95 stitch I will assume its for a 92 cm tall child. The 92 stitches cast on INCLUDE the band stitches, add 3 stitches after the garter stitch = 95 stitch. There are 8 yarnovers in the row (4 in the pattern for the front and back and 2X2 for the sleeves). If you add that to the 95 stitch you will get the stated 103 stitch. (the number of stitches are different in the two fronts because of the pattern). Happy Knitting!

06.05.2021 - 23:35

country flag Mai R wrote:

Hvorfor skal der slås om i første omgang på ærmerne? Der er ingen videre forklaring, hvorfor der må formodes at de skal strikkes ret, men det giver jo huller i ærmerne?

01.05.2021 - 12:06

DROPS Design answered:

Hei Mai. Det skal ikke legges opp nye masker når du strikker 1 omgang på ermene, men du skal strikke opp 1 maske i hver av de 9-9 (11-11-13-13) maskene som ble lagt opp under ermet. På den måten slipper du å sy igjen hullet under ermene. mvh DROPS design

03.05.2021 - 14:23

country flag Anne-Grethe wrote:

Er der rettelser til mønstret? Når A1,2 og 3 er strikket fortsættes der så med A4/A5, og i hvilken rækkefølge?

27.03.2021 - 10:52

DROPS Design answered:

Hei Anne-Grethe. Du strikker A.1, A.2, A.3, A.4 og A.5 samtidig og når A.1, A.2 og A.3 er strikket 1 gang i høyden gjentas disse i høyden i samme rekkefølge og når A.4 og A.5 er strikket 1 gang i høyden er det 219-227 (255-259-287-291) masker på pinnen og arbeidet måler ca 10-10 (12-12-15-15) cm fra halskanten. Les for videre strikk under: BÆRESTYKKET og "Nå strikkes det mønster videre slik (fra retten)". mvh DROPS design

07.04.2021 - 13:40

country flag Market wrote:

Dobrý den, poradíte prosím, jak upravit vzor na dámskou velikost XS, ať můžeme mít s dcerkou stejný svetr? :) Předem děkuji.

21.03.2021 - 19:04