
Categorías populares
¿Buscas un hilo?


Escribe un comentario sobre DROPS Baby & Children 38-9
¡Nos encantaría saber qué piensas acerca de este patrón!
Si quieres escribir una pregunta referente al patrón, por favor asegúrate de elegir la categoría correcta en el formulario debajo, para acelerar el proceso de respuesta. Los campos obligatorios están marcados con un *.
|
|||||||||||||||||||
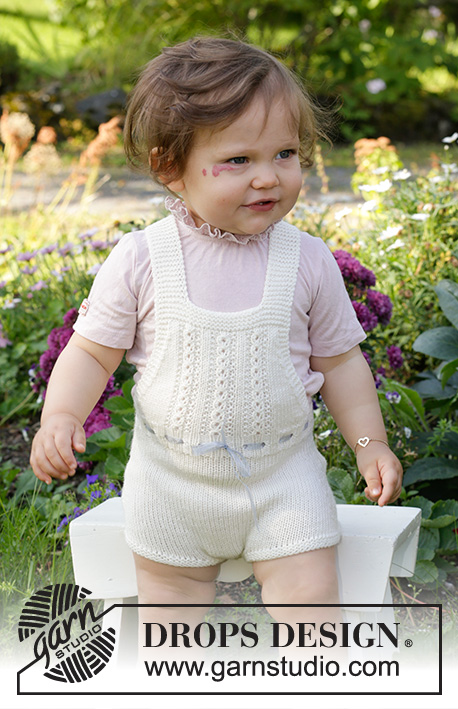
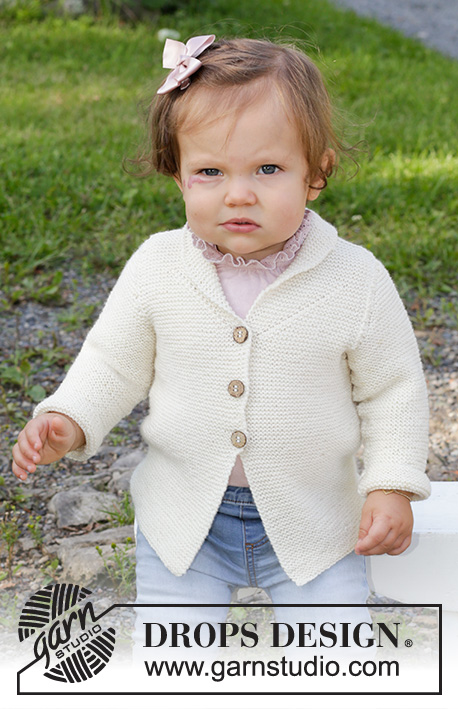
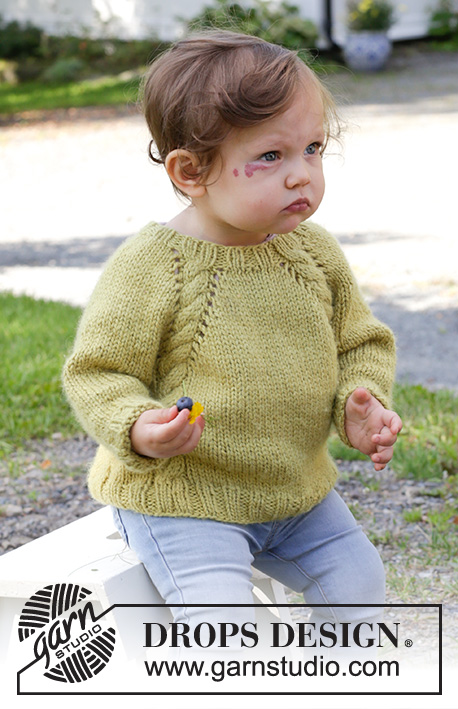
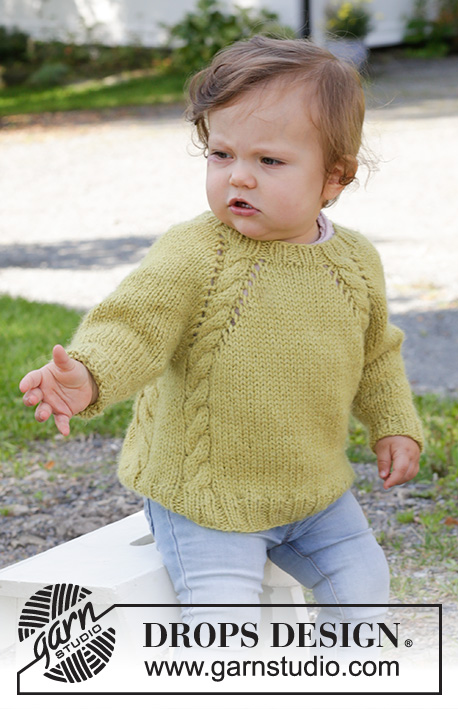
Baby Leaf Sweater |
|||||||||||||||||||
 |
 |
||||||||||||||||||
Jersey de punto para bebés y niños en DROPS Alaska. La prenda está realizada con el raglán y las trenzas, de arriba abajo. Tallas 6 meses - 8 años.
DROPS Baby & Children 38-9 |
|||||||||||||||||||
|
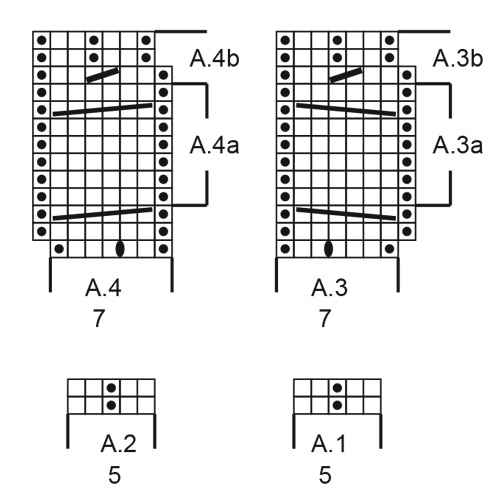
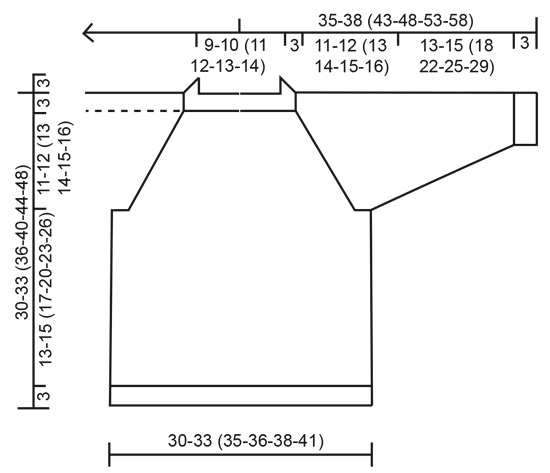
EXPLICACIONES PARA REALIZAR LA LABOR: ------------------------------------------------------- PATRÓN: Ver diagramas A.1 a A.4. TIP PARA LAS DISMINUCIONES (aplicar a las mangas): Disminuir 1 punto a cada lado del marcapuntos como sigue: Trabajar hasta que queden 3 puntos antes del marcapuntos, 2 puntos juntos de derecho, 2 derechos (el marcapuntos se encuentra entre estos puntos), deslizar 1 punto como de derecho, 1 derecho, pasar el punto deslizado sobre el punto trabajado. TIP PARA EL REMATE: Para evitar que el borde de remate quede tenso se puede usar una aguja de mayor tamaño. Si sigue demasiado tenso, trabajar 1 hebra después de aprox. cada 4º punto y a la vez cerrar (cerrar las hebras como puntos normales). ------------------------------------------------------- COMENZAR LA LABOR AQUÍ: ------------------------------------------------------- JERSEY - RESUMEN DE LA LABOR: Trabajar de arriba abajo. Trabajar la cenefa del escote en redondo con agujas de doble punta / una aguja circular corta. Trabajar el canesú con las trenzas y los aumentos para el raglán con una aguja circular. Dividir la labor para el cuerpo y las mangas. Continuar con el cuerpo en redondo con una aguja circular con trenzas. Trabajar las mangas en redondo con agujas de doble punta. CENEFA DEL ESCOTE: Montar 52-52 (60-60-68-68) puntos en agujas de doble punta / una aguja circular de 4.5 mm con Alaska. Trabajar 1 vuelta de derecho. La vuelta comienza aprox. en el centro de la espalda. Después trabajar el elástico como sigue: Mitad de la espalda: * 2 derechos, 2 reveses *, trabajar de * a * sobre 4-4 (4-4-8-8) puntos, A.1 (= 5 puntos). Manga derecha: * 2 reveses, 2 derechos *, trabajar de * a * sobre los siguientes 6-6 (10-10-10-10) puntos (es decir, comenzar y terminar con 2 reveses). Delantero: A.2 (= 5 puntos), * 2 reveses, 2 derechos *, trabajar de * a * sobre los siguientes 10-10 (10-10-14-14) puntos (es decir, comenzar y terminar con 2 reveses), A.1 sobre 5 puntos. Manga izquierda: * 2 reveses, 2 derechos *, trabajar de * a * sobre los siguientes 6-6 (10-10-10-10) puntos (es decir, comenzar y terminar con 2 reveses). Mitad de la espalda: A.2 sobre 5 puntos, * 2 reveses, 2 derechos *, sobre los últimos 6 puntos (es decir, comenzar y terminar con 2 reveses). Continuar con derecho sobre derecho y revés sobre revés hasta que la labor mida 3 cm. Insertar 1 marcapuntos al inicio de la vuelta, medir desde este marcapuntos! Cambiar a una aguja circular de 5.5 mm y trabajar el canesú como sigue: CANESÚ: Trabajar la siguiente vuelta como sigue: Mitad de la espalda: 3-3 (3-3-7-7) derechos y al mismo tiempo aumentar 0-1 (2-3-1-3) puntos repartidos, 1 hebra, A.3 (= 7 puntos). Manga derecha: 1 hebra, 4-4 (8-8-8-8) derechos y al mismo tiempo aumentar 4-4 (0-2-2-2) puntos repartidos, 1 hebra. Delantero: A.4 (= 7 puntos), 1 hebra, 8-8 (8-8-12-12) derecho y al mismo aumentar 0-2 (4-6-2-6) puntos repartidos, 1 hebra, A.3 sobre 7 puntos. Manga izquierda: 1 hebra, 4-4 (8-8-8-8) derechos y al mismo tiempo aumentar 4-4 (0-2-2-2) puntos repartidos, 1 hebra. Mitad de la espalda: A.4 sobre 7 puntos, 1 hebra, 5 derechos y al mismo tiempo aumentar 0-1 (2-3-1-3) puntos repartidos. Se han aumentado 8-12 (8-16-8-16) puntos aumentados repartidos en total, 1 hebra a cada lado de A.3/A.4 (= 8 puntos aumentados en total para el raglán) y 1 punto en cada A.3/A.4 (= 4 puntos) = 72-76 (80-88-88-96) puntos en total en la fila. Trabajar las hebras a cada lado de A.3/A.4 en la siguiente vuelta para hacer agujeros. Trabajar las otras hebras retorcidas para evitar que se formen agujeros. Continuar con A.3 y A.4 y punto jersey sobre los puntos restantes y aumentar cada 2ª vuelta 10-11 (12-12-13-14) veces en total (incluyendo el 1º aumento arriba)= 144-156 (168-176-184-200) puntos. Cuando se haya trabajado A.3 y A.4 1 vez en vertical, repetir A.3a y A.4a en vertical. RECORDAR MANTENER LA TENSIÓN DEL TEJIDO! Después de todos los aumentos la labor mide aprox. 10-11 (12-12-13-14) cm desde el marcapuntos. Después trabajar como antes sin los aumentos hasta que la labor mida 11-12 (13-14-15-16) cm. Ahora dividir la labor para el cuerpo y las mangas en la siguiente vuelta como sigue: Trabajar sobre los primeros 21-23 (25-26-29-32) puntos como antes, deslizar los siguientes 28-30 (32-34-36-38) puntos en un gancho auxiliar para la manga y montar 6 puntos bajo la manga, trabajar como antes sobre los siguientes 44-48 (52-54-56-62) puntos, deslizar los siguientes 28-30 (32-34-36-38) puntos en un gancho auxiliar para la manga y montar 6 puntos bajo la manga y trabajar los últimos 23-25 (27-28-27-30) puntos como antes. CUERPO: = 100-108 (116-120-124-136) puntos. Continuar en redondo con punto jersey y A.3/A.4 como antes. Trabajar los puntos montados bajo la manga en punto jersey. Cuando la labor mida 13-15 (17-20-23-26) cm desde la división (quedan aprox. 3 cm), trabajar la siguiente vuelta como sigue: 13-15 (17-18-21-24) derechos y al mismo tiempo aumentar 0-2 (4-3-4-1) puntos repartidos, A.3a como antes, 6 derechos y al mismo tiempo aumentar 2 puntos repartidos, A.4a como antes, 28-32 (36-38-40-46) derechos y al mismo tiempo aumentar 4-4 (4-6-4-6) puntos repartidos, A.3a como antes, 6 derechos y al mismo tiempo aumentar 2 puntos repartidos, A.4a como antes, 15-17 (19-20-19-22) derechos y al mismo tiempo aumentar 4-2 (0-3-0-5) puntos repartidos = 112-120 (128-136-136-152) puntos. Cambiar a una aguja circular de 4.5 mm. Después trabajar el elástico como sigue: * 2 reveses, 2 derechos *, trabajar de * a * sobre los primeros 12-16 (20-20-24-24) puntos, 1 revés, A.3b sobre A.3a 1 revés, * 2 derechos, 2 reveses *, trabajar de * a * sobre 6 puntos, 1 revés, A.4b sobre A.4a, 1 revés, * 2 derechos, 2 reveses *, trabajar de * a * sobre 30-34 (38-42-42-50) puntos, 1 revés, A.3b sobre A.3a, 1 revés, * 2 derechos, 2 reveses *, trabajar de * a * sobre 6 puntos, 1 revés, A.4b sobre A.4a, 1 revés, * 2 derechos, 2 reveses *, trabajar de * a * sobre 18-18 (18-22-18-26) puntos (es decir, comenzar y terminar con 2 derechos). Continuar con derecho sobre derecho y revés sobre revés hasta que la labor mida 16-18 (20-23-26-29) cm desde la división. Cerrar con derecho sobre derecho y revés sobre revés - leer TIP PARA EL REMATE. El jersey mide aprox. 30-33 (36-40-44-48) cm desde el hombro hacia abajo. MANGAS: Deslizar los 28-30 (32-34-36-38) puntos desde el gancho auxiliar a un lado de la labor con agujas de doble punta de 5.5 mm y recoger 1 punto en cada uno de los 6 puntos montados bajo la manga = 34-36 (38-40-42-44) puntos. Insertar 1 marcapuntos en el medio de los 6 puntos nuevos bajo la manga. Disminuir a cada lado de este marcapuntos más tarde. Trabajar en punto jersey en redondo. Cuando la manga mida 3 cm desde la división, disminuir 1 punto a cada lado del marcapuntos - leer TIP PARA LAS DISMINUCIONES (= 2 puntos disminuidos). Disminuir de esta manera cada 3-2½ (3½-5-5½-6) cm 3-4 (4-4-4-4) veces en total = 28-28 (30-32-34-36) puntos. Cuando la labor mida 13-15 (18-22-25-29) cm desde la división, aumentar 0-0 (2-0-2-0) puntos repartidos = 28-28 (32-32-36-36) puntos. Cambiar a agujas de doble punta de 4.5 mm. Trabajar el elástico (= 2 derechos/ 2 reveses). Cerrar con derecho sobre derecho y revés sobre revés cuando la manga mida 16-18 (21-25-28-32) cm desde la división. Trabajar la otra manga de la misma manera. |
|||||||||||||||||||
Explicaciones del diagrama |
|||||||||||||||||||
|
|||||||||||||||||||
|
|||||||||||||||||||
|
|||||||||||||||||||
|
¿Has realizado este u otro de nuestros modelos? ¡Etiqueta tus fotografías en las redes sociales con #dropsdesign para que podamos verlos! ¿Necesitas ayuda con este patrón?Encontrarás videos tutoriales, un espacio para comentarios/preguntas y más visitando la página del patrón en garnstudio.com © 1982-2024 DROPS Design A/S. Todos los derechos reservados. Este documento, incluyendo todas sus sub-secciones, está protegido por los derechos de autor (copyright). Lee más acerca de lo que puedes hacer con nuestros patrones en la parte de abajo de cada patrón de nuestro sitio. |
|||||||||||||||||||


Con más de 40 años en el diseño de modelos de punto y de ganchillo, DROPS Design ofrece una de las más vastas colecciones de patrones gratuitos en el internet - traducidos en 17 idiomas. Al día de hoy, contamos con 304 catálogos y 11422 patrones - de los cuales 10403 están traducidos en español.
Nosotros trabajamos con mucho esmero para brindarte lo mejor que las labores de punto y ganchillo tienen para ofrecer,inspiración y consejos, así como hilos de magnífica calidad a precios increíbles! Te gustaría usar nuestros patrones para otro fin además del uso personal? Puedes leer acerca de lo que estás permitida a hacer en el texto de Copyright en la parte de abajo de todos nuestros patrones. Felices labores!
Comentarios / Preguntas (69)
I wanted to know about knitting after nackedege and yoke. What to knit now? Firstly it’s A4 and A4? Or all the stitches in one row? Any how I will get that design with holes?
19.10.2023 - 16:09DROPS Design answered:
Dear Mina, after neck edge is done, work in stocking stitch (increasing on first round) with A.3 and A.4 on each raglan line and increase for each raglan before and after each A.3/A.4, starting the diagrams on first row. After the first 3 rows in diagrams have been done, repeat the 7 rows in A.3a/A.4a, at the same time, increase for the raglan as stated for the size, the holes are done by working the yarn overs (increases for raglan) in the front loop on next round. Happy knitting!
20.10.2023 - 07:53Hello, It'S not bake in my post I Wrote but neck and yoke. AND I need help to knit further. HOW TO Knit after this? Should I Knit A3 A4 first with all yarn over or should I first A3 and A4 and then next round overs with all increased? THANKS.
19.10.2023 - 14:16DROPS Design answered:
Dear Mina, could the previous answer help you? The first rows in A.3/A.4 will be worked only once, until the first cable has been worked, then you repeat the 7 rows marker with A.3a/A.4a in diagrams. Happy knitting!
19.10.2023 - 16:00Hello, I'm Mina. I want help to knit baby leaf sweater. I have knit back and yoke. Need help to knit further down the design. should Knit A3and A4 without working over other yarn overs?
19.10.2023 - 13:39DROPS Design answered:
Dear Mina, when you have to work A.3/A.4 you start with yarn overs on first row, and cable on 3rd row, then you repeat A.3a and A.4a, this means only the 7 rows marked in diagrams. Happy knitting!
19.10.2023 - 15:58Feil i anvisning av hvor mye garn til de ulike str, inni parentesen- Har strikket denne og sleit. Det var dårlig forklart hvordan mønsteret, etter at økningene som lagde raglanhullene var ferdig, skulle fortsette. Løste det med å legge inn ei felling for hver økning til hull langs flettene, og nøyde meg med hull bare på framsiden av flettene. Det ble mye prøving og feiling og ikke pent, spesielt i overgang fra økning til ikke-økning og under arm.
22.09.2023 - 20:49I cast on 52 stitches for the second smallest size. No increases in the collar. So I don't have enough stitches on the needles to perform any of the initial yoke increases. The pattern says 12 increases, yielding 76 after the first round of the yoke. But 52+12 is 64. Where are those extra stitches coming from?
18.09.2023 - 19:51DROPS Design answered:
Hi Laura, You increase with 1 yarn on each side of each A.3/A.4 and 1 yarn over in each A.3/A.4 (12 increased stitches) as well as increasing evenly over the sleeves and body (12 increased stitches). A total of 24 increased stitches. This gives you 76 stitches after all the increases. Happy knitting!
19.09.2023 - 06:44Hi! I am a little confused about how to do the YO evenly. Since some of them are before a knit and some are before a purl, I've noticed that the gaps end up being different sizes. Any advice?
12.09.2023 - 02:25DROPS Design answered:
Dear Emily, when increasing on first row on yoke, just make the yarn overs to increase evenly between stitches (see how to increase evenly here), whatever they were purled or knitted, you will knit them now. On next round, knit them twisted to avoid holes. Happy knitting!
12.09.2023 - 09:37Im trying to do the first size 6-9 months Ive correctly worked out how to get to 144 stitches by row 10 ... but then totally confused on how to stop increasing to compete A3/ A4 for the second time#
17.08.2023 - 17:25DROPS Design answered:
Dear Mrs Thomas, after you have worked the 10th rows in A.3/A.4 you have finished the section A.3a /A.4a(= 7 rows), you now repeat these 7 rows i A.3a/A.4a in height (cross stitches every 7th row) and continue increasing for raglan as before. Happy knitting!
18.08.2023 - 08:06Jeg laver str nr 2, og der står følgende: Der er nu taget totalt 12 masker ud jævnt fordelt, slå om på hver side af hver A.3/A.4 (= totalt 8 masker taget ud til raglan) og 1 maske i hver A.3/A.4 (= 4 masker) = totalt 76 masker på pinden. Jeg har kun 72 masker, for jeg kan ikke se hvor hvordan jeg skal tage en maske ud i hver A.3/A.4?
28.07.2023 - 13:52DROPS Design answered:
Hei Stine. Jo, du har 52 masker og etter du har strikket 1. omgang på bærestykket skal du ha 76 masker (inkl. kastene). Strikk slik: Halve bakstykket: Strikk 3 masker rett, øk 1 maske jevnt fordelt, 1 kast, A.3 (= 7 masker). Høyre erme: 1 kast, 4 masker rett, øk 4 masker jevnt fordelt, 1 kast. Forstykke: A.4 (= 7 masker), 1 kast, 8 masker rett, øk 2 masker jevnt fordelt, 1 kast, A.3 over 7 masker. Venstre erme: 1 kast, 4 masker rett øk 4 masker jevnt fordelt, 1 kast. Halve bakstykket: A.4 over 7 masker, 1 kast, 5 masker rett øk 1 maske jevnt fordelt = 13+10+28+10+15= 76 masker. Husk også å telle kastene i diagrammene :) mvh DROPS Design
28.07.2023 - 14:22Hello! I have been following the Baby Leaf Sweater pattern. I am making the last size. I have started working on the yoke. I have 96 stitches. I don't know what I have to do after that. How do I work the yarn over twisted to avoid holes? Also, what do I have to do after that? It is very unclear. Please guide. Thank you!
06.06.2023 - 19:19DROPS Design answered:
Hi Apeksha, To work yarn overs twisted, work in the back loop (instead of the front as normal) or slip the yarn over and replace it on the left needle the other way around. You will then avoid a hole. You continue A.3 and A.4. Any stitches which are not worked in these 2 diagrams are worked in stocking stitch. You also continue to increase for raglan every 2nd round on each side of each A.3 and A.4 pattern (8 stitches increased on the round). Hope this helps and happy knitting!
07.06.2023 - 06:45Au début avec 52 m pour le col. Je ne comprends pas où et comment intégrer les diagrammes A1 et A2. Car si on tricote 2m endroit, 2m envers et que l'on répète ces 4m, A quel endroit placer les 5m de A1. Cela dépassera les 52m. Expliquez moi clairement SVP Merci
29.05.2023 - 10:44DROPS Design answered:
Bonjour Mme Bilongo, quand vous devez répéter (2 m endroit, 2 m envers) sur 4 mailles, vous devez juste tricoter ces 4 mailles, puis pour la manche, si vous devez tricoter (2 m env, 2 m end) sur 6 mailles, vous allez tricoter: 2 m env, 2 m end, 2 m env. Et ainsi de suite. Bon tricot!
30.05.2023 - 11:06