DROPS Brushed Alpaca Silk
77% Alpaca, 23% Silk
from 5.50 CAD /25g
DROPS Kid-Silk
DROPS Kid-Silk
75% Mohair, 25% Silk
from 9.40 CAD /25g
Get the yarn to make this pattern from 55.70CAD.

The yarn cost is calculated from the pattern’s smallest size and the yarn’s cheapest product type. Looking for an even better price? You might find it on the DROPS Deals!

DROPS SS24

Cotton Candy

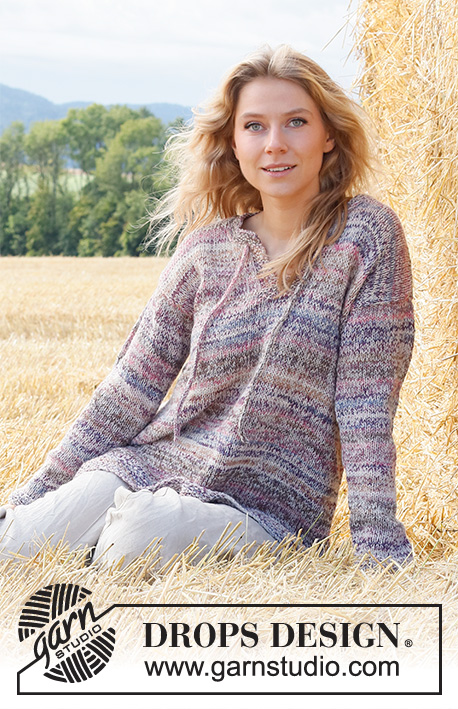
Knitted sweater in DROPS Brushed Alpaca Silk and DROPS Kid-Silk. The piece is worked in stockinette stitch with rib and double neck. Sizes S - XXXL.

DROPS 223-22
DROPS Design: Pattern no as-145
Yarn group C + A or D
-------------------------------------------------------

SIZES:
S - M - L - XL - XXL – XXXL

Finished measurements:
Chest measurements: 92-100-108-118-126-138 cm = 36¼"-39⅜"-42½"-46½"-49½"-54¼"
Full length: 49-52-54-56-58-60 cm = 19¼"-20½"-21¼"-22"-22¾"-23⅝"
All measurements in charts are in cm.

MATERIALS:
DROPS BRUSHED ALPACA SILK from Garnstudio (belongs to yarn group C)
125-125-150-150-175-175 g color 01, off white
And use:
DROPS KID-SILK from Garnstudio (belongs to yarn group A)
75-100-100-100-100-125 g color 09, light lavender

KNITTING GAUGE:
14 stitches in width and 16 rows in height with stockinette stitch and 1 strand of each quality = 10 x 10 cm = 4" x 4".

NEEDLES:
DROPS DOUBLE POINTED NEEDLES SIZE 6 MM = US 10.
DROPS CIRCULAR NEEDLE SIZE 6 MM = US 10: Length 40 cm = 16" and 60 cm = 24" or 80 cm = 32" for stockinette stitch.
DROPS DOUBLE POINTED NEEDLES SIZE 4.5 MM = US 7.
DROPS CIRCULAR NEEDLE SIZE 4.5 MM = US 7: Length 40 cm = 16" and 60 cm = 24" or 80 cm = 32" for rib.
Needle size is only a guide. If you get too many stitches on 10 cm = 4", change to a larger needle size. If you get too few stitches on 10 cm = 4", change to a smaller needle size.

-------------------------------------------------------

Alternative Yarn – See how to change yarns here
Yarn Groups A to F – Use the same pattern and change the yarn here
Yarn usage using an alternative yarn – Use our yarn converter here

-------------------------------------------------------

DROPS Brushed Alpaca Silk
77% Alpaca, 23% Silk
from 5.50 CAD /25g
DROPS Kid-Silk
DROPS Kid-Silk
75% Mohair, 25% Silk
from 9.40 CAD /25g
Get the yarn to make this pattern from 55.70CAD.

The yarn cost is calculated from the pattern’s smallest size and the yarn’s cheapest product type. Looking for an even better price? You might find it on the DROPS Deals!

Pattern instructions

NOTE: This pattern is written in American English. All measurements in charts are in cm. For conversion from inches to cm - click here. There are different terms for crocheting in American and British English. If this pattern includes crochet, click for "crochet terms" here. For this pattern in British English, please click here.
-------------------------------------------------------

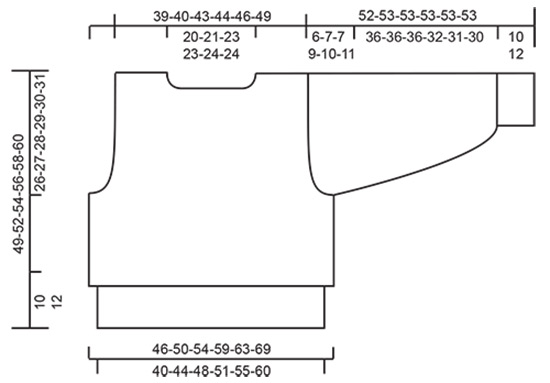
EXPLANATIONS FOR THE PATTERN:

-------------------------------------------------------

BINDING-OFF TIP:
To avoid the bind-off edge being tight you can bind off with a larger size needle. If the edge is still tight, make 1 yarn over after approx. each 4th stitch at the same time as binding off; the yarn overs are bind off as normal stitches.

-------------------------------------------------------

START THE PIECE HERE:

-------------------------------------------------------

SWEATER – SHORT OVERVIEW OF THE PIECE:
The piece is worked in the round with circular needle, bottom up as far as the armholes. Stiches are bind off for the armholes and the front and back pieces are finished separately, back and forth on the needle. The sleeves are worked in the round with short circular needle/double pointed needles as far as the armholes, then the sleeve cap is finished back and forth. The piece is sewn together and the double neck worked to finish. The whole garment is worked with 1 strand of each quality.

BODY:
Cast on 128-140-152-164-176-192 stitches with circular needle size 4.5 MM = US 7 and 1 strand Brushed Alpaca Silk and 2 strands Kid-Silk (= 3 strands). Remove one of the strands of Kid-Silk. The rest of the sweater is worked with 1 strand of each quality. Casting on with 3 strands avoids the cast-on edge being tight.
Knit 1 round. Then work rib in the round (knit 1 twisted, purl 1) for 10-10-10-12-12-12 cm = 4"-4"-4"-4¾"-4¾"-4¾".
Change to circular needle size 6 MM = US 10 and work stockinette stitch in the round. REMEMBER THE KNITTING GAUGE!
When the piece measures 23-25-26-27-28-29 cm = 9"-9¾"-10¼"-10⅝"-11"-11⅜", work the next round as follows: Bind off 6-6-6-6-8-8 stitches for the armhole, knit 58-64-70-76-80-88 (= front piece), bind off 6-6-6-6-8-8 stitches for the armhole and knit 58-64-70-76-80-88 (= back piece). The front and back pieces are finished separately.

BACK PIECE:
= 58-64-70-76-80-88 stitches. Work stockinette stitch back and forth and bind off for the armholes at the beginning of all rows as follows: Bind off 2 stitches 0-1-1-2-2-3 times and 1 stitch 2-2-3-3-4-4 times on each side = 54-56-60-62-64-68 stitches left.
Continue working until the piece measures 47-50-52-54-56-58 cm = 18½"-19¾"-20½"-21¼"-22"-22¾". On the next row bind off the middle 18-20-22-22-24-24 stitches for the neck and each shoulder is finished separately. Continue with stockinette stitch and bind off 5 stitches on the next row from the neck = 13-13-14-15-15-17 stitches on the shoulder. Continue working until the piece measures 49-52-54-56-58-60 cm = 19¼"-20½"-21¼"-22"-22¾"-23⅝". Bind off – read BINDING-OFF TIP! Work the other shoulder in the same way.

FRONT PIECE:
= 58-64-70-76-80-88 stitches. Work stockinette stitch back and forth and bind off for the armholes at the beginning of all rows as follows: Bind off 2 stitches 0-1-1-2-2-3 times and 1 stitches 2-2-3-3-4-4 times on each side = 54-56-60-62-64-68 stitches left.
Continue working until the piece measures 45-48-50-52-54-56 cm = 17¾"-19"-19¾"-20½"-21¼"-22". On the next row place the middle 18-20-22-22-24-24 stitches on 1 thread for the neck and each shoulder is finished separately. Continue with stockinette stitch and bind off at the beginning of each row from the neck as follows: Bind off 3 stitches 1 time and 2 stitches 1 time = 13-13-14-15-15-17 stitches. Continue working until the piece measures 49-52-54-56-58-60 cm = 19¼"-20½"-21¼"-22"-22¾"-23⅝". Bind off – remember BINDING-OFF TIP! Work the other shoulder in the same way.

SLEEVES:
Cast on 36-36-38-40-42-44 stitches with double pointed needles size 4.5 MM = US 7 and 1 strand Brushed Alpaca Silk and 2 strands Kid-Silk (= 3 strands). Remove one of the strands of Kid-Silk. The rest of the sleeve is worked with 1 strand of each quality. Insert 1 marker at the beginning of the round = mid under the sleeve.
Knit 1 round. Then work rib in the round (knit 1 twisted, purl 1) for 10-10-10-12-12-12 cm = 4"-4"-4"-4¾"-4¾"-4¾".
Change to double pointed needles size 6 MM = US 10 and work 1 round where you knit 1 in both the front and back loop of all stitches (doubles the number of stitches) = 72-72-76-80-84-88 stitches. Work stockinette stitch in the round until the sleeve measures 46-46-46-44-43-42 cm = 18"-18"-18"-17¼"-17"-16½".
Now start 3-3-3-3-4-4 stitches before the marker at the beginning of the round and bind off 6-6-6-6-8-8 stitches for the armhole, knit the remaining stitches.
Continue the sleeve cap back and forth on the needle at the same time as you bind off stitches at the beginning of all rows as follows: Bind off 2 stitches 1-2-2-3-3-3 times and 1 stitch 1-1-1-1-1-2 times on each side. Then bind off 2 stitches on each side until the sleeve measures 51-52-52-52-52-52 cm = 20"-20½"-20½"-20½"-20½"-20½". Bind off 3 stitches 1 time on each side and then bind off the remaining stitches - remember BINDING-OFF TIP!
Work the other sleeve in the same way.

ASSEMBLY:
Sew the shoulder seams inside the bind-off edges.
Sew in the sleeves, inside the 1 edge stitch on the front and back pieces.

DOUBLE NECK:
Start from the right side on one of the shoulders and knit up 60 to 74 stitches around the neck (including the stitches on the thread in front) with short circular needle size 4.5 MM = US 7 and 1 strand Brushed Alpaca Silk and 1 strand Kid-Silk (= 2 strand) – the number of stitches should be divisible by 2.
Work rib in the round (knit 1 twisted, purl 1) for 7-7-7-8-8-8 cm = 2¾"-2¾"-2¾"-3⅛"-3⅛"-3⅛". Bind off with knit over knit and purl over purl – remember BINDING-OFF TIP!
Fold the neck double to the inside and sew down; to avoid the neck being tight and rolling outwards it is important that the seam is elastic.

Diagram

diagram measurements

Each of our patterns has specific tutorial videos to help you.

Do you have a question? See a list of frequently asked questions (FAQ)

Knitting tension is what determines the final measurements of your work, and is usually measured per 10 x 10 cm. It is provided like so: number of stitches in width x number of rows in height - eg: 19 stitches x 26 rows = 10 x 10 cm.

The knitting tension is very individual; some people knit/crochet loosely while others work tightly. You adjust the knitting tension with the needle size, which is why the suggested needle size only serve as a guide! You need to adjust this (up or down) to ensure that YOUR knitting tension matches the knitting tension provided in the pattern. If you work with a different knitting tension than provided you will have a different yarn consumption, and your work will have different measurements than what the pattern suggests.

The knitting tension also determines which yarns can replace each other. As long as you achieve the same knitting tension you can replace one yarn with another.

See DROPS lesson: How to measure your tension/gauge

See DROPS video: How to make a gauge tension swatch

The required amount of yarn is provided in grams, eg: 450 g. To calculate how many balls you’ll need you first need to know how many grams are in 1 ball (25g, 50g or 100g). This information is available if you click on the individual yarn quality on our pages. Divide the amount required with the amount of each ball. For example, if each ball is 50g (the most common amount), the calculation will be as follows: 450 / 50 = 9 balls.

The important thing when changing from one yarn to another is that the knitting/crochet tension remains the same. This is so that the measurements of the finished piece will be the same as on the sketch provided. It is easier to achieve the same knitting tension using yarns from the same yarn group. It is also possible to work with multiple strands of a thinner yarn to achieve the knitting tension of a thicker one. Please try our yarn converter. We recommend you to always work a test swatch.

Please NOTE: when changing yarn the garment might have a different look and feel to the garment in the photo, due to individual properties and qualities of each yarn.

See DROPS lesson: Can I use a different yarn than the one mentioned in the pattern?

All our yarns are categorised into yarn groups (from A to F) according to thickness and knitting tension – group A contains the thinnest yarns and group F the thickest. This makes it easier for you to find alternative yarns to our patterns, should you wish to switch yarn. All yarns within the same group have a similar knitting tension and can easily replace each other. However, different yarn qualities have different structures and properties which will give the finished work a unique look and feel.

Click here for an overview of the yarns in each yarn group

At the top of all our patterns you’ll find a link to our yarn converter, which is a helpful tool should you wish to use a different yarn than suggested. By filling in the yarn quality you wish to replace, the amount (in your size) and number of strands, the converter will present good alternative yarns with the same knitting tension. Additionally it will tell you how much you’ll require in the new qualities and whether you’ll need to work with multiple strands. Most skeins are 50g (some are 25g or 100g).

If the pattern is worked with multiple colours, every colour will have to be converted separately. Similarly, if the pattern is worked with several strands of different yarns (for example 1 strand Alpaca and 1 strand Kid-Silk) you will have to find alternatives for each, individually.

Click here to see our yarn converter

Since different yarns have different qualities and textures we have chosen to keep the original yarn in our patterns. However, you can easily find options among our available qualities by using our yarn converter, or simply pick a yarn from the same yarn group.

It is possible that some retailers still have discontinued yarns in stock, or that someone has a few skeins at home that they would like to find patterns for.

The yarn converter will provide both alternative yarn as well as required amount in the new quality.

If you think it's hard to decide what size to make, it can be a good idea to measure a garment you own already and like the size of. Then you can pick the size by comparing those measures with the ones available in the pattern's size chart.

You'll find the size chart at the bottom of the pattern.

See DROPS lesson: How to read size chart

The needle size provided in the pattern serves only as a guide, the important thing is to follow the knitting tension. And since knitting tension is very individual, you will have to adjust the needle size to ensure that YOUR tension is the same as in the pattern – maybe you’ll have to adjust 1, or even 2 needle sizes, up or down to achieve the correct tension. For this, we recommend that you work test swatches.

Should you work with a different knitting tension than the one provided, the measurements of the finished garment might deviate from the measurement sketch.

See DROPS lesson: How to measure your tension/gauge

See DROPS video: How to make a gauge tension swatch

Working a garment top-down provides more flexibility and room for personal adjustment. For example it is easier to try the garment on while working, as well as making adjustments to length of yoke and shoulder caps.

The instructions are carefully explaining every step, in the correct order. Diagrams are adjusted to the knitting direction and are worked as usual.

The diagram depicts all rows/rounds, and every stitch seen from the right side. It is read from bottom to top, from right to left. 1 square = 1 stitch.

When working back and forth, every other row is worked from the right side and every other row is worked from the wrong side. When working from the wrong side, the diagram will have to be worked reversed: from left to right, knit stitches are purled, purl stitches are knit etc.

When working in the round every round is worked from the right side and the diagram are worked from right to left on all rounds.

See DROPS lesson: How to read knitting diagrams

The diagram depicts all rows/rounds, and every stitch seen from the right side. It is worked from bottom to top, from right to left.

When working back and forth every other row is worked from the right side: from right to left and every other row is worked from the wrong side: from left to right.

When working in the round, every row in the diagram are worked from the right side, from right to left.

When working a circular diagram you start in the middle and work your way outwards, counter clockwise, row by row.

The rows usually start with a given number of chain stitches (equivalent to the height of the following stitch), this will either be depicted in the diagram or explained in the pattern.

See DROPS lesson: How to read crochet diagrams

Instructions for working several diagrams after each other on the same row/round, will often be written like so: “work A.1, A.2, A.3 a total of 0-0-2-3-4 times". This means you work A.1 once, then A.2 is worked once, and A.3 is repeated (in width) the number of times provided for your size – in this case like so: S = 0 times, M = 0 times, L=2 times, XL= 3 times and XXL = 4 times.

The diagrams are worked as usual: begin with the first row in A.1, then work the first row in A.2 etc.

See DROPS lesson: How to read knitting diagrams

See DROPS lesson: How to read crochet diagrams

The total width of the garment (from wrist-to-wrist) will be larger in the larger sizes, despite the actual sleeves being shorter. The larger sizes have longer sleeve caps and wider shoulders, so there will be a good fit in all sizes.

The measurement sketch/schematic drawing provides information regarding the full length of the garment. If it’s a jumper or a jacket the length is measured from the highest point on the shoulder (usually closest to the neckline), and straight down to the bottom of the garment. It is NOT measured from the tip of shoulder. Similarly, the length of yoke is measured from the highest point on the shoulder and down to where yoke is split into body and sleeves.

See DROPS lesson: How to read a schematic drawing

Diagrams are often repeated on the round or in height. 1 repeat is the diagram the way it appears in the pattern. If it says to work 5 repeats of A.1 in the round, then you work A.1 a total of 5 times after/next to each other in the round. If it says to work 2 repeats of A.1 vertically/in height you work the entire diagram once, then begin again at the start and work the entire diagram one more time.

Chain stitches are slightly narrower than other stitches and to avoid working the cast-on edge too tight, we simply chain more stitches to begin with. The stitch count will be adjusted on the following row to fit the pattern and measurement sketch.

The rib edge is more elastic and will contract slightly compared to, for example, stocking stitch. By increasing before the rib edge, you avoid a visible difference in width between the rib edge and the rest of the body.

It’s very easy to cast off too tightly, and by making yarn overs while casting off (and simultaneously casting these off) you avoid a too tight cast off edge.

See DROPS video: How to bind off with yarn overs (yo)

To achieve an even increase (or decrease) you can increase on, for example: every 3rd and 4th row alternately, like so: work 2 rows and increase on the 3rd row, work 3 rows and increase on the 4th. Repeat this until the increase is complete.

See DROPS lesson: Increase or decrease 1 st on every 3rd and 4th row alternately

Should you prefer to work in the round instead of back and forth, you may of course adjust the pattern. You’ll need to add steeks mid-front (usually 5 stitches), and follow the instructions. When you would normally turn and work from the wrong side, simply work across the steek and continue in the round. At the end you’ll cut the piece open, pick up stitches to work bands, and cover the cut edges.

See DROPS video: How to knit steeks and cut open

Should you prefer to work back and forth instead of in the round, you may of course adjust the pattern so you work the pieces separately and then assemble them at the end. Divide the stitches for the body in 2, add 1 edge stitch in each side (for sewing) and work the front and back pieces separately.

See DROPS lesson: Can I adapt a pattern for circular needles into straight needles?

Pattern repeats can vary slightly in the different sizes, in order to get the correct proportions. If you’re not working the exact same size as the garment in the photo, yours might deviate slightly. This has been carefully developed and adjusted so that the complete impression of the garment is the same in all sizes.

Make sure to follow instructions and diagrams for your size!

If you have found a pattern you like which is available in women’s size it’s not very difficult to convert it to men’s size. The biggest difference will be the length of sleeves and body. Start working on the women size that you think would fit across the chest. The additional length will be worked right before you cast off for the armhole/sleeve cap. If the pattern is worked top-down you can add the length right after the armhole or before the first decrease on sleeve.

Regarding additional yarn amount, this will depend on how much length you add, but it is better with a skein too many than too few.

All yarns will have excess fibres (from production) that might come off as lint or shedding. Brushed yarns (ie hairier yarns) have more of these loose, excess fibres, causing more shedding.

Shedding also depends on what is worn under or over the garment, and whether this pulls at the yarn fibres. It’s therefore not possible to guarantee that there will be no shedding

Below are some tips on how to get the best result when working with hairier yarns:

1. When the garment is finished (before you wash it) shake it vigorously so the looser hairs come off. NOTE: do NOT use a lint roller, brush or any method that pulls at the yarn.

2. Place the garment in a plastic bag and put it in your freezer - the temperature will cause the fibres to become less attached to each other, and excess fibres will come off easier.

3. Leave in the freezer for a few hours before taking it out and shaking it again.

4. Wash the garment according to the instructions on the yarn label.

Pilling is a natural process that happens to even the most exclusive of fibers. It's a natural sign of wear and tear that is hard to avoid, and that is most visible in high friction areas of your garment like a sweater's arms and cuffs.

You can make your garment look as new by removing the pilling, using a fabric comb or a pill/lint remover.

Still can't find the answer you need? Then scroll down and leave your question so one of our experts can try to help you. This will be done normally within 5 to 10 working days.
In the meantime, you can read the questions and answers that others have left to this pattern or join the DROPS Workshop on Facebook to get help from fellow knitters/crocheters!

You might also like...

Cotton Candy

DustyPixie, Denmark

Cotton Candy

Marianne Johansson, Norway

Cotton Candy

Marianne, Norway

Cotton Candy

Marianne Johansson, Norway

Cotton Candy

Agnieszka, Poland

Post a comment to pattern DROPS 223-22

We would love to hear what you have to say about this pattern!

If you want to leave a question, please make sure you select the correct category in the form below, to speed up the answering process. Required fields are marked *.

Comments / Questions (42)

country flag Suzy wrote:

Bonjour, je suis déçue par la laine laisse beaucoup de poils sur les vêtements, manteau, pantalon . Dommage. Cordialement

29.01.2024 - 12:12

country flag Anette wrote:

Hej. Har ni tips på andra lämpliga kombinationer av DROPS BRUSHED ALPACA SILK och DROPS KID-SILK ifall man vill sticka tröjan i andra färger?

14.01.2024 - 12:40

DROPS Design answered:

Hej Annette, Ja, gå ind på farvekortet til DROPS Kid-Silk: DROPS Kid-Silk og klik på en farve, så har vi lagt samme farve ind i andre kvaliteter. Der er dog flere fine farvekombinationer end dem vi nævner her :)

16.01.2024 - 12:26

country flag Alisa wrote:

Hei! kun olin tekemässä takakappaletta minulle tuli hieman ongelmia. En oikein pysty hahmottamaan miten nuo kavennukset toimivat, ne minkä jälkeen pitäisi olla 60 silmukkaa jäljellä. Voisitko selittää sen helpommin?

11.01.2024 - 16:41

DROPS Design answered:

Hei, työn kummastakin reunasta päätetään aluksi 2 silmukkaa kerran (työstä päätetään siis yhteensä 4 silmukkaa) ja sitten kummastakin reunasta päätetään joka 2.kerros 1 silmukka yhteensä 3 kertaa.

16.01.2024 - 18:11

country flag Larissa wrote:

Bonjour, J'aimerais tricoter ce pull en taille S mais, je ne comprends pas bien ce passage: DOS= 58-64-70-76-80-88 mailles. Tricoter en jersey en allers et retours et rabattre pour les emmanchures au début de chaque rang de chaque côté: 0-1-1-2-2-3 fois 2 mailles et 2-2-3-3-4-4 fois 1 maille = il reste 54-56-60-62-64-68 mailles. Surtout le paasage de 0 fois 2 mailles. Merci de m'éclairer.

05.12.2023 - 22:08

DROPS Design answered:

Bonjour Larissa, en taille S, on rabat simplement 2 fois 1 maille de chaque côté, autrement dit, après la division du dos et du devant, rabattez 1 maille au début des 4 rangs suivants (2 fois 1 m de chaque côté). Bon tricot!

06.12.2023 - 08:23

country flag Babs_238 wrote:

I'd understood that this was a batwing jumper based on image, but I don't see the increasing in the sleeve instructions for that to be the case. Is it really simply a case of doubling up the number of loops? I'm knitting a size small, and it is still a very slim arm, and I don't see how it's going to get wider to fit the body.... where am I going wrong?!

28.03.2023 - 18:54

DROPS Design answered:

Dear Babs_238, after you have worked the ribbing edge, you will work each stitch alternately in the front and in the back loop of stitch, so that you will double the number of stitches = 72 sts = ca 51 cm around. Happy knitting!

29.03.2023 - 09:38

country flag Sara wrote:

Hi, i want to ask about the sleeve if i want to start it from top down , how i can do that . If it possible help me please

23.02.2023 - 14:55

DROPS Design answered:

Dear Sara, it might be easier to work it bottom up just as in the pattern to make sure getting the correct measurements especially on sleeve cap. Happy knitting!

24.02.2023 - 09:37

country flag Elisabeth wrote:

Bonjour, pourriez expliquer comment Terminer le devant et le dos séparément, avec l aiguille circulaire, faut il mettre les mailles en attente? Ou continuer avec des aiguilles droites ? Merci

23.01.2023 - 21:44

DROPS Design answered:

Bonjour Elisabeth, vous pouvez mettre les mailles du devant en attente (sur un fil, un arrêt de mailles, une autre aiguille circulaire) pendant que vous tricotez le dos (avec la même aiguille qu'avant ou bien une aiguille droite, mais gardez bien la bonne tension quoi qu'il en soit). Bon tricot!

24.01.2023 - 12:03

country flag Zsuzsi wrote:

After reaching the appropriate length of the body, I knitted the back piece, but after that, how do I continue the front piece? I have only stitches there but no yarn.

28.11.2022 - 22:27

DROPS Design answered:

Dear Zsuzsi, when you are done with back piece (casting off both shoulders), join the yarn to work the 58-64-70-76-80-88 sts aside for front piece. Happy knitting!

29.11.2022 - 11:11

country flag Maddalena wrote:

Usando un filato D invece che (A+C) quanti gomitoli vanno acquistati? E poi va lavorato con lo stesso numero indicato nelle istruzioni del modello (4,5 e 6)? Grazie

12.10.2022 - 13:33

DROPS Design answered:

Buonasera Maddalena, deve scegliere il filato e calcolare la quantità di filato necessaria in base al metraggio del filato scelto. Se poi il suo campione corrisponde a quello indicato, potrà procedere con le stesse spiegazioni. Buon lavoro!

13.10.2022 - 22:35

country flag Mia wrote:

Hej. Sættes forstykket på tråd, når man skal strikke for- og bagstykke hver for sig?

22.07.2022 - 17:09

DROPS Design answered:

Hej Mia, ja det kan du gøre, eller så sætter du maskerne på en anden pind så længe :)

03.08.2022 - 15:37