
Popular categories
Looking for a yarn?


|
|||||||||||||||||||
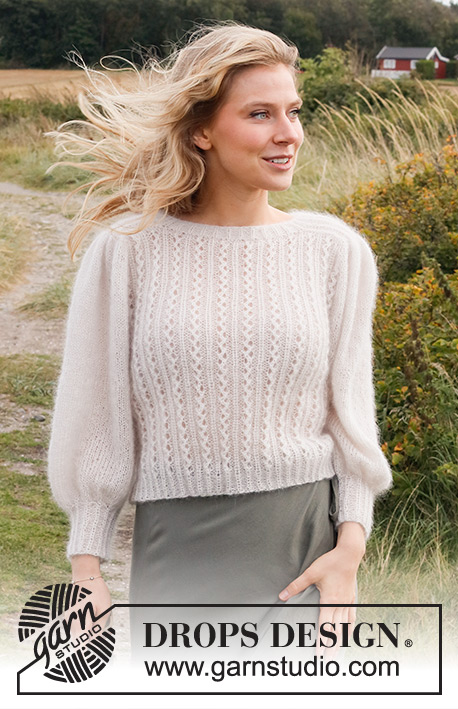
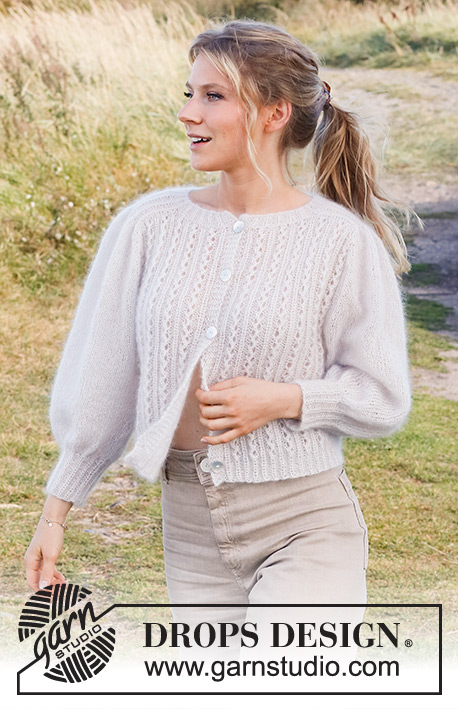
White Water Jacket |
|||||||||||||||||||
 |
 |
||||||||||||||||||
Knitted jacket in 2 strands DROPS Kid-Silk. Piece is knitted top down with round saddle shoulders, lace pattern and pouffe sleeves. Size: S - XXXL
DROPS 222-26 |
|||||||||||||||||||
|
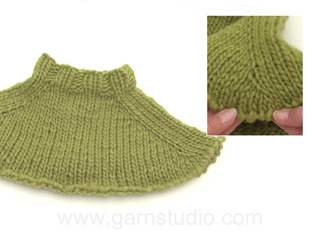
------------------------------------------------------- EXPLANATION FOR THE PATTERN: ------------------------------------------------------- GARTER STITCH (back and forth): Knit all rows. 1 ridge vertically = knit 2 rows. PATTERN: See diagrams A.1 to A.3. Diagrams show all rows in pattern seen from the right side. INCREASE/DECREASE TIP (evenly): To calculate how to increase/decrease evenly, count the stitches to be increased/decreased (e.g. 17 stitches), and divide by stitches of increases/decreases to be done (e.g. 5) = 3.4. In this example increase by making 1 yarn over after alternately approx. every 3rd and 4th stitch. On next row work yarn overs twisted to avoid holes If decreasing knit in this example alternately approx. every 2nd and 3rd stitch and every 3rd and 4th stitch together. INCREASE TIP-1: All increases are done from the right side. Increase 1 stitch by making 1 yarn over. On next row (from wrong side) purl yarn over twisted to avoid holes. INCREASE TIP-2 FROM RIGHT SIDE: BEFORE MARKER: The stitch is twisted towards the right. Use left needle to pick up thread between 2 stitches from row below, pick up thread from behind and knit stitch in front loop. AFTER MARKER: The stitch is twisted towards the left. Use left needle to pick up thread between 2 stitches from row below, pick up thread from front and knit stitch in back loop. BUTTONHOLES: Decrease for buttonholes on right band (when garment is worn). Decrease from right side when 3 stitches remain on row as follows: Make 1 yarn over, knit the next 2 stitches together, knit last stitch. On next row (wrong side) knit the yarn over to make a hole. Decrease first buttonhole when rib in neck measures approx. 3 cm = 1⅛". Then bind off the next 4-4-5-5-5-5 buttonholes approx. 9½-10-8-8½-9-9 cm = 3 5/9"-4"-3⅛"-3¼"-3½"-3½" apart. BIND-OFF TIP: To avoid a tight bind-off edge you may use a larger needle size. If this also is too tight, work a 1 yarn over after approx. 3rd or every 6th stitch while binding off (bind off yarn overs as regular stitches). ------------------------------------------------------- START THE PIECE HERE: ------------------------------------------------------- JACKET - SHORT OVERVIEW OF THE PIECE: Worked top down. Work neck edge back and forth from mid front. Then work shoulders back and forth separately. Then slip all stitches on to same circular needle, at the same time pick up stitches along the saddle shoulders. Then work yoke back and forth from mid front, at the same time increase for sleeves and yoke. Now divide yoke for body and sleeves. Work body back and forth on circular needle, top down. Work sleeves in the round on double pointed needles/short circular needle, top down. NECK EDGE: Cast on 96-102-106-106-110-122 stitches (including 5 band stitches in each side towards mid front) on circular needle size 3 MM = US 2.5 with 2 strands Kid-Silk. Purl 1 row (= wrong side). Work next row as follows from right side: Work 5 band stitches in GARTER STITCH – read explanation above, work A.1 over the next 12-15-15-15-15-18 stitches, work the first 2 stitches in A.1, insert 1 marker here (= in transition between front piece and left saddle shoulder), work A.2 over the next 13-13-15-15-17-17 stitches, insert 1 marker here (= in transition between left saddle shoulder and back piece), work A.1 over the next 30-30-30-30-30-36 stitches, work the first 2 stitches in A.1, insert 1 marker here (= in transition between back piece and right saddle shoulder), work A.2 over the next 13-13-15-15-17-17 stitches, insert 1 marker here (= in transition between right saddle shoulder and right front piece), work A.1 over the next 12-15-15-15-15-18 stitches, work the first 2 stitches in A.1, 5 band stitches in garter stitch. Continue back and forth like this. When rib measures 3 cm = 1⅛", cut the yarn. Now divide the piece for front pieces, back piece and saddle shoulders. Slip the first and last 19-22-22-22-22-25 stitches on separate stitch holders (= front piece), skip the next 13-13-15-15-17-17 stitches in each side (= shoulder stitches), slip the middle 32-32-32-32-32-38 stitches on a stitch holder (= back piece). Now work saddle shoulder separately. SADDLE SHOULDERS: = 13-13-15-15-17-17 stitches. Work back and forth over shoulder stitches in one side on circular needle size 3 MM = US 2.5, as follows: Cast on 1 stitch on row (= edge stitch), work the 13-13-15-15-17-17 stitches in pattern as before, at the same time increase all 1 purl stitch to 2 purl stitches – read INCREASE TIP-1 (= 6-6-7-7-8-8 stitches increased), cast on 1 stitch at the end of row (= edge stitch) = 21-21-24-24-27-27 stitches. Now work pattern (1 English rib stitch, purl 2) back and forth until piece measures 7-7-7-8-8-8 cm = 2¾"-2¾"-2¾"-3⅛"-3⅛"-3⅛" from where all 1 purl stitches were increased to 2 purl stitches, adjust so that last row is worked from wrong side. Slip stitches on a stitch holder. Work the other saddle shoulder the same way. Now work front pieces, back piece and shoulder stitch on to same circular needle size 5 MM = US 8, at the same time pick up stitches along the sides on saddle shoulders. Work as follows from RS: 5 band stitches in garter stitch, knit over the next 14-17-17-17-17-20 stitches and increase at the same time 1-5-5-8-8-12 stitches evenly – read INCREASE/DECREASE TIP (= 15-22-22-25-25-32 stitches), pick up 16-16-16-20-20-20 stitches inside edge stitch along the side on saddle shoulder, knit 1 * knit 1 in front and back loop of next stitch, make 1 yarn over *, work from *-* a total of 17-17-21-21-24-24 times, knit 1 in front and back loop of stitch, knit 1 (= 37-37-43-43-49-49 stitches increased to = 58-58-67-67-76-76 stitches on the saddle shoulder), pick up 16-16-16-20-20-20 stitches inside edge stitch along the other side of saddle shoulder, knit over the 32-32-32-32-32-38 stitches on back piece and increase at the same time 9-9-9-15-15-9 stitches evenly (= 41-41-41-47-47-47 stitches), pick up 16-16-16-20-20-20 stitches inside edge stitch along the side on saddle shoulder, knit 1 * knit 1 in front and back loop of next stitch, make 1 yarn over *, work from *-* a total of 17-17-21-21-24-24 times, knit 1 in front and back loop of stitch, knit 1 (= 37-37-43-43-49-49 stitches increased to = 58-58-67-67-76-76 stitches on the saddle shoulder), pick up 16-16-16-20-20-20 stitches inside edge stitch along the other side of saddle shoulder, knit over the next 14-17-17-17-17-20 stitches and increase at the same time 1-5-5-8-8-12 stitches evenly (= 15-22-22-25-25-32 stitches), 5 band stitches in garter stitch. Remember BUTTONHOLES on right band - read explanation above. There are now 261-275-293-321-339-353 stitches on needle. Purl 1 row from wrong side (band stitches in garter stitches as before). YOKE: Insert a marker thread after band at the beginning of stitches mid front - NOW MEASURE PIECE FROM HERE! Now work pattern and 4 markers in the piece as follows: 1st marker: Work 5 band stitches in garter stitch, A.3 over the next 28-35-35-42-42-49 stitches, work the first 3 stitches in A.3, insert 1st marker in next stitch (= right front piece). 2nd marker: Work in stockinette stitch over the next 56-56-65-65-74-74 stitches, insert 2nd marker in next stitch (= right sleeve). 3rd marker: Work A.3 over the next 70-70-70-84-84-84 stitches, work the first 3 stitches in A.3, insert 3rd marker in next stitch (= back piece). 4th marker: Work in stockinette stitch over the next 56-56-65-65-74-74 stitches, insert 4th marker in next stitch (= left sleeve). Work A.3 over the next 28-35-35-42-42-49 stitches, work the first 3 stitches in A.3, 5 band stitches in garter stitch (= left front piece). Move these 4 markers upwards when working; increase at each of these markers. Continue back and forth with pattern like this. (stitches with markers are worked in stockinette stitch. AT THE SAME TIME on next row from right side the increase for SLEEVE INCREASE and YOKE INCREASE starts. Increase as explained below: SLEEVE INCREASE: Work in stockinette stitch on sleeves. AT THE SAME TIME on next row from right side increase 4 stitches for sleeves as follows: Increase AFTER 1st and 3rd marker and increase BEFORE 2nd and 4th marker – read INCREASE TIP-2 (= 4 stitches increased). Increase stitches on sleeves, and work the increased stitches in stockinette stitch. Increase like this every other round 7-10-7-9-6-8 times in total. YOKE INCREASE: Work pattern as before on front pieces and back piece. AT THE SAME TIME on next row from right side increase 4 stitches for yoke as follows: Increase BEFORE 1st and 3rd marker and increase AFTER 2nd and 4th marker – remember INCREASE TIP-2 (= 4 stitches increased). Increase on front pieces and back piece, and work the increased stitches in A.3. Increase like this every other round 0-7-7-7-14-21 times in total. When all increases are done there are 289-343-349-385-419-469 stitches on row. Work until piece measures 19-21-23-25-27-29 cm = 7½"-8¼"-9"-9¾"-10⅝"-11⅜" from marker after neck edge. Now divide piece for body and sleeves. Work next row as follows: Work the first 40-50-52-57-64-78 stitches as before (= front piece), slip the next 64-78-77-85-88-92 stitches on a stitch holder for sleeve, cast on 6-6-8-10-10-10 new stitches on row (= in the side under sleeve), work the next 81-87-91-101-115-129 stitches as before (= back piece), slip the next 64-78-77-85-88-92 stitches on a stitch holder for sleeve, cast on 6-6-8-10-10-10 new stitches on row (= in the side under sleeve), work the last 40-50-52-57-64-78 stitches as before (= front piece). Now finish body and sleeves separately. NOW MEASURE PIECE FROM HERE! BODY: = 173-199-211-235-263-305 stitches. Continue back and forth with pattern as before, but over the 14-6-12-10-10-10 stitches in each side (i.e. the 6-6-8-10-10-10 new stitches cast on + 4-0-2-0-0-0 stitches on each side of these stitches) work in stockinette stitch. When piece measures 19-19-18-18-17-17 cm = 7½"-7½"-7"-7"-6¾"-6¾" from division, next row from right side as follows: 5 band stitches in garter stitch, work A.3 as before over the next 31-45-45-52-59-73 stitches, but skip the yarn over in every repetition A.3 (decrease 1 stitch in every repetition A.3 = 4-6-6-7-8-10 stitches decreased), knit over the next 14-6-12-10-10-10 stitches and increase at the same time 4-3-6-5-5-5 stitches evenly, work pattern as before over the next 73-87-87-101-115-129 stitches but skip the yarn over in every repetition A.3 (decrease 1 stitch in each repetition A.3 = 10-12-12-14-16-18 stitches deceased), knit the next 14-6-12-10-10-10 stitches and increase at the same time 4-3-6-5-5-5 stitches evenly, work pattern as before over the next 31-45-45-52-59-73 stitches, but skip the yarn over in every repetition A.3 (decrease 1 stitch in every repetition A.3 = 4-6-6-7-8-10 stitches decreased), 5 band stitches in garter stitch = 163-181-199-217-241-277 stitches. Switch to circular needle size 3 MM = US 2.5. Now work rib as follows: 5 band stitches in garter stitch, work the last 2 stitches in A.1, then work A.1 until 6 stitches remain on row, work first stitch in A.1, 5 band stitches in garter stitch - English rib stitch in A.1 should fit knit stitches in A.3. Continue rib like this for 3 cm = 1⅛". Bind off with knit over garter stitches and English rib stitches and purl over purl - read BIND-OFF TIP. Jacket measures approx. 46-48-50-52-54-56 cm = 18"-19"-19¾"-20½"-21¼"-22" from shoulder and down. SLEEVES: Slip the 64-78-77-85-88-92 stitches from stitch holder in one side back on a short circular needle/double pointed needles size 5 MM = US 8. Pick in addition up 1 stitch in each of the 6-6-8-10-10-10 new stitches under sleeve = 70-84-85-95-98-102 stitches. Work in stockinette stitch in the round. When piece measures 22-20-18-16-15-12 cm = 8¾"-8"-7"-6¼"-6"-4¾" from division - try the jacket on and work until desired length (approx. 9 cm = 3½" rib remain until finished measurements), decrease 28-42-40-47-47-51 stitches evenly = 42-42-45-48-51-51 stitches. Switch to double pointed needles size 3 MM = US 2.5. Work A.1 in the round for 9 cm = 3½". Bind off with knit over English rib stitches and purl over purl - read BIND-OFF TIP. Sleeve measures approx. 31-29-27-25-24-21 cm = 12¼"-11⅜"-10⅝"-9¾"-9½"-8¼" from division. Work the other sleeve the same way. ASSEMBLY: Sew the buttons on to left band. |
|||||||||||||||||||
Diagram explanations |
|||||||||||||||||||
|
|||||||||||||||||||

|
|||||||||||||||||||
|
Have you made this or any other of our designs? Tag your pictures in social media with #dropsdesign so we can see them! Do you need help with this pattern?You'll find tutorial videos, a Comments/Questions area and more by visiting the pattern on garnstudio.com. © 1982-2024 DROPS Design A/S. We reserve all rights. This document, including all its sub-sections, has copyrights. Read more about what you can do with our patterns at the bottom of each pattern on our site. |
|||||||||||||||||||


With over 40 years in knitting and crochet design, DROPS Design offers one of the most extensive collections of free patterns on the internet - translated to 17 languages. As of today we count 304 catalogs and 11422 patterns - 11417 of which are translated into English (US/in).
We work hard to bring you the best knitting and crochet have to offer, inspiration and advice as well as great quality yarns at incredible prices! Would you like to use our patterns for other than personal use? You can read what you are allowed to do in the Copyright text at the bottom of all our patterns. Happy crafting!
Comments / Questions (38)
Merci pour votre réponse rapide .
13.02.2024 - 08:35Bonjour, je suis au début de mon ouvrage pour faire le montage des cotes du col et je ne comprends pas la répartition des mailles avec les diagrammes A1 et A2 . J’ai toujours les mailles en trop …Pouvez-vous me donner plus de détails. Je vous remercie. Cordialement.
12.02.2024 - 09:59DROPS Design answered:
Bonjour Mme Puigrenier, tricotez ainsi: 5 m point mousse, 12 à 18 m de A.1 (cf taille) + les 2 premières mailles de A.1 (= 14 à 20 mailles de A.1), marqueur, 13 à 17 m de A.2, marqueur, 30-36 m de A.1 + les 2 premières m de A.1 (32-38 m de A.1), marqueur, 12 à 17 m de A.2, marqueur, 12 à 18 m de A.1 + les 2 premières m de A.1 (= 14 à 20 m de A.1), 5 m point mousse. Bon, tricot!
13.02.2024 - 08:04Hej! Får inte maskantalet att gå i hop i stl S ! Är vid sadelaxlen där framstycke, bakstycke och axelmaskorna ska stickas på samma sticka och här får jag inte det att gå ihop så jag får 58 maskor! Vad gör jag för fel?
31.01.2024 - 16:00DROPS Design answered:
Hei Kirsi. Vanskelig å vite hva du har gjort feil. Hvor mange masker har du? Har du økt i alle vrangmaskene på begynnelsen av sadelskuldren? Har du økt til kantmasker når sadelskuldren ble strikket? Har du sett på hjelpevideoen lengre ned på siden? Kanskje den kan hjelpe deg. mvh DROPS Design
09.02.2024 - 10:55I would like to knit this cardigan in stocking stitch only and I wonder wether I do need all the increased stitches when starting the body? Does it affect the amount of yarn needed as well? Thanks for your advise Lidwina
30.10.2023 - 23:45DROPS Design answered:
Dear Lidwina, you can get help from our basic patterns worked top down with saddle shoulders here, it might be easier than to adapt another pattern. Happy knitting!
31.10.2023 - 15:56Bonjour, Au moment de l'empiècement, pour augmenter je suis perdue, j'ai l'habitude d'augmenter d'un côté ou de l'autre d'un marqueur entre deux mailles. Ici le marqueur etant sur UNE maille, dois je augmenter avant la maille marqueur/ tricoter la maille marqueur/ augmenter après la maille marqueur ? Merci
15.10.2023 - 09:53DROPS Design answered:
Bonjour Elise, effectivement, vous allez simplement devoir augmenter avant et/ou après la maille avec le marqueur, tricotez les mailles avec le marqueur à l'endroit et augmentez soit avant, soit après soit avant et après end onction des augmentations à faire. Bon tricot!
16.10.2023 - 09:34Hvor finner jeg målene som gjør at jeg kan velge riktig størrelse? Ser en kommentar ovenfor om at 96 cm tilsvarer str M.
02.10.2023 - 21:15DROPS Design answered:
Hei Wibeke, Du finner målskissen på bunnen av oppskriften. God fornøyelse!
03.10.2023 - 06:49Hello: it seems to be an error in the measurements: Chest measurements: 90-106-104-114-128-142 cm = 35 1/2"-41 3/4"-41"-45"-50 3/8"-55 3/4" which is the real measure of the M size? with Thanks, Sharon
31.07.2023 - 14:43DROPS Design answered:
Dear Mrs Lubasch, the chest circumference of the finished jacket in size M should be approx. 96 cm, this means approx. =3 ft 1.80 inch (37.80 in). Happy knititng!
31.07.2023 - 15:38Am Ende des Teils für die Sattelschulter sollten in Größe M 271 Maschen auf der Nadel sein, nicht 275 wie angegeben. Als nächstes strickt man für die Passe 5+35+3+56+70+3+56+35+3+5=271 Maschen. Wäre toll, wenn Ihr das korrigieren könntet :)
26.05.2023 - 23:08DROPS Design answered:
Liebe Leonie, 275 Maschen sind richtig: 5 Blenden-Maschen, 17 Maschen stricken +5 Maschen zunehmen (22); 16 Maschen auffassen, dann 21 Maschen stricken + 37 Maschen zunehmen (= 58 Maschen), 16 Maschen auffassen, 32 Maschen stricken + 9 Maschen zunehmen (41 Maschen), 16 Maschen auffassen, dann 21 Maschen stricken + 37 Maschen zunehmen (= 58 Maschen), 16 Maschen auffassen, 17 Maschen stricken + 5 Maschen zunehmen (22 Maschen) + 5 Blenden-Maschen=5+22+16+58+16+41+16+58+16+22+5=275 Maschen. Viel Spaß beim stricken!
30.05.2023 - 12:00Bonjour, je tricote la plus petite taille. Je suis bloquée pour les augmentations. Comment arrive-t-on à augmenter les manches en 7 fois alors que le nombre final résulte de seulement 4 fois ? Pour l'empiècement, les explications prévoient 0 augmentation après une seule augmentation qui impliquerait la création en une seule fois de 4 mailles pour les devants et 8 mailles pour le dos. Merci pour vos éclaircissements.
19.12.2022 - 11:21DROPS Design answered:
Bonjour Mme Demonet, en S on augmente 7 fois pour les manches (et pas pour l'empiècement), vous aurez ainsi 70 m entre les marqueurs pour les manches, mais lors de la division, les 3 premières mailles de la manche + les 3 dernières mailles de la manche seront attribuées au devant gauche/dos et au dos/devant droit. Bon tricot!
19.12.2022 - 13:06Hei, nydelig jakke som jeg skal strikke til min datter, men jeg ser ikke noen diagrammer eller symboler. Hvor finner jeg dem? Hilsen Solveig
19.11.2022 - 16:07DROPS Design answered:
Hei Solveig, Diagammene finnes på bunnen av oppskriften. God fornøyelse!
21.11.2022 - 06:51