
Popular categories
Looking for a yarn?


|
||||||||||||||||||||||||||||||||||
Crisp Air |
||||||||||||||||||||||||||||||||||
 |
 |
|||||||||||||||||||||||||||||||||
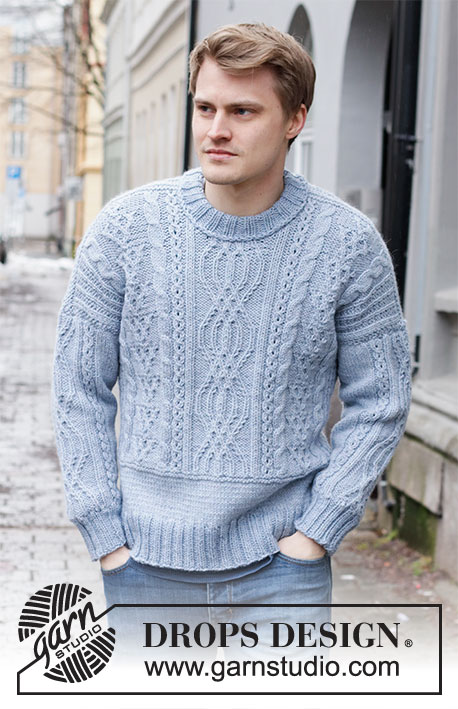
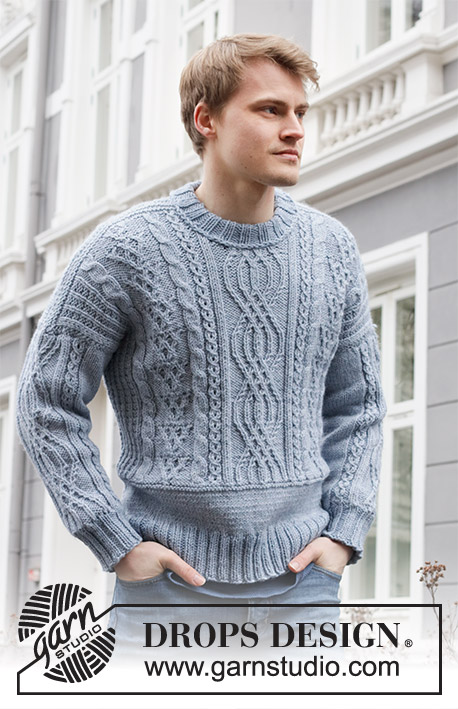
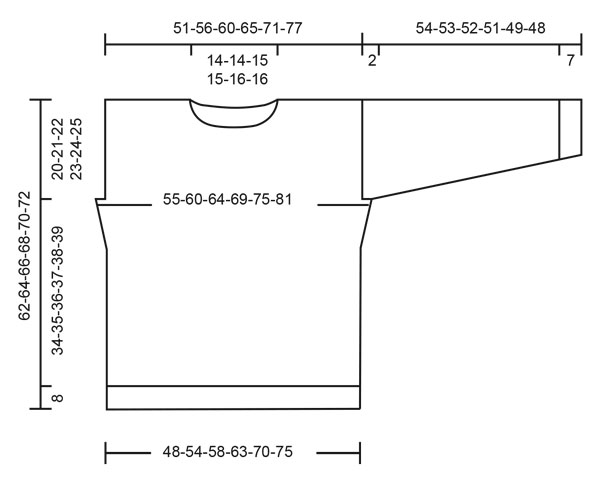
Knitted jumper with cables for men in DROPS Nepal. Size: S - XXXL
DROPS 219-12 |
||||||||||||||||||||||||||||||||||
|
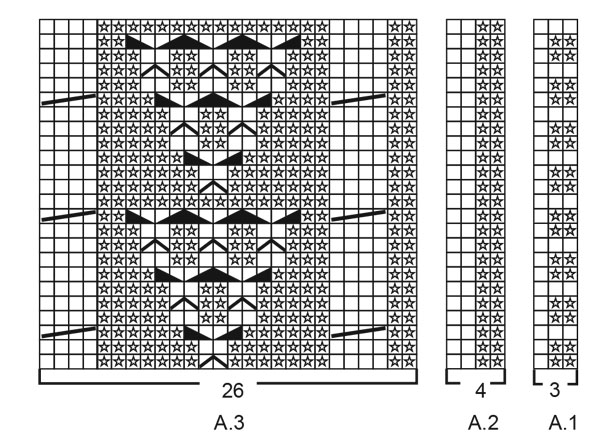
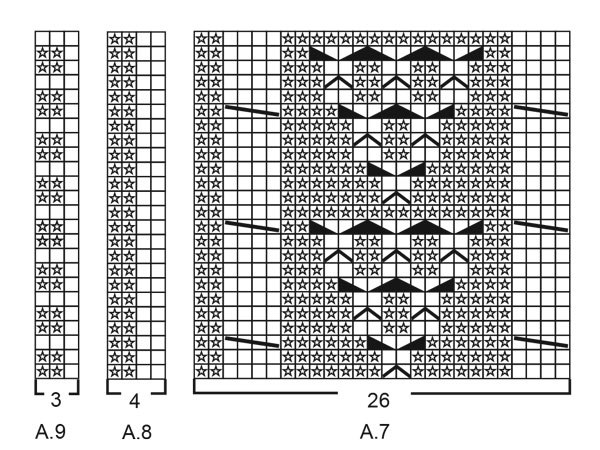
---------------------------------------------------------- EXPLANATION FOR THE PATTERN: ---------------------------------------------------------- GARTER STITCH (back and forth): Knit all rows. 1 ridge vertically = knit 2 rows. INCREASE TIP (evenly): To calculate how to increase evenly, use the total number of stitches on row (e.g. 90 stitches) and divide stitches by number of increases to be done (e.g. 24) = 3.75. In this example increase by making 1 yarn over after approx. every 4th stitch. On next row work yarn overs twisted to avoid holes. DECREASE TIP (evenly): To calculate how to decrease evenly, use the total number of stitches on row (e.g. 114 stitches) and divide stitches by number of decreases to be done (e.g. 24) = 4.75. In this example work approx. every 4th and 5th stitch together. DECREASE TIP-2: Decrease 1 purl stitch by purling 2 together from the right side (decrease over purl sections). PATTERN: See diagrams A.1 to A.10. Diagram A.2 and A.8 only applies to sizes XXL and XXXL. INCREASE TIP (applies to sleeves): All increases are done from right side. Increase 1 stitch by making 1 yarn over. On next row work yarn overs twisted to avoid holes Work the increased stitches in stocking stitch. ---------------------------------------------------------- START THE PIECE HERE: ---------------------------------------------------------- JUMPER - SHORT OVERVIEW OF THE GARMENT: Worked back and forth on circular needle in parts and sewn together when finished. Work sleeves back and forth on needle. Work neck edge in the round. BACK PIECE: Cast on 102-110-118-130-142-154 stitches on circular needle size 5 mm with Nepal. Work back and forth as follows – first row is from right side: 1 edge stitch in GARTER STITCH - read explanation above, * knit 2 and purl 2 *, work from *-* until 1 stitch remains, and work 1 edge stitch in garter stitch. Work rib like this until piece measures 8 cm. Switch to circular needle size 5.5 mm. Work in stocking stitch with 1 stitch in garter stitch in each side - on first row decrease 24-24-26-30-32-34 stitches evenly – read DECREASE TIP = 78-86-92-100-110-120 stitches. REMEMBER THE KNITTING TENSION! Work in stocking stitch with 1 edge stitch in garter stitch in each side of piece until piece measures 16 cm - adjust after row from wrong side, switch to circular needle size 5 mm. Work 2 ridges– on last row in last ridge increase 24-22-22-26-34-30 stitch evenly - read INCREASE TIP= 102-108-114-126-144-150 stitches. SIZE S-M-L-XL: Switch back to circular needle size 5.5 mm. Continue to work pattern from right side as follows: 1 edge stitch in garter stitch, 1 stitch in stocking stitch, A.1 (= 3 stitches) 1-2-3-5 times in total, A.3 (= 26 stitches), A.4 (= 5 stitches), A.5 (= 30 stitches), A.6 (= 5 stitches), A.7 (= 26 stitches), A.9 (= 3 stitches) 1-2-3-5 times in total, 1 stitch in stocking stitch and 1 edge stitch in garter stitch. SIZE XXL-XXXL Switch back to circular needle size 5.5 mm. Continue to work pattern from right side as follows: 1 edge stitch in garter stitch, 1 stitch in stocking stitch, A.1 (= 3 stitches) 5-6 times in total, A.2 (= 4 stitches), A.4 (= 5 stitches), A.3 (= 26 stitches), A.4 (= 5 stitches), A.5 (= 30 stitches), A.6 (= 5 stitches), A.7 (= 26 stitches), A.6 (= 5 stitches), A.8 (= 4 stitches), A.9 (= 3 stitches) 5-6 times in total, 1 stitch in stocking stitch and 1 edge stitch in garter stitch. ALL SIZES: Continue this pattern and repeat diagrams vertically. When piece measures 30-31-32-33-34-35 cm, increase 1 stitch in each side, increase inside 1 edge stitch in garter stitch. Increase every 2 cm 6 times in total = 114-120-126-138-156-162 stitches. Work the increased stitches in A.1/A.9. When piece measures 42-43-44-45-46-47 cm, cast off 3-3-3-3-3-3 stitches for armholes at the beginning of the next 2 rows = 108-114-120-132-150-156 stitches. Continue the pattern as before with 1 edge stitch in garter stitch in each side of piece. When piece measures 59-61-63-65-67-69 cm, decrease 4 purl stitches evenly over the middle 22 stitches - read DECREASE TIP-2= 104-110-116-128-146-152 stitches. On next row from right side, cast off the middle 20-20-22-22-24-24 stitches for neck, and finish each shoulder separately = 42-45-47-53-61-64 stitches. Then cast off 1 stitch on next row from neck = 41-44-46-52-60-63 stitches for shoulder. Continue until piece measures 61-63-65-67-69-71 cm, adjust to finish after a row from wrong side. Then work 1 ridge while decreasing 4 stitches evenly on first row in ridge = 37-40-42-48-56-59 stitches. Knit 1 row from right side, cast off by knitting from wrong side - make sure to avoid a tight cast-off edge! Work the other shoulder the same way. FRONT PIECE: Cast on and work the same way as back piece. When piece measures 53-55-57-59-61-63 cm, work next row as follows from the right side: Work the first 47-50-52-58-67-70 stitches as before, work the next 14-14-16-16-16-16 stitches – at the same time decrease 4 purl stitches evenly over these stitches - then slip these stitches on a stitch holder for neck (= 10-10-12-12-12-12 stitches on stitch holder), work the remaining 47-50-52-58-67-70 stitches as before. Now work each shoulder separately. Continue to cast off for neck at beginning of every row from neck as follows: Cast off 2 stitches 2 times, and 1 stitch 2-2-2-2-3-3 times = 41-44-46-52-60-63 stitches. Continue until piece measures 61-63-65-67-69-71 cm, adjust to finish after a row from wrong side. Then work 1 ridge while decreasing 4 stitches evenly on first row in ridge = 37-40-42-48-56-59 stitches. Knit 1 row from right side, cast off by knitting from wrong side. Work the other shoulder the same way. SLEEVE: Cast on 38-38-42-42-46-46 stitches (including 1 edge stitch in each side) on circular needle size 5 mm with Nepal. Work back and forth as follows – first row is from right side: 1 edge stitch in garter stitch, * knit 2 and purl 2 *, work from *-* until 1 stitch remains, and 1 edge stitch in garter stitch. Work rib like this until piece measures 7 cm. Switch to circular needle size 5.5 mm. Purl 1 row from wrong side while increasing 4-6-4-4-2-4 stitches evenly = 42-44-46-46-48-50 stitches. Work next row as follows from right side: 1 edge stitch in garter stitch, 2-3-4-4-5-6 stitches in stocking stitch, A.4 (= 5 stitches), A.10 (= 26 stitches), A.6 (= 5 stitches), 2-3-4-4-5-6 stitches in stocking stitch and 1 edge stitch in garter stitch. When A.10 has been worked vertically, there are 46-48-50-50-52-54 stitches on needle. Then work A.5 (= 30 stitches) over A.10, continue the remaining stitches as before. Repeat A.5 vertically. When piece measures 9-10-10-10-10-11 cm, increase 1 stitch inside 1 edge stitch in each side - read INCREASE TIP. Increase like this every 3½-3-3-2½-2½-2 cm 12-13-13-15-15-16 times in total = 70-74-76-80-82-86 stitches. When piece measures 52-51-50-49-47-46 cm, insert 1 marker in both sides of piece. Markers indicate where sleeve is sewn into armhole on jumper (marker = side seam on jumper). Continue to work until piece measures 53-52-51-50-48-47 cm. Then decrease 4 purl stitches evenly over A.5 from right side = 66-70-72-76-78-82 stitches. Cast off on next row from right side. Piece measures approx. 54-53-52-51-49-48 cm (shorter measurements in the larger sizes because of wider shoulders). Work the other sleeve the same way. ASSEMBLY: Sew shoulder seams with grafting/kitchener stitches inside cast-off edge. Sew in sleeves, sew bottom of armhole (marker on sleeve should fit side seam on body). Sew underarm and side seams in one inside 1 edge stitch in garter stitch. NECK EDGE: Work neck edge in the round. Use circular needle size 5 mm and begin from right side at one shoulder seam. Pick up 60-60-64-64-68-68 stitches (including stitches on stitch holder at the front). Work rib with knit 2 and purl 2 for 8 cm. Cast off stitches with knit over knit and purl over purl. Fold the neck outwards towards the right side. Fasten cast-off edge – Sew with neat little stitches from the wrong side of jumper (make sure to make the seam invisible on the right side and to avoid a tight seam). |
||||||||||||||||||||||||||||||||||
Diagram explanations |
||||||||||||||||||||||||||||||||||
|
||||||||||||||||||||||||||||||||||
|
||||||||||||||||||||||||||||||||||

|
||||||||||||||||||||||||||||||||||
|
||||||||||||||||||||||||||||||||||
|
||||||||||||||||||||||||||||||||||
|
Have you made this or any other of our designs? Tag your pictures in social media with #dropsdesign so we can see them! Do you need help with this pattern?You'll find tutorial videos, a Comments/Questions area and more by visiting the pattern on garnstudio.com. © 1982-2024 DROPS Design A/S. We reserve all rights. This document, including all its sub-sections, has copyrights. Read more about what you can do with our patterns at the bottom of each pattern on our site. |
||||||||||||||||||||||||||||||||||


With over 40 years in knitting and crochet design, DROPS Design offers one of the most extensive collections of free patterns on the internet - translated to 17 languages. As of today we count 304 catalogues and 11422 patterns - 11422 of which are translated into English (UK/cm).
We work hard to bring you the best knitting and crochet have to offer, inspiration and advice as well as great quality yarns at incredible prices! Would you like to use our patterns for other than personal use? You can read what you are allowed to do in the Copyright text at the bottom of all our patterns. Happy crafting!
Comments / Questions (16)
Ja, voor alle Nederlandse breisters: in de uitleg van het telpatroon, er staan fouten in. De derde steek van boven in de uitleg, moet de kabelnaald niet voor maar achter het werk liggen. Beide steken moeten dan rechts gebreid worden. De steken die daarna worden uitgelegd, daar dienen de woorden voor en achter omgewisseld te worden.
15.12.2023 - 23:58Ja, ik begin links onder naar rechts. En de tweede regel van rechts naar links, etc.
06.11.2023 - 21:39Toen ik het patroon met de aanwijzingen van de legenda ging breien kwamen sommige steken er verkeerd-om uit. Pas toen ik bewust de kabelnaald 'voor' veranderde in 'achter' (inclusief de daarop volgende handelingen) klopte het patroon. Het betreft de kabelsteken over 2 steken (steken nr. 4 en 5 in de legenda) Ik lees hier verder niets over terug, ben ik de enige die deze 'fout' ervaart?
05.11.2023 - 19:10DROPS Design answered:
Dag Pascal,
Lees je het patroon, zoals het hoort, van beneden naar boven?
05.11.2023 - 19:44Thank you for your help.😊
14.01.2022 - 10:43Hi I would like to knit size for 42 inch chest. Could you please tell me which size to knit for a 42inch chest?
13.01.2022 - 13:42DROPS Design answered:
Dear Mary, you will find all finished measurements in the chart, measure a garment he like the shape and compare these measurements to those in the chart (in cm) - this is the most accurate way to find out the matching size. Read more here. Happy knitting!
13.01.2022 - 16:13Wo kann ich die Maß-Skizze finden? Ich weiß nicht, welche Größe ich stricken soll!
14.11.2021 - 19:41DROPS Design answered:
Liebe Andrea, Maßskizze finden Sie ganz unten nach den Diagrammen. Viel Spaß beim stricken!
15.11.2021 - 08:30Bonjour, je ne comprends pas le triangle sur 3 mailles dans les commentaires j'ai vu double croisement serait t'il possible d'avoir l'explication,de même le triangle a 4 mailles je ne trouve pas l'explication. Vous en remerciant par avance. Cordialement.
30.08.2021 - 12:28DROPS Design answered:
Bonjour Mme Bannière Dacremont, il n'y a pas de triangle sur 4 mailles, il s'agit de 2 triangles sur 2 mailles côte à côte (= 5ème + 4ème symbole), quant au 9ème symbole, il s'agit d'une petite torsade qui se fait sur 3 mailles - cette vidéo montre comment procéder. En espérant que ceci puisse vous aider. Bon tricot!
30.08.2021 - 16:00Bonsoir Il existe une vue complète des points employés pour le modèle parce que ce n'est vraiment pas très pratique de devoir tourner les pages pour savoir ce que l'on doit faire. Merci d'avance de votre réponse. Bien à vous, Catherine Van Damme
06.07.2021 - 20:42DROPS Design answered:
Bonjour Mme Van Damme, il n'existe qu'une seule version de nos modèles, les diagrammes sont souvent séparés en groupes de motifs qui sont à tricoter différemment selon les tailles. Essayez de les imprimer sur des pages différentes pour les avoir bien devant vous, ce peut être plus simple. Bon tricot!
07.07.2021 - 07:31How do I work “ back and forth on circular needle”? I assume I’d be knitting flat pieces that are later sewn together. Couldn’t I just use long straight single pointed needles
30.04.2021 - 20:00DROPS Design answered:
Dear Lisa, you can knit the pieces on straight needles, we only suggest curculard, because of teh number of stitches itmight be more comfortable to use them. Happy Knitting!
01.05.2021 - 00:24Grazie mille , ho sbagliato tutto , il diagrama non e solo il diritto c’è anche il rovescio vero? va letto la prima riga da destra a sinistra e al seconda riga da sinistra a destra
07.02.2021 - 09:22DROPS Design answered:
Buonasera Silvia, il maglione è lavorato in piano, per cui i diagrammi si leggono da destra a sinistra per il ferro di andata e da sinistra verso destra per quello di ritorno. Buon lavoro!
07.02.2021 - 23:00