
Popular categories
Looking for a yarn?


|
||||
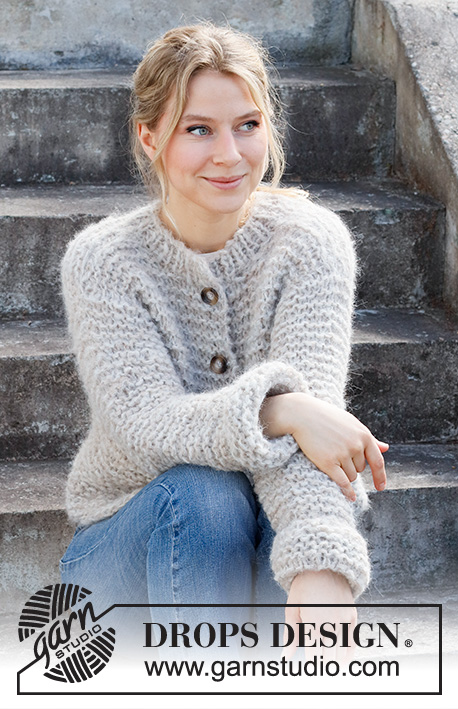
Good Book Cardigan |
||||
 |
 |
|||
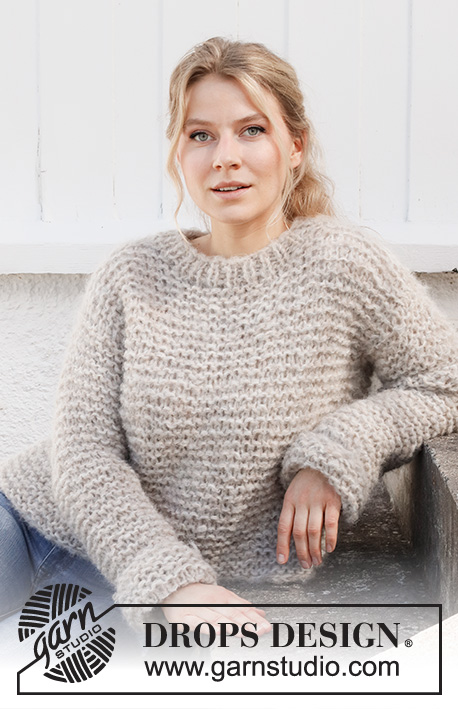
Knitted jacket in DROPS Alpaca Bouclé and DROPS Kid-Silk. The piece is worked in stockinette stitch with a small shawl-collar and turn-ups on the sleeves. Sizes XS - XXL.
DROPS 215-36 |
||||
|
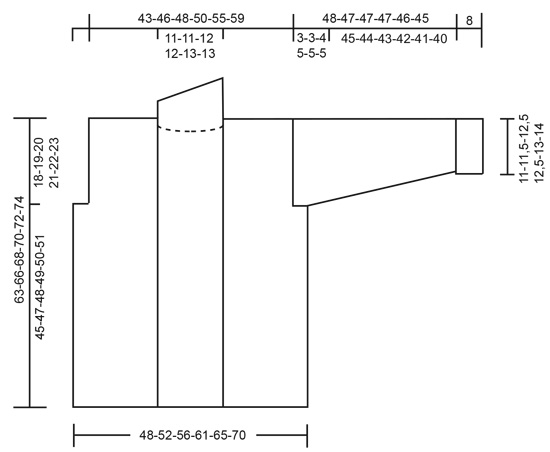
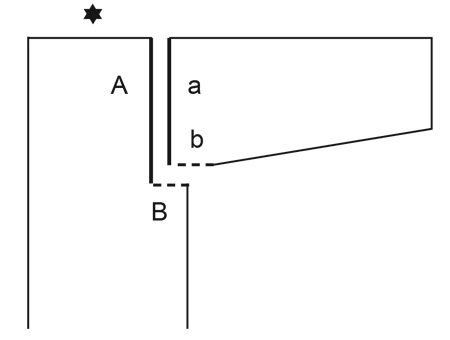
------------------------------------------------------- EXPLANATIONS FOR THE PATTERN: ------------------------------------------------------- RIDGE/GARTER STITCH (worked back and forth): Knit all rows. 1 ridge in height = Knit 2 rows. MEASURING TIP: All widths are taken with the piece lying flat and without stretching. All lengths are taken holding the piece up or the jacket will be too long when worn. INCREASE TIP (for sides of sleeves): Increase 1 stitch on the inside of the 2 edge stitches by making 1 yarn over. On the next row work the yarn over twisted to avoid a hole. Then work the new stitch in stockinette stitch. BINDING-OFF TIP: To avoid the bind-off edge being tight you can bind off with a larger size needle. If the edge is still tight, make 1 yarn over after approx. each 4th stitch at the same time as binding off and the yarn overs are bind off as normal stitches. ------------------------------------------------------- START THE PIECE HERE: ------------------------------------------------------- JACKET – SHORT OVERVIEW OF THE PIECE: The whole garment is worked with 1 strand of each quality (2 strands). The back/front pieces and the sleeves are worked separately, back and forth with circular needle and bottom up. The garment is then sewn together as described in the text. BACK PIECE: Cast on 62-68-73-79-85-91 stitches with circular needle size 7 mm = US 10,75 and 2 strands Kid-Silk and 1 strand Alpaca Bouclé (= 3 strands). Remove 1 of the strands of Kid-Silk (the rest of the back piece is worked with 1 strand of each quality; casting on with 3 strands prevents the cast-on edge being tight). Change to circular needle size 6 mm = US 10 and work 3 RIDGES back and forth – read description above. Change back to circular needle size 7 mm = US 10,75 and work stockinette stitch back and forth with 2 edge stitches in garter stitch on each side. REMEMBER THE KNITTING GAUGE! When the piece measures 45-47-48-49-50-51 cm = 17¾"-18½"-19"-19 1/4-19 3/4"-20" – read MEASURING TIP, bind off 3-4-5-7-7-7 stitches for the armholes at the beginning of the next 2 rows = 56-60-63-65-71-77 stitches. Continue as before with 1 edge stitch in garter stitch on each side. When the piece measures 61-64-66-68-70-72 cm = 24"-25½"-26"-26¾"-27½"- 28⅜", bind off the middle 10-10-11-11-13-13 stitches for the neck and each shoulder is finished separately. Continue working as before and bind off 2 stitches on the next row from the neck = 21-23-24-25-27-30 stitches on the shoulder. Continue until the piece measures 63- 66-68-70-72-74 cm = 24¾"-26"-26¾"-27½"-28⅜"-29⅛". Loosely bind off with knit from the right side – read BINDING-OFF TIP! Work the other shoulder in the same way. RIGHT FRONT PIECE: Cast on 34-37-39-42-45-48 stitches with circular needle size 7 mm = US 10,75 and 2 strands Kid-Silk and 1 strand Alpaca Bouclé (= 3 strands). Remove 1 of the strands of Kid-Silk (the rest of the front piece is worked with 1 strand of each quality). Change to circular needle size 6 mm = US 10 and work 3 ridges back and forth. Change back to circular needle size 7 mm = US 10,75 and work stockinette stitch back and forth with 2 edge stitches in garter stitch towards the side and 3 edge stitches in garter stitch towards mid front. When the piece measures 45-47-48-49-50-51 cm = 17¾"-18½"-19"-19 1/4-19 3/4"-20", bind off 3-4-5-7-7-7 stitches for the armhole at the beginning of the next row from the wrong side = 31-33-34-35-38-41 stitches. Continue as before with 1 edge stitch in garter stitch towards the armhole and 3 edge stitches in garter stitch towards mid front. When the piece measures 63-66-68-70-72-74 cm = 24¾"-26"-26¾"-27½"-28 3/8"-29⅛", bind off for the shoulder as follows, on the next row from the wrong side: Bind off the first 21-23-24-25-27-30 stitches and knit the remaining 10-10-10-10-11- 11 stitches = collar. The collar is worked as described below. RIGHT COLLAR: = 10-10-10-10-11-11 stitches. Keep the stitches on circular needle size 7 mm = US 10,75. Start from the right side and work ridges back and forth with 1 strand of each quality as follows: * Work 2 ridges over all stitches, work 1 ridge over just the first 6-6- 6-6-7-7 stitches towards mid front *, work from *-* until the collar should measure 7-7-8-8-8-8 cm = 2¾"-2¾"-3⅛"-3⅛"-3⅛"-3⅛" on the inside, where it is shortest. Loosely bind off with knit from the right side. LEFT FRONT PIECE: Cast on 34-37-39-42-45-48 stitches with circular needle size 7 mm = US 10,75 and 2 strands Kid-Silk and 1 strand Alpaca Bouclé (= 3 strands). Remove 1 of the strands of Kid-Silk (the rest of the front piece is worked with 1 strand of each quality). Change to circular needle size 6 mm = US 10 and work 3 ridges back and forth. Change back to circular needle size 7 mm = US 10,75 and work stockinette stitch back and forth with 2 edge stitches in garter stitch towards the side and 3 edge stitches in garter stitch towards mid front. When the piece measures 45-47-48-49-50-51 cm = 17¾"-18½"-19"-19 1/4-19 3/4"-20", bind off 3-4-5-7-7-7 stitches for the armhole at the beginning of the next row from the right side = 31-33-34-35-38-41 stitches. Continue as before with 1 edge stitch in garter stitch towards the armhole and 3 edge stitches in garter stitch towards mid front. When the piece measures 63-66-68-70-72-74 cm = 24¾"-26"-26¾"-27½"-28 3/8"-29⅛", bind off for the shoulder as follows, on the next row from the right side: Bind off the first 21-23-24-25-27-30 stitches and knit the remaining 10-10-10-10-11- 11 stitches = collar. The collar is worked as described below. LEFT COLLAR: = 10-10-10-10-11-11 stitches. Keep the stitches on circular needle size 7 mm = US 10,75. Start from the wrong side and work ridges back and forth with 1 strand of each quality as follows: * Work 2 ridges over all stitches, work 1 ridge over just the first 6-6- 6-6-7-7 stitches towards mid front *, work from *-* until the collar should measure 7-7-8-8-8-8 cm = 2¾"-2¾"-3⅛"-3⅛"-3⅛"-3⅛" on the inside, where it is shortest. Knit 1 row from the wrong side. Loosely bind off with knit from the right side. SLEEVE: Cast on 28-30-32-32-34-36 stitches with circular needle size 7 mm = US 10,75 and 2 strands Kid-Silk and 2 strands Alpaca Bouclé (= 4 strands). Remove 1 strand of each quality (the rest of the sleeve is worked with 1 strand of each quality; casting on with 4 strands avoids the cast-on edge being tight). Change to circular needle size 6 mm = US 10 and work 3 ridges back and forth. Change back to circular needle size 7 mm = US 10,75 and purl 1 row from the right side with 1 edge stitch in garter stitch on each side. Continue with stockinette stitch (knit from right side, purl from wrong side) and 1 edge stitch in garter stitch on each side. When the sleeve measures 8 cm = 3 1/8", insert 1 marker in each side. These mark where the sleeve will be turned up; the piece is now measured from these markers. Continue with stockinette stitch and 1 edge stitch in garter stitch on each side. When the piece measures 9 cm = 3½" from the markers increase 1 stitch on each side – read INCREASE TIP. Increase like this every 4-3½-3½-3-2½-2½ cm = 1½"-1 1/4"-1¼"-1⅛"-⅞"-⅞" a total of 9-10-10-11-12-12 times on each side = 46-50- 52-54-58-60 stitches. When the sleeve measures 45-44-43-42-41-40 cm = 17¾"-17¼"-17"-16½"-16 1/8"-15¾" from the markers insert 1 new marker in each side. These mark where the bottom of the armhole starts. Continue working until the sleeve measures 48-47-47-47-46-45 cm = 19"-18½"-18 1/2"-18½"-18"-17¾" from the markers at the bottom of the sleeve. Loosely bind off with knit from the right side – read BINDING-OFF TIP! The whole sleeve measures approx. 56-55-55-55-54-53 cm = 22"-21⅝"-21⅝"-21⅝"-21¼"-21" from the cast-on to the bind-off edge. Work the other sleeve in the same way. ASSEMBLY: Sew the shoulder seams inside the bind-off edge. Sew in the sleeves inside the 1 edge stitch and sew the bottom of the armholes – the markers inserted in each side at the top of the sleeves should match the sides of the body. Sew the sleeve and side seams in one go – sew in the outermost loop of the outermost stitch so the seam is flat. Sew the collar together mid back; make sure the seam turns to the wrong side when the collar is turned down. Sew the collar to the neck. Turn up the bottom 8 cm = 3⅛" on each sleeve and sew down with a couple of small stitches if necessary. |
||||
Diagram explanations |
||||
|
||||
|
||||
|
||||
|
Have you made this or any other of our designs? Tag your pictures in social media with #dropsdesign so we can see them! Do you need help with this pattern?You'll find tutorial videos, a Comments/Questions area and more by visiting the pattern on garnstudio.com. © 1982-2024 DROPS Design A/S. We reserve all rights. This document, including all its sub-sections, has copyrights. Read more about what you can do with our patterns at the bottom of each pattern on our site. |
||||


With over 40 years in knitting and crochet design, DROPS Design offers one of the most extensive collections of free patterns on the internet - translated to 17 languages. As of today we count 304 catalogs and 11422 patterns - 11417 of which are translated into English (US/in).
We work hard to bring you the best knitting and crochet have to offer, inspiration and advice as well as great quality yarns at incredible prices! Would you like to use our patterns for other than personal use? You can read what you are allowed to do in the Copyright text at the bottom of all our patterns. Happy crafting!
Comments / Questions (30)
Maar in de beschrijving lees ik:* 2 ribbels over alle steken, dat zijn m.i. toch 4 naalden recht over alle steken, dan 1 ribbel over 6 steken, is 2 nld recht over de 6 steken * en dit ** 9x herhalen??? Zo staat het beschreven. Volgens U 1x over de 10 en 1x over de 6 en dit 9x herhalen?? Wat is nu juist?
08.04.2021 - 09:27DROPS Design answered:
Dag Mieke,
Ja, je hebt inderdaad gelijk: 2 ribbels over alle steken en 1 ribbel over alleen 6 steken. Was fout van mij.
08.04.2021 - 09:51Ik heb een vraag over de kraag,: ik heb 4 keer 2 ribbels over de 10 steken gebreid en 4 keer 1 ribbel over de 6 steken en heb nu al een lengte van 8 cm. Kan dit kloppen? 2 ribbels zijn m.i. toch 4 naalden recht? 1 ribbel 2 naalden recht?
07.04.2021 - 12:50DROPS Design answered:
Dag Mieke,
Het is de bedoeling dat je afwisselend over alle 10 steken en alleen over 6 steken breit. Dus je breit eerst een ribbel over 10 steken. Dan een ribbel over 6 steken, dan weer een ribbel over 10 steken, enzovoorts. Aan de kant waar de kraag aan het pand genaaid wordt, wordt hij dan korter.
08.04.2021 - 09:16Ska koftan blockas? Om ja, I så fall före eller efter montering? \r\n\r\nNybörjaren 😊
29.03.2021 - 00:08DROPS Design answered:
Hej Marie, denne model behøver ikke blockas, men om du vælger at gøre det, så gør det efter montering :)
06.04.2021 - 15:54Kan ik ook met gewone breinaalden breien, aangezien het heen en weer breien is op een rondbreinaald?
29.01.2021 - 16:19DROPS Design answered:
Dag Annette,
Ja, je kan dit patroon ook met rechte naalden breien. De reden dat er gekozen is voor rondbreinaalden is dat er veel steken op de naald staan, met name in de grotere maten.
31.01.2021 - 20:06Bonjour Combien faut-il de pelotes pour faire ce modèle en taille xl ?
18.11.2020 - 13:48DROPS Design answered:
Bonjour Gina, DROPS ALPACA BOUCLÉ 350 g (7 pelotes) et DROPS KID-SILK 100 g (4 pelotes). Bon tricot!
18.11.2020 - 17:02Une veste toute simple avec un col châle. Tout comme j'aime ! En laine Alpaca et Kid-silk, cette veste doit être légère et bien chaude... ce sera mon prochain ouvrage ! Merci beaucoup pour tous ces beaux modèles. Bien à vous.
08.11.2020 - 20:17How can a CO of 68 plus 4 increases TWICE =60 stitches? Think it is time to find a new Tech Editor. Maybe I should be the new Tech Editor. I was the Controller of a large Savings and Loan, so I know how to balance, WITHOUT cheating, or errors. Thank you for your time and attention to my query, yet again. Have a great day!
07.11.2020 - 00:05MJ answered:
My mistake. CO 68 and BO 4 sts TWICE =60. Sorry to fumble. Being too distracted in my working space HAS NEVER WORKED!
07.11.2020 - 00:10Ihana simppeli takki, tästä olisi lempivillatakiksi!
24.10.2020 - 10:00Modèle tout simple et classe, l'occasion pour moi d'essayer l'Alpaga bouclé
15.06.2020 - 23:14Me gusta por lo sencilla e informal, además de calentita.
06.06.2020 - 10:31