DROPS Alpaca Bouclé
DROPS Alpaca Bouclé
80% Alpaca, 15% Wool, 5% Polyamide
from 3.85 € /50g
DROPS Kid-Silk
DROPS Kid-Silk
75% Mohair, 25% Silk
from 5.05 € /25g
Get the yarn to make this pattern from 34.40€.

The yarn cost is calculated from the pattern’s smallest size and the yarn’s cheapest product type. Looking for an even better price? You might find it on the DROPS Deals!

DROPS SS24

Good Book Cardigan

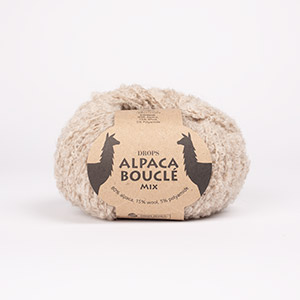
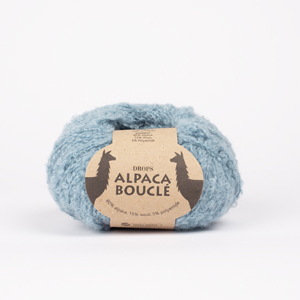
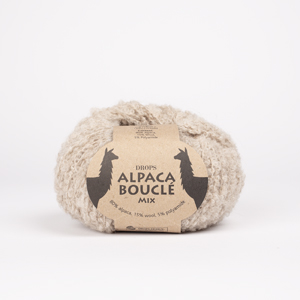
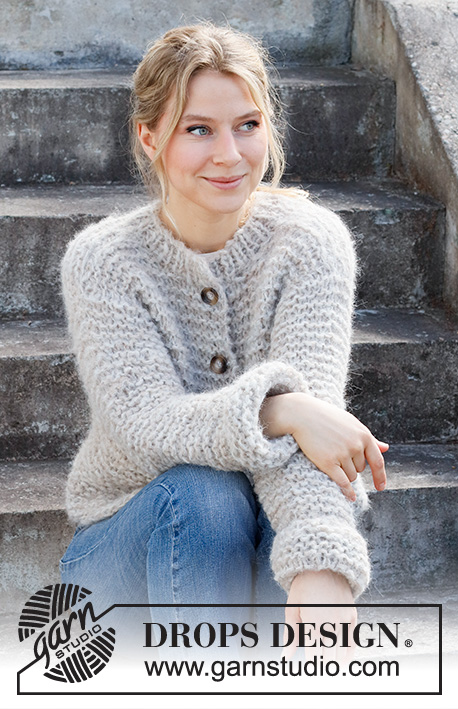
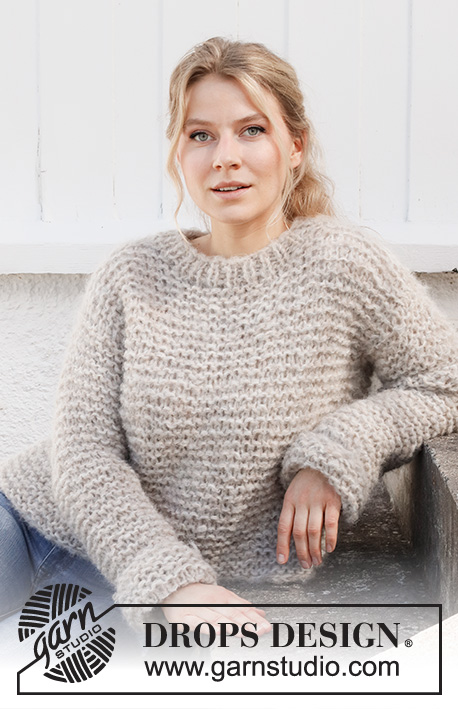
Knitted jacket in DROPS Alpaca Bouclé and DROPS Kid-Silk. The piece is worked in stocking stitch with a small shawl-collar and turn-ups on the sleeves. Sizes XS - XXL.

DROPS 215-36
DROPS Design: Pattern no ab-107
Yarn group C + A or D
-------------------------------------------------------

SIZES:
XS - S - M - L - XL - XXL

MATERIALS:
DROPS ALPACA BOUCLÉ from Garnstudio (belongs to yarn group C)
250-250-300-300-350-350 g colour 2020, light beige
and use:
DROPS KID-SILK from Garnstudio (belongs to yarn group A)
75-100-100-100-100-125 g colour 20, light beige

KNITTING TENSION:
13 stitches in width and 15 rows in height with stocking stitch and 1 strand of each quality = 10 x 10 cm.

NEEDLES:
DROPS CIRCULAR NEEDLE SIZE 7 MM: Length 60 or 80 cm for stocking stitch.
DROPS CIRCULAR NEEDLE SIZE 6 MM: Length 60 or 80 cm for garter stitch edges.
Needle size is only a guide. If you get too many stitches on 10 cm, change to a larger needle size. If you get too few stitches on 10 cm, change to a smaller needle size.

-------------------------------------------------------

Alternative Yarn – See how to change yarns here
Yarn Groups A to F – Use the same pattern and change the yarn here
Yarn usage using an alternative yarn – Use our yarn converter here

-------------------------------------------------------

DROPS Alpaca Bouclé
DROPS Alpaca Bouclé
80% Alpaca, 15% Wool, 5% Polyamide
from 3.85 € /50g
DROPS Kid-Silk
DROPS Kid-Silk
75% Mohair, 25% Silk
from 5.05 € /25g
Get the yarn to make this pattern from 34.40€.

The yarn cost is calculated from the pattern’s smallest size and the yarn’s cheapest product type. Looking for an even better price? You might find it on the DROPS Deals!

Pattern instructions

-------------------------------------------------------

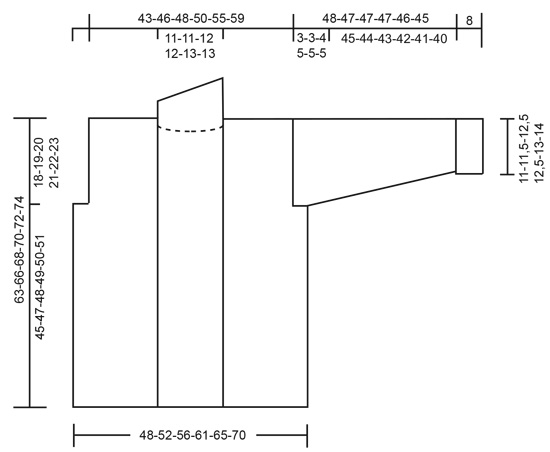
EXPLANATIONS FOR THE PATTERN:

-------------------------------------------------------

RIDGE/GARTER STITCH (worked back and forth):
Knit all rows.
1 ridge in height = Knit 2 rows.

MEASURING TIP:
All widths are taken with the piece lying flat and without stretching.
All lengths are taken holding the piece up or the jacket will be too long when worn.

INCREASE TIP (for sides of sleeves): 
Increase 1 stitch on the inside of the 2 edge stitches by making 1 yarn over. On the next row work the yarn over twisted to avoid a hole. Then work the new stitch in stocking stitch.

CASTING-OFF TIP:
To avoid the cast-off edge being tight you can cast off with a larger size needle. If the edge is still tight, make 1 yarn over after approx. each 4th stitch at the same time as casting off and the yarn overs are cast off as normal stitches.

-------------------------------------------------------

START THE PIECE HERE:

-------------------------------------------------------

JACKET – SHORT OVERVIEW OF THE PIECE:
The whole garment is worked with 1 strand of each quality (2 strands). The back/front pieces and the sleeves are worked separately, back and forth with circular needle and bottom up. The garment is then sewn together as described in the text.

BACK PIECE:
Cast on 62-68-73-79-85-91 stitches with circular needle size 7 mm and 2 strands Kid-Silk and 1 strand Alpaca Bouclé (= 3 strands). Remove 1 of the strands of Kid-Silk (the rest of the back piece is worked with 1 strand of each quality; casting on with 3 strands prevents the cast-on edge being tight).
Change to circular needle size 6 mm and work 3 RIDGES back and forth – read description above.
Change back to circular needle size 7 mm and work stocking stitch back and forth with 2 edge stitches in garter stitch on each side.
REMEMBER THE KNITTING TENSION!
When the piece measures 45-47-48-49-50-51 cm – read MEASURING TIP, cast off 3-4-5-7-7-7 stitches for the armholes at the beginning of the next 2 rows = 56-60-63-65-71-77 stitches. Continue as before with 1 edge stitch in garter stitch on each side.
When the piece measures 61-64-66-68-70-72 cm, cast off the middle 10-10-11-11-13-13 stitches for the neck and each shoulder is finished separately.
Continue working as before and cast off 2 stitches on the next row from the neck = 21-23-24-25-27-30 stitches on the shoulder. Continue until the piece measures 63-66-68-70-72-74 cm. Loosely cast off with knit from the right side – read CASTING-OFF TIP!
Work the other shoulder in the same way.

RIGHT FRONT PIECE:
Cast on 34-37-39-42-45-48 stitches with circular needle size 7 mm and 2 strands Kid-Silk and 1 strand Alpaca Bouclé (= 3 strands). Remove 1 of the strands of Kid-Silk (the rest of the front piece is worked with 1 strand of each quality).
Change to circular needle size 6 mm and work 3 ridges back and forth.
Change back to circular needle size 7 mm and work stocking stitch back and forth with 2 edge stitches in garter stitch towards the side and 3 edge stitches in garter stitch towards mid front.
When the piece measures 45-47-48-49-50-51 cm, cast off 3-4-5-7-7-7 stitches for the armhole at the beginning of the next row from the wrong side = 31-33-34-35-38-41 stitches.
Continue as before with 1 edge stitch in garter stitch towards the armhole and 3 edge stitches in garter stitch towards mid front.
When the piece measures 63-66-68-70-72-74 cm, cast off for the shoulder as follows, on the next row from the wrong side: Cast off the first 21-23-24-25-27-30 stitches and knit the remaining 10-10-10-10-11-11 stitches = collar. The collar is worked as described below.

RIGHT COLLAR:
= 10-10-10-10-11-11 stitches. Keep the stitches on circular needle size 7 mm. Start from the right side and work ridges back and forth with 1 strand of each quality as follows: * Work 2 ridges over all stitches, work 1 ridge over just the first 6-6-6-6-7-7 stitches towards mid front *, work from *-* until the collar measures 7-7-8-8-8-8 cm on the inside, where it is shortest. Loosely cast off with knit from the right side.

LEFT FRONT PIECE:
Cast on 34-37-39-42-45-48 stitches with circular needle size 7 mm and 2 strands Kid-Silk and 1 strand Alpaca Bouclé (= 3 strands). Remove 1 of the strands of Kid-Silk (the rest of the front piece is worked with 1 strand of each quality).
Change to circular needle size 6 mm and work 3 ridges back and forth.
Change back to circular needle size 7 mm and work stocking stitch back and forth with 2 edge stitches in garter stitch towards the side and 3 edge stitches in garter stitch towards mid front.
When the piece measures 45-47-48-49-50-51 cm, cast off 3-4-5-7-7-7 stitches for the armhole at the beginning of the next row from the right side = 31-33-34-35-38-41 stitches.
Continue as before with 1 edge stitch in garter stitch towards the armhole and 3 edge stitches in garter stitch towards mid front.
When the piece measures 63-66-68-70-72-74 cm, cast off for the shoulder as follows, on the next row from the right side: Cast off the first 21-23-24-25-27-30 stitches and knit the remaining 10-10-10-10-11-11 stitches = collar. The collar is worked as described below.

LEFT COLLAR:
= 10-10-10-10-11-11 stitches. Keep the stitches on circular needle size 7 mm. Start from the wrong side and work ridges back and forth with 1 strand of each quality as follows: * Work 2 ridges over all stitches, work 1 ridge over just the first 6-6-6-6-7-7 stitches towards mid front *, work from *-* until the collar measures 7-7-8-8-8-8 cm on the inside, where it is shortest. Knit 1 row from the wrong side. Loosely cast off with knit from the right side.

SLEEVE:
Cast on 28-30-32-32-34-36 stitches with circular needle size 7 mm and 2 strands Kid-Silk and 2 strands Alpaca Bouclé (= 4 strands). Remove 1 strand of each quality (the rest of the sleeve is worked with 1 strand of each quality; casting on with 4 strands avoids the cast-on edge being tight).
Change to circular needle size 6 mm and work 3 ridges back and forth. Change back to circular needle size 7 mm and purl 1 row from the right side with 1 edge stitch in garter stitch on each side. Continue with stocking stitch (knit from right side, purl from wrong side) and 1 edge stitch in garter stitch on each side.
When the sleeve measures 8 cm, insert 1 marker in each side. These mark where the sleeve will be turned up; the piece is now measured from these markers.
Continue with stocking stitch and 1 edge stitch in garter stitch on each side.
When the piece measures 9 cm from the markers increase 1 stitch on each side – read INCREASE TIP. Increase like this every 4-3½-3½-3-2½-2½ cm a total of 9-10-10-11-12-12 times on each side = 46-50-52-54-58-60 stitches.
When the sleeve measures 45-44-43-42-41-40 cm from the markers insert 1 new marker in each side. These mark where the bottom of the armhole starts.
Continue working until the sleeve measures 48-47-47-47-46-45 cm from the markers at the bottom of the sleeve. Loosely cast off with knit from the right side – read CASTING-OFF TIP! The whole sleeve measures approx. 56-55-55-55-54-53 cm from the cast-on to the cast-off edge. Work the other sleeve in the same way.

ASSEMBLY:
Sew the shoulder seams inside the cast-off edge. Sew in the sleeves inside the 1 edge stitch and sew the bottom of the armholes – the markers inserted in each side at the top of the sleeves should match the sides of the body.
Sew the sleeve and side seams in one go – sew in the outermost loop of the outermost stitch so the seam is flat.
Sew the collar together mid back; make sure the seam turns to the wrong side when the collar is turned down. Sew the collar to the neck.
Turn up the bottom 8 cm on each sleeve and sew down with a couple of small stitches if necessary.

This pattern has been corrected.

Updated online: 18.11.2022
Right + Left collar: ;;; work from *-* until the collar measures 7-7-8-8-8-8 cm on the inside...

Diagram

symbols = The sleeve cap is sewn to the armhole as follows: Sew a to A and b to B
diagram
diagram

Each of our patterns has specific tutorial videos to help you.

Do you have a question? See a list of frequently asked questions (FAQ)

Knitting tension is what determines the final measurements of your work, and is usually measured per 10 x 10 cm. It is provided like so: number of stitches in width x number of rows in height - eg: 19 stitches x 26 rows = 10 x 10 cm.

The knitting tension is very individual; some people knit/crochet loosely while others work tightly. You adjust the knitting tension with the needle size, which is why the suggested needle size is only meant as a guide! You need to adjust this (up or down) to ensure that YOUR knitting tension matches the knitting tension provided in the pattern. If you work with a different knitting tension than provided you will have a different yarn consumption, and your work will have different measurements than what the pattern suggests.

The knitting tension also determines which yarns can replace each other. As long as you achieve the same knitting tension you can replace one yarn with another.

See DROPS lesson: How to measure your tension/gauge

See DROPS video: How to make a gauge tension swatch

The required amount of yarn is provided in grams, eg: 450 g. To calculate how many balls you’ll need you first need to know how many grams are in 1 ball (25g, 50g or 100g). This information is available if you click on the individual yarn quality on our pages. Divide the amount required with the amount of each ball. For example, if each ball is 50g (the most common amount), the calculation will be as follows: 450 / 50 = 9 balls.

The important thing when changing from one yarn to another is that the knitting/crochet tension remains the same. This is so that the measurements of the finished piece will be the same as on the sketch provided. It is easier to achieve the same knitting tension using yarns from the same yarn group. It is also possible to work with multiple strands of a thinner yarn to achieve the knitting tension of a thicker one. Please try our yarn converter. We recommend you to always work a test swatch.

Please NOTE: when changing yarn the garment might have a different look and feel to the garment in the photo, due to individual properties and qualities of each yarn.

See DROPS lesson: Can I use a different yarn than the one mentioned in the pattern?

All our yarns are categorised into yarn groups (from A to F) according to thickness and knitting tension – group A contains the thinnest yarns and group F the thickest. This makes it easier for you to find alternative yarns to our patterns, should you wish to switch yarn. All yarns within the same group have a similar knitting tension and can easily replace each other. However, different yarn qualities have different structures and properties which will give the finished work a unique look and feel.

Click here for an overview of the yarns in each yarn group

At the top of all our patterns you’ll find a link to our yarn calculator, which is a helpful tool should you wish to use a different yarn than suggested. By filling in the yarn quality you wish to replace, the amount (in your size) and number of strands, the calculator will present good alternative yarns with the same knitting tension. Additionally it will tell you how much you’ll require in the new qualities and whether you’ll need to work with multiple strands. Most skeins are 50g (some are 25g or 100g).

If the pattern is worked with multiple colours, every colour will have to be calculated separately. Similarly, if the pattern is worked with several strands of different yarns (for example 1 strand Alpaca and 1 strand Kid-Silk) you will have to find alternatives for each, individually.

Click here to see our yarn calculator

Since different yarns have different qualities and textures we have chosen to keep the original yarn in our patterns. However, you can easily find options among our available qualities by using our yarn calculator, or simply pick a yarn from the same yarn group.

It is possible that some retailers still have discontinued yarns in stock, or that someone has a few skeins at home that they would like to find patterns for.

The yarn calculator will provide both alternative yarn as well as required amount in the new quality.

If you think it's hard to decide what size to make, it can be a good idea to measure a garment you own already and like the size of. Then you can pick the size by comparing those measures with the ones available in the pattern's size chart.

You'll find the size chart at the bottom of the pattern.

See DROPS lesson: How to read size chart

The needle size provided in the pattern serves only as a guide, the important thing is to follow the knitting tension. And since knitting tension is very individual, you will have to adjust the needle size to ensure that YOUR tension is the same as in the pattern – maybe you’ll have to adjust 1, or even 2 needle sizes, up or down to achieve the correct tension. For this, we recommend that you work test swatches.

Should you work with a different knitting tension than the one provided, the measurements of the finished garment might deviate from the measurement sketch.

See DROPS lesson: How to measure your tension/gauge

See DROPS video: How to make a tension/gauge swatch

Working a garment top-down provides more flexibility and room for personal adjustment. For example it is easier to try the garment on while working, as well as making adjustments to length of yoke and shoulder caps.

The instructions are carefully explaining every step, in the correct order. Diagrams are adjusted to the knitting direction and are worked as usual.

The diagram depicts all rows/rounds, and every stitch seen from the right side. It is read from bottom to top, from right to left. 1 square = 1 stitch.

When working back and forth, every other row is worked from the right side and every other row is worked from the wrong side. When working from the wrong side, the diagram will have to be worked reversed: from left to right, knit stitches are purled, purl stitches are knit etc.

When working in the round every round is worked from the right side and the diagram are worked from right to left on all rounds.

See DROPS lesson: How to read knitting diagrams

The diagram depicts all rows/rounds, and every stitch seen from the right side. It is worked from bottom to top, from right to left.

When working back and forth every other row is worked from the right side: from right to left and every other row is worked from the wrong side: from left to right.

When working in the round, every row in the diagram are worked from the right side, from right to left.

When working a circular diagram you start in the middle and work your way outwards, counter clockwise, row by row.

The rows usually start with a given number of chain stitches (equivalent to the height of the following stitch), this will either be depicted in the diagram or explained in the pattern.

See DROPS lesson: How to read crochet diagrams

Instructions for working several diagrams after each other on the same row/round, will often be written like so: “work A.1, A.2, A.3 a total of 0-0-2-3-4 times". This means you work A.1 once, then A.2 is worked once, and A.3 is repeated (in width) the number of times provided for your size – in this case like so: S = 0 times, M = 0 times, L=2 times, XL= 3 times and XXL = 4 times.

The diagrams are worked as usual: begin with the first row in A.1, then work the first row in A.2 etc.

See DROPS lesson: How to read knitting diagrams

See DROPS lesson: How to read crochet diagrams

The total width of the garment (from wrist-to-wrist) will be larger in the larger sizes, despite the actual sleeves being shorter. The larger sizes have longer sleeve caps and wider shoulders, so there will be a good fit in all sizes.

The measurement sketch/schematic drawing provides information regarding the full length of the garment. If it’s a jumper or a jacket the length is measured from the highest point on the shoulder closest to the neckline, and straight down to the bottom of the garment. It is NOT measured from the tip of shoulder. Similarly, the length of yoke is measured from the highest point on the shoulder and down to where yoke is split into body and sleeves.

On a jacket measures are never taken along bands, unless specifically stated. Always measure inside band stitches when measuring the length.

See DROPS lesson: How to read a schematic drawing

Diagrams are often repeated on the round or in height. 1 repeat is the diagram the way it appears in the pattern. If it says to work 5 repeats of A.1 in the round, then you work A.1 a total of 5 times after/next to each other in the round. If it says to work 2 repeats of A.1 vertically/in height you work the entire diagram once, then begin again at the start and work the entire diagram one more time.

Chain stitches are slightly narrower than other stitches and to avoid working the cast-on edge too tight, we simply chain more stitches to begin with. The stitch count will be adjusted on the following row to fit the pattern and measurement sketch.

The rib edge is more elastic and will contract slightly compared to, for example, stocking stitch. By increasing before the rib edge, you avoid a visible difference in width between the rib edge and the rest of the body.

It’s very easy to cast off too tightly, and by making yarn overs while casting off (and simultaneously casting these off) you avoid a too tight cast off edge.

See DROPS video: How to bind off with yarn overs (yo)

To achieve an even increase (or decrease) you can increase on, for example: every 3rd and 4th row alternately, like so: work 2 rows and increase on the 3rd row, work 3 rows and increase on the 4th. Repeat this until the increase is complete.

See DROPS lesson: Increase or decrease 1 st on every 3rd and 4th row alternately

Should you prefer to work in the round instead of back and forth, you may of course adjust the pattern. You’ll need to add steeks mid-front (usually 5 stitches), and follow the instructions. When you would normally turn and work from the wrong side, simply work across the steek and continue in the round. At the end you’ll cut the piece open, pick up stitches to work bands, and cover the cut edges.

See DROPS video: How to knit steeks and cut open

Should you prefer to work back and forth instead of in the round, you may of course adjust the pattern so you work the pieces separately and then assemble them at the end. Divide the stitches for the body in 2, add 1 edge stitch in each side (for sewing) and work the front and back pieces separately.

See DROPS lesson: Can I adapt a pattern for circular needles into straight needles?

Pattern repeats can vary slightly in the different sizes, in order to get the correct proportions. If you’re not working the exact same size as the garment in the photo, yours might deviate slightly. This has been carefully developed and adjusted so that the complete impression of the garment is the same in all sizes.

Make sure to follow instructions and diagrams for your size!

If you have found a pattern you like which is available in women’s size it’s not very difficult to convert it to men’s size. The biggest difference will be the length of sleeves and body. Start working on the women size that you think would fit across the chest. The additional length will be worked right before you cast off for the armhole/sleeve cap. If the pattern is worked top-down you can add the length right after the armhole or before the first decrease on sleeve.

Regarding additional yarn amount, this will depend on how much length you add, but it is better with a skein too many than too few.

All yarns will have excess fibres (from production) that might come off as lint or shedding. Brushed yarns (ie hairier yarns) have more of these loose, excess fibres, causing more shedding.

Shedding also depends on what is worn under or over the garment, and whether this pulls at the yarn fibres. It’s therefore not possible to guarantee that there will be no shedding

Below are some tips on how to get the best result when working with hairier yarns:

1. When the garment is finished (before you wash it) shake it vigorously so the looser hairs come off. NOTE: do NOT use a lint roller, brush or any method that pulls at the yarn.

2. Place the garment in a plastic bag and put it in your freezer - the temperature will cause the fibres to become less attached to each other, and excess fibres will come off easier.

3. Leave in the freezer for a few hours before taking it out and shaking it again.

4. Wash the garment according to the instructions on the yarn label.

Pilling is a natural process that happens to even the most exclusive of fibers. It's a natural sign of wear and tear that is hard to avoid, and that is most visible in high friction areas of your garment like a sweater's arms and cuffs.

You can make your garment look as new by removing the pilling, using a fabric comb or a pill/lint remover.

Still can't find the answer you need? Then scroll down and leave your question so one of our experts can try to help you. This will be done normally within 5 to 10 working days.
In the meantime, you can read the questions and answers that others have left to this pattern or join the DROPS Workshop on Facebook to get help from fellow knitters/crocheters!

You might also like...

Post a comment to pattern DROPS 215-36

We would love to hear what you have to say about this pattern!

If you want to leave a question, please make sure you select the correct category in the form below, to speed up the answering process. Required fields are marked *.

Comments / Questions (30)

country flag Eva Svensson wrote:

Hej! Önskar ett mer formfast alternativ till Alpacka Boucle. Ska passa till Drops Kid Silk uni colour beige. Mvh Eva.

25.09.2023 - 09:10

DROPS Design answered:

Hej Eva, da kan du bruge DROPS Alaska 49 som passer perfekt og er på tilbud eller så finder du en selv: Beige - garngrupp c

26.09.2023 - 15:46

country flag Mary Roche wrote:

Where the pattern calls for 2 strands one each of drops alpaca bouclé and drops kid-silk and I would like to use only Bouclé should I reduce the needle size to 4/5 mm in place of 6/7mm and adjust for size (with a tension sample)?\r\nThanks you

18.09.2023 - 14:05

DROPS Design answered:

Dear Mrs Roche, you will have to make your own swatch and recalculate the whole pattern - read more here - it might be easier to look at the pattern for a yarn group C, just as Alpaca Bouclé and with 1 strand - see here. Happy knitting!

18.09.2023 - 16:12

country flag Lise wrote:

Bonjour, Merci beaucoup pour vos modèles. Est-il possible d’avoir ce modèle en3XL ou 4XL?

16.05.2023 - 19:41

DROPS Design answered:

Bonjour Lise, ce modèle ne va que jusqu'au XXL, mais vous trouverez ici tous nos modèles de gilets et vestes en XXXL, n'hésitez pas à ajouter des filtres pour affiner votre recherche. Bon tricot!
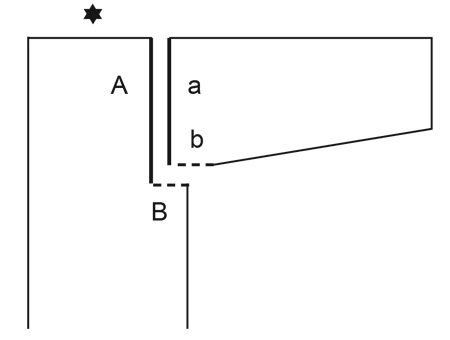
17.05.2023 - 08:05

country flag Else Marie Johansen Panagiotaki wrote:

Hei Er strikket ermet til deit man skal sette 1 nytt merke i hver siden for å marker hvor bunnen av ermhullet starter. Oppskrift: Strikk vieder til ermet måler .....cm fra merkene nederst på ermet. Fell løst av fra retten. Sy bunnen av ermet? I følge dette vil jo ikke ermet passet inn i ermfellingen på bak- og forstykkene jmf diagramforklaringen. Hvordan skal dette forståes?

02.03.2023 - 16:12

DROPS Design answered:

Hej Else Marie, jo da det stemmer, se skissen hvordan du syr sammen :)

08.03.2023 - 07:55

country flag Iuliia wrote:

Hi! Thank you for this beautiful model. Question - back and front are casted using 3 threads while sleeves are casted using 4. Why?

05.12.2022 - 00:22

DROPS Design answered:

Dear Iuliia, you cast on the sleeves with 4 strands so that you will be sure to get an ealastic edge (needs to be more elastic on wrist than on bottom edge). Happy knitting!

06.12.2022 - 11:33

country flag Katleen wrote:

@Katrien, voor de kraag heb ik geen 2 maar 1 ribbel gebreid voor de lange toeren. Succes !

19.11.2022 - 01:23

country flag Katrien wrote:

Hallo, IVM de kraag : op 2/10/22 schreef u (aan Kathleen) dat u de ontwerpafdeling contacteerde om evt aanpassingen te doen? Ik wacht nu enkele weken om de kraag te breien, wacht ik nog, of heeft u tips voor mij, zodat de kraag mooi lukt. Ik lees hier dat bij velen die kraag niet lukt. Mvg

30.10.2022 - 18:33

country flag Dominique Masson wrote:

Bonjour je m'aperçois au moment de les assembler que les 2 morceaux du col st bcp trop longs... j'ai une encolure de 30cm env et 2 morceaux de col de 22cm. J'ai fait 9 fois 3 rangs de côtes et 1 rang envers comme indiqué pour taille M, les autres mesures st ok avec le modèle. Dois je refaire ? coudre froncé ? Merci de votre conseil Dominique Par contre la laine est très belle et le modèle très cocooning, top !

25.10.2022 - 17:58

DROPS Design answered:

Bonjour Mme Masson, les deux parties du col doivent mesurer 7 ou 8 cm (cf taille) du côté le plus court (= côté épaule/ c'est le côté qui est cousu le long de l'encolure dos), de l'autre côté (côté bordure devant/ouverture de la veste), il sera 2 fois plus long à cause des rangs raccourcis, mais c'est le côté qui sera replié - cette vidéo montre un col châle sans rangs raccourcis (le côté le plus court est le côté où vous avez tricoté moins de rangs), en espérant qu'elle puisse vous aider. Bon tricot!

26.10.2022 - 07:38

country flag Katleen wrote:

Er zijn hier al veel vragen gesteld ivm de kraag. Inderdaad, als je de instructies volgt heb je veel meer dan 8 cm aan de korte kant ( kant die aangenaaid wordt aan rugpand). Toch graag eens duidelijke instructies.

29.09.2022 - 02:04

DROPS Design answered:

Dag Katleen,

Inderdaad lijkt het alsof er een fout in zit en dat je minder ribbels moet breien. Ik heb het doorgegeven aan de ontwerpafdeling om naar te kijken. Hopelijk komt er spoedig een correctie.

02.10.2022 - 16:14

country flag Vee wrote:

Must it be knitted on a circular kneedle or can regular kneedles be used !

26.06.2022 - 22:32

DROPS Design answered:

Dear Mrs Vee, each piece is worked here with circular needle to get enough room for all stitches, but you will work all the way back and froth, so that you can use straight needles, the stitches will just be tighter. Read more here. Happy knitting!

27.06.2022 - 09:03