
Popular categories
Looking for a yarn?


|
|||||||||||||
Forest Vines Jacket |
|||||||||||||
 |
 |
||||||||||||
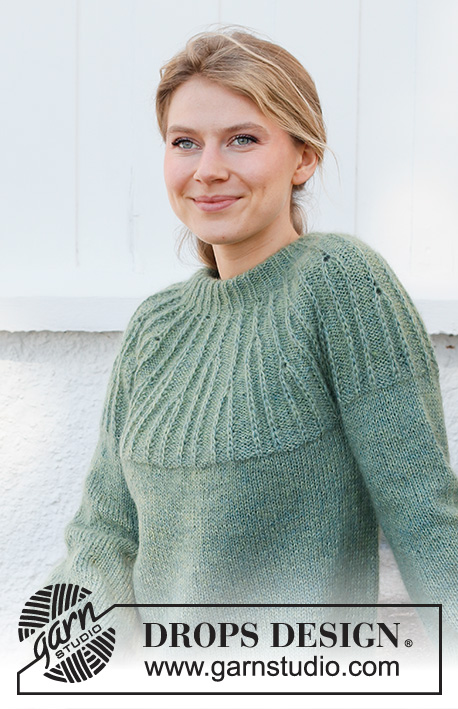
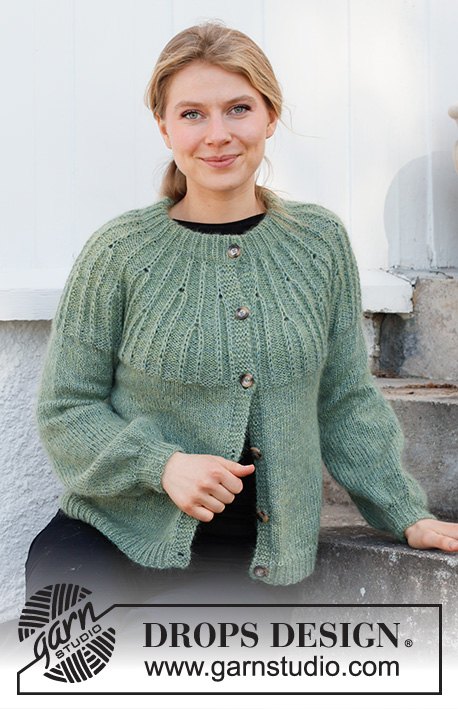
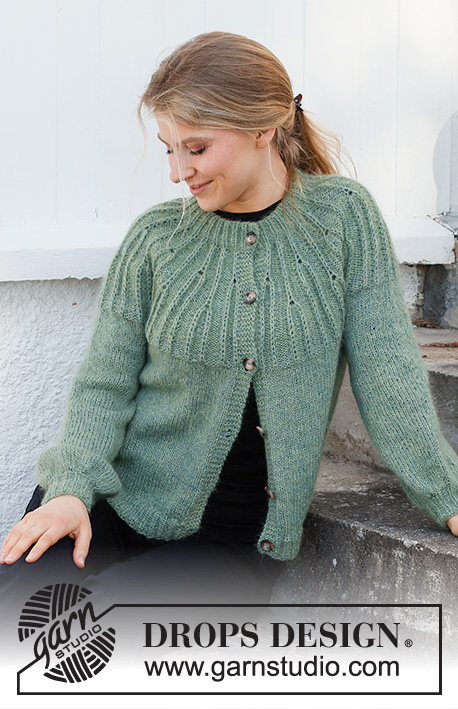
Knitted jacket in DROPS Alpaca and DROPS Kid-Silk. The piece is worked top down with double neck, round yoke and textured pattern on the yoke. Sizes S - XXXL.
DROPS 215-23 |
|||||||||||||
|
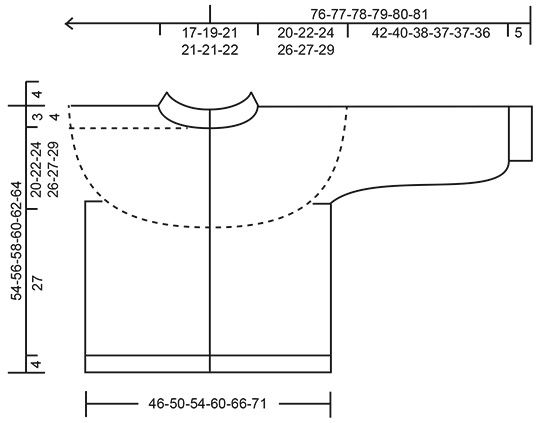
------------------------------------------------------- EXPLANATIONS FOR THE PATTERN: ------------------------------------------------------- RIDGE/GARTER STITCH (worked back and forth): Knit all rows. 1 ridge in height = Knit 2 rows. PATTERN: See diagrams A.1 to A.3. Choose diagram for your size (applies to A.1A, A.2A and A.3A). The diagrams show all rows in the pattern from the right side! INCREASE/DECREASE TIP (evenly spaced): To work out how to increase/decrease evenly, count the total number of stitches on needle (e.g. 165 stitches), minus the bands (e.g. 10 stitches) and divide the remaining stitches with number of increases/decreases to be made (e.g. 23) = 6.7. In this example, increase by making 1 yarn over after alternately each 6th and 7th stitch. Do not increase on the bands. On the next row work the yarn overs twisted to avoid holes. When decreasing, work together alternately each 5th and 6th stitch and each 6th and 7th stitch. DECREASE TIP (for mid under sleeve): Start 3 stitches before the marker thread, knit 2 together, knit 2 (marker thread sits between these 2 stitches), slip 1 stitch as if to knit, knit 1 and pass the slipped stitch over the knitted stitch (= 2 stitches decreased). INCREASE TIP (for sleeves): Start 2 stitches before the marker thread, 1 yarn over, knit 4 (marker thread sits between these 4 stitches), 1 yarn over. On the next round knit the yarn overs twisted to avoid holes. Then work the new stitches in stocking stitch. BUTTONHOLES: Work buttonholes on the right band (when the garment is worn). Work from the right side when there are 3 stitches left on the row as follows: Make 1 yarn over, knit 2 together and knit 1. On the next row (wrong side), knit the yarn over to leave a hole. The first buttonhole is worked when the rib on the neck measures approx. 2 cm, the second when the neck measures 8 cm. These 2 buttonholes will meet each other when the neck is folded. The other 5-5-6-6-7-7 buttonholes are worked with approx. 9½-10-8½-9-8-8 cm between each one. CASTING-OFF TIP: To avoid the cast-off edge being tight you can cast off with a larger size needle. If the edge is still tight, make 1 yarn over after approx. each 6th stitch at the same time as casting off; the yarn overs are cast off as normal stitches. ------------------------------------------------------- START THE PIECE HERE: ------------------------------------------------------- JACKET – SHORT OVERVIEW OF THE PIECE. The neck and yoke are worked back and forth with circular needle, from mid front and top down. The yoke is divided for body and sleeves and the body continued back and forth with circular needle. The sleeves are worked in the round with double pointed needles/short circular needle, top down. NECK: Cast on 93-99-105-105-111-117 stitches with circular needle size 4 mm and 1 strand Alpaca and 1 strand Kid-Silk (= 2 strands). Purl 1 row (= wrong side). The next row is worked as follows from the right side: 1 edge stitch in GARTER STITCH – read description above, * knit 1, purl 2 *, work from *-* until there are 2 stitches left on the row, knit 1 and finish with 1 edge stitch in garter stitch. Continue this rib – remember the 2 BUTTONHOLES on the right band – read description above. When the rib measures 9 cm, work as follows from the right side: S, M and L: Knit 1, knit 2 twisted together, knit 1, knit 2 twisted together, knit 1, * knit 1, make 1 yarn over, purl 2, make 1 yarn over *, work from *-* until there are 8 stitches left on the row, knit 2, knit 2 together, knit 1, knit 2 together and finish with knit 1 = 141-151-161 stitches (and 2 stitches have been decreased on each side towards mid front). Continue from ALL SIZES! XL, XXL and XXXL: Knit 1, knit 2 twisted together, knit 1, knit 2 twisted together, knit 1, * knit 1, make 1 yarn over, purl 1, make 1 yarn over, purl 1, 1 yarn over *, work from *-* until there are 8 stitches left on the row, knit 2, knit 2 together, knit 1, knit 2 together and finish with knit 1 = 191-203-215 stitches (and 2 stitches have been decreased on each side towards mid front). Continue from ALL SIZES! ALL SIZES: The next row is worked as follows from the wrong side: 5 band stitches in garter stitch, purl over purl and knit over knit until there are 5 stitches left on the row (yarn overs knitted twisted to avoid holes) and finish with 5 band stitches in garter stitch. Insert 1 marker inside the band at the beginning of the row; the yoke is measured from this marker. YOKE: Change to circular needle size 5 mm and work the first row from the right side as follows: 5 band stitches in garter stitch, work A.1A until there are 6 stitches left on the row (= 13-14-15-15-16-17 repeats of 10-10-10-12-12-12 stitches), work A.1B (= 1 stitch) and finish with 5 band stitches in garter stitch. Continue this pattern. REMEMBER THE KNITTING TENSION! When the piece measures 5-6-6-6-7-7 cm from the marker on the neck, work the next row as follows from the right side: 5 band stitches in garter stitch, work A.2A until there are 6 stitches left on the row (= 13-14-15-15-16-17 repeats of 10-10-10-12-12-12 stitches), A.2B (= 1 stitch) and finish with 5 band stitches in garter stitch. After the first row in A.2 there are 197-211-225-255-271-287 stitches. When the first 2 rounds in A.2 are finished, repeat A.x onwards in height. When the piece measures 10-12-12-13-14-14 cm from the marker on the neck, work the next row as follows from the right side: 5 band stitches in garter stitch, work A.3A until there are 10 stitches left on the row (= 13-14-15-15-16-17 repeats of 14-14-14-16-16-16 stitches), A.3B (= 5 stitches) and finish with 5 band stitches in garter stitch. After the first row in A.3 there are 249-267-285-315-335-355 stitches. When the first 2 rounds in A.3 are finished, repeat A.y onwards in height. Continue this pattern until the piece measures 18-20-22-23-24-26 cm from the marker on the neck. Knit 1 row from the right side where you increase 0-6-4-2-2-6 stitches evenly spaced = 249-273-289-317-337-361 stitches. Continue with stocking stitch back and forth and with 5 band stitches in garter stitch on each side. When the piece measures 20-22-24-26-27-29 cm from the marker on the neck, divide the yoke for body and sleeves on the next row as follows: Work 41-45-47-52-56-61 stitches in garter/stocking stitch as before (= front piece), place the next 48-52-56-60-62-64 stitches on 1 thread for the sleeve and cast on 6-6-8-8-10-10 new stitches on the needle (= in side under sleeve), work 71-79-83-93-101-111 stitches in stocking stitch (= back piece), place the next 48-52-56-60-62-64 stitches on 1 thread for the sleeve and cast on 6-6-8-8-10-10 new stitches on the needle (= in side under sleeve) and work the remaining 41-45-47-52-56-61 stitches in stocking/garter stitch as before (= front piece). Body and sleeves are finished separately. THE PIECE IS NOW MEASURED FROM HERE! BODY: = 165-181-193-213-233-253 stitches. Work stocking stitch back and forth with 5 band stitches in garter stitch on each side until the piece measures 27 cm from the division. There is approx. 4 cm to finished length; you can try the jacket on and work to desired length. Knit 1 row from the right side where you increase 23-25-28-29-33-37 stitches evenly spaced – read INCREASE/DECREASE TIP = 188-206-221-242-266-290 stitches. Change to circular needle size 4 mm. The next row is worked as follows from the wrong side: 5 band stitches in garter stitch, * purl 1, knit 2 *, work from *-* until there are 6 stitches left on the row, purl 1 and finish with 5 band stitches in garter stitch. Continue this rib for 4 cm. Cast off with garter stitch over garter stitch, knit over knit and purl over purl – read CASTING-OFF TIP! The jacket measures approx. 54-56-58-60-62-64 cm from the shoulder down. SLEEVE: Place the 48-52-56-60-62-64 stitches from the thread on the one side of the piece on double pointed needles/short circular needle size 5 mm and knit up 1 stitch in each of the 6-6-8-8-10-10 stitches cast on under the sleeve = 54-58-64-68-72-74 stitches. Insert a marker thread in the middle of the 6-6-8-8-10-10 stitches under the sleeve. Allow the thread to follow your work onwards; it will be used when decreasing under the sleeve. Start the round at the marker thread and work stocking stitch in the round. When the sleeve measures 3 cm from the division, decrease 2 stitches under the sleeve – read DECREASE TIP. Repeat the decrease when the sleeve measures 6 cm from the division = 50-54-60-64-68-70 stitches. When the piece measures 14 cm from the division, increase 2 stitches under the sleeve – read INCREASE TIP. Increase like this every 4 cm a total of 5-5-4-4-4-4 times = 60-64-68-72-76-78 stitches. Continue working until the sleeve measures 42-40-39-38-38-36 cm from the division. There is approx. 5 cm to finished length; you can try the jacket on and work to desired length. NOTE: Shorter measurements in larger sizes due to wider neck and longer yoke. Knit 1 round where you decrease 24-28-29-33-37-36 stitches evenly spaced = 36-36-39-39-39-42 stitches. Change to double pointed needles size 4 mm. Work rib (= knit 1, purl 2) for 5 cm. Cast off with knit over knit and purl over purl – remember CASTING-OFF TIP! The sleeve measures approx. 47-45-43-42-42-41 cm from the division. Work the other sleeve in the same way. ASSEMBLY: Fold the neck double to the wrong side and fasten with small, neat stitches- make sure the 2 buttonholes meet. Sew the buttons onto the left band. |
|||||||||||||
Diagram explanations |
|||||||||||||
|
|||||||||||||

|
|||||||||||||

|
|||||||||||||
|
|||||||||||||
|
Have you made this or any other of our designs? Tag your pictures in social media with #dropsdesign so we can see them! Do you need help with this pattern?You'll find tutorial videos, a Comments/Questions area and more by visiting the pattern on garnstudio.com. © 1982-2024 DROPS Design A/S. We reserve all rights. This document, including all its sub-sections, has copyrights. Read more about what you can do with our patterns at the bottom of each pattern on our site. |
|||||||||||||


With over 40 years in knitting and crochet design, DROPS Design offers one of the most extensive collections of free patterns on the internet - translated to 17 languages. As of today we count 304 catalogues and 11422 patterns - 11422 of which are translated into English (UK/cm).
We work hard to bring you the best knitting and crochet have to offer, inspiration and advice as well as great quality yarns at incredible prices! Would you like to use our patterns for other than personal use? You can read what you are allowed to do in the Copyright text at the bottom of all our patterns. Happy crafting!
Comments / Questions (6)
Czy ten wzór występuje również z rzędami skróconymi dla podniesienie tyłu dekoltu.
10.02.2024 - 22:01DROPS Design answered:
Witaj Halino, niestety nie, ale z łatwością wykonasz kilka dodatkowych rzędów z tyłu, aby go nieco podnieść. Powodzenia!
12.02.2024 - 09:11Når havbrise er udsolgt, er der så andre farver, der kan matches med en farve i silk?
10.11.2022 - 22:39DROPS Design answered:
Hej Mie, ja du kan vælge at strikke sammen med en grøn i DROPS Flora eller DROPS Nord eller DROPS Baby Merino og stadigvæk få samme strikkefasthed :)
11.11.2022 - 13:28Bonjour. dans le modèle 215-23 je ne comprends pas comment vous obtenez 141 mailles pour la taille L. après 2 diminutions de chaque côté. Moi j' en obtient que 139. J' ai bien recompté je n ai pas oublié de jeté. Merci de votre réponse.
10.01.2021 - 09:25DROPS Design answered:
Bonjour Mme Segalen, vous devez avoir 161 m en taille L (et 141 m en taille S): les 7 m du début du rang sont diminuées à 5( = 2 m ens torse à l'end x 2), vous répétez 30 fois (1 m end, 1 jeté, 2 m env, 1 jeté) (= vous avez 150 m) et tricotez les 8 dernières m en diminuant 2 m = 5+150+6=161 m. Bon tricot!
11.01.2021 - 09:16Comment faire une cote anglaise sur ce modèle
22.12.2020 - 16:56DROPS Design answered:
Bonjour Mme Yenn! Suivez les diagrammes A.1 à A.3. Voir diagrammes (A.1A, A.2A et A.3A) appropriés à la taille. Les diagrammes montrent tous les rangs du point fantaisie, vus sur l'endroit. Bon tricot!
22.12.2020 - 17:15Bonsoir pour les boutonnières on dit de tricoter jusqu'à 3 mailles avant la fin du rang. Est-ce que la maille lisière est incluse dans ces 3 mailles ou non ? Merci pour votre réponse. A bientôt.
24.11.2020 - 22:27DROPS Design answered:
Bonjour Nzina, en fait il n'y a pas de mailles lisières à proprement parler vu qu'il n'y a pas de coutures, donc les 5 mailles de la bordure devant se tricotent au point mousse de chaque côté, et les boutonnières se font - en fin de rang - après les 2 premières des 5 m point mousse (= 2 m point mousse, jeté, 2 m ens à l'end, 1 m end). Bon tricot!
25.11.2020 - 07:49Attraktiv!
06.06.2020 - 15:10