
Popular categories
Looking for a yarn?


Comments / Questions (151)
![]() Toos Oolman wrote:
Toos Oolman wrote:
Waarom worden de 2 st.recht tussen A1 en A2 (en andersom) niet vermeld?
17.11.2020 - 15:04
![]() Brigitte wrote:
Brigitte wrote:
Bonsoir, je ne comprends pas comment faire le raglan après A1 et A2 . Pour A3 , lorsque j.augmente de chaque côté , je ne retrouve plus les 2 mailles raglan , mais je me retrouve avec des trous faits par les jetés des augmentations
16.11.2020 - 20:19DROPS Design answered:
Bonjour Brigitte, après A.1 et A.2, continuez comme avant, autrement dit, toujours avec vos 2 mailles jersey à chaque raglan, avec les jetés avant et après ces 2 mailles jersey comme vous avez fait auparavant dans A.1 et A.2 (début et fin des diagrammes) et tricotez A.3 au milieu (au 1er tour par ex augmentez comme dans A.1, puis tricotez A.3A, répétez A.3B, tricotez A.3C et augmentez comme à la fin de A.1). Bon tricot!
17.11.2020 - 08:53
![]() Gasparetto wrote:
Gasparetto wrote:
Merci pour votre retour. Juste pour confirmation on ne reproduit pas la maille Jersey avant A1 les 2 mailles jersey avant A2 qu,on a fait au premier rang aux tours suivants ? on applique juste les diagrammes A1 et A2 comme indiques?
16.11.2020 - 12:36
![]() Gasparetto wrote:
Gasparetto wrote:
Pourriez vous me confirmer que si on finit par un jete sur une ligne A1 on recommence par un jete sur cette même ligne dans le diagramme A2 (exemple 3 émet ligne des 2 diagrammes en taille S)..comment lire le schéma A1 par exemple au 2 émet rang. On lit 7 mailles envers au dessus des 3 mailles tricotées ensemble avec la maille glissée donc il ne reste plus qu.une maille donc je dois tricoter 5 mailles envers en tout au lieu des 7 indiquées sur le schéma? ? Merci pour votre retour
16.11.2020 - 07:32DROPS Design answered:
Bonjour Mme Gasparetto, effectivement, si vous faites 1 jeté au début et à la fin de A.1 pour augmenter le nombre de mailles, alors vous devrez - sur le même tour, faire un jeté au début et à la fin de A.2 pour augmenter le nombre de mailles également. En revanche, au rang 2 de A.1 et A.2, on ne commence pas par un jeté = on n'augmente que tous les 2 rangs des diagrammes/2 tours du pull. A.1 se tricote ainsi au 2ème tour: 3 m end, 7 m envers, 3 m end, 7 m env, 3 m end (= 23 m). Bon tricot!
16.11.2020 - 10:01
![]() Brigitte wrote:
Brigitte wrote:
Bonjour, pour le diagramme A3 , faut- il continuer à faire une maille jersey de chaque côté ?
14.11.2020 - 16:24DROPS Design answered:
Bonjour Brigitte, vous tricotez A.3 quand les diagrammes A.1/A.2 sont terminés en hauteur, mais vous devez toujours augmenter comme dans A.1/A.2 de chaque côté de A.3 et vous aurez toujours les 2 mailles jersey à chaque transition entre le dos/le devant et les manches car ce sont les mailles du raglan (= on augmente de part et d'autre de ces 2 mailles, comme pour A.1/A.2 au début). Bon tricot!
16.11.2020 - 10:44
![]() Agnès wrote:
Agnès wrote:
Bonsoir, comment tricoter A3a, A3b et A3c ? Je ne comprends pas comment faire le premier surjet double , ni le deuxième 😕. Merci d'avance pour votre aide, entre temps la nuit m'aura peut-être porté conseil 😉.
12.11.2020 - 22:17DROPS Design answered:
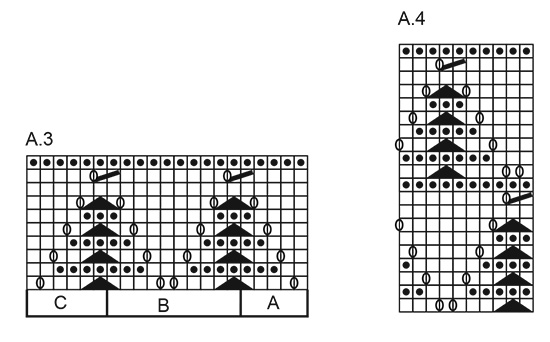
Bonjour Agnès, le nombre de mailles de chaque diagramme doit rester le même (sauf les augmentations qui se tricotent de chaque côté comme dans A.1 et A.2), autrement dit, vous devez avoir 5 m dans A= la dernière m de A se tricote avec les 2 premières m de B (le jeté permet de conserver les 5 m), la dernière m de B se tricote avec les 2 premières m du B suivant et en fin de rang avec les 2 premières m de C. Bon tricot!
13.11.2020 - 08:20
![]() Gasparetto wrote:
Gasparetto wrote:
Bonjour Pour commencer le col puis-je utiliser des aiguilles double pointe en 4 car l,aiguille circulaire en 40 semble trop longue pour bien joindre les 2 cotés du rang avec la laine Silk qui est très fine et que j’ai peur de casser. Merci
11.11.2020 - 13:45DROPS Design answered:
Bonjour Mme Gasparetto, vous pouvez tout à fait tricoter avec des aiguilles doubles-pointes si vous êtes plus à l'aise, ou également en "magci loop" avec la longue circulaire - mais pensez à bien vérifier votre échantillon au préalable - vous devez avoir 17 m x 22 rangs jersey = 10 x 10 cm avec 2 fils Kid-Silk ou 1 fil Brushed Alpaca Silk. Bon tricot!
11.11.2020 - 14:27
![]() Brigitte wrote:
Brigitte wrote:
Bonjour , j’ai deux questions : Pour la taille L , le diagramme A 2 commence bien avec 1 motif ? A quoi servent les mailles jersey entre les motifs A1 et A2 ? Merci
11.11.2020 - 11:12DROPS Design answered:
Bonjour Brigitte, les mailles jersey entre les diagrammes sont les mailles des raglans - on augmente de part et d'autre de ces mailles. Je ne suis pas certaine de comprendre votre question sur A.2; au 1er rang de A.2 on tricote sur 11 m (et on augmente 2 m = 13 m à la fin du 1er rang de A.2). Bon tricot!
11.11.2020 - 14:04
![]() Paulette wrote:
Paulette wrote:
Pour le modèle 216-3, j'ai fini A1 et A2 avec au total 192 m. en taille S. Il faut maintenant tricoter A3 (A3A les 5 1ères m et A3C les 6 dernières), donc reste A3B de 10m à répéter sur les181 m et çà ne tombe pas juste et je ne comprends comment augmenter en même temps comme A1 et A2 et à quel repaire de ligne je dois démarrer les augmentations. Merci
07.11.2020 - 09:09DROPS Design answered:
Bonjour Paulette, quand les diagrammes A.1 et A.2 sont terminés, vous tricotez maintenant en suivant A.3 mais en même temps, continuez à augmenter tous les 2 tours comme dans A.1 et A.2 : tricotez A.3A (en augmentant comme avant dans A.1/A.2), répétez A.3B et terminez par A.3C (en augmentant comme dans A.1/A.2). Bon tricot!
09.11.2020 - 09:29
![]() Barbara wrote:
Barbara wrote:
Liebes Drops Team ich finde bei dieser Anleitung schlecht, dass die 2 rechten Maschen zwischen den einzelnen Rapporten nicht mehr erwähnt werden oder im Musterrapport erscheinen. Auch dass die regelmäßigen Zunahmen in A3 nicht mehr erwähnt werden oder eingezeichnet sind führte dazu, dass ich sie überlesen habe und am Teilungspunkt auftrennen musste, weil ich natürlich zu wenig Maschen hatte. Ansonsten ein schöner Pullover, Gruß Barbara
06.11.2020 - 13:41
|
||||||||||||||||
Frosted Leaves#frostedleavessweater |
||||||||||||||||
 |
 |
|||||||||||||||
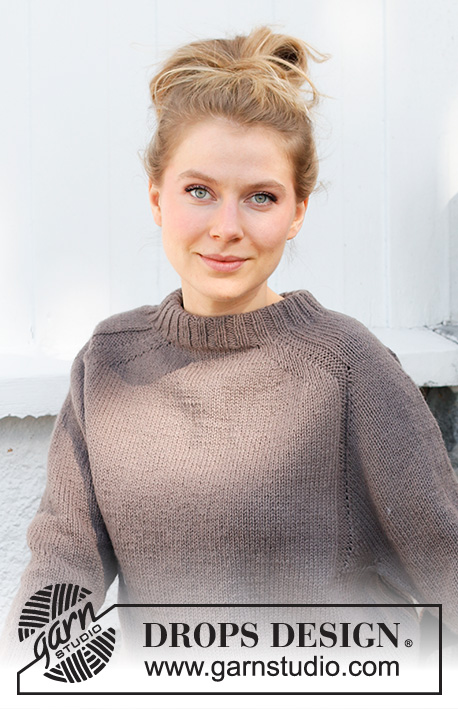
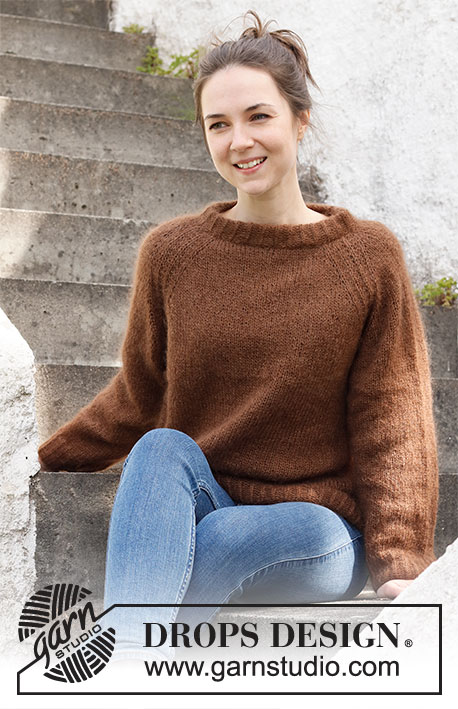
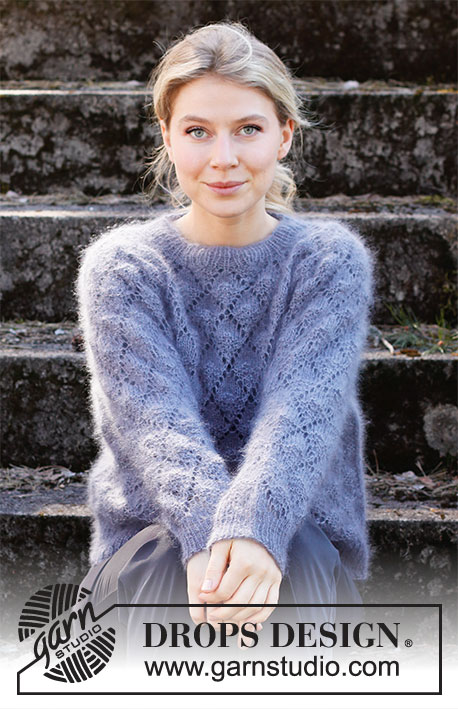
Knitted jumper in 1 strand DROPS Brushed Alpaca Silk or 2 strands DROPS Kid-Silk. The piece is worked top down with raglan and lace pattern. Sizes S - XXXL.
DROPS 216-3 |
||||||||||||||||
|
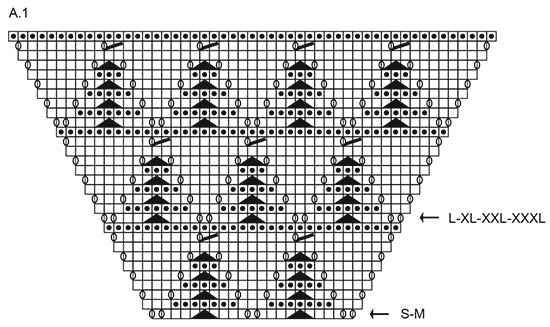
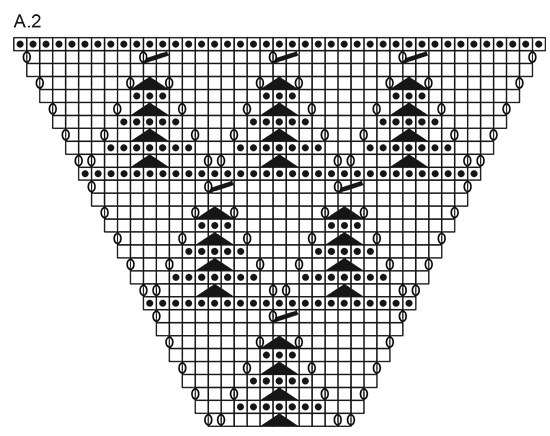
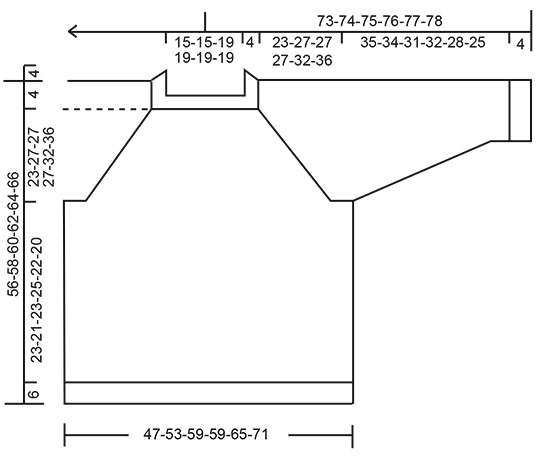
------------------------------------------------------- EXPLANATIONS FOR THE PATTERN: ------------------------------------------------------- PATTERN: See diagrams A.1 to A.4 DECREASE TIP-1 (evenly spaced): To work out how to decrease evenly, count the total number of stitches on needle (e.g. 48 stitches) and divide by number of decreases to be made (e.g. 8) = 6. In this example decrease by knitting each 5th and 6th stitch together. DECREASE TIP-2 (for sleeves): Decrease 1 stitch on either side of the marker thread as follows: Work until there are 3 stitches left before the marker thread, knit 2 together, knit 2 (marker thread sits between these 2 stitches), slip 1 stitch as if to knit, knit 1 and pass the slipped stitch over the knitted stitch (= 2 stitches decreased). CASTING-OFF TIP: To avoid the cast-off edge being tight you can cast off with a larger size needle. If the edge is still tight, make 1 yarn over after approx. each 4th stitch at the same time as casting off; the yarn overs are cast off as normal stitches. ------------------------------------------------------- START THE PIECE HERE: ------------------------------------------------------- JUMPER – SHORT OVERVIEW OF THE PIECE: The neck and yoke are worked in the round with circular needle, top down. The yoke is divided for body and sleeves and the body continued in the round with circular needle. The sleeves are worked in the round with short circular needle/double pointed needles, top down. The piece is worked with 1 strand Brushed Alpaca Silk or 2 strands Kid-Silk. NECK: Cast on 72-72-92-92-92-92 stitches with circular needle size 4 mm and 1 strand Bruched Alpaca Silk or 2 strands Kid-Silk. Knit 1 round. Then work rib (knit 1, purl 1) for 4 cm. Insert 1 marker at the beginning of the round. The yoke will be measured from this marker. Change to circular needle size 5 mm and work the yoke as described below. REMEMBER THE KNITTING TENSION! YOKE: On the next round work pattern as follows: Work 1 stitch in stocking stitch, A.1 (= 21-21-31-31-31-31 stitches, see start-arrow for your size), 2 stitches in stocking stitch, A.2 (= 11 stitches), 2 stitches in stocking stitch, A.1 (= 21-21-31-31-31-31 stitches, see start-arrow for your size), 2 stitches in stocking stitch, A.2 (= 11 stitches) and 1 stitch in stocking stitch. Continue this pattern; all increases are drawn into the diagrams. 8 stitches are increased every 2nd round. When A.1 and A.2 have been worked 1 time in height, continue with A.3. Work A.3 A over the first 5 stitches, repeat A.3 B until there are 6 stitches left on the row and work A.3 C over the last 6 stitches. Each time A.3 has been worked 1 time in height there is room for 1 more repeat of A.3 B in width. Continue the increases as shown in A.1 and A.2. Increase every 2nd round a total of 25-30-30-30-35-40 times = 272-312-332-332-372-412 stitches. The piece measures approx. 23-27-27-27-32-36 cm from the marker thread. Now divide the yoke for body and sleeves as follows (continue the pattern as before; you should be on the last round in a repeat of A.3, where all stitches are purled): Work 73-83-93-93-103-113 stitches (= back piece), place the next 63-73-73-73-83-93 stitches on 1 thread for the sleeve, cast on 7 new stitches on the needle (= in side under sleeve), work 73-83-93-93-103-113 stitches as before (= front piece), place the next 63-73-73-73-83-93 stitches on 1 thread for the sleeve and cast on 7 new stitches on the needle (= in side under sleeve). Body and sleeves are finished separately. Cut the strand. BODY: = 160-180-200-200-220-240 stitches. Start 3 stitches before the 7 new stitches cast on in the side and work A.4 over all stitches; make sure the pattern matches the pattern on the yoke. Continue working until the piece measures 23-21-23-25-22-20 cm from the division (there is approx. 6 cm left to finished length; you can try the jumper on and work to desired length). Change to circular needle size 4 mm and work rib (knit 1, purl 1) for 6 cm. Cast off with knit over knit and purl over purl – read CASTING-OFF TIP! The jumper measures approx. 56-58-60-62-64-66 cm from the shoulder down. SLEEVES: Place the 63-73-73-73-83-93 stitches from the thread on the one side of the piece on short circular needle/double pointed needles size 5 mm and knit up 1 stitch in each of the 7 stitches cast on under the sleeve = 70-80-80-80-90-100 stitches. Insert a marker thread in the middle of the 7 stitches under the sleeve. Allow the thread to follow your work onwards; it will be used when decreasing under the sleeve. Cut the strand and start working 3 stitches before the new stitches under the sleeve and continue the pattern in the round according to A.4; make sure the pattern matches the pattern on the yoke. When the sleeve measures 3 cm from the division in all sizes, decrease 2 stitches mid under the sleeve – read DECREASE TIP-2. Decrease like this every 3-2-1½-2-1-1 cm a total of 11-15-15-13-17-21 times = 48-50-50-54-56-58 stitches. The stitches which do not fit into the pattern when decreasing are worked in stocking stitch. Continue working until the sleeve measures 35-34-31-32-28-25 cm from the division (there is approx. 4 cm left to finished length; you can try the jumper on and work to desired length). NOTE: Shorter measurements in larger sizes due to wider neck and longer yoke. Knit 1 round where you decrease 8 stitches evenly spaced – read DECREASE TIP-1 = 40-42-42-46-48-50 stitches. Change to double pointed needles size 4 mm and work rib (knit 1, purl 1) for 4 cm. Cast off with knit over knit and purl over purl – remember CASTING-OFF TIP! The sleeve measures approx. 39-38-35-36-32-29 cm from the division. Work the other sleeve in the same way. |
||||||||||||||||
Diagram explanations |
||||||||||||||||
|
||||||||||||||||
|
||||||||||||||||
|
||||||||||||||||
|
||||||||||||||||
|
||||||||||||||||
Have you finished this pattern?Tag your pictures with #dropspattern #frostedleavessweater or submit them to the #dropsfan gallery. Do you need help with this pattern?You'll find 25 tutorial videos, a Comments/Questions area and more by visiting the pattern on garnstudio.com. © 1982-2025 DROPS Design A/S. We reserve all rights. This document, including all its sub-sections, has copyrights. Read more about what you can do with our patterns at the bottom of each pattern on our site. |
||||||||||||||||


With over 40 years in knitting and crochet design, DROPS Design offers one of the most extensive collections of free patterns on the internet - translated to 17 languages. As of today we count 314 catalogues and 11821 patterns translated into English (UK/cm). 11821
We work hard to bring you the best knitting and crochet have to offer, inspiration and advice as well as great quality yarns at incredible prices! Would you like to use our patterns for other than personal use? You can read what you are allowed to do in the Copyright text at the bottom of all our patterns. Happy crafting!
Post a comment to pattern DROPS 216-3
We would love to hear what you have to say about this pattern!
If you want to leave a question, please make sure you select the correct category in the form below, to speed up the answering process. Required fields are marked *.