
Popular categories
Looking for a yarn?


How to crochet a shopping bag
Crochet bags are all the rage this season! Never crocheted one before? Do not worry! Here’s a step-by-step tutorial on how to crochet the bag Pacific Blues (DROPS 199-15), so you can easily get to work on your first (or maybe tenth...) bag.
Do you have any questions? Leave them in the comment section at the bottom of the page and we'll get back to you asap!

Size: The crocheted square measures approx. 74 x 74 cm, before the edge and straps are worked.
Straps: approx 33 cm without the edge (approx. 43 cm including the edge).
NOTE: The straps will stretch with time, as the bag is being used.
Materials:
DROPS Cotton Light from Garnstudio (belongs to yarn group B)
250 g colour 34, light jeans blue
Crochet hook: DROPS crochet hook size 4 mm.
Tension: 18 treble crochets in width and 9 rows in height = 10 x 10 cm.
Hook size is only a guide. If you get too many stitches on 10 cm, change to a larger hook size. If you get too few stitches on 10 cm, change to a smaller hook size.
Let’s get started!
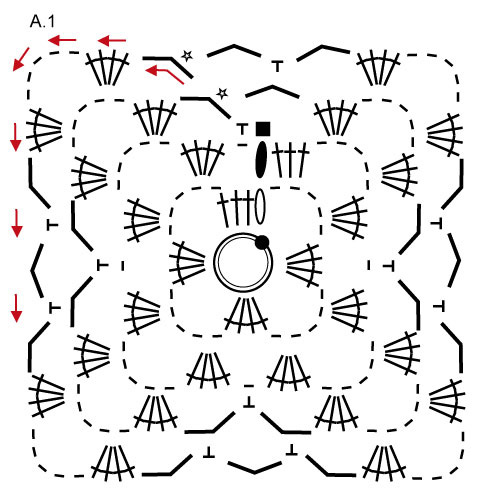
Below you’ll find the complete diagram for the bag we are about to crochet. Have problems following it? No worries, if you scroll a little more you’ll see we have broken the diagram into smaller pieces that are followed with pictures, so that you can crochet the bag with us, one step at a time!
SHORT OVERVIEW OF THE PIECE:
The piece is worked in the round from the bottom of the bag and outwards in a square. We are describing every round of A.1. Then the rest of the square, the edge and straps are worked in the round. More information, including lessons and video tutorials can be found at the bottom of the page.
Diagram
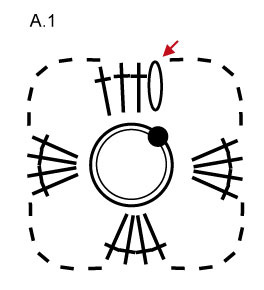
 | = Start here - this chain-stitch ring (= 4 chain stitches + 1 slip stitch in first chain stitch) is described in text. Continue with symbol over point on circle and work towards the left |
 | = 1 chain stitch (if there are several chain stitches in a row, these are referred to as a chain space) |
 | = 6 chain stitches (chain space) |
 | = 1 double crochet around chain stitch/chain-space |
 | = 1 treble crochet around chain stitch/chain-space |
 | = Round begins with 3 chain stitches (replaces first treble crochet on round) and finishes with 1 slip stitch in 3rd chain stitch at beginning of round |
 | = Round begins with 3 chain stitches (replaces last treble crochet on round) and finishes with 1 slip stitch in 3rd chain stitch at beginning of round |
 | = Round begins with 1 chain stitch (does not replace first double crochet on round) |
 | = Round ends with 1 double crochet around first chain space on round |
 | = Slip stitch |

One step at a time
Now we are going to work diagram A.1 step by step. The red arrows illustrate the crochet direction.
Are you already finished with A.1? Click here to go directly to step 10 and continue with your bag.
1) SQUARE: Work 4 chain stitches witch Cotton Light and hook size 4 mm, and form them into a ring with 1 slip stitch in the first chain stitch.


2) 1. ROUND: Continue in the round according to diagram A.1, see symbol definition above.

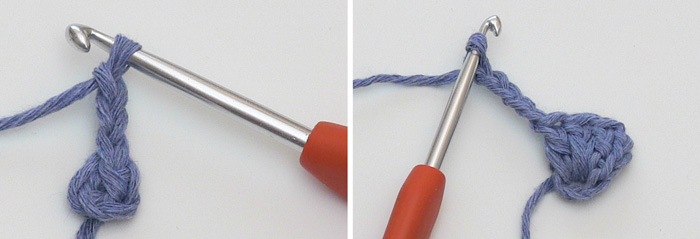
3) Finish round with 1 slip stitch in the 3rd chain stitch from the beginning of round.
4) 2. ROUND: Continue in the round according to diagram A.1.


5) Finish round with a slip stitch in the 3rd chain from beginning of round.


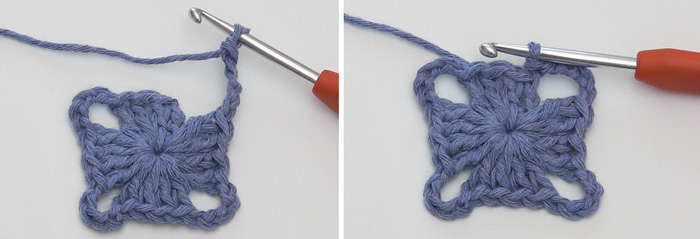
6) 3. ROUND: Begin round with 1 chain stitch (this does NOT replace the first double crochet on round), continue according to A.1


7) Finish round with a double crochet around the first chain space from beginning of round.


8) 4. ROUND: Begin round with 6 chain stitches, continue according to diagram A.1.

9) Finish round with 1 double crochet around the first chain space from beginning of round.


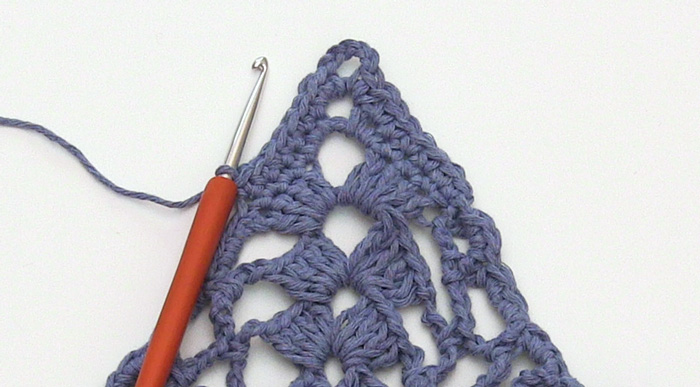
10) When entire A.1 has been worked 1 time vertically, continue in the round according to the last 2 rounds of diagram. Ie: for each round, there will be 1 more chain space on each side of the square - REMEMBER THE CROCHET TENSION!


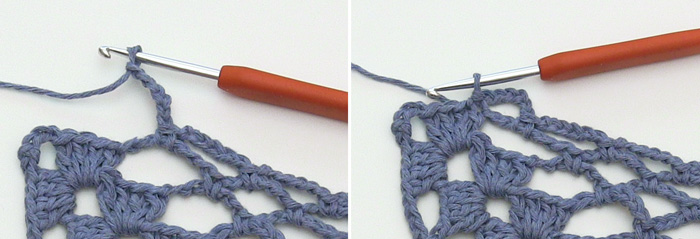
11) When you have worked 28 rounds from the chain stitch ring, there are 27 chain spaces along each side of the square + the chain space in each corner. Finish with a double crochet (star) as illustrated in A.1.


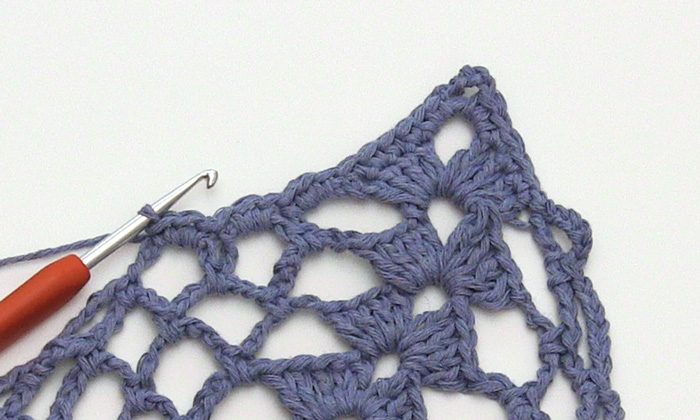
12) Then work 6 chain stitches and 1 slip stitch in the first of the 4 treble crochets before the next corner.

13) The square is now complete and measures approx 74 x 74 cm.

14)
THE EDGE:
CROCHET INFORMATION-1: The instructions in between two * are to be repeated every time “from *-*” is found in pattern.
CROCHET INFORMATION-2:
At the beginning of each round of double crochets, start with 1 chain stitch; this chain stitch does not replace the first double crochet. The round finishes with 1 slip stitch in the first double crochet on the round.
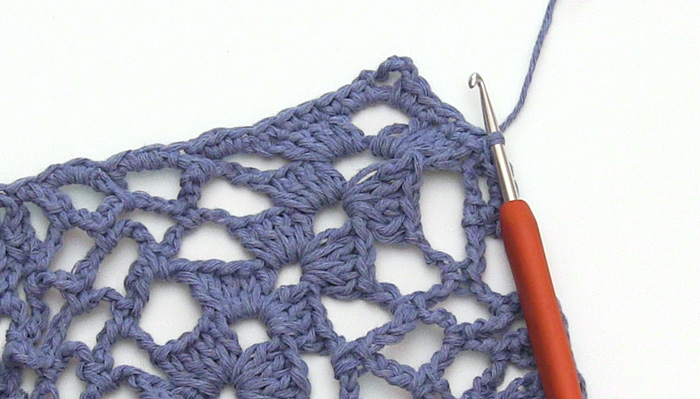
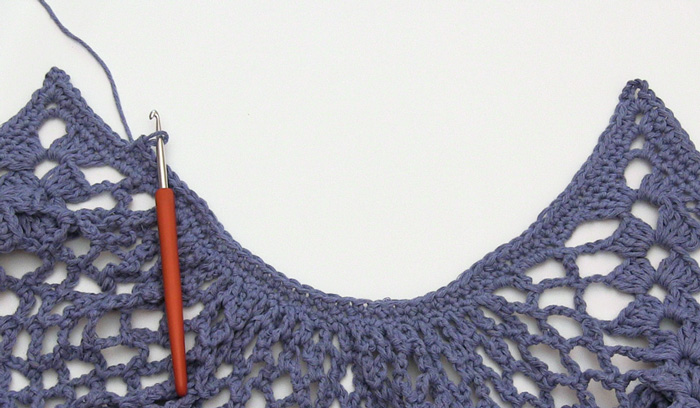
ROUND 1: * Work 1 double crochet in each of the first 4 treble crochets – read CROCHET INFORMATION, work 2 double crochets around the chain-space in corner, 5 chain stitches, 2 double crochets around the same chain-space in corner, 1 double crochet in each of the next 4 treble crochets.

15) Then work 3 double crochets around each of the next 3 chain spaces.
16) Then work 1 double crochet around each of the next 21 chain spaces.

17) Then work 3 double crochets around each of the next 3 chain spaces *.

18) Now, work from *-* (point 14-17) - SEE CROCHET INFORMATION-1 - a total of 4 times on the round (=51 double crochets along each of the sides) and finish with 1 slip stitch in the first double crochets on the round.
19) ROUND 2: *Work 1 double crochet in each of the first 6 stitches, 2 double crochets around the chain space in corner, 5 chain stitches, 2 double crochets around the same chain space in corner, 1 double crochet in each of the next 6 stitches.
20) Then work 1 double crochet in each of the next 39 double crochets *.

21) Repeat from *-* (point 19-20) a total of 4 times on the round (= 55 double crochets along each side). Finish with 1 slip stitch in the first double crochet on the round.

22) ROUND 3: * Work 1 double crochet in each of the first 8 stitches, 2 double crochets around the chain space in corner, 5 chain stitches, 2 double crochets around the same chain-space in corner, 1 double crochet in each of the next 8 stitches.

23) Then work 1 double crochet in each of the next 39 double crochets *.
24) Then work from *-* (point 22-23) a total of 4 times on the round (= 59 double crochets on each side). Finish with 1 slip stitch in the first double crochet on the round.

25) Now, work straps as follows:
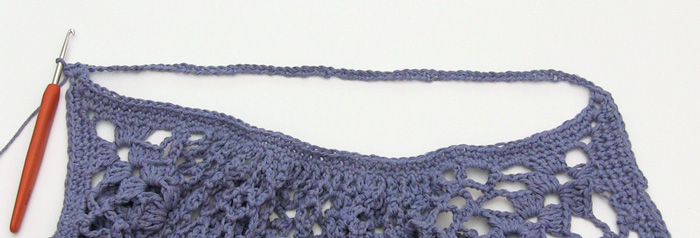
ROUND 4: Work 1 double crochet in each of the first 10 stitches.

26) Then, * work 3 double crochets around the chain space in corner, work 60 loose chain stitches for the strap, skip the next side of the square and continue working around the chain-space in the next corner (make sure the row of chain stitches has not twisted).

27) Work 3 double crochets around the chain space in corner.
28) Then work 1 double crochet in each double crochet as far as the next corner *.

29) Work from *-* 1 more time (point 26-28). but finish with 1 slip stitch in the first chain stitch at the beginning of the round.
30) ROUND 5: Work 1 double crochet in each stitch.

31) ROUND 6: Work 1 double crochet in each stitch. Cut and fasten the strand.
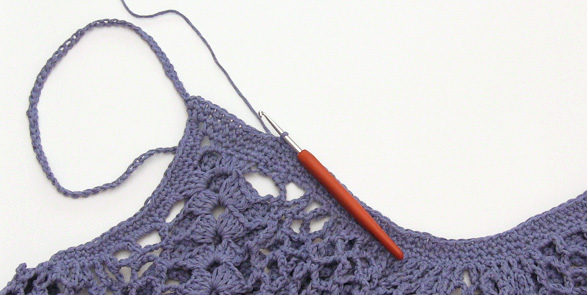
32) Now, work 1 round of double crochets on the opposite side of the strap, ie: work in the chain stitch row that was worked for strap:
Fasten the strand with a double crochet in the first chain stitch worked after the corner.

33) Continue with 1 double crochet in each of the 60 chain stitches for the strap, work 3 double crochets around the chain stitch in the corner.

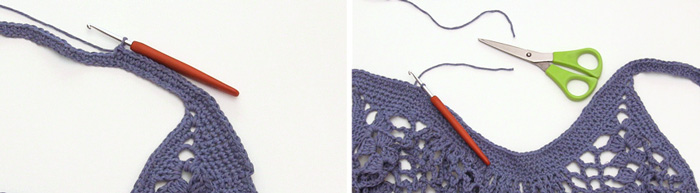
34) Continue with 1 double crochet in each stitch until the next corner, work 3 double crochets around the chain stitch in the corner, finish with a slip stitch in the first double crochet on the round.

35) Cut and fasten the strand. Repeat around the second strap.

Finished
Thanks for crocheting this bag with us!
We can’t wait to see how yours turned out. Post your pictures on social media using hashtags #dropsalong and #pacificbluebag so we can see them!
Need some help?
Should you want more information about the different stitches or techniques, here’s a list of lessons and video tutorials that will help:


With over 40 years in knitting and crochet design, DROPS Design offers one of the most extensive collections of free patterns on the internet - translated to 17 languages. As of today we count 304 catalogues and 11422 patterns - 11422 of which are translated into English (UK/cm).
We work hard to bring you the best knitting and crochet have to offer, inspiration and advice as well as great quality yarns at incredible prices! Would you like to use our patterns for other than personal use? You can read what you are allowed to do in the Copyright text at the bottom of all our patterns. Happy crafting!
Thank you very much for the detailed description of the bag. It's very cool and I crocheted it. Love it!!!
23.05.2020 - 18:22: