How to work a jumper top down

Several of our jumpers are worked top-down, and this is primarily because it provides more flexibility in terms of adjusting the jumper to personal measurements or preferences. It is easier to adjust the length of sleeves, body and especially the yoke. Working top-down also makes it easier to try the piece on while working.

In this lesson we show you how to work a jumper with a simple raglan increase. Start by picking the pattern you want to knit and use this lesson to guide you. If you want to work on a pattern with a different kind of raglan just follow the instructions for increases in you pattern - you’ll notice that the principle of top-down is the same as in this example. Similarly, this technique can also be used when working a round yoke, just follow the increase instructions for the round yoke instead of the raglan showed here.

Additionally, If you’re working a jacket top-down the technique will be the same, but you’ll work the piece back and forth on needle, starting mid front (a marker at the back will not be necessary).

Let’s get started

1) We have started this example by casting on 48 stitches and working 3 cm rib (knit 2, purl 2), before starting the raglan increases.

After the rib edge, continue in stocking stitch and place a marker mid-back. Continue by placing 4 marker threads for raglan in the transition between body and sleeves (from 1. mark to 1. marker thread = half back piece. From 1. to 2. marker thread = 1. sleeve. From 2. to 3. marker thread = front piece. From 3. to 4. marker thread = 2. sleeve. The remaining stitches between 4. marker thread and 1. mark = half back piece).
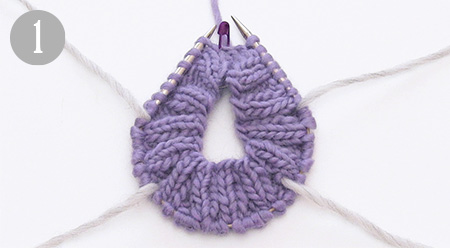
2) Start increasing for raglan on each side of the 4 marker threads.

3) Increase as follows: start 1 stitches before marker thread, make 1 yarn over on right needle.

4) Work 2 stitches (marker thread sits between these stitches), make 1 yarn over on right needle.

5) First increases (yarn overs) before and after 1. marker thread is now complete. Repeat increases at each marker thread (=8 stitches increased on round).

6) On next round, knit the yarn overs twisted (work in the back loop of stitch) to avoid holes.
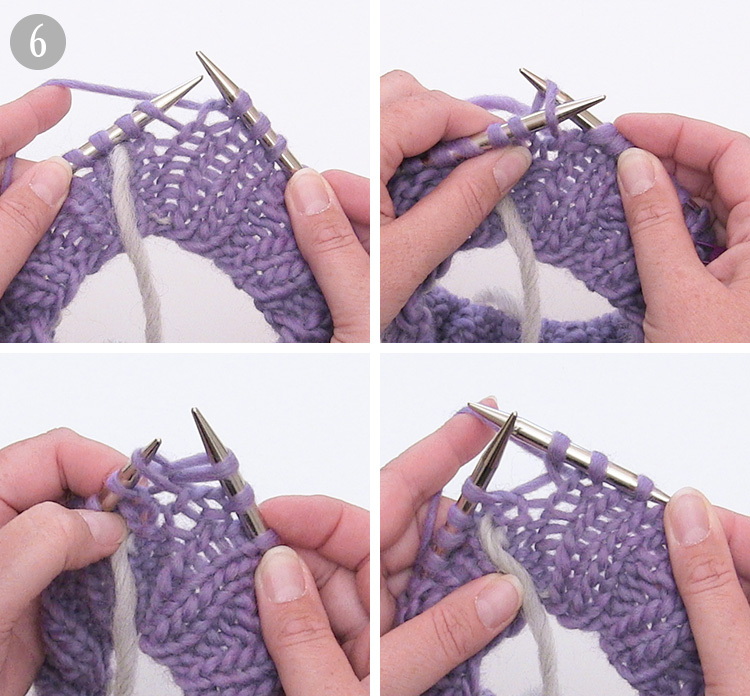
7) Continue with pattern, and increase for raglan as explained.

8) When all increases for raglan are complete, continue working until you reach the measurements for where piece is divided for body and sleeves.

9) Divide piece for sleeves and front/back piece, and finish each part separately. Work until 1. marker thread (=half back piece).

10) Place stitches between 1. and 2. marker thread on a thread/stitch holder (= 1. sleeve).

11) Cast on new stitches under sleeve.
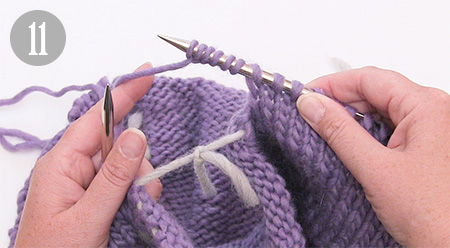
12) Work stitches between 2. and 3. marker thread (=front piece).
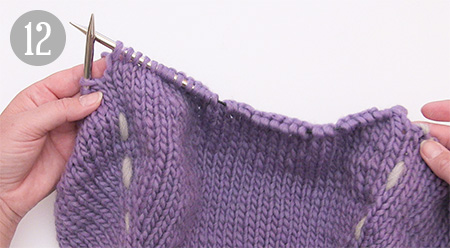
13) Place stitches between 3. and 4. marker thread on a thread/stitch holder (= 2. sleeve).

14) Cast on new stitches under sleeve (same number of stitches as cast on under 1. sleeve).
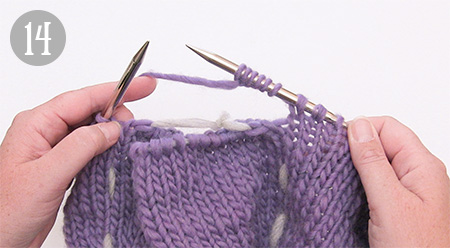
15) Work remaining stitches on back piece (until 1. marker).

16) Work the body in the round, follow instructions for increases, decreases, length and rib edge in your pattern. If you’re unsure about the length of piece, or considering shortening/lengthening it, you can easily try the jumper on while working (TIP: when trying the piece on, distribute stitches over several circular needles to minimise the risk of losing any stitches).

17) Work sleeves: place stitches from one of the threads/stitch holders back on the needle.

18) Cast on new stitches under sleeve, see picture A) or pick up 1 stitch in each stitch of the stitches cast on under the sleeve, see picture B) - see pattern for exact number and place a marker. The piece is now measured from here.

19) Work the length stated in the pattern, place a new marker in the middle of the new stitches cast on. Decrease 1 stitch on each side of the marker.

20) Work until 2 stitches remain before the stitch with marker, slip 1 stitch onto right needle, knit 1, pass the slipped stitch over (= 1 stitch decreased).

21) Work stitch with marker.

22) Knit 2 stitches together (=1 stitch decreased).

You have now decreased 1 stitch before and 1 stitch after marker (= 2 stitches decreased).

23) Follow instructions in pattern regarding the number of decreases and cm/rounds in-between each decrease.

24) When both sleeves have been completed, sew the hole under sleeves.
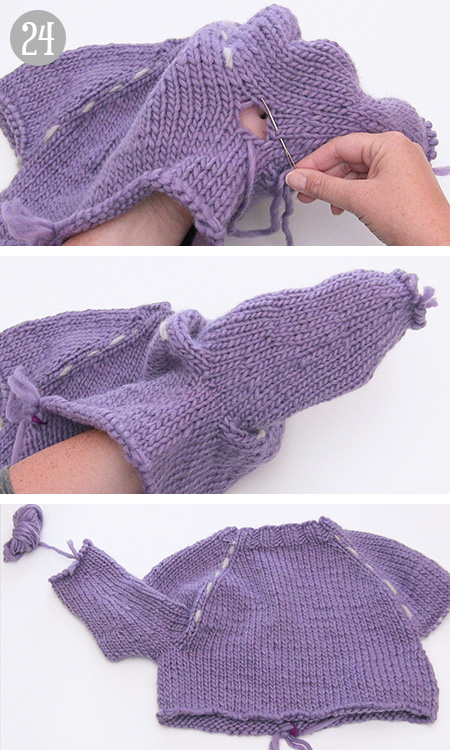
When the body and sleeves are completed according to the pattern, remove all markers and marker threads, and fasten all strands. The jumper is now finished!

Still haven’t chosen a top down pattern? Find some inspiration below:

Comments (151)

Silvia wrote:

Ich arbeite mit DROPS 217-1 Ich habe A.1 gestrickt und have jetzt 140 Maschen auf der Rundnadel. A.2 (size S) gibt keine Anleitung im Diagram zum Zunehmen con Maschen, aber es sollten 240-264 Maschen in der Runde sein. Wo kommen die zusätzlichen 140 Maschen her? Ich verstehe nicht die Anleitung in Diagram A.1 dann A.2 und dann A.3. Werden die nacheinander gearbeitet? Danke für eine genauere Erklärung des Arbeitssblaufes!

01.06.2022 - 03:10:

DROPS Design answered:

Liebe Silvia, wenn sie A.2 stricken sollen Sie Maschen zunehmen (= siehe 9. Symbol): 1 Umschlag bei der 4. Runde, 2 Umschläge bei der 13. Runde und 2 Umschläge bei der 21. Runde= so haben Sie 7 + 1+2+2=12 Maschen in jedem A.2 = 240 Maschen auf der Nadel. Viel Spaß beim stricken!

01.06.2022 - 08:42:

Jacqueline Genne wrote:

Ou trouve t on les explications (nombre de mailles à augmenter combien de fois ) ??? Merci je ne les vois PAS.

22.05.2022 - 21:03:

DROPS Design answered:

Bonjour Mme Genne, elles n'y sont pas car ce n'est qu'une exemple illustrant la façon de tricoter un pull de haut en bas; vous devez vous suivre les explications du modèle où vous retrouvez toutes les indications relatives à ce modèle: échantillon, nombre de mailles à monter, à augmenter etc... Retrouvez par exemple tous nos modèles de pulls femme tricotés de haut en bas ici. Bon tricot!

23.05.2022 - 09:11:

Lillian Andersen wrote:

Jakke 232-15 str m\r\nJeg får ikke bærestykke til å stemme med oppskriften . 7 stolpemasker, a1 over 18 masker, ,a2a3over 9masker,,a2a3over 37masker,a2a3 over 9masker.Hva nå? får det ikke til å stemme med resten av maskene

09.05.2022 - 20:35:

Lorna wrote:

I am confused on pattern no z-816.. the patter starts out with all stitches in garter stitch, then increases are made after the first seven rounds.. which stitches are knit in stocking stitches and which stitches are knit in garter stitch ? The picture looks like the body is all garter stitch.\r\nThanks for your help

18.04.2022 - 07:03:

DROPS Design answered:

Dear Lorna, in this pattern you will work the 16 stitches for the raglan line in garter stitch, feel free to add a marker before/after these stitches if it can help you to visualize them since all stitches will be knitted on first round, and then increase on either side of these 16 sts that will be alternately knitted and purled. Happy knitting!

21.04.2022 - 07:51:

Hilde wrote:

Ich bringe den Übergang von Rundstricknadel 3,5zu5 nicht zustande da ich die Maschen nich über den Übergang bringe modell 232-4 Wechsel zur Passe

05.04.2022 - 16:55:

DROPS Design answered:

Liebe Hilde, bei der Jacke 232-4 stricken Sie die erste Reihe der Passe mit der Rundnadel 5 wie beschrieben (mit A.1 und die Umschläge), und dann stricken Sie weiter mit der Rundnadel 5. Viel Spaß beim stricken!

06.04.2022 - 08:05:

AEtske wrote:

Ik kom nog even terug op het antwoord aan Sabine: Een vest brei je heen en weer op de rondbreinaald van midden voor naar midden voor. Nu is mijn vraag: Kun je het vest ook op gewone pennen breien: met of zonder knop?

22.02.2022 - 19:56:

DROPS Design answered:

Dag AEtske,

Vanwege de techniek kan dat inderdaad op rechte naalden. Vaak worden echter wel rondbreinaalden aanbevolen om dat je dan een groot aantal steken op de naalden hebt, met name bij de grote maten en bij oversized modellen.

26.02.2022 - 16:29:

Sabina wrote:

Hoe brei ik een vest met een rondbreinaald? Een vest moet toch open blijven tussen het linker-en rechtervoorpand

09.02.2022 - 07:41:

DROPS Design answered:

Dag Sabina,

Dat klopt, een vest brei je heen en weer op de rondbreinaald van midden voor naar midden voor. Op deze manier heb je geen zijnaden.

13.02.2022 - 10:34:

Arta wrote:

Jeg har strikket ret og vrang. Nu skal jeg starte Raglan. Jeg har 56 masker som opskriften siger til str. L ind jeg starter Raglan.. Jeg skal sætte 1. Mærke efter 18 masker, 2. Mærke efter 8, den 3. Mærke efter 18 og opskriften siger jeg har 8 masker tilbage til den andet ærme. Det passer ikke... Da 56 masker i alt. minus 18 og minus 8 og minus 18 og minus 8 så har jeg 4 mesker tilbage eller formeget.

05.02.2022 - 16:23:

DROPS Design answered:

Hei Arta. Litt vanskelig å gi deg et 100% korrekt svar, da det ikke er opplyst hvilken genser og str. du strikker. Men sjekk i oppskriften du strikker om det står at du skal sette merket i en maske. Da får du nemlig 18 masker + 1. maske med merke + 8 merke + 2. maske med merke + 18 masker + 3. maske med merke + 8 masker + 4. maske med merke =18+1+8+1+18+1+8+1=56 masker. mvh DROPS Design

07.02.2022 - 08:04:

Marlen wrote:

Hei, på oppskrift smell the rain, og ved øking av maskene, jeg har strikket kastene vridd rett, men hvordan får jeg de nye maskene inn i mønsteret riktig? skjønner ikke helt hvor jeg skal putte de nye maskene

02.02.2022 - 20:09:

DROPS Design answered:

Hei Marlen. Kastene gjøres på hver side av A.2 (8 steder pr økeomgang) og disse maskene strikkes inn i mønstret. F.eks ved første økning strikkes det på neste omgang vridd slik at det ikke blir hull, og da på neste omgang strikkes denne masken etter mønster som da er 4. maske i A.1 (rettmaske). DROPS Design

07.02.2022 - 07:57:

Linda wrote:

Hej! Jag har tänkt sticka en Bee Season Jumper. Nu har jag försökt och repat tre gånger. Fattar bara inte detta med A1 och A2. Dessutom blir det ju ett väldigt stort hål för huvudet med 104 maskor som upplägg för halsbanden. Stämmer det verkligen? Fattar inget! Det är inte lätt att förstå era mönster tyvärr. Med vänlig hälsning, Linda

30.01.2022 - 23:12:

Julie wrote:

I am knitting the "dear to my heart" Drops 199-7 pattern. I have finished the yoke and am now stymied. I knit the 42 stiches then placed the 59 on a stich holder. Do I cut the wool strand from the 42 and then attach again after the 59 stitches so I can then cast on the 8 new stiches? Do I need more needles then or do those stiches just end up joining the other ones. Is there a video? I am more of a visual learner to be honest.

27.01.2022 - 00:47:

DROPS Design answered:

Dear Julie, picture 9 shows how to work to first sleeve (= your 42 sts for half back piece), then picture 10 shows how to slip the 59 sts on a thread for sleeve, then picture 11 shows how to cast on the 8 new stitches for mid under sleeve, without cutting the yarn and how to continue then working front piece, etc. See in this video<.a> from time code approx. 06:58 how to divide piece, slipping sts on a thread and casting on new sts under sleeve. Happy knitting!

27.01.2022 - 09:08:

Müller wrote:

Hallo, die Anleitung ist super vielen Dank! Jedoch gibt es Pullover wie z.B Dusk Rose der anders gestrickt wird. Können Sie dazu vielleicht auch so eine ausführliche Anleitung schreiben? Vielen Dank!

10.01.2022 - 22:59:

DROPS Design answered:

Liebe Frau Müller, bei diesem Modell finden Sie in den passenden Videos, einige, die die Sattelschulter- sowie die Ärmelzunahmen zeigen. Sicher kann es Ihnen weiterhelfen. Viel Spaß beim stricken!

11.01.2022 - 09:53:

Daniella Geltzer wrote:

Hej 😊 Jeg er i gang med at strikke lightkeeper trøjen og er i tvivl om hvad jeg skal gøre når jeg starter på raglan og samtidig skal lave udtagningerne. Hvordan fortsætter jeg mønsteret, når jeg bliver afbrudt af raglan og udtagninger? Jeg kan ikke få det til at passe 😅 På forhånd tak for hjælpen 🧶

09.01.2022 - 22:01:

DROPS Design answered:

Hei Daniella. Du strikker de nye maskene (som du øker ved raglan) inn i mønsteret, men mønstret (2 rett/2 vrang) vil ikke alltid å stemme. Men vil stemme ved neste økning osv. mvh DROPS Design

14.01.2022 - 08:28:

Ghislaine wrote:

Je fais les augmentations pour le raglan mais j’arrive dans le motif alors mon nombre de mailles n’est plus le bon pour le motif. Exemple: je fais 1 jeté, 1m à l’endroit passé le marqueur 1m endroit,1 jeté. Maintenant mon nombre de mailles pour le motif est maintenant 18 plutôt que 19. Les augmentations arrivent dans le motif. Mon patron est le modèle DROPS 159-33.

03.01.2022 - 21:13:

DROPS Design answered:

Bonjour Ghislaine, pour augmenter sur le dos/le devant, faites le jeté avant A.2 à la fin du dos/devant et après A.2 au début du dos/devant; pour augmenter sur les manches, faites 1 jeté après le A.2 du début de la manche et avant le A.2 de la fin de la manche (= vous avez 3 mailles entre les 2 A.2 après la 1ère augmentation). Bon tricot!

04.01.2022 - 08:06:

Annie wrote:

Je travaille en top down un pull en côte 3/1 avec un col montant Je continue le travail toujours en côte 3/1 mais avec les augmentations raglan Après les augmentations mon travail de côté 3/1 sont décalés je ne comprends pas bien alors que j augmente avant la maille raglan

03.01.2022 - 18:08:

Annie wrote:

Si on continu le point côté 3/1 ou autre côté comment faire les augmentations afin de faire le dos manche devant manche pour ne pas que le point soit décalé D avance merci

03.01.2022 - 12:01:

DROPS Design answered:

Bonjour Annie, je ne suis pas bien sûre de comprendre votre question, pourriez-vous développer ou bien peut-être la poser dans la rubrique "questions" du modèle concerné? Merci pour votre compréhension.

03.01.2022 - 15:17:

Hedwig wrote:

Frage! Wie stricke ich den Halsausschnitt, wenn er vorne tiefer sein soll als am Rücken ? …mit der Technik Pullover von oben ab stricken ohne Naht??? Vielen Dank

22.12.2021 - 11:32:

DROPS Design answered:

Liebe Hedwig, dann könnne Sie eine Erhöhung stricken - siehe dieses Video. Viel Spaß beim stricken!

22.12.2021 - 15:52:

Jenny Nilsson wrote:

Vilken bra tutorial! Äntligen fattar jag mönstret jag har framför mig när jag sett bilder på tillvägagångssättet, från början till slut. Tack!!!

11.12.2021 - 21:41:

Cathy Kapp wrote:

I find this whole pattern confusing. It's the first time I've knitted a top down sweater but I am an advanced knitter, I've been knitting since I was 3. The pattern doesn't say to knit according to the diagram and to start from the start of the diagram when all the rows in the diagram have been completed although you obviously have to.

11.12.2021 - 11:41:

DROPS Design answered:

Dear Cathy, this is an example of how to work a sweater top down, step by step but you can't knit any real sweater with this, it's missing the sizes, number of stitches and diagrams. If you have trouble with a specific pattern, please state the pattern number or comment under the pattern and we'll have to try and give you specific help. Happy knitting!

11.12.2021 - 20:23:

Leave a comment or question to this lesson

Your email address will not be published. Required fields are marked *.