
Popular categories
Looking for a yarn?


|
|||||||||||||
Ellie |
|||||||||||||
 |
 |
||||||||||||
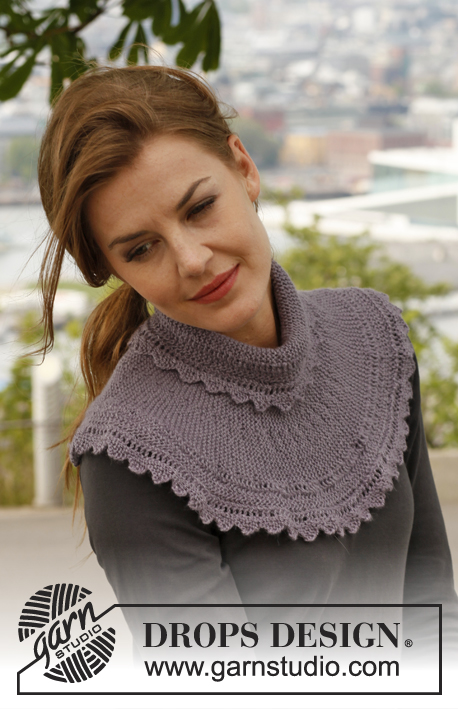
Knitted DROPS neck warmer with garter st and zigzag edges in ”BabyAlpaca Silk”.
DROPS 141-2 |
|||||||||||||
|
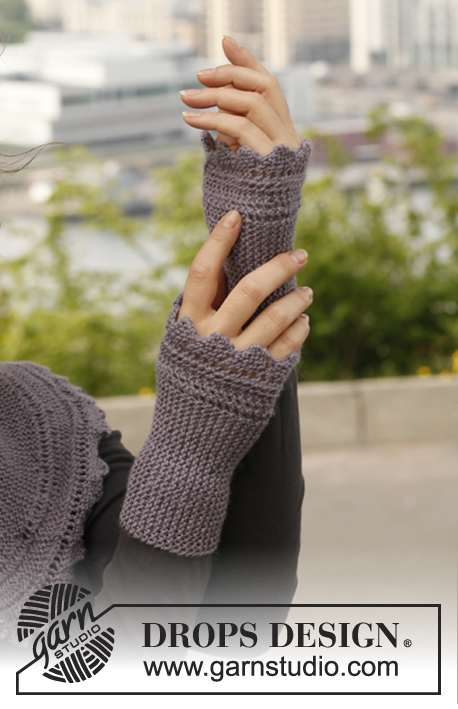
PATTERN: See diagrams A-1 and A-2. Diagrams show all rows in pattern seen from RS. SHORT ROWS: 1st row beg from bottom edge. * Work until 1st marker, turn and work back, work 2 rows over all sts, work until 2nd marker, turn and work back, work until 3rd marker, turn and work back, work 2 rows over all sts *, repeat from *-*, i.e. 1 repetition = 10 rows (5 ridges) in one side (= bottom) and 4 rows (= 2 ridges) in the other side (= top). ---------------------------------------------------------- NECK WARMER: Worked back and forth on needle. There is no difference between RS and WS, the piece is the same on both sides. Start therefore every row as if it is worked from RS. Cast on 60 sts on needle size 3 mm with BabyAlpaca Silk. K 1 row over all sts. Turn, then insert 3 markers in the piece as follows from bottom edge (do not work the row): 1st marker after 12 sts, 2nd marker after 12 more sts and 3rd marker after another 12 sts, there are 24 sts after last marker. READ THE REST OF THE PATTERN BEFORE CONTINUING! Continue as follows from bottom edge: Work diagram A-1 over the first 12 sts, then K the rest of row. Turn and work as follows from the top: Diagram A-1 over the first 12 sts, then K the rest of row. PATTERN: When diagram A-1 has been worked 1 time in each side of piece, continue with A-2 until finished measurements, all sts between A-2 are K on all rows (= garter st). No of sts will vary from 62 to 68 depending on where you are in the diagram. Make sure that all the markers stays in the same place the entire time. SHORT ROWS: At the same time after the first 2 rows have been worked, work SHORT ROWS – see explanation above. Work like this until piece measures approx. 40 cm at the top and 100 cm at the bottom – finish after 1 whole repetition of A-2, loosely cast off. Then sew neck warmer tog mid back, cast on edge against cast off edge to avoid a chunky seam. ---------------------------------------------------------- Wrist warmers – see pattern: 141-3 ---------------------------------------------------------- |
|||||||||||||
Diagram explanations |
|||||||||||||
|
|||||||||||||

|
|||||||||||||
|
Have you made this or any other of our designs? Tag your pictures in social media with #dropsdesign so we can see them! Do you need help with this pattern?You'll find tutorial videos, a Comments/Questions area and more by visiting the pattern on garnstudio.com. © 1982-2024 DROPS Design A/S. We reserve all rights. This document, including all its sub-sections, has copyrights. Read more about what you can do with our patterns at the bottom of each pattern on our site. |
|||||||||||||


With over 40 years in knitting and crochet design, DROPS Design offers one of the most extensive collections of free patterns on the internet - translated to 17 languages. As of today we count 304 catalogues and 11422 patterns - 11422 of which are translated into English (UK/cm).
We work hard to bring you the best knitting and crochet have to offer, inspiration and advice as well as great quality yarns at incredible prices! Would you like to use our patterns for other than personal use? You can read what you are allowed to do in the Copyright text at the bottom of all our patterns. Happy crafting!
Comments / Questions (37)
Eftersom babyalpacka silk inte verkar finnas längre vill jag ha hjälp med att välja ett annat garn som passar till mönstret. Tack/Lisbeth Svensson
21.10.2023 - 19:44DROPS Design answered:
Hej Lisbeth. Du kan sticka med ett annat garn som tillhör garngrupp A, du hittar en översikt på våra garngrupper här. Se bara till att du får den stickfasthet som uppges i mönstret, och att beräkna riktig garnåtgång. Mvh DROPS Design
23.10.2023 - 14:43Jag kan inte se att jag fått något svar av er
27.09.2022 - 01:29DROPS Design answered:
Hej Anette, jo du starter med første pind i A.1, fortsætter med riller pinden ud. Vend, starter med første pind i A.1 og fortsætter med rille pinden ud, vend og strik pind 3 i diagrammet osv. Se videoen hvordan du strikker vendepinde samtidigt (men vänd vid märken i din beskrivning): förkortade varv
27.09.2022 - 10:41Förstår inte mönster 3 butiker tittat på det diagram stickas vanligtvis fr hö tillvänster o gör man det blir det bara kanten på nedre del denskall ju vara på båda sidor när du sedan börjar stickaA2 o samtidigt skall två rätamaskor stekas över hela arbete skall man inte göra A2 då sedan förstår jag inte dom två sista raderna på vändningsschema vänligen hjälp
26.09.2022 - 12:39DROPS Design answered:
Hei Annette. Har du sett på svaret vi gav deg /sendte til deg i dag morges? Fremdeles problemer? mvh DROPS Design
26.09.2022 - 13:31Jag får inte detta mönster att stämma o vad bertyder o på diagrammet har satt i tre markörer men vad o hur skall jag fortsätta nu
16.09.2022 - 15:32Gostei imensamente!
29.03.2022 - 00:33Gostei muito! Muito obrigada!.
29.03.2022 - 00:32I am having an issue trying to get the little triangles edge on the neck part of the pattern. When knitting you only knit all stitches on a few rows and I am confused. I know about short rows and am able to get the edge on the bottom of the project Can you help?
29.10.2020 - 05:31DROPS Design answered:
Dear Mrs Beaton, not sure to understand the issue; you are working A.1 on each side = first row of A.1 is worked at the beginning of row from RS (bottom edge) and first row of A.1 is worked at the beginning of row from WS (towards neck); so that the 7th row in A.2 is worked at the beg of a row (to be able to cast off the stitches), but both diagrams won't be work at the same time because of the short rows, ie you will have more A.2 towards bottom than towards top of piece. Each A.2 should just be the same = 8 rows. Hope this will help. Happy knitting!
29.10.2020 - 08:46Can you please clearly tell me what rows are knitted from the wrong side to form the correct edging on the neck edge? The pattern reads that the wrong side rows are knitted, so the neck remains flat. Is it during the Short Row section or A-2 section? Thank you. Please email me below.
28.05.2020 - 03:43DROPS Design answered:
Dear Mrs Taylor, on the bottom of piece you will work row 1, 3, 5, 7 from RS, on the top (towards neck) you will work row 1,3,5 and 7 from WS, ie at the beg of row from WS - from the right side you will start with rows 1,3,5, or 7 and end (when working all sts) with the rows 2,4,6,8. Happy knitting!
28.05.2020 - 08:39Magnifique cela fait un moment que j'ai tricoté ce modèle en cette couleur ainsi que les mitaines. une laine très agréable avec de la soie; Bien agréable sur robe un peu décolletée pour l-moi que j'ai aussi tricotées
20.05.2017 - 18:16Sally Driscoll wrote:
Hi, I understand about the short rows, but as I follow the chart, each return at neck end is only knit (garter stitch), therefore no picot edging. What am I doing wrong please?
08.10.2016 - 09:32DROPS Design answered:
Dear Mrs Driscoll, in the diagrams you will work the eyelet rows at beg of row from RS (and these sts will be K on next row from WS) on one side of the piece and the eyelete rows on the other side of piece will be worked at beg of row from WS (and these sts will be K on next row from RS). Happy knitting!
10.10.2016 - 08:56