
Sweet Martine
#sweetmartineponcho


Crochet DROPS poncho with squares and lace pattern in ”Cotton Light”. The piece is worked top down. Size: S - XXXL.
DROPS 167-21
DROPS design: Pattern no cl-060
Yarn group B
----------------------------------------------------------
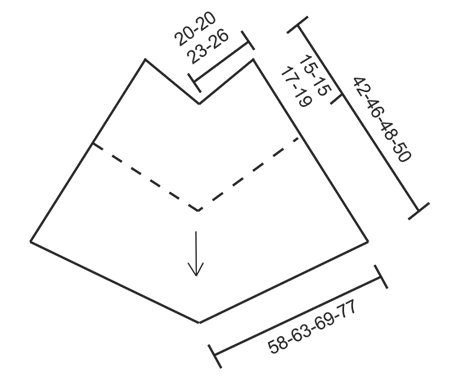
Size: S/M – L/XL - XXL - XXXL
Materials:
DROPS COTTON LIGHT from Garnstudio
400-400-450-500 g colour no 21, light beige
150 g for all sizes in colour no 01, off white
NOTE: Poncho worked in one colour = 500-550-600-650 g Cotton Light.
DROPS CROCHET HOOK SIZE 4 mm – or size needed to get 18 tr x 9 rows = 10 x 10 cm.
PATTERN:
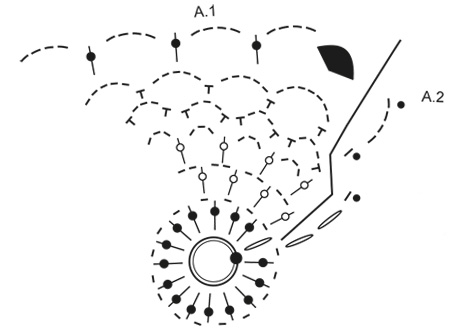
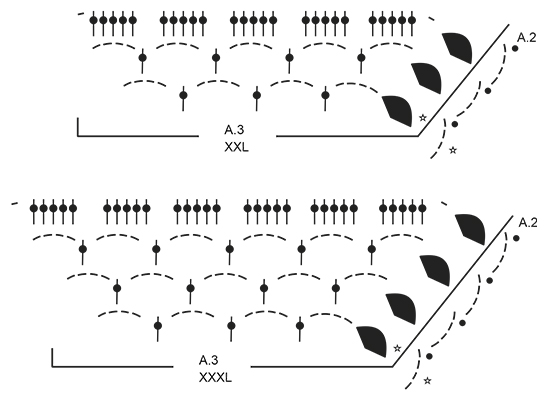
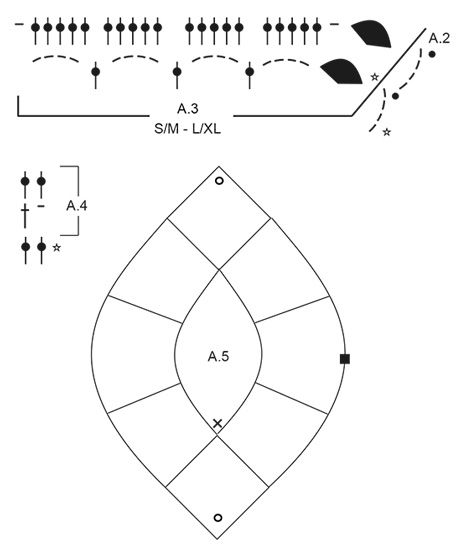
See diagrams A.1 to A.5. On diagram A.1 work first round in the entire round, then repeat A.1 and A.3 4 times in total on round. Diagram A.2 shows how every round beg and ends. A.5 shows how squares are assembled.
CROCHET INFO:
Beg every round with tr with 3 ch and finish with 1 sl st in 3rd ch.
STRIPES:
Work 0-4-4-4 rounds with light beige, then work * 2 rounds with off white, work 4 round with light beige *, repeat from *-* 3 times in total.
INCREASE:
On 1st round in A.4 (i.e. round with tr and ch) inc as follows: Work 1 ch, around ch-space at the tip work as follows: 2 tr around ch-space, 3 ch, 2 tr around same ch-space.
On 2nd round in A.4 (i.e. round with tr) inc as follows: Work 1 tr around ch, around ch-space at the tip work as follows: 2 tr around ch-space, 3 ch, 2 tr around same ch-space.
----------------------------------------------------------
PONCHO:
The piece is worked from the neck down. First work squares as follows:
SQUARE:
Work 4 ch on hook size 4 mm with light beige and form a ring with 1 sl st in first ch. Work A.1. Diagram A.2 shows how every round beg and ends. When first round of A.1 is worked, repeat A.1 4 times in total on round. When A.1 has been worked 1 time vertically, there are 16 ch-spaces and 4 corners.
Work A.3 over A.1, i.e. repeat A.3 4 times in total on round (see diagram for correct size). NOTE: First round in A.3 is not worked, it only shows how next round is worked around sts. Diagram A.2 shows how every round beg and ends. When A.3 has been worked 1 time vertically, there are 80-80-100-120 tr and 4 corners. Fasten off. Square measures approx. 15-15-17-19 x 15-15-17-19 cm. REMEMBER THE CROCHET TENSION! Work 8 squares.
ASSEMBLY:
Sew squares tog edge to edge (see A.5) i.e. sew in outer loops of edge sts. These make up the upper part of poncho. Now work in the round from bottom edge of squares as follows:
FROM SQUARES AND DOWN:
ROUND 1: Beg in the side of square (see A.5), in the middle of the 1st square (i.e. 10-10-12-15 tr before corner). Work 3 ch – READ CROCHET INFO, work 1 tr in each of the first 10-10-12-15 tr, * over the 2 corners sewn tog work as follows: 1 tr in each of the next 2 tr, 2 tr around each of the next 2 corners, 1 tr in each of the next 2 tr *, then work 1 tr in every tr until next corner sewn tog (= over the next 20-20-25-30 tr), repeat from *-* over the next 2 corners sewn tog, 1 tr in each of the next 20-20-25-30 tr, over the next corner inc (see A.5) as follows: Work 1 tr around ch, around ch-space at the tip work as follows: 2 tr around ch-space, 3 ch, 2 tr around same ch-space, 1 tr around next ch. Work 1 tr in every tr and from *-* over the next 8 corners sewn tog and the next 100-100-125-150 tr (i.e. 20-20-25-30 tr between each of the 2 corners sewn tog).
Around next corner inc as follows: Work 1 tr around ch, around ch-space at the tip work as follows: 2 tr around ch-space, 3 ch, 2 tr around same ch-space. Work 1 tr in every tr and from *-* the entire round, finish with 1 sl st in 3rd ch = 276-276-326-376 tr.
ROUND 2: Work with off white - READ STRIPES. Work A.4 until 3 tr remain before ch-space in the tip, adjust to finish with 1 tr in last tr, work INCREASE – see explanation above. Repeat A.4 until next tip, work increase, work A.4 the rest of round. On every round inc 8 tr, i.e. inc 2 tr on each side of mid front/back.
Repeat stripes and A.4 until finished measurements. When stripes have been worked, piece measures approx. 36-40-42-44 cm from the neck.
EDGE AT THE BOTTOM:
ROUND 1: Work with light beige. Work 1 ch, work 1 dc in first tr, work * 5 ch, skip 4 tr, 1 dc in next tr *, repeat from *-* until mid front/back, ** adjust so that last dc is worked around ch-space mid front/back, 5 ch, 1 dc around same ch-space **, repeat from *-* until mid front/back, repeat from **-** around ch-space mid front/back, repeat from *-* the rest of round, finish with 1 sl st in first ch at beg of round.
ROUND 2: Work 3 ch, 1 sl st around first ch-space, 2 ch (= 1 htr), work * 4 ch, 1 htr around next ch-space *, repeat from *-* until ch-space mid front/back, ** 4 ch, around ch-space mid front/back work 1 htr + 4 ch + 1 htr **, repeat from *-* until mid front/back, repeat from **-** around ch-space mid front/back, repeat from *-* the rest of round, finish with 1 sl st in 2nd ch (= htr) at beg of round.
ROUND 3: Work 3 ch (= 1 tr), work 5 tr around every ch-space, around ch-space mid front/back work: 1 ch, 2 tr around ch-space, 3 ch, 2 tr around same ch-space, 1 ch, finish round with 1 sl st in 3rd ch at beg of round. Fasten off.
NECK EDGE:
Beg mid front - see diagram and work with light beige on hook size 4 mm. Work as follows from RS:
ROUND 1: Work 1 dc around ch-space in the middle (tip for the middle square), ** work 5 ch, skip corner (i.e. 3 ch + 2 tr), 1 dc around ch, * 5 ch, skip 5 tr, 1 dc between 2 tr *, repeat from *-* 2-2-3-4 more times, 5 ch, skip 5 tr, 1 dc around ch, 5 ch, 1 dc in seam between squares **, repeat from **-** around the entire neck, finish with 1 sl st in first dc.
ROUND 2: Work 2 ch, 1 sl st around first ch-space, 2 ch (= 1 htr), * 4 ch, 1 htr around next ch-space *, repeat from *-* until 1 ch-space remains before mid back, work 1 htr around the next 2 ch-spaces, repeat from *-* until 1 ch-space remains, work 1 htr around last ch-space, finish with 1 sl st in 2nd ch (= 1 htr) at beg of round.
ROUND 3: Work 3 ch (= 1 tr), work 2 tr around first ch-space, work 5 tr around every ch-space until 1 ch-space remains before mid back, work 3 tr around each of the next 2 ch-spaces, work 5 tr around every ch-space until 1 ch-space remains, work 3 tr around last ch-space, finish with 1 sl st in first tr. Fasten off.
Diagram explanations
 |
= | Work 4 ch and form a ring with 1 sl st in first ch (see point on circle), start and stop round here. |
 |
= | ch |
 |
= | dc around ch-space |
 |
= | beg round with 3 ch, and finish round 1 sl st in 3rd ch at beg of round |
 |
= | tr around ch-space |
 |
= | tr in tr |
 |
= | Tr-group with 2 tr: Work 1 tr around next ch/ch-space but wait with last pull through (= 2 sts on hook), then work next tr around same ch/ch-space but on last pull through, pull yarn through all sts on hook. |
 |
= | corner Work around ch-space as follows: 2 tr, 3 ch, 2 tr |
 |
= | crochet direction |
 |
= | sl st |
 |
= | this round is explained in pattern |
 |
= | beg working from squares and down here |
 |
= | mid front/back - inc here - see INCREASE |
 |
= | beg working neck edge here |
Have you finished this pattern?
Tag your pictures with #dropspattern #sweetmartineponcho or submit them to the #dropsfan gallery.
Do you need help with this pattern?
You'll find 11 tutorial videos, a Comments/Questions area and more by visiting the pattern on garnstudio.com.
Have you purchased DROPS yarn to make this pattern? Then you are entitled to receive help from the store that sold you the yarn.
© 1982-2026 DROPS Design A/S. We reserve all rights. This document, including all its sub-sections, has copyrights. Read more about what you can do with our patterns at the bottom of each pattern on our site.