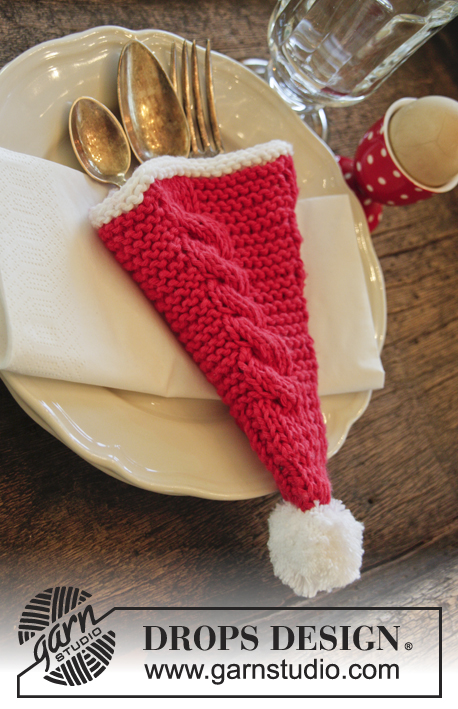
Dinner At The Kringles

DROPS Christmas: Knitted DROPS cutlery holder with cables in ”Paris”.
DROPS Extra 0-1062
DROPS design: Pattern no w-535
Yarn group C or A + A
-----------------------------------------------------------
Measurements: Length: 16 cm without pompom. Circumference at the top: 22 cm
Materials:
DROPS PARIS from Garnstudio
50 g colour no 12, red
50 g colour no 16, white
1 ball red = 2 cutlery holders.
DROPS STRAIGHT NEEDLES SIZE 3.5 mm - or size needed to get 20 sts x 27 rows in stocking st or 20 sts x 40 rows in garter st = 10 x 10 cm.
GARTER ST (back and forth):
K all rows. 1 ridge = 2 rows K.
INCREASE TIP:
Inc 1 st by making 1 YO, on next row work YO twisted (i.e. work in the back loop of st instead front) to avoid holes.
PATTERN:
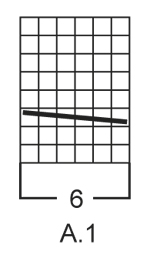
See diagram A.1. The diagrams show all rows in pattern seen from RS.
----------------------------------------------------------
CUTLERY HOLDER:
Worked back and forth and sewn tog when finished.
Cast on 14 sts (incl 1 edge sts in garter st in each side) on needle size 3.5 mm with red. Work 1st row as follows from RS: 1 edge st in GARTER ST - see explanation above, 2 sts in stocking st, 1 st in garter st, * 3 sts in stocking st, 1 st in garter st *, repeat from *-* 1 more time, 1 st in stocking st, 1 edge st in garter st. Continue like this back and forth. When piece measures 2 cm, inc as follows on next row from RS - READ INCREASE TIP: 1 edge st in garter st, 1 YO, 1 st in stocking st, 1 YO, 1 st in stocking st, * 1 st in garter st, 1 st in stocking st, 1 YO, 1 st in stocking st, 1 YO, 1 st in stocking st *, repeat from *-* 1 more time, 1 st in garter st, 1 st in stocking st, 1 edge st in garter st = 20 sts. NOTE! Work YOs in stocking st. When piece measures 5 cm, inc 3 sts evenly in each of the first 3 sections in stocking st (i.e. 9 sts inc) = 29 sts. REMEMBER THE KNITTING TENSION! Now work pattern as follows from RS: 1 edge st in garter st, * A.1 (= 6 sts), 3 sts in garter st *, repeat from *-* 2 more times, 1 edge st in garter st. AT THE SAME TIME when piece measures 2 cm, inc 1 st in each side of every section in garter st (i.e. 6 sts inc) = 35 sts. NOTE: Work YOs in garter st! Repeat inc every 2 cm 3 more times = 53 sts. When piece measures 15 cm in total, switch to white and work 1 ridge before casting off.
ASSEMBLY:
Beg at the top by the white edge on cutlery holder and sew seam inside 1 edge st in garter st with red. Cut the yarn and leave approx. 20 cm. Thread yarn through one and one st in cast-on edge, tighten tog and fasten.
POMPOM:
Make a pompom of approx. 3 cm in diameter with white. Fasten it to then bottom of holder.
Diagram explanations
 |
= | K from RS, P from WS |
 |
= | slip 3 sts on cable needle in front of piece, K 3, K 3 from cable needle |

Have you finished this pattern?
Tag your pictures with #dropspattern or submit them to the #dropsfan gallery.
Do you need help with this pattern?
You'll find 17 tutorial videos, a Comments/Questions area and more by visiting the pattern on garnstudio.com.
Have you purchased DROPS yarn to make this pattern? Then you are entitled to receive help from the store that sold you the yarn.
© 1982-2025 DROPS Design A/S. We reserve all rights. This document, including all its sub-sections, has copyrights. Read more about what you can do with our patterns at the bottom of each pattern on our site.
