
Candy Cane Bear
#dropscandycanebear

Crocheted polar bear teddy with scarf and sugar cane / Christmas decoration in DROPS Merino Extra Fine. Piece is crocheted bottom up with embroidered eyes and snout. Theme: Christmas.
DROPS Extra 0-1666
DROPS design: Pattern me-303
Yarn group B
----------------------------------------------------------
SIZE:
Piece measures approx.
Teddy: Circumference = 14 cm Height = 15 cm without ears.
Sugar cane: Width = 1 cm Height: = 8 cm
YARN:
DROPS MERINO EXTRA FINE from Garnstudio (belongs to yarn group B)
50 g colour 01, Off White
50 g colour 11, Crimson Red
And use:
Some left-over yarn of in colour Dark Grey for eyes and mouth
1 teddy weighs approx. 26 g without filling.
1 scarf weighs approx. 2 g.
1 sugar cane weighs approx. 2 g.
ACCESSORIES:
Some cotton wool for filling
Optional strand for strap.
CROCHET HOOK:
DROPS CROCHET HOOK SIZE 3 mm
CROCHET TENSION:
22 double crochets in width and 22 rows vertically on hook size 3 mm = 10 x 10 cm.
22 treble crochets in width 11 rows vertically on hook size 3 mm = 10 x 10 cm.
NOTE! Remember that hook size is only a suggestion. If you have too many stitches on 10 cm switch to larger hook. If you have too few stitches on 10 cm switch to smaller hook.
----------------------------------------------------------
EXPLANATION FOR THE PATTERN:
----------------------------------------------------------
PATTERN:
See diagrams A.1 to A.14.
COLOUR PATTERN:
When working with two colours on a round with treble crochets, work as follows:
Work last treble crochet with first colour but wait with last yarn over and pull through, switch to next colour and work last yarn over and pull through with the new colour, then work next treble crochet.
When working with two colours place strand for the colour not worked over stitches from previous row to work around the strand. Strand follows in piece but is hidden inside the stitches.
TIP:
You can stiffen the sugar cane by dipping it in syrup or a colourless soda and then place this flat to dry.
----------------------------------------------------------
START THE PIECE HERE:
----------------------------------------------------------
TEDDY – SHORT OVERVIEW OF THE PIECE:
Work in the round, bottom up. First work 2 legs. Then put the legs together for body and continue working in the round up to neck. Work 2 arms, work the arms together with body before working the head. Then work 2 ears, fasten ears to head. Embroider eyes and mouth on teddy. Crochet a small scarf that is tied around the neck on teddy.
Work 2 sugar canes at the end. Fasten one on to the teddy and hang the other as decoration together with the teddy.
LEGS:
Use hook size 3 mm and colour Off White in DROPS Merino Extra Fine. Crochet diagram A.1 (= chain stitch ring). Then work as follows: Work A.2 (= beginning and end of round), work A.3 4 times in total around the chain stitch ring. Remember to follow the crochet tension!
When A.2 and A.3 have been worked vertically, there are 16 double crochets + 1 chain stitch on round and leg measures approx. 3½ cm vertically. Cut and fasten the yarn. Work the other leg the same way and fill some cotton wool in both legs.
BODY:
Use colour Off White Begin with diagram A.4, i.e. skip chain stitch and first double crochet on one leg, work A.4 in next double crochet, then work A.5 around the leg (skip the 2 last double crochets on leg as shown in diagram), do not cut the yarn but work A.6 over next leg as diagram shows. After 1st round on body there are 28 stitches + 1 chain stitch at the beginning of round - beginning of round = mid back.
Continue in the round like this. When A.4, A.5 and A.6 have been worked vertically, there are 30 double crochets + 1 chain stitch on round. Continue to work as follows: Work A.7 (= beginning and end of round), work A.8 6 times in total around the body. When A.7 and A.8 have been worked vertically, piece measures approx. 8½ cm vertically. Do not cut the yarn, leave the stitch pm the hook and work arms as explained below. Fill some cotton wool in the teddy along the way.
ARMS:
Get the yarn from inside the ball with colour Off White, work diagram A.1 (= chain stitch ring). Then work as follows: Work A.2 (= beginning and end of round), work A.3 2 times in total around the chain stitch ring. When A.2 and A.3 have been worked vertically, there are 8 double crochets + 1 chain stitch on round. Work last round in diagram A.2/A.3, 2 more times = 10 rounds in total have been worked. The piece measures approx. 4½ cm vertically. Cut and fasten the yarn. Work another arm the same way. Fill some cotton wool in the arms, i.e. The 3-4 top rounds should be without filling.
BODY, ARMS AND HEAD:
Begin mid back on teddy where round began earlier and work with colour Off White. Work A.9 in chain stitch at the beginning of round, then work A.10 around the body - AT THE SAME TIME work arms on to 1st round as shown in diagram. When A.9 and A.10 have been worked vertically, there are 16 double crochets + 1 chain stitch on round and teddy measures approx. 15 cm vertically. Fill some extra cotton wool in the head.
EARS:
Use colour Off White, work diagram A.1 (= chain stitch ring). Then work as follows: Work A.11 (= beginning and end of round), work A.12 2 times in total around the chain stitch ring. When last round in A.11 and A.12 remain, there are 8 double crochets + 1 chain stitch on round. Now fold the ear double, work A.11, then work last row in A.12 through both layers. The ear is now flat and there are 3 double crochets + 1 chain stitch on row. Work the other ear the same way.
ASSEMBLY:
You can use colour Dark Grey and embroider eyes with French knots - see photo and diagram A (on the model in the photo the strand is spun 3 times around the needle).
Use the same colour and embroider mouth with flat stitches at the front on head on teddy - photo and diagram B.
Sew head together at the top (place the head flat and sew with 1 stitch in each stitch through both layers). Fasten ears where stitches were decreased in each side on head.
Sew tog the opening between the legs.
SCARF:
Use colour Crimson Red, begin at hexagon in diagram A.13 and work 35 chain stitches as shown in diagram. Work A.13 (= 1 row). Fasten off when A.13 has been worked. There are 2 fringes in each side of scarf. 1 fringe = cut 3 lengths of 5 cm in colour Crimson Red. Place strands double, pull loop through a stitch the edge in one side of scarf, pull ends through the loop and tighten. Tie the scarf around the teddy's neck.
STRAP:
Cut a optional yarn of approx. 15 cm. Pull yarn through a stitch at the top of head on teddy (make sure that the strap is fastened so that the teddy hangs straight), tie a knot at the end.
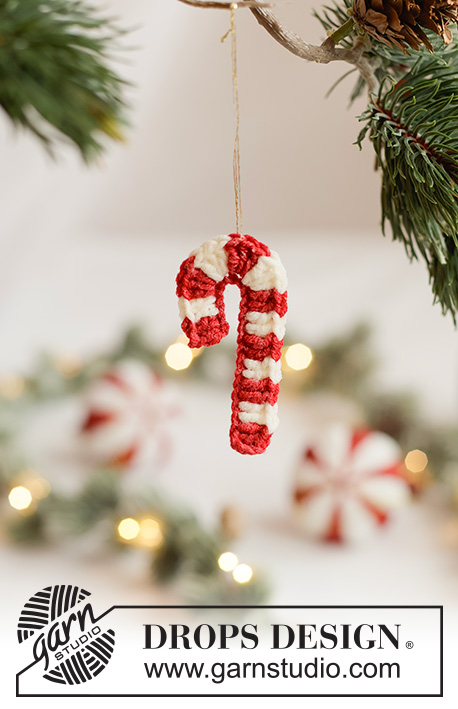
SUGAR CANE:
Use colour Crimson Red, begin at hexagon in diagram A.14 and work 25 chain stitches as shown in diagram. Read COLOUR PATTERN and work A.14 (= 1 row). Fasten off when A.14 has been worked. Read TIP and sew sugar cane on to teddy under one arm - see photo.
Work another sugar cane for decoration and fasten a strap at the top of sugar cane the same way as on teddy - remember TIP.
Diagram explanations
 |
= | Begin here. Work 4 chain stitches and form a ring with 1 slip stitch in first chain stitch. Continue with symbol over point on circle, and work towards the left |
 |
= | 1 chain stitch - if you work at the end of hook the chain stitch will often be too tight, 1 chain stitch should be the same length as 1 double crochet / treble crochet is wide |
 |
= | at the beginning of round work 1 chain stitch, round ends with 1 slip stitch in this chain stitch |
 |
= | 1 double crochet around chain stitch ring / 1 double crochet in stitch below |
 |
= | 2 double crochets in stitch below (= 1 double crochet increased) |
 |
= | this round (grey marking) has already been worked (= last round on legs) and only shows how 1st round on body is working in last round on legs. |
 |
= | this round (grey marking) has already been worked (= last round on body before arms are worked together with body) and only shows how 1st round is worked in stitches below. |
 |
= | 1 double crochet from last round on leg, skip this double crochet |
 |
= | 1 double crochet from last round on leg, the body is worked in this double crochet |
 |
= | 1 slip stitch in stitch below |
 |
= | 1 double crochet from body - work arm in this double crochet |
 |
= | place stitch at the top of arm flat so that there are 4 stitches at the top of arm, work 1 double crochet from arm together with 1 double stitch from body (work through all 3 layers) |
 |
= | work 2 double crochets together as follows: Work 1 double crochet in first stitch but wait with last yarn over and pull through, work 1 double crochet in next stitch but now pull last yarn over through all 3 loops on hook (= 1 double crochet decreased) |
 |
= | when this row remains, fold ear double (= flat) and work last row through both layers |
 |
= | crochet direction |
 |
= | begin here and work number of chain stitches shown in diagram |
 |
= | 1 treble crochet in stitch below with colour Crimson Red - read COLOUR PATTERN |
 |
= | 1 treble crochet in stitch below with colour Off White - remember COLOUR PATTERN |
 |
= | French knot 1-4 pictures PICTURE 1: Insert needle from wrong side, and up on front side where you want to begin the French knot. PICTURE 2: Then twist thread around the tip of needle 2 to 4 times depending on how large the knot should be. PICTURE 3: Insert needle down in piece approx. 0.5-1 stitch on the side of whole where yarn came up and pull yarn out on the wrong side. PICTURE 4: When yarn is pulled through piece the twists are tightened, and a French knot is made. Fasten yarns on wrong side. |
 |
= | flat stitches 1-4 pictures PICTURE 1: Insert needle from wrong side, and up on front side where you want to begin the first flat stitch. PICTURE 2: Skip 0.5 cm and insert needle in piece and up again where you want to begin the next flat stitch and pull yarn through. PICTURE 3: Skip 0.5 cm and insert needle in piece and up again where you want to begin the next flat stitch and pull yarn through. Continue like this until desired number of stitches have been worked. Fasten yarns on wrong side. PICTURE 4: Flat stitches shown in different direction and length. |


Have you finished this pattern?
Tag your pictures with #dropspattern #dropscandycanebear or submit them to the #dropsfan gallery.
Do you need help with this pattern?
You'll find 13 tutorial videos, a Comments/Questions area and more by visiting the pattern on garnstudio.com.
Have you purchased DROPS yarn to make this pattern? Then you are entitled to receive help from the store that sold you the yarn.
© 1982-2026 DROPS Design A/S. We reserve all rights. This document, including all its sub-sections, has copyrights. Read more about what you can do with our patterns at the bottom of each pattern on our site.