
Winter's Tale
#dropswinterstale
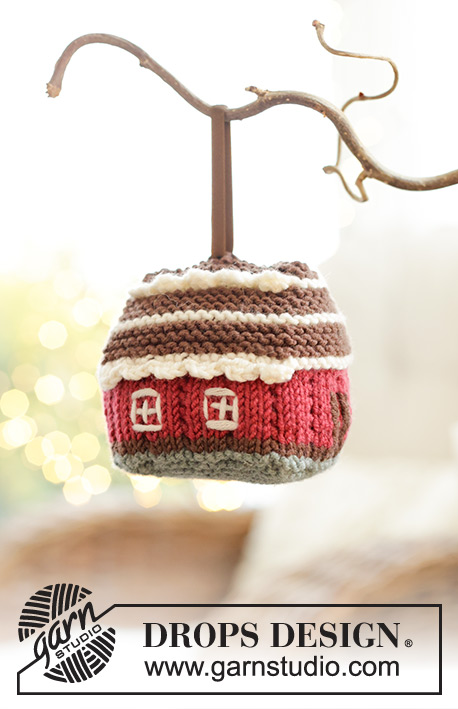
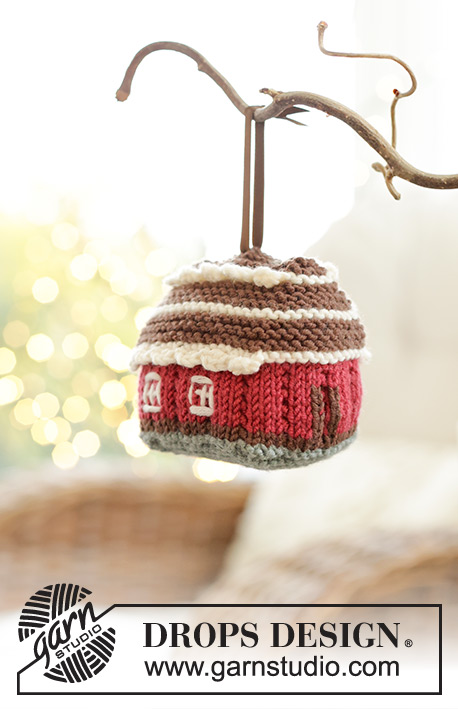
Knitted house/Christmas decoration in DROPS Merino Extra Fine. The piece is worked in the round, bottom up. Theme: Christmas.
DROPS Extra 0-1608
DROPS Design: Pattern me-279
Yarn group B
-------------------------------------------------------
SIZE:
Width = 7 cm. Length = 7 cm. Height = 9 cm.
YARN:
DROPS MERINO EXTRA FINE from Garnstudio (belongs to yarn group B)
50 g colour 01, off white
50 g colour 32, dark rose
50 g colour 49, chocolate
50 g colour 47, sage green
ACCESSORIES:
Wadding.
30 cm silk ribbon (width 0.5 cm) for ex. colour brown for loop.
The house weighs approx. 30 g without wadding.
NEEDLES:
DROPS DOUBLE POINTED NEEDLES SIZE 3 MM.
CROCHET HOOK:
DROPS CROCHET HOOK SIZE 3 MM.
KNITTING TENSION:
23 stitches in width and 32 rows in height with stocking stitch = 10 x 10 cm.
NOTE: Needle size is only a guide. If you get too many stitches on 10 cm, change to a larger needle size. If you get too few stitches on 10 cm, change to a smaller needle size.
-------------------------------------------------------
EXPLANATIONS FOR THE PATTERN:
-------------------------------------------------------
GARTER STITCH (worked in the round):
1 ridge vertically = 2 rounds, i.e. knit 1 round and purl 1 round.
PATTERN:
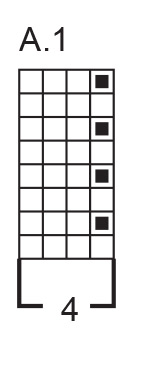
See diagram A.1. The diagram shows all rows in the pattern from the right side.
STRIPES:
* 1 ridge in colour off white, 3 ridges in colour chocolate *, work from *-* a total of 3 times but, on the last repeat, finish after 2 ridges in colour chocolate = 22 rounds of stripes.
INCREASE TIP:
Increase 1 stitch on each side of the marker-stitch as follows: Knit 1 in both the front and back loops of the stitch before the marker-stitch, knit the marker-stitch, knit 1 in both the front and back loops of the next stitch (2 increased stitches). Repeat at each marker-stitch.
DECREASE TIP-1:
Work until there are 2 stitches left before the marker-stitch, purl 2 together, purl the marker-stitch, purl 2 twisted together (2 decreased stitches). Repeat at each marker-stitch.
DECREASE TIP-2:
Decrease on a knitted round.
AFTER MARKERS 1 AND 3:
Knit 2 twisted together.
BEFORE MARKERS 2 AND 4:
Work until there are 2 stitches left before the marker, knit 2 together.
-------------------------------------------------------
START THE PIECE HERE:
-------------------------------------------------------
HOUSE – SHORT OVERVIEW OF THE PIECE:
The piece is worked in the round with double pointed needles, bottom up. The floor is worked first, then the walls and the roof to finish. The door and windows are embroidered with flat stitch and a picot edge is worked around the roof. The piece is filled with wadding before the roof is sewn together and ribbon fastened at the top for the loop.
FLOOR:
Cast on 8 stitches with double pointed needles size 3 mm and colour sage green DROPS Merino Extra Fine. Divide the stitches equally onto 4 needles with 2 stitches on each needle. Purl 1 round.
Insert 1 marker in the last stitch on each needle (4 markers). Work GARTER STITCH in the round – read description above. AT THE SAME TIME on each knitted round, increase 1 stitch on each side of each marker-stitch – read INCREASE TIP (8 increased stitches). Increase like this a total of 8 times = 72 stitches (the beginning of the round is the middle of one side).
After the last increase-round, purl 1 round and decrease 1 stitch on each side of all marker-stitches – read DECREASE TIP-1 = 64 stitches (8 decreased stitches). There are 15 stitches between each marker-stitch. The floor measures approx. 4 cm from the middle outwards. Now work the walls.
WALLS:
Keep the markers in place; they now mark the corners of the house. Change to colour chocolate and work A.1 in the round (the marker-stitches should match the garter stitches in the pattern). REMEMBER THE KNITTING TENSION!
When you have worked 2 rounds with colour chocolate, change to colour dark rose. Work 10 rounds of A.1 with colour dark rose. The walls measure approx. 4 cm in height. Now work the roof.
ROOF:
Change to colour off-white. Work garter stitch and STRIPES in the round – read description above. In addition, shape the gables by decreasing AFTER markers 1 and 3 and BEFORE markers 2 and 4 – read DECREASE TIP-2. Decrease like this every 4th round a total of 5 times, then every 2nd round 1 time = 40 stitches.
On the next knitted round, decrease the remaining 3 stitches on each gable as follows: Start after the marker-stitch, slip 1 stitch knit-wise, knit 2 together, pass the slipped stitch over the knitted-together stitches, repeat on the other gable (4 decreased stitches) = 36 stitches.
Cast off with purl. Keep the markers in place.
ASSEMBLY:
Work a row of picot along the top and bottom ridges on the roof using colour off-white (along the long-sides only): Hold the house with the roof towards you (i.e., upside down). Use crochet hook size 3 mm and colour off white. Work 1 double crochet in the marker-stitch, * 4 chain stitches, 1 treble crochet in the first chain stitch worked, skip 1-1½ cm, 1 double crochet in the next stitch *, work from *-* to the next marker-stitch. Cut and fasten the strand. There are 5 picots at the top and 6 picots at the bottom of the roof.
Use colour chocolate and embroider a door with flat stitch in the middle of one wall – see photo.
Use colour off-white and embroider 2 windows on one long side – see photo.
Cut and fasten the strands. Fill the house with wadding. Use colour chocolate and sew the roof together at the top with small stitches.
LOOP:
Thread the silk ribbon through the sewing in the middle of the roof, tie a knot in the end. Pull the ribbon through so the knot is by the roof.
Diagram explanations
 |
= | knit |
 |
= | purl |
 |
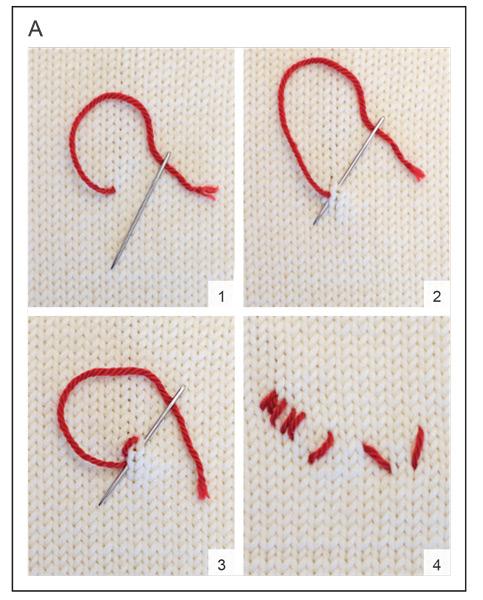
= | Flat stitch, Pictures 1-4 PICTURE 1: Insert the needle from the wrong side to the right side, where you wish the stitch to start. PICTURE 2: Skip your required distance and thread the needle down and up again to where you want the next flat stitch to start, pull the strand through. PICTURE 3: Skip your required distance and thread the needle down and up again to where you want the next flat stitch to start, pull the strand through. Continue like this until you have enough stitches. Fasten the strand on the wrong side. PICTURE 4: Flat stitches of different directions and lengths. |
Have you finished this pattern?
Tag your pictures with #dropspattern #dropswinterstale or submit them to the #dropsfan gallery.
Do you need help with this pattern?
You'll find 18 tutorial videos, a Comments/Questions area and more by visiting the pattern on garnstudio.com.
Have you purchased DROPS yarn to make this pattern? Then you are entitled to receive help from the store that sold you the yarn.
© 1982-2026 DROPS Design A/S. We reserve all rights. This document, including all its sub-sections, has copyrights. Read more about what you can do with our patterns at the bottom of each pattern on our site.