
Bee Buddies
#dropsbeebuddies

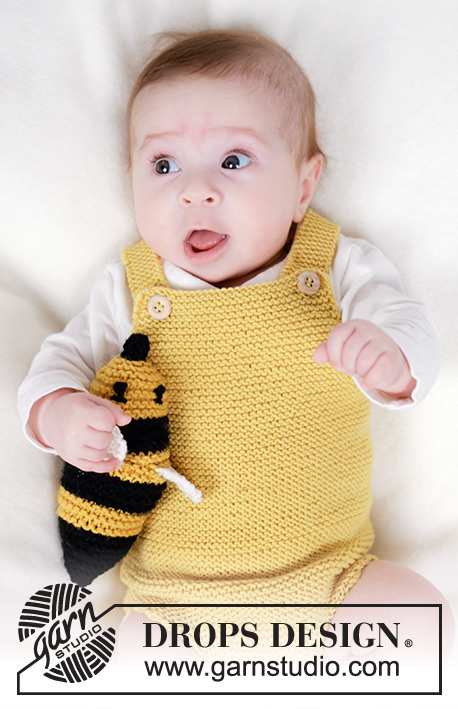
Knitted bee for babies and children in DROPS Merino Extra Fine. The piece is worked back and forth in garter stitch. Theme: Soft toys
DROPS Baby 46-19
DROPS Design: Pattern me-092-by
Yarn group B
-----------------------------------------------------------
SIZE:
Length: approx. 13 cm.
YARN:
DROPS MERINO EXTRA FINE from Garnstudio (belongs to yarn group B)
50 g colour 02, black
50 g colour 30, mustard
50 g colour 01, off white
One bee (with wadding) weighs approx. 25 g.
NEEDLES:
DROPS SINGLE POINTED OR DOUBLE POINTED NEEDLES SIZE 3.5 MM.
ACCESSORIES:
Wadding.
KNITTING TENSION:
22 stitches in width and 45 rows in height with garter stitch = 10 x 10 cm.
NOTE: Needle size is only a guide. If you get too many stitches on 10 cm, change to a larger needle size. If you get too few stitches on 10 cm, change to a smaller needle size.
-------------------------------------------------------
EXPLANATIONS FOR THE PATTERN:
-------------------------------------------------------
RIDGE/GARTER STITCH (worked back and forth):
Knit all rows.
1 ridge = knit 2 rows.
DIAGRAMS:
See diagrams A and B. The diagrams show how to work the embroidered stitches.
-------------------------------------------------------
START THE PIECE HERE:
-------------------------------------------------------
BEE – SHORT OVERVIEW OF THE PIECE:
The piece is worked back and forth with double pointed or with single pointed needles, from head to tail. The wings are worked as you go and can be positioned 3 or 5 stitches apart; use numbers in () if you want them to be 3 stitches apart.
BEE (front):
Cast on 10 stitches with needle size 3.5 mm and colour black DROPS Merino Extra Fine:
ROWS 1-4: Knit.
Change to colour mustard.
ROW 5: Knit.
ROW 6: * Knit 2, 1 yarn over *, work from *-* 3 more times, knit 2 = 14 stitches.
ROW 7: Knit; yarn overs knitted twisted to avoid holes.
ROW 8: * Knit 2, 1 yarn over *, work from *-* 5 more times, knit 2 = 20 stitches.
ROW 9: Knit; yarn overs knitted twisted to avoid holes.
ROW 10: *Knit 2, 1 yarn over *, work from *-* 8 more times, knit 2 = 29 stitches.
ROW 11: Knit; yarn overs knitted twisted to avoid holes.
ROWS 12-18: Knit.
Change to colour black.
ROWS 19-24: Knit.
Change to colour mustard.
ROWS 25-28: Knit.
ROW 29: On this rows the wings are worked: Knit 6 (7) with colour mustard. Continue as described below.
FIRST WING:
Knit the next 6 stitches with colour off white. Turn and knit 12 rows over these 6 stitches (6 ridges). After the last stitch on the last row, cast off these stitches (without turning) as follows: * Pass the next-to-last stitch over the last stitch *, repeat from *-* until all the stitches have been passed over. Cut the strand and pull it through the last stitch. Fold the wing towards you and knit up 1 stitch in each of the wing stitches, behind the wing, using colour mustard. Knit the next 5 (3) stitches (between the wings) in colour mustard.
SECOND WING:
Work the second wing in the same way as the first, over the next 6 stitches. When the wing is finished, knit up stitches with colour mustard in the same way as behind the first wing. Knit the last 6 (7) stitches on the row with colour mustard.
BEE (back):
ROW 30: Knit.
Change to colour black.
ROWS 31-36: Knit.
Change to colour mustard.
ROWS 37-42: Knit.
Change to colour black.
ROWS 43-48: Knit.
ROW 49: * Knit 1, knit 2 together *, work from *-* 8 more times, knit 2 = 20 stitches.
ROWS 50-52: Knit.
ROW 53: Knit 1, knit 2 together *, work from *-* 5 more times, knit 2 = 14 stitches.
ROWS 54-56: Knit.
ROW 57: Knit 1, knit 2 together *, work from *-* 3 more times, knit 2 = 10 stitches.
ROWS 58-59: Knit.
ROW 60: Cast off with knit.
EYES:
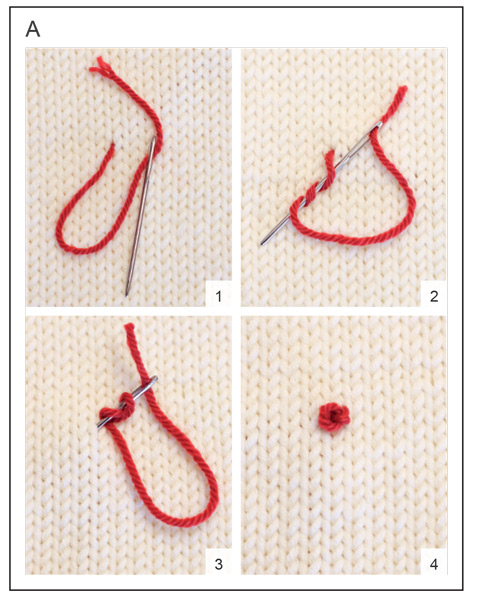
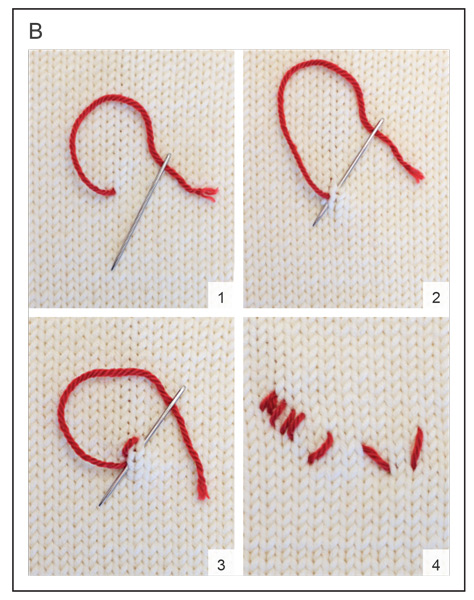
Embroider 2 eyes with colour black. Each eye is a French knot - see diagram A, and 1 flat stitch - see diagram B.
Start by embroidering the French knot, then a flat stitch of approx. 1 cm, horizontally over the French knot.
ASSEMBLY:
Use colour black and tack the strand through the stitches from the cast-off edge, tighten the strand and fasten well. Fold the piece and sew the seam underneath, in the outermost loop of the outermost stitch, filling with wadding as you go. Close the cast-on edge in the same way as the cast-off edge. In addition, tack around the first row of black and tighten the strand so the first 4 rows are contracted to form a «nose».
Diagram explanations
 |
= | French knot, Pictures 1-4 PICTURE 1: Insert the needle from the wrong side and up to the right side where you would like the French knot to be positioned. PICTURE 2: Wind the strand around the end of the needle 2 to 4 times – depending on how big you wish the knot to be. PICTURE 3: Thread the needle down, 0.5-1 stitches away from where the strand came up and pull it out on the wrong side. PICTURE 4: Pulling the strand through the material fastens the French knot. Fasten the strand on the wrong side. |
 |
= | Flat stitch, Pictures 1-4 PICTURE 1: Insert the needle from the wrong side to the right side, where you wish the stitch to start. PICTURE 2: Skip 0.5 - 1 cm and thread the needle down and up again to where you want the next flat stitch to start, pull the strand through. PICTURE 3: Skip 0.5 - 1 cm and thread the needle down and up again to where you want the next flat stitch to start, pull the strand through. Continue like this until you have enough stitches. Fasten the strand on the wrong side. PICTURE 4: Flat stitches of different lengths and in different directions. |
Have you finished this pattern?
Tag your pictures with #dropspattern #dropsbeebuddies or submit them to the #dropsfan gallery.
Do you need help with this pattern?
You'll find 13 tutorial videos, a Comments/Questions area and more by visiting the pattern on garnstudio.com.
Have you purchased DROPS yarn to make this pattern? Then you are entitled to receive help from the store that sold you the yarn.
© 1982-2026 DROPS Design A/S. We reserve all rights. This document, including all its sub-sections, has copyrights. Read more about what you can do with our patterns at the bottom of each pattern on our site.