
Spring Parade Cardigan
#springparadecardigan
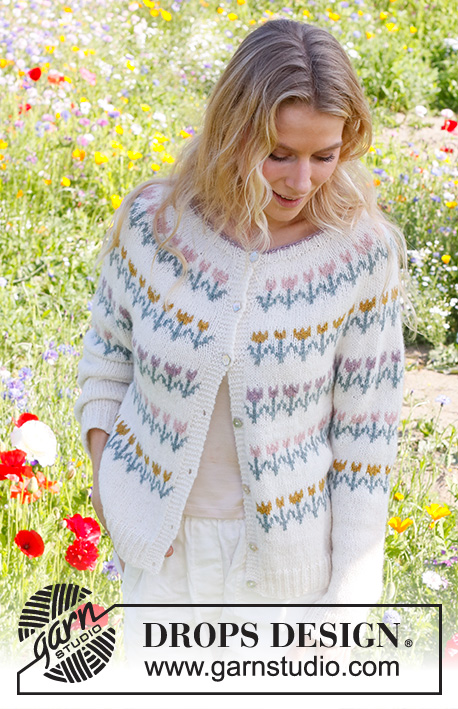
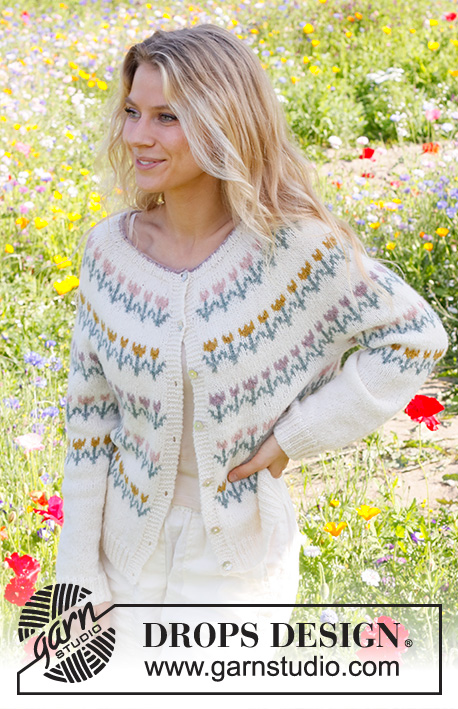
Knitted jacket in DROPS Sky. The piece is worked top down with round yoke, flowers/folklore pattern. Sizes S - XXXL.
DROPS 230-7
DROPS Design: Pattern sk-167
Yarn group B
-------------------------------------------------------
SIZES:
S - M - L - XL - XXL - XXXL
MATERIALS:
DROPS SKY from Garnstudio (belongs to yarn group B)
200-250-250-300-300-350 g colour 01, white
50-50-50-50-50-50 g colour 07, light sea green
50-50-50-50-50-50 g colour 08, dusty violet
50-50-50-50-50-50 g colour 14, unicorn
50-50-50-50-50-50 g colour 17, curry
DROPS BUTTONS NO 521: 7-7-8-8-8-8 items.
NEEDLES:
DROPS CIRCULAR NEEDLE SIZE 4 MM: Length 40 cm and 80 cm.
DROPS CIRCULAR NEEDLE SIZE 3 MM: Length 80 cm.
DROPS DOUBLE POINTED NEEDLES SIZE 4 MM.
DROPS DOUBLE POINTED NEEDLES SIZE 3 MM.
The technique MAGIC LOOP can be used – you then only need circular needle of 80 cm in each size.
KNITTING TENSION:
21 stitches in width and 28 rows in height with stocking stitch = 10 x 10 cm.
NOTE: Needle size is only a guide. If you get too many stitches on 10 cm, change to a larger needle size. If you get too few stitches on 10 cm, change to a smaller needle size.
-------------------------------------------------------
EXPLANATIONS FOR THE PATTERN:
-------------------------------------------------------
RIDGE/GARTER STITCH (worked back and forth):
Knit all rows.
1 ridge = knit 2 rows.
PATTERN:
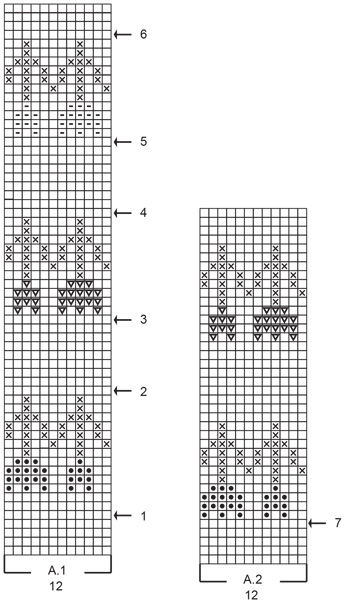
See diagrams A.1 and A.2. The diagrams are worked in stocking stitch.
INCREASE TIP-1 (evenly spaced):
To work out how to increase evenly, count the total number of stitches on the needle (e.g. 115 stitches) minus the bands (e.g. 12 stitches) and divide the remaining stitches by the number of increases to be made (e.g. 42) = 2.4.
In this example, increase by making 1 yarn over after alternately each 2nd and 3rd stitch. Do not increase over the bands. On the next row purl the yarn overs twisted to avoid holes.
DECREASE TIP (for sleeves):
Decrease 1 stitch on either side of the marker as follows: Work until there are 3 stitches left before the marker, knit 2 together, knit 2 (marker sits between these 2 stitches), slip 1 stitch as if to knit, knit 1 and pass the slipped stitch over the knitted stitch.
BUTTONHOLES:
Work buttonholes on the right band (when the garment is worn). Work from the right side when there are 3 stitches left on the row as follows: Make 1 yarn over, knit 2 together and knit 1. On the next row, knit the yarn over to leave a hole.
The first buttonhole is worked when the rib on the neck measures approx. 1½-2 cm. Then work the other 6-6-7-7-7-7 buttonholes with approx. 7 cm between each one.
-------------------------------------------------------
START THE PIECE HERE:
-------------------------------------------------------
JACKET – SHORT OVERVIEW OF THE PIECE.
The neck and yoke are worked back and forth with circular needle, from mid front and top down. The yoke is divided for body and sleeves and the body continued back and forth with circular needle. The sleeves are worked in the round with double pointed needles/short circular needle.
NECK:
Cast on 112-115-121-124-133-136 stitches with circular needle size 3 mm and the colour dusty violet DROPS Sky. Purl 1 row from the wrong side. Change to colour white.
Work the next row from the right side as follows: 6 band stitches in GARTER STITCH – read description above, * knit 1, purl 2 *, work from *-* until there are 7 stitches left, knit 1 and 6 band stitches in garter stitch. Continue this rib for 3 cm. Remember the BUTTONHOLE on the right band – read description above. Insert 1 marker after the band at the beginning of the row; the yoke is measured from this marker!
YOKE:
Change to circular needle size 4 mm.
Knit 1 row from the right side where you increase 33-42-36-45-48-57 stitches evenly spaced – read INCREASE TIP = 145-157-157-169-181-193 stitches. Purl 1 row from the wrong side with 6 band stitches in garter stitch on each side.
Now work pattern, starting from the right side, as follows:
6 band stitches in garter stitch, A.1,11-12-12-13-14-15 times in width, work the first stitch in A.1 and 6 band stitches in garter stitch. REMEMBER THE KNITTING TENSION!
Increase evenly spaced on each row with an arrow in the diagram as follows (do not increase over the bands):
Arrow 1: Increase 36-36-48-36-48-48 stitches = 181-193-205-205-229-241 stitches.
A.1 is repeated 14-15-16-16-18-19 times in width.
Arrow 2: Increase 36-36-36-36-48-48 stitches = 217-229-241-241-277-289 stitches.
A.1 is worked 17-18-19-19-22-23 times in width.
Arrow 3: Increase 36-36-36-36-36-48 stitches = 253-265-277-277-313-337 stitches.
A.1 is worked 20-21-22-22-25-27 times in width.
Arrow 4: Increase 24-36-36-36-36-36 stitches = 277-301-313-313-349-373 stitches.
A.1 is worked 22-24-25-25-28-30 times in width.
Arrow 5: Increase 24-24-36-36-36-36 stitches = 301-325-349-349-385-409 stitches.
A.1 is worked 24-26-28-28-31-33 times in width.
Arrow 6: Increase 0-12-36-36-24-24 stitches = 301-337-385-385-409-433 stitches.
A.1 is worked 24-27-31-31-33-35 times in width.
When A.1 has been completed in height the yoke measures approx. 23 cm from the marker.
Now work pattern and AT THE SAME TIME divide for the body and sleeves. Read the next section before continuing!
PATTERN:
Work as follows: 6 band stitches in garter stitch, A.2, 24-27-31-31-33-35 times in width, work the first stitch in A.2 and 6 band stitches in garter stitch.
Increase evenly on the last increase-row as follows:
Arrow 7: Increase 0-0-0-0-12-12 stitches = 301-337-385-385-421-445 stitches.
A.2 is worked 24-27-31-31-34-36 times in width.
DIVIDE:
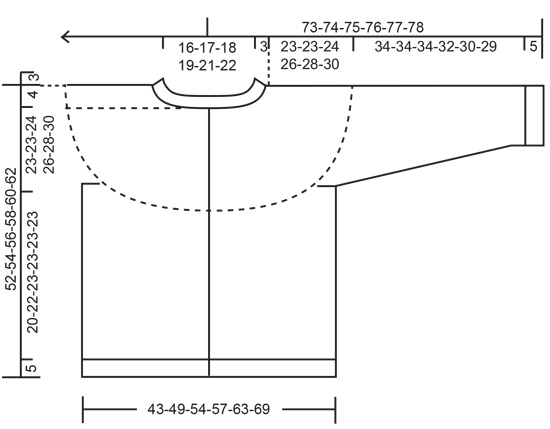
When the piece measures 23-23-24-26-28-30 cm from the neck, divide for the body and sleeves as follows:
Work 6 front band stitches in garter stitch, 42-48-54-54-60-66 stitches, slip the next 60-66-78-78-84-84 stitches on a thread for the sleeve, cast on 6-6-6-12-12-12 stitches under the sleeve, work 84-96-108-108-120-132 stitches, slip the next 60-66-78-78-84-84 stitches on a thread for the sleeve, cast on 6-6-6-12-12-12 stitches under the sleeve and work 43-49-55-55-61-67 stitches and 6 front band stitches in garter stitch.
The body and sleeves are finished separately.
BODY:
= 193-217-241-253-277-301 stitches. Continue A.2 with 6 band stitches in garter stitch on each side. When A.2 has been completed in height, repeat the first 0-0-0-16-16-16 rounds in A.2 one more time.
Now continue with colour white, stocking stitch and 6 band stitches in garter stitch on each side.
When the piece measures 20-22-23-23-23-23 cm from the division, purl 1 row from the wrong side where you increase 6-6-6-12-12-12 stitches evenly spaced (do not increase over the bands) = 199-223-247-265-289-313 stitches.
Change to circular needle size 3 mm and work rib as follows from the right side: 6 band stitches in garter stitch, * knit 1, purl 2 *, work from *-* until there are 7 stitches left, knit 1 and 6 band stitches in garter stitch. Work this rib for 5 cm. Cast off. The jacket measures approx. 52-54-56-58-60-62 cm from the shoulder down.
SLEEVES:
Place the 60-66-78-78-84-84 sleeve-stitches on the one side of the piece on short circular needle/double pointed needles size 4 mm and knit up 1 stitch in each of the 6-6-6-12-12-12 stitches cast on under the sleeve = 66-72-84-90-96-96 stitches. Insert a marker in the middle of the new stitches under the sleeve.
Now work pattern and decrease AT THE SAME TIME. Read the next section before continuing!
PATTERN:
Continue A.2. When A.2 has been completed in height, repeat the first 0-0-0-16-16-16 rounds in A.2 one more time.
Then work stocking stitch with colour white.
DECREASE:
When the sleeve measures 4 cm from the division, decrease 2 stitches under the sleeve – read DECREASE TIP. Decrease like this every 3-2½-1½-1½-1-1 cm a total of 8-10-15-17-19-18 times = 50-52-54-56-58-60 stitches.
Work until the sleeve measures 34-34-34-32-30-29 cm. Knit 1 round where you increase 4-2-3-1-2-0 stitches evenly spaced = 54-54-57-57-60-60 stitches. Change to double pointed needles size 3 mm and work rib (knit 1, purl 2) for 5 cm. Cast off. Work the other sleeve in the same way.
ASSEMBLY:
Sew the buttons onto the left band.
Diagram explanations
 |
= | white |
 |
= | light sea green |
 |
= | dusty violet |
 |
= | unicorn |
 |
= | curry |
 |
= | increase-row – read description in text |
Have you finished this pattern?
Tag your pictures with #dropspattern #springparadecardigan or submit them to the #dropsfan gallery.
Do you need help with this pattern?
You'll find 31 tutorial videos, a Comments/Questions area and more by visiting the pattern on garnstudio.com.
Have you purchased DROPS yarn to make this pattern? Then you are entitled to receive help from the store that sold you the yarn.
© 1982-2026 DROPS Design A/S. We reserve all rights. This document, including all its sub-sections, has copyrights. Read more about what you can do with our patterns at the bottom of each pattern on our site.