
Little Bee Cardigan
#littebeecardigan
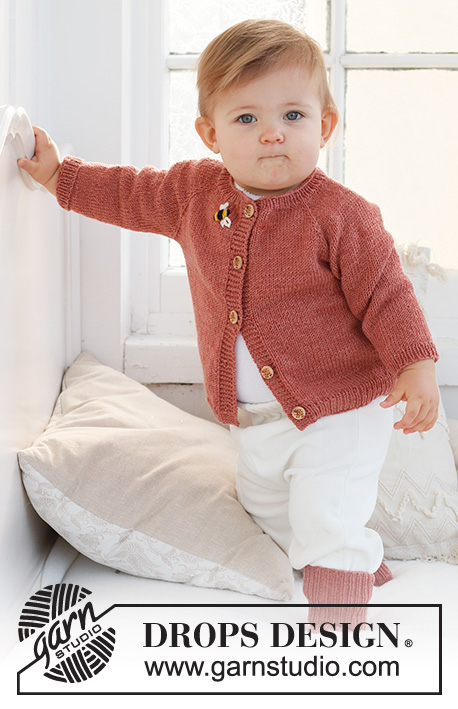
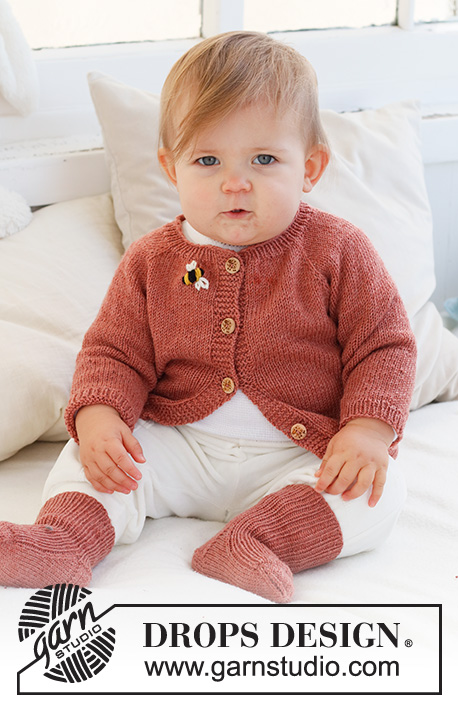
Knitted jacket for babies and children in DROPS BabyMerino. The piece is worked top down, with raglan and embroidered bee. Sizes 0 - 4 years.
DROPS Baby 42-4
DROPS Design: Pattern bm-129-by
Yarn group A
-----------------------------------------------------------
SIZES:
0/1 - 1/3 - 6/9 - 12/18 months (2 - 3/4) years
Child’s height in cm:
48/52 - 56/62 - 68/74 - 80/86 (92 - 98/104)
MATERIALS:
DROPS BABY MERINO from Garnstudio (belongs to yarn group A)
100-100-150-150 (150-150) g colour 48, blush
For the bee use left-over:
DROPS MERINO EXTRA FINE from Garnstudio (belongs to yarn group B)
colour 02, black
colour 30, mustard
colour 01, off white
DROPS BUTTONS NO 627: 5-5-5-5 (6-6) items.
NEEDLES:
DROPS CIRCULAR NEEDLE SIZE 3 MM: Length 80 cm.
DROPS CIRCULAR NEEDLE SIZE 2.5 MM: Length 80 cm.
DROPS DOUBLE POINTED NEEDLES SIZE 3 MM.
DROPS DOUBLE POINTED NEEDLES SIZE 2.5 MM.
The technique MAGIC LOOP can be used – you then only need circular needle of 80 cm in each size.
KNITTING TENSION:
24 stitches in width and 32 rows in height with stocking stitch = 10 x 10 cm.
NOTE: Needle size is only a guide. If you get too many stitches on 10 cm, change to a larger needle size. If you get too few stitches on 10 cm, change to a smaller needle size.
-------------------------------------------------------
EXPLANATIONS FOR THE PATTERN:
-------------------------------------------------------
RIDGE/GARTER STITCH (worked back and forth):
Knit all rows.
1 ridge = knit 2 rows.
RAGLAN:
All increases are worked from the right side!
Work to the marker-stitch, 1 yarn over, knit the marker-stitch, 1 yarn over. Increase like this at each marker-stitch (8 stitches increased). On the next row purl the yarn overs twisted to avoid holes. Then work the new stitches in stocking stitch.
DECREASE TIP (sleeves):
Decrease 1 stitch on either side of the marker as follows: Work until there are 3 stitches left before the marker, knit 2 together, knit 2 (marker sits between these 2 stitches), slip 1 stitch as if to knit, knit 1 and pass the slipped stitch over the knitted stitch.
BUTTONHOLES:
Work buttonholes on the right band (when the garment is worn). Work from the right side when there are 3 stitches left on the row as follows: Make 1 yarn over, knit 2 together and knit 1. On the next row, knit the yarn over to leave a hole.
The first buttonhole is worked when the neck measures 2 cm. Then work the other 4-4-4-4 (5-5) buttonholes with after 5-6-6½-7 (6½-7) cm between each one.
-------------------------------------------------------
START THE PIECE HERE:
-------------------------------------------------------
JACKET – SHORT OVERVIEW OF THE PIECE:
The yoke is worked back and forth with circular needle. It is divided for the body and sleeves and the body continued back and forth. The sleeves are worked in the round with double pointed needles.
NECK:
Cast on 75-81-85-91 (95-99) stitches with circular needle size 2.5 mm and DROPS Baby Merino.
Purl 1 row from the wrong side with 6 band stitches in GARTER STITCH on each side – read description above.
Then work rib as follows:
6 band stitches in garter stitch, * knit 1, purl 1 *, work from *-* until there are 7 stitches left, knit 1 and 6 band stitches in garter stitch.
When the rib measures 2 cm, change to circular needle size 3 mm. Insert 1 marker after the band at the beginning of the row, the yoke is measured from this marker!
YOKE:
Work the next row from the right side:
6 band stitches in garter stitch, knit 63-69-73-79 (83-87) and increase 9-11-7-13 (13-17) stitches evenly spread and 6 band stitches in garter stitch = 84-92-92-104 (108-116) stitches. Work the first BUTTONHOLE – read description above.
On the next row insert 4 markers as follows:
Work 6 band stitches in garter stitch, purl 11-13-13-16 (17-19), insert 1 marker in the next stitch, purl 12, insert 1 marker in the next stitch, purl 22-26-26-32 (34-38), insert 1 marker in the next stitch, purl 12, insert 1 marker in the next stitch, purl 11-13-13-16 (17-19) and 6 band stitches in garter stitch. Continue with stocking stitch and 6 band stitches in garter stitch on each side, increasing as follows:
On the next row from the right side increase 1 stitch on each side of all the markers – read RAGLAN! Increase like this every row from the right side 12-14-16-17 (18-19) times = 180-204-220-240 (252-268) stitches. REMEMBER THE KNITTING TENSION!
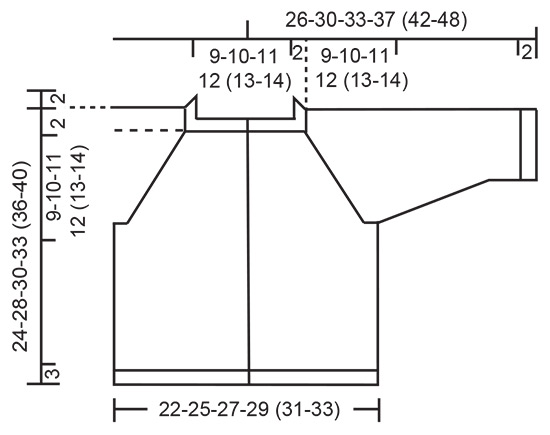
When the piece measures 9-10-11-12 (13-14) cm from the marker, divide for the body and sleeves as follows:
Work 6 band stitches in garter stitch, 23-27-29-32 (34-37) stitches in stocking stitch, place the next 38-42-46-50 (52-54) stitches on a thread for the sleeve, cast on 6 stitches, work 46-54-58-64 (68-74) stitches in stocking stitch, place the next 38-42-46-50 (52-54) stitches on a thread for the sleeve, cast on 6 stitches, work 23-27-29-32 (34-37) stitches in stocking stitch and 6 band stitches in garter stitch.
BODY:
= 116-132-140-152 (160-172) stitches.
Continue back and forth with stocking stitch and 6 band stitches in garter stitch on each side.
When the piece measures 10-13-14-16 (18-21) cm from the division, increase 13-13-15-15 (17-19) stitches evenly spaced on the next row from the right side (do not increase over the bands) = 129-145-155-167 (177-191) stitches.
Change to circular needle size 2.5 mm and work rib, starting from the wrong side as follows:
6 band stitches in garter stitch, * purl 1, knit 1 *, work from *-* until there are 7 stitches left, purl 1 and 6 band stitches in garter stitch.
Continue this rib for 3 cm. Cast off.
SLEEVES:
Place the 38-42-46-50 (52-54) stitches from the thread on the one side of the piece on double pointed needles size 3 mm and knit up 1 stitch in each of the 6 stitches cast on under the sleeve = 44-48-52-56 (58-60) stitches. Insert a marker in the middle of the new stitches under the sleeve. Start at the marker and work stocking stitch in the round.
When the sleeve measures 1 cm from the division, decrease 1 stitch on each side of the marker - read DECREASE TIP!
Decrease like this every 2½-2½-1½-2 (2-3) cm a total of 3-4-6-7 (7-7) times = 38-40-40-42 (44-46) stitches.
When the sleeve measures 8-11-12-15 (18-23) cm, increase 4-4-4-4 (6-6) stitches evenly spaced = 42-44-44-46 (50-52) stitches.
Change to double pointed needles size 2.5 mm and work rib (knit 1, purl 1) for 2 cm. Cast off.
Work the other sleeve in the same way.
BEE:
Embroider a bee on the right front piece – see photo.
The bee is worked with a single strand and flat stitch, the wings are worked with chain stitch.
BEE – BLACK STRIPES:
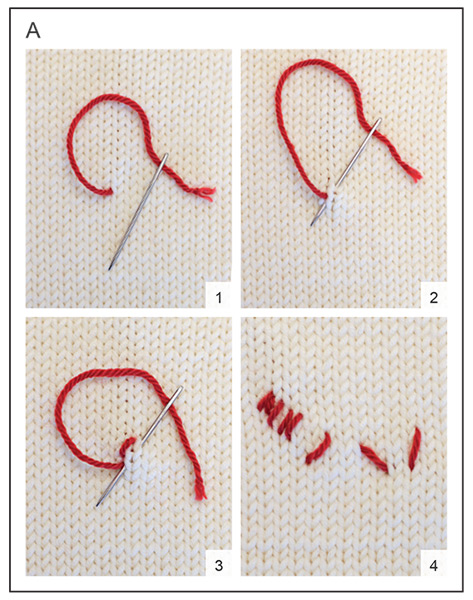
See diagram A and diagram explanations. Using black, start 3 cm below the neck and 4 cm from the band. Embroider 2 flat stitches, diagonally up to the right (towards the band), close together and 0.5 cm in length. Skip 0.5 cm diagonally up to the left and embroider 4 flat stitches close together and parallel to the first 2 stitches, 1 cm in length (= middle of body), skip 0.5 cm, work 2 flat stitches close together and parallel to the 4 stitches, 0.5 cm in length.
BEE – MUSTARD STRIPES:
Change to mustard. Embroider flat stitches between the black stripes - 4 stitches of the same length as the black stitches they are close to (2 mustard stripes).
BEE - WINGS:
Use colour off white; the wings consist of 2 chain stitches, both starting from the same hole.
Work as follows:
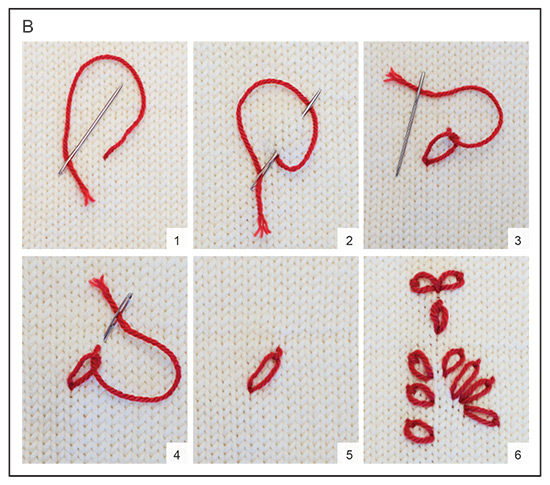
STITCH 1: Work 1 chain stitch, 1-1.5 cm in length from the middle of the bee - see diagram B and diagram explanations.
STITCH 2: Work 1 chain stitch, 1-1.5 cm in length, starting from the same place.
Embroider a set of wings on the other side of the bee.
ASSEMBLY:
Sew the buttons onto the left band.
Diagram explanations
 |
= | Flat stitch, Pictures 1-4 PICTURE 1: Insert the needle from the wrong side to the right side, where you wish the stitch to start. PICTURE 2: Skip 05 - 1 cm and thread the needle down and up again to where you want the next flat stitch to start, pull the strand through. PICTURE 3: Skip 0.5 - 1 cm and thread the needle down and up again to where you want the next flat stitch to start, pull the strand through. Continue like this until you have enough stitches. Fasten the strand on the wrong side. PICTURE 4: Flat stitches of different lengths and in different directions. |
 |
= | Chain stitch, single, Pictures 1-6. PICTURE 1: Insert the needle from the wrong side to the right side, where you want the stitch to start. PICTURE 2: Insert the needle through the same hole the strand came from, then up again to the right side 0,5-1.5 cm further forward – allow the strand to lie under the tip of the needle. PICTURE 3: Pull the needle through, creating a loop with the strand coming through this loop. PICTURE 4: Insert the needle down, 0.5 stitches in front of the loop and pull the strand through. PICTURE 5: The chain stitch is finished; if you want more stitches start from Picture 1 again. Fasten the strand on the wrong side. PICTURE 6: Various chain stitches embroidered vertically, horizontally and diagonally, some from the same hole, others from different holes. |
Have you finished this pattern?
Tag your pictures with #dropspattern #littebeecardigan or submit them to the #dropsfan gallery.
Do you need help with this pattern?
You'll find 31 tutorial videos, a Comments/Questions area and more by visiting the pattern on garnstudio.com.
Have you purchased DROPS yarn to make this pattern? Then you are entitled to receive help from the store that sold you the yarn.
© 1982-2026 DROPS Design A/S. We reserve all rights. This document, including all its sub-sections, has copyrights. Read more about what you can do with our patterns at the bottom of each pattern on our site.