
Hello Cinderella
#dropshellocinderellapumpkins

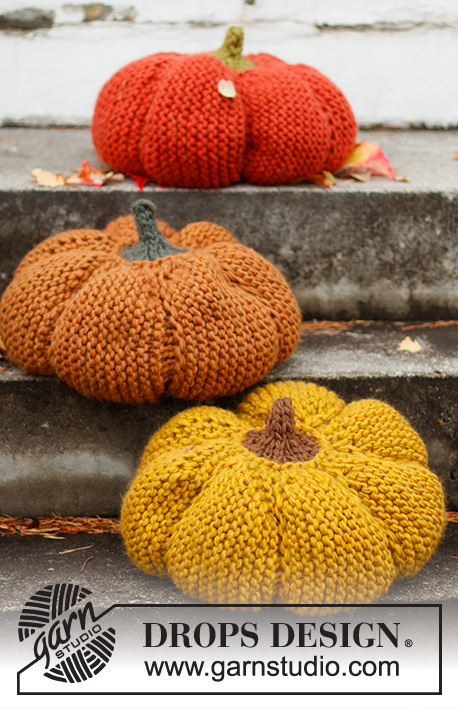
Knitted pumpkin pillow in 2 strands DROPS Snow. Theme: Halloween.
DROPS Extra 0-1540
DROPS design: Pattern ee-720
Yarn group E + E or F
----------------------------------------------------------
SIZE:
Pillow measures approx. 22 cm vertically and has a circumference of approx. 128 cm.
MATERIALS:
DROPS SNOW from Garnstudio (belongs to yarn group E)
450 g colour 07, orange
50 g colour 29, apple green
Or use:
450 g colour 86, copper
50 g colour 22, army
Or use:
450 g colour 85, curry
50 g colour 90, toffee
KNITTING TENSION:
8 stitches in width and 12 rows vertically in garter stitch and 2 strands = 10 x 10 cm.
NEEDLES:
DROPS CIRCULAR NEEDLE SIZE 12 mm: Length 60 or 80 cm for garter stitch.
Needle size is only a suggestion! If you have too many stitches on 10 cm switch to larger needles. If you have too few stitches on 10 cm switch to smaller needles.
ACCESSORIES: Some cotton wool for filling
----------------------------------------------------------
EXPLANATION FOR THE PATTERN:
----------------------------------------------------------
GARTER STITCH (back and forth):
Knit all rows.
1 ridge vertically = knit 2 rows.
PATTERN:
See diagram A.1. Diagrams show all rows in pattern seen from the right side.
TIP:
If you want a larger pumpkin cast on more stitches and work more rows vertically by doing as follows:
Cast on half the number of stitches on desired height of pumpkin (must be divisible by 2) + 1 edge stitch in each side (= 1st row in diagram). Cast on the extra stitches at the beginning and end of row. I.e. on first row with short rows from right side (= 5th row in diagram A.1) work until 11 stitches remain + the extra stitches you cast on, before working back from wrong side (= 6th row in diagram) until 6 stitches + the extra stitches you cast on remain. Work back and forth the same way as in diagram, but continue short rows until 7 stitches remain from right side and 2 stitches from wrong side before working over all stitches (= 15th row in diagram). Follow the same procedure until decrease row (= last row in diagram).
----------------------------------------------------------
START THE PIECE HERE:
----------------------------------------------------------
PUMPKIN PILLOW – SHORT SUMMARY OF PIECE:
Work piece back and forth on circular needle. Work the pillow sideways, then work the stem along one of the long sides. Work the entire piece in double yarn.
PUMPKIN PILLOW:
Cast on 18 stitches on circular needle size 12 mm with 2 strands colour orange, copper or curry. Work A.1 and REMEMBER THE KNITTING TENSION. Repeat A.1 until diagram has been worked 7 times in total vertically.
Cast off by knitting.
STEM:
Pick up stitches for stem in the side of pumpkin, pick up in the first stitch in A.1 seen from right side. Use 2 strands colour orange, copper or curry, begin from right side and pick up 28 stitches evenly in total along right edge (seen from right side in knitting direction). Turn and purl 1 row from wrong side.
Switch to 2 strands colour olive, army or toffee, and work in stocking stitch with 1 edge stitch in each side - AT THE SAME TIME as on first row from right side decrease 8 stitches evenly = 20 stitches. Then decrease 6 stitches evenly on the next 2 rows from right side = 8 stitches. On next row from wrong side decrease edge stitches in each side by purling 2 stitches together in each side = 6 stitches. Then work only from right side without cutting the yarn as follows: Knit 6, do not turn piece. Slide the stitches to the other end of needle to knit them again. Knit until stem measures approx. 8 cm from where the colour was changed. Let the yarn end be approx. 15 cm before cutting them (used for assembly), pull yarns through the last stitches. Tighten tog and fasten.
ASSEMBLY:
Sew stem together inside 1 edge stitch with colour olive, army or toffee. Fill the stem with some cotton wool.
Use colour orange, curry or copper and sew together the side of pumpkin (cast-on edge is sewn to cast-off edge), sew in front loop of outermost stitch.
Fill the pumpkin with some cotton wool - NOTE: Do not fill too much, but fill some cotton wool in each arch and some in the middle of pumpkin. Baste a yarn through the front loop of every stitch around the bottom, tighten together and fasten.
Diagram explanations
 |
= | knit from the right side, purl from the wrong side |
 |
= | knit from wrong side |
 |
= | 1 yarn over between 2 stitches, on next row knit yarn overs twisted to avoid holes |
 |
= | knit 2 together from wrong side |

Have you finished this pattern?
Tag your pictures with #dropspattern #dropshellocinderellapumpkins or submit them to the #dropsfan gallery.
Do you need help with this pattern?
You'll find 17 tutorial videos, a Comments/Questions area and more by visiting the pattern on garnstudio.com.
Have you purchased DROPS yarn to make this pattern? Then you are entitled to receive help from the store that sold you the yarn.
© 1982-2025 DROPS Design A/S. We reserve all rights. This document, including all its sub-sections, has copyrights. Read more about what you can do with our patterns at the bottom of each pattern on our site.