
May Flowers Vest
#mayflowersvest

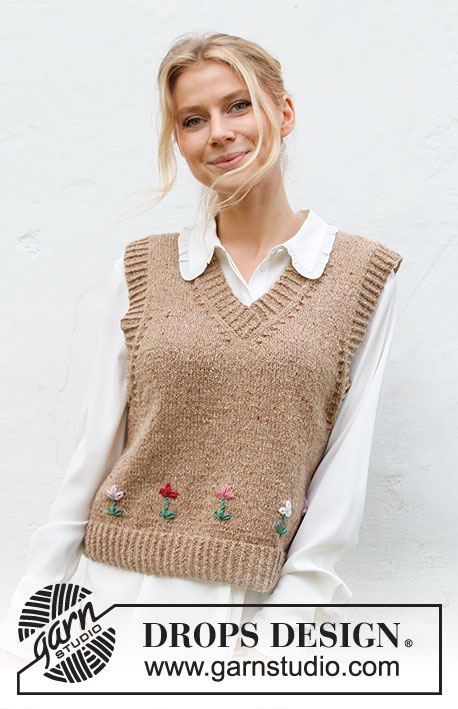
Knitted vest / slipover in DROPS Soft Tweed. The piece is worked with V-neck, ribbed edges and embroidered flowers. Sizes S - XXXL. Theme: Embroidery.
DROPS 222-42
DROPS Design: Pattern no st-002
Yarn group B
-------------------------------------------------------
SIZES:
S - M - L - XL - XXL - XXXL
The flowers measure 4.5 - 5 cm in height and approx. 2.5 cm in width.
MATERIALS:
DROPS SOFT TWEED from Garnstudio (belongs to yarn group B)
250-300-300-350-350-400 g colour 04, beige
For the flowers we have used:
DROPS MERINO EXTRA FINE from Garnstudio (belongs to yarn group B)
colour 31, forest green
colour 40, powder pink
colour 32, dark rose
colour 33, rose
colour 01, off white
colour 16, light pink
NEEDLES:
DROPS CIRCULAR NEEDLE SIZE 4.5 MM: Length 60-60-60-80-80-80 cm.
DROPS CIRCULAR NEEDLE SIZE 3.5 MM: Length 60 cm.
SEWING NEEDLE: For embroidery.
KNITTING TENSION:
20 stitches in width and 26 rows in height with stocking stitch = 10 x 10 cm.
NOTE: Needle size is only a guide. If you get too many stitches on 10 cm, change to a larger needle size. If you get too few stitches on 10 cm, change to a smaller needle size.
-------------------------------------------------------
EXPLANATIONS FOR THE PATTERN
-------------------------------------------------------
RIDGE/GARTER STITCH (worked back and forth):
Knit all rows.
1 ridge = knit 2 rows.
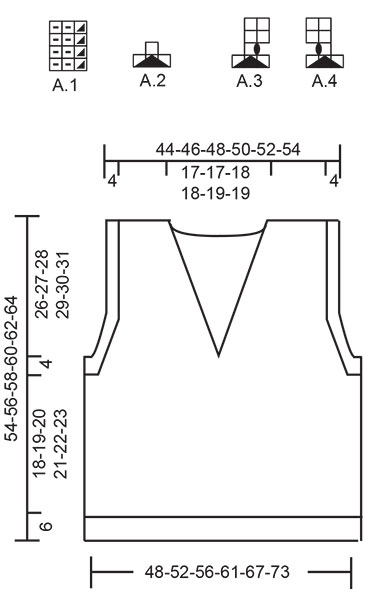
PATTERN:
See diagrams A.1 to A.4. The diagrams show all rows in the pattern from the right side.
DECREASE TIP-1 (evenly spaced):
To work out how to decrease evenly, count the total number of stitches on needle (e.g. 111 stitches) minus the edge stitches (e.g. 2 stitches) and divide the remaining stitches by the number of decreases to be made (e.g. 14) = 7.7.
In this example decrease by knitting together alternately each 6th and 7th stitch and each 7th and 8th stitch (approx.).
DECREASE TIP-2 (for armholes and V-neck):
All decreases are worked from the right side!
Decrease 2 stitches at the beginning of the row as follows: Work 1 edge stitch in garter stitch, 2 stitches in stocking stitch, A.2 over the next 3 stitches (= 2 stitches decreased).
Decrease 2 stitches at the end of the row as follows: Work until there are 6 stitches left, work A.2 over the next 3 stitches (= 2 stitches decreased), 2 stitches in stocking stitch, 1 edge stitch in garter stitch
Decrease 1 stitch at the beginning of the row as follows: Work 1 edge stitch in garter stitch, 2 stitches in stocking stitch, A.3 over the next 3 stitches (2 stitches decreased on the first row and 1 stitch increased on the second row in A.3 = 1 stitch decreased).
Decrease 1 stitch at the end of the row as follows: Work until there are 6 stitches left, A.4 over the next 3 stitches (2 stitches decreased on the first row and 1 stitch increased on the second row in A.4 = 1 stitch decreased), 2 stitches in stocking stitch, 1 edge stitch in garter stitch.
-------------------------------------------------------
START THE PIECE HERE:
-------------------------------------------------------
VEST – SHORT OVERVIEW OF THE PIECE:
The front and back pieces are worked back and forth on circular needles. The pieces is then sewn together. Edges are worked in the round on circular needles around the armholes, and the neck edge is worked back and forth on circular needle. When the whole vest is finished flowers are embroidered on the front piece.
BACK PIECE:
Cast on 111-120-129-141-153-168 stitches with circular needle size 3.5 mm and DROPS Soft Tweed. Work rib back and forth as follows:
1 edge stitch in GARTER STITCH – read description above, A.1 until there are 2 stitches left, work the first stitch in A.1 and 1 edge stitch in garter stitch. Continue this rib for 6 cm. Knit 1 row from the right side where you decrease 14-15-16-18-18-21 stitches evenly spaced – read DECREASE TIP-1 = 97-105-113-123-135-147 stitches.
Change to circular needle size 4.5 mm.
Purl 1 row from the wrong side (edge stitches are knitted). Continue with stocking stitch back and forth with 1 edge stitch in garter stitch on each side until the piece measures 24-25-26-27-28-29 cm. REMEMBER THE KNITTING TENSION!
At the beginning of the next 2 rows cast off 5-5-7-7-8-8 stitches for the armholes. Then decrease on each side as follows – read DECREASE TIP-2. Decrease 2 stitches as shown in A.2 every 4th row a total of 0-0-0-2-4-7 times, then decrease 1 stitch as shown in A.3/A.4 every 4th row 8-10-10-9-8-6 times (= 8-10-10-13-16-20 stitches decreased on each side) = 71-75-79-83-87-91 stitches.
Continue with stocking stitch and 1 edge stitch in garter stitch on each side. When the piece measures 52-54-56-58-60-62 cm, cast off the middle 31-31-33-33-35-35 stitches for the neck and each shoulder is finished separately. On the next row from the neck cast off 1 stitch = 19-21-22-24-25-27 stitches on the shoulder.
Continue with stocking stitch and 1 edge stitch in garter stitch on each side until the piece measures 30-31-32-33-34-35 cm from the bottom of the armhole. Cast off with knit (make sure the cast-off edge is not tight). The piece measures 54-56-58-60-62-64 cm from the shoulder down. Work the other shoulder in the same way.
FRONT PIECE:
Cast on 111-120-129-141-153-168 stitches with circular needle size 3.5 mm and DROPS Soft Tweed. Work rib back and forth as follows:
1 edge stitch in garter stitch, A.1 until there are 2 stitches left, work the first stitch in A.1, 1 edge stitch in garter stitch. Continue this rib for 6 cm. Knit 1 row from the right side where you decrease 14-15-16-18-18-21 stitches evenly spaced – read DECREASE TIP-1 = 97-105-113-123-135-147 stitches.
Change to circular needle size 4.5 mm.
Purl 1 row from the wrong side (edge stitches are knitted). Continue with stocking stitch back and forth with 1 edge stitch in garter stitch on each side until the piece measures 24-25-26-27-28-29 cm.
OVERVIEW OF THE NEXT SECTION:
You now decrease for the armholes and V-neck at the same time – read the next section before continuing.
ARMHOLES:
At the beginning of the next 2 rows cast off 5-5-7-7-8-8 stitches for the armholes. Then decrease stitches on each side as follows – remember DECREASE TIP-2. Decrease 2 stitches as shown in A.2 every 4th row 0-0-0-2-4-7 times, then decrease 1 stitch as shown in A.3/A.4 every 4th row 8-10-10-9-8-6 times = 8-10-10-13-16-20 stitches decreased on each side.
V-NECK:
When the piece measures 31-32-33-34-35-36 cm, cast off the middle stitch on the row and each shoulder is finished separately.
Right shoulder:
Continue back and forth and decrease for the neck at the beginning of each row from the right side (from the neck) – remember DECREASE TIP-2. Decrease 2 stitches as shown in A.2 every 4th row 4-4-4-4-4-4 times, then decrease 1 stitch as shown in A.3 every 4th row 8-8-9-9-10-10 times = 16-16-17-17-18-18 stitches decreased for the neck.
When all the decreases for the neck and armhole are finished there are 19-21-22-24-25-27 stitches on the shoulder. Continue with stocking stitch and 1 edge stitch in garter stitch on each side until the piece measures 30-31-32-33-34-35 cm from the bottom of the armhole. Cast off with knit (make sure the cast-off edge is not tight). The piece measures 54-56-58-60-62-64 cm from the shoulder down.
Left shoulder:
Continue back and forth and decrease for the neck at the end of each row from the right side (towards the neck) – remember DECREASE TIP-2. Decrease 2 stitches as shown in A.2 every 4th row 4-4-4-4-4-4 times, then decrease 1 stitch as shown in A.4 every 4th row 8-8-9-9-10-10 times = 16-16-17-17-18-18 stitches decreased for the neck.
When all the decreases for the neck and armhole are finished there are 19-21-22-24-25-27 stitches on the shoulder. Continue with stocking stitch and 1 edge stitch in garter stitch on each side until the piece measures 30-31-32-33-34-35 cm from the bottom of the armhole. Cast off with knit (make sure the cast-off edge is not tight). The piece measures 54-56-58-60-62-64 cm from the shoulder down.
ASSEMBLY:
Sew the shoulder seams with grafting stitches. Sew the side seams from the armholes down, inside the 1 edge stitch.
NECK:
Start from the bottom of the V-neck, use circular needle size 3.5 mm and DROPS Soft Tweed. Knit up from the right side 159 to 192 stitches inside the 1 edge stitch around the neck. The number of stitches should be divisible by 3.
Work pattern A.1 back and forth with 1 edge stitch in garter stitch on each side – make sure the pattern starts and finishes with the first stitch in A.1 inside the edge stitches, so the pattern is symmetrical on both sides.
Continue back and forth like this for 4 cm. Cast off with knit over knit and purl over purl.
Lay the right side of the neck on top of the left side mid-front. Sew the edge stitch neatly to the neck line. Repeat on the inside so the left side is sewn to the right side.
SLEEVE EDGES:
Start at the side seam under the sleeve with circular needle size 3.5 mm and DROPS Soft Tweed. Knit up from the right side 144 to 168 stitches inside the 1 edge stitch around the armhole. The number of stitches should be divisible by 3. Work A.1 in the round for 3½ to 4 cm. Work 1 more round but in the first 5-5-6-6-7-7 repetitions and the last 6-6-7-7-8-8 repetitions of A.1 under the sleeve, decrease all purl-2 to purl-1 by purling the 2 stitches together. This gives a neater finish to the bottom of the sleeve edge.
Cast off with knit over knit and purl over purl.
Work the other sleeve edge in the same way.
EMBROIDERING:
Flowers are embroidered at the bottom of the front piece. Place the flowers in a row approx. 2 cm above the rib and 8.5 – 9 cm between each one.
FLOWER – SHORT OVERVIEW OF THE PIECE:
The flower measures approx. 4,5 – 5 cm in height and approx. 2,5 cm in width.
The flower consists of 2 leaves at the bottom, 1 stem and 1 flower.
First embroider the leaves, then make the stem and finish with the flower itself. The hole flower is worked with twisted chain stitches and chain stitches.
LEAVES:
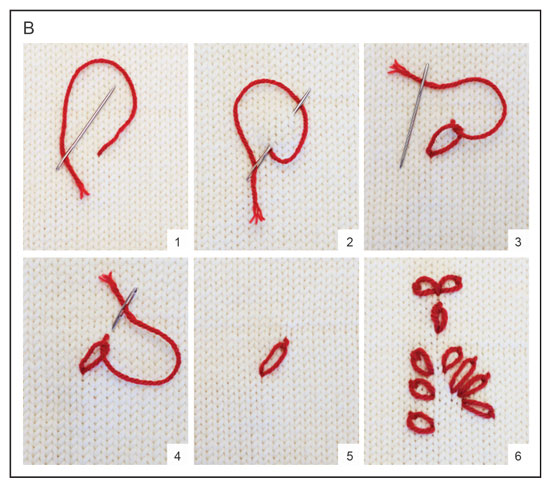
The leaves are embroidered with 1 strand colour forest green and consist of 2 chain stitches starting from the same hole at the bottom of the flower.
Start as follows:
STITCH 1: Work 1 chain stitch of approx. 2 cm in length, slightly diagonally up and to the right – see diagram B and diagram explanation.
STITCH 2: Work the second chain stitch from the same hole, slightly diagonally up and to the left. The leaves are finished.
STEM:
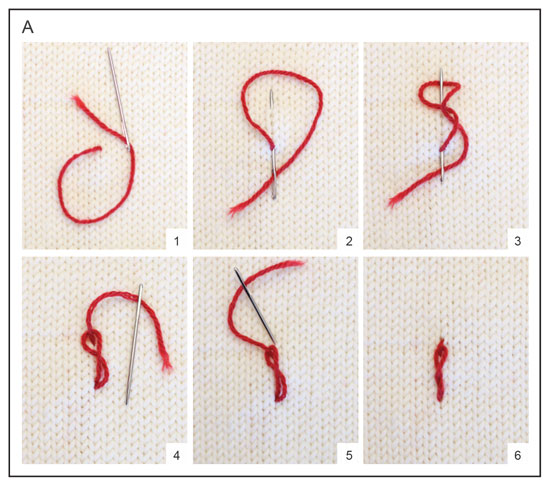
The stem is embroidered with 1 strand of colour forest green and consists of 2 twisted chain stitches in height.
Start from the same hole as the leaves started from and work 1 twisted chain stitch of approx. 1.5 cm straight up between the 2 leaves - see diagram A and the diagram explanation. Work 1 more stitch in height. The stem is finished. Cut and fasten the strand.
FLOWER:
Each flower is worked with 2 strands and chain stitch, each with a different colour: powder pink, dark rose, rose, off white and light pink. They consist of 3 chain stitches, all starting from the same hole where the stem finished.
Start as follows:
STITCH 1: Work a chain stitch of approx. 1.5 cm, slightly diagonally up to the right – see diagram B and diagram explanation.
STITCH 2: Work the second chain stitch from the same hole, slightly diagonally up to the left.
STITCH 3: Work the third chain stitch from the same hole but straight up between the other 2 stitches. The flower is finished. Cut and fasten the strand.
Work as many flowers as you wish, placing them as you feel is best.
Diagram explanations
 |
= | knit from right side, purl from wrong side |
 |
= | twisted right from right side, twisted purl from wrong side |
 |
= | purl from right side, knit from wrong side |
 |
= | purl 3 together (= 2 stitches decreased) |
 |
= | worked from the wrong side: 1 yarn over between 2 stitches, on the next row knit the yarn over twisted to avoid a hole |
 |
= | Twisted chain stitch, Pictures 1-6. PICTURE 1: Insert the needle from the wrong side and through to the right side where you would like the chain stitch to begin. PICTURE 2: Thread the needle down through the hole the strand came up through, then to the right side again approx. 2 cm further on – allow the strand to lie in a loop around the tip of the needle. PICTURE 3: Pick up the loop and twist it 2-3 times before laying it down again under the tip of the needle. PICTURE 4: Pull the strand through carefully, so the stitch is neat. If you want more stitches in height, repeat PICTURES 2 - 4. PICTURE 5: Thread the needle through the piece approx. 0.5 stitches in front of the loop and pull it through to the wrong side. Fasten the strand. PICTURE 6: The twisted chain stitch is finished. |
 |
= | Chain stitch, Pictures 1-6. PICTURE 1: Insert the needle from the wrong side and through to the right side where you would like the chain stitch to begin. PICTURE 2: Insert the needle down through the hole the strand came up through, then to the right side again approx. 2 cm further on – allow the strand to lie under the point of the needle. PICTURE 3: Now thread the needle through the piece and form a loop with the strand which comes up in the middle of the loop. PICTURE 4: Insert the needle into the piece approx. 0.5 stitches in front of the loop and pull it through the piece. PICTURE 5: The chain stitch is finished; if you want more stitches, start from Picture 1 again. Fasten the thread on the wrong side. |
Have you finished this pattern?
Tag your pictures with #dropspattern #mayflowersvest or submit them to the #dropsfan gallery.
Do you need help with this pattern?
You'll find 32 tutorial videos, a Comments/Questions area and more by visiting the pattern on garnstudio.com.
Have you purchased DROPS yarn to make this pattern? Then you are entitled to receive help from the store that sold you the yarn.
© 1982-2026 DROPS Design A/S. We reserve all rights. This document, including all its sub-sections, has copyrights. Read more about what you can do with our patterns at the bottom of each pattern on our site.