Kommentarer til DROPS 175-24
![]() Trine wrote:
Trine wrote:
Bindes vesten sammen foran eller hænger den løst?
15.10.2023 kl. 16:18:DROPS Design answered:
Hej Trine, Vi har lavet 2 snore midt foran, så man kan binde sammen hvis man vil :)
17.10.2023 kl. 15:41:
![]() Mesnier wrote:
Mesnier wrote:
Mais pourquoi ne voit on pas ce " coin" sur la photo en bas du gilet ? Merci
07.09.2023 kl. 13:14:DROPS Design answered:
Bonjour Mme Mesnier, ce n'est pas forcément important, le coin va se trouver côté bas du gilet, orientez-vous à l'aide des diagrammes et des indications précédentes pour bien vous repérer; n'hésitez pas à demander de l'aide à votre magasin ou via notre DROPS Workshop, ce sera peut-être ainsi plus facile à d'autres crocheteuses de pouvoir vois aider en voyant votre ouvrage. Bon crochet!
07.09.2023 kl. 17:00:
![]() Mesnier wrote:
Mesnier wrote:
J'aimerais simplement savoir SI LE COIN (2 brides 3 mailles 2 brides) se trouve EN HAUT ou EN BAS du gilet ? MErci
01.09.2023 kl. 18:15:DROPS Design answered:
Bonjour Mme Mesnier, si vous parlez de ce groupe crocheté dans A.4C, c'est alors bien en bas du devant (côté opposé à l'épaule). Bon crochet!
04.09.2023 kl. 09:23:
![]() Mesnier wrote:
Mesnier wrote:
Toujours moi, est-ce que le coin (2 brides 3 mailles en l'air 2 brides) se trouve en bas ou en haut du gilet ? J'ai fait les devants et le dos il y a un certain temps et je ne me souviens pas où j'ai terminé mon dernier rang ? Donc coin vers emmenchures ou en bas du gilet ? Cordialement
01.09.2023 kl. 12:28:DROPS Design answered:
Bonjour Mme Mesnier, parlez-vous de cette partie du diagramme de A.4C? Alors A.4c se trouve à gauche, vu sur l'endroit (pour le devant droit), autrement dit du côté opposé à celui où on va crocheter l'épaule. Bon crochet!
01.09.2023 kl. 15:34:
![]() Mesnier wrote:
Mesnier wrote:
Merci pour votre réponse mais j'aimerais savoir où se trouve le coin (2 brides 3 mailles en l'air 2 brides) par rapport à l'épaule ? Merci pour votre réponse Cordialement
31.08.2023 kl. 10:01:DROPS Design answered:
Bonjour Mme Mesnier, je ne suis pas bien sûre de comprendre votre question, vous avez d'abord crocheté un demi-cercle, en terminant soit par A.4 soit par A.5. Pour crocheter l'épaule, vous aller travailler uniquement les premières mailles de droite, vus sur l'endroit autrement dit, vous crochetez au-dessus du diagramme A.4A (en S/M) ou A.5A/B (en L/XL et XXLXXXL). Ai-je bien compris cette fois?
01.09.2023 kl. 08:28:
![]() Mesnier wrote:
Mesnier wrote:
Je suis perdue. Où faire les épaules ? Où placer le coin par rapport aux épaules ? Cordialement
29.08.2023 kl. 10:27:DROPS Design answered:
Bonjour Mme Mesnier, l'épaule se fait sur les premières brides de A.4/A.5, vu sur l'endroit, autrement dit, sur le côté droit du demi-cercle pour le devant droit. Bon crochet!
30.08.2023 kl. 07:38:
![]() Michelle Williamson wrote:
Michelle Williamson wrote:
Why does the stitches on the vest look different to the pattern and i think the pattern is slightly off i am counting the stitches on the pictures and they don't line up and i feel the beginning of A.1 and A.2 is off.
30.09.2022 kl. 11:32:DROPS Design answered:
Dear Mrs Williamson, A.1 is just showing how to start/end each round, then you will work A.2 a total of 4 times in the round - make sure you are reading the appropriate English pattern since UK and US crochet terms are different - maby it can help? Read more about crochet diagrams here. Happy crocheting!
30.09.2022 kl. 13:19:
![]() Ekaterina wrote:
Ekaterina wrote:
Dear Drops! Thank you for your prompt reply, but I still have problems with the shoulder. I understand that I have to replace the first tr with 3 chains but I don't understand where exactly the row begins. Should I count from the corner= 2tr+3ch +2tr or start the shoulder over 13 trebles and work A. 3A in the tr in stich from previous row?
27.05.2020 kl. 00:43:DROPS Design answered:
Dear Ekaterina, in the 2nd size you have to work a total of 13 sts in A.3A and A.3B, count the last 13 sts from the end of the previous row (from the left towards the right, seen from RS) and join yarn here, You will then have enough room to work: A.3A and repeat A.3B a total of 6 times in width. Hope this helps. Happy crocheting!
27.05.2020 kl. 08:55:
![]() Ekaterina wrote:
Ekaterina wrote:
Dear Drops! I need to specify the start of the shoulder- should I start A. 3A = 1 tr at the corner or at the 3 ch stitches after the corner? Should I work A. 3B over the last 13 tr?
25.05.2020 kl. 22:24:DROPS Design answered:
Dear Ekaterina, you have to replace the first tr with 3 chains (see info crochet), so that A.3A will be worked with 3 chains at the beg of the row and as 1 treble at the end of row from WS - A.3B will end with 1 tr from RS and start with 3 ch (instead of 1 tr) from WS. Happy crocheting!
26.05.2020 kl. 08:41:
![]() Ekaterina wrote:
Ekaterina wrote:
Thanks a lot for all your help.
25.05.2020 kl. 13:19:
![]() Ekaterina wrote:
Ekaterina wrote:
Dear Drops! I need your help again, this time I don' t understand how to crochet shoulder. Should I work only A. 3A, A. 3B and what about A. 3C? My front piece ends with a corner 2tr3ch st2tr, then 3 ch and 13 tr to the end. And the 1st row in diagrams show 1ch st, 2 tr in chain space. Please, help me to solve this problem.
23.05.2020 kl. 21:57:DROPS Design answered:
Dear Ekaterina, you should also start A.3 with A.3A and repeat A.3B over the last sts on the left side (end of rows from RS with A.4/A.5): count 5-6-7 times 2 sts (for each A.3B), then 1 more stitch for A.3A and start now with a.3A = 1 treble, and repeat A.3B (1 chain, skip 1 st, 1 treble). So that you have the correct number of sts: 11-13-15 sts. Happy crocheting!
25.05.2020 kl. 09:13:
![]() Ekaterina wrote:
Ekaterina wrote:
If I crochet left front piece the same way as right front piece, I will need to turn it to have half circle look to the centre. But in this case last row will be done on the WS.
22.05.2020 kl. 11:06:DROPS Design answered:
Dear Ekaterina, work the same way as on right front piece, then when crocheting shoulder, instead of working over the first stitches on the right side as for right front piece, you will now work over the last stitches on the left side (seen from RS). Happy crocheting!
22.05.2020 kl. 12:28:
![]() Ekaterina wrote:
Ekaterina wrote:
Dear Drops! Would you be so kind to help me with the following problem. I failed to crochet left front piece. How should I begin? Could you explain the first rows, thanks in advance.
21.05.2020 kl. 01:38:DROPS Design answered:
Dear Ekaterina, you start the same way but crochet then shoulder over the last stitches instead of the first stitches so that left front piece will be a mirrored image of the right front piece. Happy crocheting!
22.05.2020 kl. 09:07:
![]() AlmuSG wrote:
AlmuSG wrote:
Hola, No me queda claro cómo hay que proceder para realizar los aumentos del frente derecho. Cuando se refiere "Aumentar 0-6-6 puntos altos sobre A.4A (= 27-33-33 puntos altos)". ¿Hay que hacer los aumentos en la última vuelta? ¿cuántos puntos (0-6-6)? Agradecería una explicación más concreta. Gracias.
14.05.2020 kl. 18:57:DROPS Design answered:
Hola AlmySG, tu aumentas puntos en la última vuelta de los diagramas. Aumentar 0-6-6 puntos altos sobre A.4A depende de que talla haces (0 puntos en la talla S/M, 6 punos en las tallas L/XL y XXL/XXXL). Buen trabajo!
22.11.2020 kl. 20:17:
![]() Ekaterina wrote:
Ekaterina wrote:
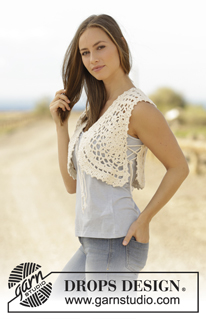
Dear Drops! What kind of yarn is used for the vest in the photo. It looks much thinner than Paris.
13.05.2020 kl. 22:47:DROPS Design answered:
Dear Ekaterina, the modell was made with Paris yarn. Happy Crafting!
14.05.2020 kl. 01:39:
![]() Marjon De Vries wrote:
Marjon De Vries wrote:
Ik mis telpatroon A1 en a2 van drops 175-24, deze zat niet bij het patroon en garen die ik besteld had, zou u de missende telpatroon alsnog kunnen sturen per mail, wil heel graag het mooie giletje haken. Groetjes Marjon
09.05.2020 kl. 17:56:DROPS Design answered:
Dag Marjon,
Je kunt de telpatronen afdrukken via de afdrukknop bij het patroon op de site. Hier vind je de afbeeling van A.1 en A.2.
13.05.2020 kl. 10:08: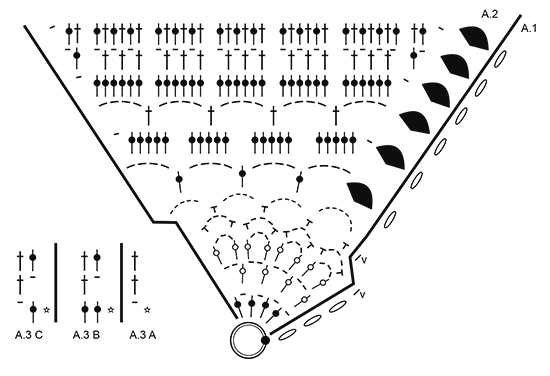
![]() Sylvie Plancher wrote:
Sylvie Plancher wrote:
Re bonjour, Excusez moi, j'ai bien compris que les côtés doivent être symétriques, mais je ne comprends toujours pas ce que veut dire "en sens inverse" pour un diagramme en demi cercle. par quoi dois-je commencer ? cordialement
22.04.2020 kl. 16:53:DROPS Design answered:
Bonjour Mme Plancher, vous crochetez le devant gauche comme le droit mais A.3 sera à gauche au lieu de à droite (vu sur l'endroit) pour que les deux demi-cercles soient symétriques et que les arrondis des demi-cercles soient face à face et l'épaule sur le côté "droit" du devant (= à droite sur le devant droit et à gauche sur le devant gauche). Bon crochet!
23.04.2020 kl. 10:19:
![]() Sylvie Plancher wrote:
Sylvie Plancher wrote:
Bonjour, j'ai réalisé le dos sans problème mais j'ai beaucoup de mal à décortiquer les diagrammes du devant. j'obtiens quelque chose d'informe et petit avec un bord intérieur absolument pas droit. les A4 ne sont pas tout à fait à la même échelle. Y a-t-il des diagrammes plus clair ? ou un moyen d’enchainer les diagrammes que je n'ai pas compris . Pour le côté gauche que signifie "en sens inverse " ? Je démarre par quoi ? cordialement
22.04.2020 kl. 16:23:DROPS Design answered:
Bonjour Mme Plancher, pour le devant droit, crochetez les diagrammes A.4A, A.4B,A.4C - vous devez avoir un demi-cercle (approx.). Crochetez ensuite quelques rangs supplémentaires avec A.5 si besoin. Pour former l'épaule: A.3A + 5 à 7 fois A.3B au-dessus du côté droit de A.4/A.5. Le devant gauche se fait en sens inverse pour que les 2 devants soient symétriques. (L'échelle des diagrammes ne change rien à la façon des les faire). En cas de doute, n'hésitez pas à montrer votre ouvrage à votre magasin - même une photo par mail - ce sera plus facile pour eux de pouvoir vous assister en voyant ce que vous avez fait. Bon crochet!
22.04.2020 kl. 16:43:
![]() Ashlee wrote:
Ashlee wrote:
How do you work the left front side backwards? do you still work a4a, a4b and then a4c but from right to left or do you work a4c, a4b, a4a from left to right or vice versa? seems like whatever combination i use it just isnt possible? I dont understand why you make these patterns so difficult to follow, even for an expert!!
23.02.2020 kl. 00:11:DROPS Design answered:
Dear Ashlee, you will work A.4 A, B & C the same way, but you will work the shoulders over the last stitches instead of the first stitches so that left front piece will be a mirrored image from the right front piece. Happy crocheting!
24.02.2020 kl. 08:51:
![]() RENAUT Mathilde wrote:
RENAUT Mathilde wrote:
A propos de ce modèle, vous parlez du diagramme A2 pour le dos et il est introuvable dans la liste des diagrammes ou alors il y a quelque chose que je n\'ai pas compris. Merci de me répondre sur mon nouvel email ci-dessous.
27.08.2019 kl. 12:45:DROPS Design answered:
Bonjour Mme Renaut, le diagramme A.2 se trouve juste sous la légende des symboles des diagrammes. Bon crochet!
27.08.2019 kl. 15:57:
![]() Manuela Bohn wrote:
Manuela Bohn wrote:
Ich bin ja soo froh endlich eine kompotente Anleitung gefunden zu haben, Bin richtig überwältigt lege gleich los...danke..danke. Mit freundlichen grüßen Ihre Manuela
24.06.2019 kl. 13:20:
![]() Elizabeth wrote:
Elizabeth wrote:
Hi, I am stuck please help, I completed diagram A4A, but can’t see how to follow on with A4B and A4C , they all seem to be starting at the same point and no logical follow on? also at the end of A4A my treble count is 52 working size S/M and not 27 as per the pattern. Can’t figure this one out as I have a half circle . Please help.
19.05.2019 kl. 11:50:DROPS Design answered:
Dear Elisabeth, when you work A.4 you are supposed to work seen from RS: A.4A, then A.4B and finish with A.4C - read more how to read several diagrams consecutively on the row here. Happy crocheting!
20.05.2019 kl. 14:10:
![]() Alisa Gannon wrote:
Alisa Gannon wrote:
I love this vest. Is it possible to reduce the size to a girl's 12? So hard to find a good kids vest pattern but your adult ones are gorgeous!
14.01.2019 kl. 15:26:DROPS Design answered:
Dear Mrs Gannon, we are unfortunately not able to adjust every pattern to each individual request. However you can check the measurement from chart and adjust following your tension to the desired measurements. Your DROPS store may assist you if required, even per mail or telephone. Happy crocheting!
14.01.2019 kl. 17:40:
![]() Astrid wrote:
Astrid wrote:
Zur Anleitung Drops 175-24 habe ich folgende Frage. Beim Vorderteil steht, dass in der letzten Reihe der Diagramme Stäbchen zugenommen werden sollen. Wie ist das zu verstehen? Zum Beispiel in A.4A steht 0-6-6. Sind die wirklich alle in einer Reihe zu verteilen oder in 3 Reihen mit je 0, 6 und 6 Stäbchen. Und wenn alle in einer Reihe zugenommen werden, wie werden sie dann verteilt? Für eine kurzfristige Antwort wäre ich sehr dankbar, damit ich gleich weiter machen kann. Danke.
20.06.2018 kl. 21:28:DROPS Design answered:
Liebe Astrid, alle diese Zunahmen sind bei der letzten Reihe (= alle in einer Reihe) regelmäßig verteilt zu häkeln - siehe 21.06.2018 kl. 08:08:
![]() Tamara Stockbauer wrote:
Tamara Stockbauer wrote:
Anleitung Bonita von Drops Design, 175-24\\\\\\\\\r\nHallo, wo muss ich bei der Schulter anfangen? Das müsste ja über die ersten Stäbchen sein bevor das Eck los geht. Mich verwirrt nur die Vorzeile (mit * markiert). Da wird nämlich eine Luftmasche angezeigt, es sind aber nur Stäbchen. Und zwar 13 Stück, lt. Muster von der Schulter werden es nur 11. Oder beginnt man da genau dazwischen, dass quasi die erste und letzte Masche ausgelassen werden? Vielen Dank
13.03.2018 kl. 22:16:
![]() Tamara Stockbauer wrote:
Tamara Stockbauer wrote:
Anleitung Bonita von Drops Design, 175-24\\\\\\\\r\\\\\\\\n\\r\\nHallo, ich habe eine Frage zum Vorderteil. Werden da bei der dritt letzten Reihe vom Diagramm A.4A, A.4B und A.4C wirklich die Stäbchen in die Maschen gehäkelt nicht um den Maschenbogen? Es sind nämlich 5 Stäbchen (oder 5 Doppelstäbchen bei A.4B) für 6 Luftmaschen. Vielen Dank für Ihre Hilfe :-)
13.03.2018 kl. 22:13:DROPS Design answered:
Liebe Frau Stockbauer, Ihren Hinweis wird unserer Designteam weiterleitet. Ich würde auch diese 5 Stäbchen um den Maschenbogen häkeln (dh wie beim 6. und 8. Reihe in A.2). Viel Spaß beim häkeln!
14.03.2018 kl. 09:21:
![]() Tamara Stockbauer wrote:
Tamara Stockbauer wrote:
Anleitung Bonita von Drops Design, 175-24\\r\\nHallo, ich habe eine Frage zum Vorderteil. Werden da bei der dritt letzten Reihe vom Diagramm A.4A, A.4B und A.4C wirklich die Stäbchen in die Maschen gehäkelt nicht um den Maschenbogen? Es sind nämlich 5 Stäbchen (oder 5 Doppelstäbchen bei A.4B) für 6 Luftmaschen.wVielen Dank für Ihre Hilfe :-)
13.03.2018 kl. 22:10:
![]() Gwyn Milton-Taylor wrote:
Gwyn Milton-Taylor wrote:
Thank you Deidre - I understand, but are you including the chain 3 as the 16th DC?
08.07.2017 kl. 14:38:DROPS Design answered:
Hello again Gwyn, No, the 3 chain stitches are just the start and the finish of the round (A1), the 16 double crochets are A2, Deirdre
09.07.2017 kl. 12:49:
![]() Gwyn Milton-Taylor wrote:
Gwyn Milton-Taylor wrote:
I am sorry - in my original message I am referring to chart A.1..thank you!
08.07.2017 kl. 02:16:
![]() Gwyn Milton-Taylor wrote:
Gwyn Milton-Taylor wrote:
Hi there! In the first round of A.2, are there a total of 15 double crochets plus the chain 3 - for a total of 16 DC. In looking at the diagram, if you repeat 4 times and include the chain 3 (which counts as a double crochet) you would have a total of 17 DC. I would imagine you wouldn't want an odd number of stitches in forming a square...thank you for your advise!
08.07.2017 kl. 02:12:DROPS Design answered:
Hi Gwyn, There should be 16 double crochets. The 3 chain stitches are to start the round with and then you end the round with 1 slip stitch in the 3rd chain stitch. I hope this helps. Kind regards, Deirdre.
08.07.2017 kl. 11:57:
![]() Anita wrote:
Anita wrote:
In het voorpand zit in tekening A4c een hoek. Zit deze aan de boven- of onderkant van het voorpand. Dit is mij niet echt duidelijk en ook op de foto kan ik deze hoek niet zien.
06.07.2017 kl. 23:29:DROPS Design answered:
Hoi Anita, A.4a zit aan de onderkant van het voorpand; A.4c zit aan de bovenkant, dus die hoek zit inderdaad aan de bovenkant.
07.07.2017 kl. 09:29:
![]() Paula Brindley wrote:
Paula Brindley wrote:
Is it possible to put the instructions in English (US) terms for the referring to see charts? I don't read charts !! When downloaded in English (US) they (the charts are not included anyway, but neither are the English US instructions) Several of people like and want to create this but are at a stand still. Thank you, I have done other patterns from you and they had the English instructions complete.
23.04.2017 kl. 17:37:DROPS Design answered:
Dear Mrs Brindley, you will find at the bottom of the page, just above the diagrams all symbols with matching text in US-English. Happy crocheting!
24.04.2017 kl. 10:20:
![]() Vanessa wrote:
Vanessa wrote:
Bonjour, je n'arrive pas a comprendre comment fait l'épaule et comment faire le coter gauche. (A4C, A4B, A4A au lieu de A4A, A4B, A4C?)
20.03.2017 kl. 23:01:DROPS Design answered:
Bonjour Vanessa, le devant gauche se commence comme le devant droit: A.4A, A.4B, A.4C mais pour l'épaule, crochetez A.3 à gauche au lieu de à droite (vu sur l'endroit) pour que les 2 demi-cercles soient symétriques et que les arrondis des demi-cercles soient face à face et l'épaule sur le côté "droit" du devant (= à droite sur le devant droit et à gauche sur le devant gauche). Bon crochet!
21.03.2017 kl. 09:38:
![]() Regina wrote:
Regina wrote:
Mij is totaal niet duidelijk hoe ik verder moet bij de schouder in maat s/m. Aan de goede kant beginnen komt in patroon niet uit met de getekende toer die al gehaakt is.
27.02.2017 kl. 20:44:DROPS Design answered:
Hoi Regina. Je moet stk heen en weer haken over de goede kant van A.4. Je begint met 2e rij van de telpatronen en haakt A.3A: 1 stk in losse van de 1e rij, dan A.3B (1 l, 1 stk) over de 2 stk van de 1e rij. Je herhaalt dit 5 keer (dus je hebt 5x 1 l, 1 stk en je hebt over 10 stk gehaakt) Dan keer je het werk en haak de laatste (3e rij) terug. Herhaal nu deze 2 rijen nog 3 keer = schouder.
01.03.2017 kl. 16:22:
![]() Eva wrote:
Eva wrote:
Ich bin immer wieder faziniert von den Modellen. Dieses möchte ich lieber heute als morgen arbeiten. Ich hoffe die Anleitung ist schnell zur Verfügung.
26.01.2017 kl. 13:29:Valeria wrote:
Hello, I'm Valeria, from Argentina. I love this pattern, please include!!!
25.01.2017 kl. 00:53:
![]() LINDA HANSEN wrote:
LINDA HANSEN wrote:
WANT TO MAKE!!! PLEASE INCLUDE!
17.01.2017 kl. 19:08:
![]() Nancy C Covington wrote:
Nancy C Covington wrote:
I just love this!
30.12.2016 kl. 19:08:
![]() " Wonderful Dream " wrote:
" Wonderful Dream " wrote:
Einfach und doch schick.
18.12.2016 kl. 02:13:
![]() Lauren McRoberts wrote:
Lauren McRoberts wrote:
Beautiful! Please include.
14.12.2016 kl. 14:45:Kommentere opskrift DROPS 175-24
Vi vil gerne høre din mening om denne model!
Hvis du ønsker at stille et spørgsmål, så husk at vælge rigtig kategori i menuen under - det vil give dig hurtigere svar.
Din mailadresse vil ikke synes. Obligatoriske felter er markeret med *.
Je suis complètement perdue... où et comment faire les épaules ? Où placer le \"coin\" par rapport aux épaules ?\r\nMerci pour votre réponse.\r\nCordialement
29.08.2023 kl. 10:23: