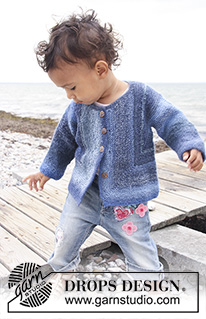
Kommentarer til DROPS Baby 20-15
![]() Latri wrote:
Latri wrote:
Bonjour , il s'agit des augmentations , A combien du bort ?
14.04.2024 kl. 17:49:DROPS Design answered:
Bonjour Mme Latri, les augmentations du devant se font de chaque côté de la maille avec le marqueur, autrement dit, le marqueur doit toujours rester dans cette maille et le nombre de mailles avant/après cette maille avec un marqueur va augmenter - cf diagonale dans le schéma. Bon tricot!
15.04.2024 kl. 08:21:
![]() Franca wrote:
Franca wrote:
Questo modello si può fare per una misura da adulto?
08.01.2024 kl. 22:35:DROPS Design answered:
Buongiorno Franca, questo modello è stato pensato per taglie da bambino, sul nostro sito può trovare tantissime ispirazioni gratuite per modelli da adulto. Buon lavoro!
09.01.2024 kl. 16:23:
![]() Raymonde wrote:
Raymonde wrote:
Bonjour, une question concernant boutonnières combien de rangs y a t-il après les boutonnières? Moi j ai plus de 20 rangs après
08.11.2023 kl. 22:07:DROPS Design answered:
Bonjour Raymonde, vous ne devez pas avoir autant de rangs après les boutonnières, les boutonnières sont faites à 14-15-17 (18-19-20) cm - mesurés le long du bas du devant et le devant mesure 16-17-19 (20-21-22) cm (cf schéma). Bon tricot!
09.11.2023 kl. 08:27:
![]() Brigitte Svec wrote:
Brigitte Svec wrote:
Wenn ich nach dem Ärmel die Maschen zunehme, auf welcher Seite und. immer 2? Liebe Grüße Brigitte
13.05.2023 kl. 22:53:DROPS Design answered:
Liebe Brigitte, nach dem Ärmel werden die neuen Maschen am Ende einer Hinreihe für das Rückenteil angeschlagen; stricken Sie dann die Rückreihe. Setzen Sie jetzt eine Markierung in die 2. Maschen der nächsten Hinreihe und jetzt werden Sie beidseitig von dieser Maschen für das Vorderteil zunehmen (die Masche mit der gestrichen Linien). Viel Spaß beim stricken!
15.05.2023 kl. 08:40:
![]() Bits wrote:
Bits wrote:
Hallo und schönen Abend, Nehme ich beim Rumpfteil immer vor und nach der vorletzten Masche zu, oder immer dort wo ich als erstes den Markierer eingesetzt habe? Vielen Dank und liebe Grüße aus Wien. Brigitte
12.05.2023 kl. 22:52:
![]() Ingrid Grange wrote:
Ingrid Grange wrote:
Hej! När ökningarna på varje sida maskmarkören gjorts på FRAM BAKSTYCKE och man går över till att enbart sticka maskorna på vänster sida, hur många maskor totalt ska det då vara på stickan i storlek 12/18 mån? Hälsningar, Ingrid
03.05.2023 kl. 06:47:DROPS Design answered:
Hej Ingrid, du har 58 m, slår 50 masker op til ryggen, økar 2 m på vartannant varv (totalt 46 gg på framstycket) men når arb måler 10,5 cm (enligt stickfastheten har du 48v på 10 cm) har du ökat ca 25 ggr x 2 m så ca 52 m på framstycket :)
09.05.2023 kl. 10:14:
![]() Gerda Verheecke wrote:
Gerda Verheecke wrote:
Is dit patroon ook beschikbaar voor volwassenen?
05.03.2023 kl. 16:58:DROPS Design answered:
Dag Gerda,
Nee, helaas is dit patroon er alleen voor babymaten.
Misschien kun je wel iets vinden als je zoekt op damesvesten in DROPS Delight.
08.03.2023 kl. 12:56:
![]() Fabienne Estadieu wrote:
Fabienne Estadieu wrote:
Bonjour Tous les tutos que vous publiez en rapport aux jetés sont sur du jersey donc rang suivant envers mais dans ce modèle au point mousse comment tricoter le jeté torse ? Nous tenons notre fil de la main droite ce qui augmente la difficulté pour les tutos ! J’aimerais vraiment tricoter ce modèle mais les jetés me résistent !
30.01.2023 kl. 12:41:DROPS Design answered:
Bonjour Mme Estadieu, tricotez le jeté dans le brin arrière (donc pas le brin face à vous mais celui qui se trouve plutôt de l'autre côté de l'aiguille) et tricotez simplement à l'endroit, ce qui va donner l'effet "torse" est de le tricoter dans le brin arrière - quand vous regardez les vidéos, suivez le fil par rapport à l'aiguille, ce sera la même chose, quelle que soit la main avec laquelle vous tenez votre fil. Bon tricot!
30.01.2023 kl. 15:58:
![]() Angela Vigelahn wrote:
Angela Vigelahn wrote:
Ich möchte die Jacke in Größe 3-4-Jahre stricken, aber MIT KAPUZE. Wie stricke ich die, wenn ich da auch gerne einen " Zacken " drin haben möchte? Danke Angela
15.01.2023 kl. 21:44:DROPS Design answered:
Liebe Frau Vigelahn, leider können wir nicht jede Anleitung nach jeder Anfrage anpassen - vielleicht können Sie zuerst die Jacke stricken dann die Maschen auffassen um die Kapuze zu stricken. Gerne kann Ihnen Ihr DROPS Händler damit - auch per Telefon oder per E-Mail - helfen, eine Kapuze dazu zu stricken. Viel Spaß beim stricken!
16.01.2023 kl. 10:26:
![]() Nines wrote:
Nines wrote:
Entiendo que las mangas se tejen con agujas circulares, pero el cuerpo también con las mismas agujas? Gracias.
14.01.2023 kl. 18:07:DROPS Design answered:
Hola Nines, sí, como puedes ver al inicio de las explicaciones, en la mitad derecha, te indican que se trabaja con una aguja circular. Toda la labor se trabaja con la misma aguja circular, la indicada en los materiales.
15.01.2023 kl. 10:51:
![]() Ina Tilman wrote:
Ina Tilman wrote:
Kan ik het patroon ook downloaden ik heb nl geen printer
07.12.2022 kl. 23:01:DROPS Design answered:
Dag Ina,
Ja, dat kan. Je klikt dan eerst op afdrukken > patroon. En bij de afdrukopties kun je bij bestemming kiezen voor 'Opslaan als pdf' in plaats van de printer. Dit is een beetje afhankelijk van hoe je computer is ingesteld.
10.12.2022 kl. 09:35:
![]() Marny CA wrote:
Marny CA wrote:
How does this differ from the Zimmermann sweater?
12.09.2022 kl. 13:37:
![]() Karen wrote:
Karen wrote:
Hi is this a DK yarn? Thank you
31.05.2022 kl. 09:06:DROPS Design answered:
Dear Karen, DROPS Delight is a fingering yarn; you can see all relevant information regarding this yarn here: https://www.garnstudio.com/yarn.php?show=drops-delight&cid=19
31.05.2022 kl. 16:57:
![]() Karen wrote:
Karen wrote:
Good day. Could I have this pattern in English please? Thank you
31.05.2022 kl. 08:39:DROPS Design answered:
Dear Karen, sure, click on the scroll down menu below the picture and select your language - either English UK /cm or US/inch. Happy knitting!
31.05.2022 kl. 08:46:
![]() Tiku wrote:
Tiku wrote:
Hi, I love this sweater and am making the largest size but having trouble understanding what stitches I need to knit in line 1 of body. If i need to knit all 132 -52 times inc both ends or do I knit on 132 sets only 52 times. Do I put the cast 60 stars on a holder & work the 132 sets?The knitting pattern does not look right. Is there is simple way for explaining since this is knitted sideways and 2 pieces only? Thank you
29.03.2022 kl. 16:57:DROPS Design answered:
Dear Tiku, you are working the largest size, correct? When you have the 132 sts on the needle you have cast on 60 sts on the left side for the back piece - insert a marker in the 2nd stitch on the right side = this stitch is the dotted line in the chart. You will now increase on each side of this stitch to create this angle on the front piece. Happy knitting!
30.03.2022 kl. 07:57:
![]() Eva Neuschl wrote:
Eva Neuschl wrote:
Ich habe schon viel gestrickt und verstehe nicht die Zunahme. Rumpfteil ist Vorderteil oder? Der Ärmel ist mit der Maschenzahl 68 fertig und die cm stimmen auch. Nun mein Problem. Es steht bei dem Rumpfteil :am Ende der Reihe 58 Maschen anschlagen, für das Rückenteil 126 Maschen anschlagen. Das ist aber viel zu groß. Muss ich dann im Vorderteil - Rumpfteil da zunehmen wo die gestreichelt Linie ist bei der Skizze? Ich stricke die Größe 110
04.12.2021 kl. 13:19:DROPS Design answered:
Liebe Frau Neuschl, Rumpfteil steht für beides Rücken- und Vorderteil. Am Ende der Ärmel werden 58 neuen Maschen für das Rückenteil (= ca 24 cm zwischen untere Kante der Jacke und Anfang der Ärmel - siehe Maßskizze) angeschlagen, dann wird für das Vorderteil beidseitig der Masche mit der Markierung (siehe gestrichte Linie in der Skizze) zugenommen. kann das Ihnen helfen?
06.12.2021 kl. 07:52:
![]() Ellen Colville wrote:
Ellen Colville wrote:
Volgens het patroon en de werktekening zijn de 2 helften van het voorpand ieder 3 cm wijder dan de helften van het rugpand. Hoe werk je die extra cm's weg? Ik snap dat het gedeelte van de knoopsgaten over de andere helft valt maar totaal 6 cm.verschil is wel erg ruim.
02.11.2021 kl. 16:35:
![]() Demartin wrote:
Demartin wrote:
Hourra j’ai compris pour les diminutions du col !!
19.09.2021 kl. 10:44:
![]() Demartin wrote:
Demartin wrote:
Je ne comprends pas les diminutions pour l’encolure. Se font elles à part du devant ?
18.09.2021 kl. 17:27:
![]() Joanne Richards wrote:
Joanne Richards wrote:
How would I make this for an 8 year old?
25.07.2021 kl. 06:29:DROPS Design answered:
Dear Joanne, please understand that we cannot modify our patterns for each individual request. This is a pattern for babies and small children, because this kind of cut suits their sizes the best. Having said that for one size bigger you can try using somewhat thicker yarn and needles, but you will have to recalculate the stitchnumbers. Happy Stitching!
25.07.2021 kl. 09:40:
![]() Grace wrote:
Grace wrote:
Tejer 1 fila del derecho, girar, insertar un MP en el 2º pt en la ag por el LD (=lado derecho). Continuar – AL MISMO TIEMPO aum 1 pt a cada lado del MP cada 2ª fila un total de 38-40-46 (48-50-52) vcs – VER TIP PARA LOS AUMENTOS. AL MISMO TIEMPO. Esta es la parte que no sé cómo se hace ni qué quiere decir, porque si aumento quedaría deformada la delantera. Traté pero no pude, no queda como debería. Gracias
25.06.2021 kl. 23:36:DROPS Design answered:
Hola Grace, a continuación tienes un vídeo sobre el cuadrado domino. En el vídeo esta en el punto central y te explica como se trabajan los aumentos. En nuestro caso, estaría en el 2º punto y hay que aumentar a cada lado del marcapuntos: https://www.garnstudio.com/video.php?patternid=9250&lang=es
15.07.2021 kl. 00:46:
![]() Grace wrote:
Grace wrote:
Hi. La explicación no está clara. Cuando termino con la manga, mi sentido común dice que tengo que agregar la misma cantidad de puntos del lado derecho que del lado izquierdo pero eso no está claro en la explicación. Veo que del lado de la espalda debo seguir tejiendo como vienen los puntos pero en el delantero debo hacer esos aumentos que no son aumentos sino una vista. Debo ir desplazando esos "aumentos" hacia el exterior del sweater? No sé cómo hacer eso. Hay video de esa técnica?
24.06.2021 kl. 21:21:DROPS Design answered:
Hola Grace, puedes ver nuestra respuesta arriba.
15.07.2021 kl. 00:46:
![]() Natasza Dimmock wrote:
Natasza Dimmock wrote:
I am not clear about the instructions following the cast on stitches for the back. It reads cast on sts at the end of right side row, then knit 1 row. if you knit back, this would still be on the Right Side of the work. It then says "turn" and place marker in 2nd stitch. This would make it on the wrong side of the work, but the instructions say RS. Please clarify. I don't know that it makes much difference, but I would like to know.
17.05.2021 kl. 18:06:DROPS Design answered:
Hi Natasza, You cast on stitches at the end of the row from the right side, then you turn and knit back from the wrong side. Now you turn and insert the marker in the 2nd stitch on the right side. Happy knitting
18.05.2021 kl. 08:07:
![]() Christine wrote:
Christine wrote:
Good Morning, this jacket reminds very much of the surprise Jacket Elisabeth Zimmermann designed. Her way of knitting the jacket is much more comprehendable. Very sad, that there is no mentioning of her!
06.05.2021 kl. 12:23:
![]() Natasza Dimmock wrote:
Natasza Dimmock wrote:
I am knitting second size of this adorable sweater. I checked my gauge and it is correct; however like another knitter mentioned, at 9cm I have only had 22 increases. My question is do you continue working on the left side, putting the right side stitches, where the increases were made, on the holder and continue the increases after these stitches are picked up later? I have read the instructions many times and I am having trouble figuring this out.
04.05.2021 kl. 15:13:DROPS Design answered:
Dear Mrs Dimmock, when piece measures 9 cm (2nd size) you divide piece for neck, ie increasees on front piece are not finished yet but you first work the left side of piece (= back piece) and will finish the front piece later. Work only the 65 sts on the left side of piece (= the last 65 sts on needle, seen from RS) and put all remaining sts on a thread/stitch holder for front piece. Hope this will help. Happy knitting!
05.05.2021 kl. 08:19:
![]() Edith wrote:
Edith wrote:
Ich musste die linke Seite bis zum Ärmel wieder aufmachen. Die Anleitung hat einen Fehler. LINKES TEIL: 1 R re stricken, 60M anschlagen, 1 R zurück stricken, vor der zweitletzten M 1 U, Maschenmarkierer, M stricken, 1 U 1 M, wenden und die M und U stricken, dann stimmt auch die Frontansicht.
13.03.2021 kl. 14:20:DROPS Design answered:
Liebe Edith, da kraus rechts gestrickt wird, sind Vorderseite und Rückseite jeder gestrickten Hälfte komplett identisch. Die linke Hälfte wird daher genauso wie die rechte gestrickt und anschließend einfach umgedreht. Die Anleitung wurde noch einmal sprachlich überarbeitet, damit das noch klarer wird. Gutes Gelingen weiterhin!
16.03.2021 kl. 23:50:
![]() Eulalia-Frederike wrote:
Eulalia-Frederike wrote:
Hallo, ich komme mit der Anleitung gut klar, bis auf einen Punkt: ab wo messe ich die cm für das erste Knopfloch? Die Beschreibung an dieser Stelle ist mir nicht verständlich. Wenn ich die Jacke für meinen Enkel dann fertig habe, werde ich sie für mich umrechnen und stricken. Dann aber mit Taschen. Freue mich schon darauf😊
04.03.2021 kl. 22:46:DROPS Design answered:
Liebe Eulalia-Frederike, messen Sie von dem Anfang der Zunahmen für das Vorderteil (am Anfang der gestrichten Linien in Diagram aber dann gerade dh in der selben Richtung wie der Pfeil messen, nicht in die Strickrichtung vor den Zunahmen). Viel Spaß beim stricken!
05.03.2021 kl. 07:42:
![]() Gisela wrote:
Gisela wrote:
Ich bin eine erfahrene Strickerin u.verstehe den Grund der Zunahme gar nicht? Finde zum 1.mal eine Anleitung von DROPS sehe chaotisch,schade
26.02.2021 kl. 18:27:DROPS Design answered:
Liebe Gisela, meinen Sie die Zunahmen beidseitig von der Markierung am Vorderteil? Diese werden den Rückenteil machen, schauen Sie die gestrichelte Linie in der Skizze, diese ist die Masche mit der Markierung, wo Sie beidseitig zunehmen werden, ein Winklel (wie auf dem Foto) wird sich so bilden - der "Aufbau" dieses Modell ist etwas unterschiedlich als ein ganz "normalen" Modell - folgen Sie die Anleitung Schritt für Schritt, und so sehen Sie die Jacke wachsen. Viel Spaß beim stricken!
01.03.2021 kl. 07:37:
![]() Chris wrote:
Chris wrote:
I absolutely love this design and so want to get it right but find that the right back is 14 cm wide but the front is 20 cm wide (second size). The front and back are the same length and the pattern looks correct otherwise. Could you kindly help me out please?
25.02.2021 kl. 09:57:DROPS Design answered:
Dear Chris, you cast off for buttonholes when front piece measures 15 cm from beg of increase for front piece and then when you have finished all increases (= 93 sts on needle) you should have approx 17 cm when casting off the sts towards front band then work 1 more cm over the sts on bottom edge. Maybe it could be a good idea to show/bring your work to your store, they could check together with you while seing the jacket. (make sure tension in height is right, it may be the reason). Happy knitting!
25.02.2021 kl. 12:01:
![]() Carmen Grieco wrote:
Carmen Grieco wrote:
Se puede realizar con dos agujas?
06.01.2021 kl. 13:21:DROPS Design answered:
Hola Carmen, en la primera talla si, pero para otras tallas necesitas aguja circular. Buen trabajo!
03.02.2021 kl. 15:20:
![]() Helga Voss wrote:
Helga Voss wrote:
Hallo, ich meine die Jacke: Knitted domino jacket in garter st for baby and children in DROPS Delight Im Netz gibt es Bilder dieser Jacke in blau bzw. in pink. Welche Farb-No. hat die pinke Wolle? Leider gibt es im Umkreis von 60 km kein Wollgeschäft, der DROPS vertreibt - daher hoffe ich auf Ihre HILFE. Danke im voraus!
05.01.2021 kl. 12:46:DROPS Design answered:
Liebe Frau Voss, was meinen Sie mit dem Netz? Sollte es in unserer Facebook Seite oder unser Instagram sein? Ihr DROPS Laden kann Ihnen gerne auch telefonisch oder per mail damit helfen - hier finden Sie die Liste von DROPS Händlern in Deutschland. Viel Spaß beim stricken!
05.01.2021 kl. 14:41:
![]() Helga Voss wrote:
Helga Voss wrote:
Hallo, liebes Drops-Team! Danke für die prompte Antwort. Es gibt bei Delight 2 Farben mit pink etc. Welche wurde für die Jacke verwendet? Möchte sie gerne genauso stricken wie das Foto im Netz, oder gibt es Fotos, auf denen man den Farbverlauf sehen kann? Liebe Grüße
05.01.2021 kl. 09:48:DROPS Design answered:
Liebe Frau Voss, leider weiss ich nicht, von welcher Jacke Sie sprechen - Ihr DROPS Laden kann Ihnen aber sicher gerne damit helfen, die Farbe zu wählen. Viel Spaß beim stricken!
05.01.2021 kl. 11:49:
![]() Helga Voss wrote:
Helga Voss wrote:
Hallo, habe im Netz dieses Jäckchen auch in rosa /pink mit blau gesehen. Welches Garn wurde hierfür verwendet (Nummer)? Danke für kurze Info!
03.01.2021 kl. 19:57:DROPS Design answered:
Liebe Frau Voss, hier finden Sie die Farbkarte für Delight, vielleicht finden Sie dort die gewünschte Farbe - diese Jäckchen kann mit einem Garn der Garngruppe A gestrickt werden, dh auch Fabel, Alpaca usw... benutzen Sie unseren Garnumrechner um die Alternative zu sehen. Viel Spaß beim stricken!
05.01.2021 kl. 09:31:
![]() Inger Nymann wrote:
Inger Nymann wrote:
ærmet er strikket, nye masker til ryg er strikket, afmaskning af ryg er sket. Udtag 2 m på hv a. pind 40 g= skrå linie, aflukning til hals og knaphuller ok. Problem: hvordan fremkommer forstykkets nederste skrå del fra den stiplede linie og ned? I skriver: efter alle ud- og indtagninger er der 90 masker???? jeg har ca 60
20.10.2020 kl. 19:53:DROPS Design answered:
Hei Inger. Usikker på hvilken størrelse du strikker. Du skriver at det skal være 90 masker etter alle fellingene og økningene (= str. 1/3 mnd.), men også at du har økt 40 ganger (= str. 6/9 mnd.) Har du husker å øke med 1 masker på hver side av masken med merke på? mvh DROPS design
26.10.2020 kl. 12:51:
![]() Janet wrote:
Janet wrote:
I think the needle size in the pattern is wrong. I had to start again, increasing the size from 3 to 3.75, and I noticed too late that the yarn label recommended 3.75. Apart from that, the pattern's ingenious and the finished product looks great.
12.09.2020 kl. 17:36:DROPS Design answered:
Dear Janet, needle size is only a suggestion, depending on your own tension you might have to use smaller/larger needle - read more about tension here. Happy knitting!
14.09.2020 kl. 10:04:
![]() Elliporelli wrote:
Elliporelli wrote:
Hallo an das Team von Drops Design, ich kann stricken, komme nicht so recht mit der Anleitung klar. Gibt es eine Möglichkeit mir aufzuzeigen wie ich quer (rechte Seite) anfange auf einem Bild zu zeigen wo ich zunehmen muss. Sorry, irgendwie hab ich einen Denkfehler. Ich benötige ihre Hilfe. Die Zeichnung hab ich mir schon aufgemalt und ausgeschnitten... Könnten sie mir helfen? Herzlichen Dank Elisabeth
17.04.2020 kl. 10:18:DROPS Design answered:
Liebe Elliporelli, die Zunahmen bei dem Vorderteil wird beidseitig von der Masche mit der Markierung entstehen (immer die selbe Masche, dh davor und danach wird die Maschenanzahl zunehmen), diese Zunahme macht so eine Linie (= die gestrichte Linie in der Maßskizze). Die später am Vorderteil abgekettene Maschen werden dann für den unteren Rand (die ersten zugenommenen Maschen bis zur Markierung). Viel Spaß beim stricken!
17.04.2020 kl. 10:41:
![]() Catherine wrote:
Catherine wrote:
Bonjour, après avoir terminé la 1ère manche et monté les mailles du côté, quand je tricote plusieurs rangs avec les augmentations, mon ouvrage ne correspond plus au croquis qui, lui, forme un angle plus que droit entre la manche et le côté. Mon ouvrage commence à faire un angle aigu. Est-ce normal, dois-je continuer? Merci pour votre éclairage.
06.03.2020 kl. 14:33:DROPS Design answered:
Bonjour Catherine, dans le schéma, la ligne pointillé correspond à la maille avec le marqueur (= sur le devant du gilet). Les mailles avant le marqueur (= à droite de cette ligne) sont les augmentations faites + les mailles avant le marqueur. vous avez donc un angle droit qui va se former, et, quand vous rabattrez les 51-74 mailles du devant, il restera celles du bas (= les 39-52 m soit les 16-22 cm du bas du devant). Bon tricot!
06.03.2020 kl. 14:59:
![]() Catherine wrote:
Catherine wrote:
Bonjour, je suis un peu perdue après le montage des mailles DOS-DEVANT. Quand on a monté les mailles à la suite du rang devant, on doit revenir, donc sur le dos. Est-ce à la fin de ce rang DOS qu'on met le marqueur? Je lis pourtant: tricoter un rang ENDROIT, tourner. A quel moment faut-il tourner? Après les nouvelles mailles montées? ou au bout de la manche?
01.03.2020 kl. 09:53:DROPS Design answered:
Bonjour Catherine, quand la manche a atteint la longueur souhaitée, on va tricoter 1 rang sur l'endroit et monter les mailles du dos à la fin de ce rang. On tourne, on tricote 1 rang endroit. On met un marqueur dans la 2ème maille à droite sur l'endroit (= c'est la maille avec un marqueur qui va servir aux augmentations du devant = la ligne pointillé dans le schéma). Maintenant, vous augmentez tous les rangs sur l'endroit de chaque côté de cette maille avec un marqueur (le nombre de mailles avant le marqueur (et après) va augmenter). Bon tricot!
02.03.2020 kl. 10:33:
![]() Bettina wrote:
Bettina wrote:
Guten Tag! Ich finde diese Baby-/Kinderjacke so toll, dass ich sie mir gerne selbst stricken würde. Fragen: Spricht etwas gegen diesen Schnitt für Erwachsene? Haben Sie einen Tipp zum umrechen/anpassen an die Damen-Kleidergröße 38? Das würde mich sehr freuen. Mit vielem Dank für die großartigen Seiten und Anleitungen! Bettina
09.02.2020 kl. 15:12:DROPS Design answered:
Liebe Bettina, diese Jacke ist vielleicht die einige, die ähnliche ist, auch wenn sie nicht genauso gestrickt wird. Viel Spaß beim sticken!
10.02.2020 kl. 09:30:
![]() Sollasalm wrote:
Sollasalm wrote:
Thank you for sharing
22.01.2020 kl. 09:39:
![]() Monica wrote:
Monica wrote:
Hej, jag är en mycket van stickerska, men detta mönster går jag inte iland med. Det är det mest konstiga mönster jag nånsin sett!
28.12.2019 kl. 16:16:
![]() Claudia Habenreich wrote:
Claudia Habenreich wrote:
Die Jacke als solches ist ja hübsch aber ich habe alles wieder aufgetrennt denn mir hat keine Naht gefallen für die Rückennaht. Schade drum aber da finde ich die Jacke nach ...... angenehmer.Ich wollte eben auf etwas anderes noch hinweisen und komme mir ganz schön zensiert vor da ich das Wort nicht benutzen darf weil es verboten ist?!
28.10.2019 kl. 12:41:DROPS Design answered:
Liebe Frau Habenreich, könnten Sie uns kurz auf Facebook sagen, was Sie schreiben sollten? Je nach den Sprachen können die Wörter ändern. Viel Spaß beim stricken!
05.11.2019 kl. 09:39:
![]() Claudia Habenreich wrote:
Claudia Habenreich wrote:
Moin Moin, ich bin wohl zu doof um dieses Jäckchen zu stricken :-/ Die Anleitung ist derart kompliziert geschrieben dass ich im Moment nicht weiß wo vorne und wo hinten ist. Ist der neu angeschlagene Teil das Rückenteil? und Vorderteil dann der Teil bei dem beidseitig der markierten Masche zugenommen wird?
15.10.2019 kl. 15:37:DROPS Design answered:
Liebe Frau Habenreich, ja so ist es; siehe auch die Maßskizze, die Masche mit der Markierung (= es wird beidseitig dieser Masche zugenommen = gestrichte Linie) ist beim Vorderteil. Viel Spaß beim stricken!
15.10.2019 kl. 17:19:
![]() Paola Carlini wrote:
Paola Carlini wrote:
Non capisco come fare ad intrecciare 66 m. dalla scollatura e giù lungo il bordo del davanti e poi fare la metà sx. Non sono riuscita a spiegarmi bene.
27.09.2019 kl. 21:56:DROPS Design answered:
Buongiorno Paola. Partendo dallo scollo, deve chiudere 66 maglie e proseguire sulle maglie rimaste (maglie del bordo in basso del davanti) per 2 cm circa. Lavora la parte sinistra come la destra, senza aprire le asole e cuce le due parti al centro sul dietro. Buon lavoro!
28.09.2019 kl. 19:20:
![]() PECOUT Marie wrote:
PECOUT Marie wrote:
Bonjour. Je remercie DROPS carje viens de tricoter la veste pour enfant n° DE-006-by en DELIGHT et c'est une réussite! Existe-t-il un modèle similaire pour FEMME? Cordiaux remerciements.
19.09.2019 kl. 15:21:DROPS Design answered:
Bonjour Mme Pecout, ce modèle est probablement le plus proche, même si les manches se tricotent ici séparément - vous trouverez ici, d'autres modèles tricotés en transversal. Bon tricot!
19.09.2019 kl. 15:26:
![]() Donna Parker wrote:
Donna Parker wrote:
FRONT PIECE: What do I do with the 10 neckline stitches that is have left on the stitch holder?
23.06.2019 kl. 03:02:DROPS Design answered:
Dear Donna, You should use those stitches, whenmaking the edging for the neckline. The number of stitches to pick up includes these stitches. Happy Kntiing!
23.06.2019 kl. 08:33:
![]() Judi wrote:
Judi wrote:
When increasing on either side of stitch with marker, do you increase 38 stitches or 38 times? I feel that if it is 38 times it would be longer than stated. Than’s
18.06.2019 kl. 05:21:DROPS Design answered:
Dear Judi, in the first size you increase a total of 38 times 1 stitch on each side of the stitch with the marker every row from RS (= 2 sts increased on every other row). See chart: the dotted line is matching the stitch with marker, the increases on each side will shape front piece and side at the same time. You will then have to increase 38 times 2 sts = 76 sts when all increases on front piece are done. Happy knitting!
18.06.2019 kl. 08:43:
![]() Martine Telser wrote:
Martine Telser wrote:
Ik begrijp niet hoe ik aan de rechter kant moet meerderen. Ik heb de 2. steek van rechts gemarkeerd,links en rechts daarvan 1 steek gemeerderd. Elke 2. toer meerder ik nu. Maar blijft de gemarkeerde steek steeds de 2. steek,of wandelt die naar links?
25.05.2019 kl. 11:32:DROPS Design answered:
Dag Martine,
De markeerdraad blijft steeds in dezelfde steek zitten en je kunt de markeerdraad in de hoogte meenemen. Aan beide kanten van deze markeerdraad meerder je steeds. Door het meerderen krijg je er dus steken bij aan beide kanten van de markeerdraad.
26.05.2019 kl. 09:56:
![]() Ellie wrote:
Ellie wrote:
Perhaps I am looking in the wrong spot for tutorials but as an experienced knitter I am having trouble envisioning how this all works. So I will use the diagram on the pattern and wing it. I found the 8 tutorials not to be of help. Sorry, love the yarn.
07.03.2019 kl. 00:20:DROPS Design answered:
Dear Ellie, the jacket is worked sideways, when you have worked all inc on sleeve (and piece measure 19-33 cm), cast on new sts for back piece at the end of next RS row, turn and work WS row. At the beg of next row from RS, insert a marker in the 2nd st on the right side and from now on leave the marker in this stitch and increase 1 st on each side of this stitch with a marker: this will create the dotted line in chart and increase the number of sts for front piece. Happy knitting!
07.03.2019 kl. 10:05:
![]() Dorothea Scarlett wrote:
Dorothea Scarlett wrote:
Have you a similar pattern knit on two needles please.
01.02.2019 kl. 10:46:DROPS Design answered:
Dear Mrs Scarlett, this jacket is entirely worked back and forth on circular needle to get enough room for all stitches, you can then use straight needles, but remember to keep the correct tension since the stitches will be quite more tighten. Happy knitting!
01.02.2019 kl. 14:48:
![]() Hajnalka Klára Réthy wrote:
Hajnalka Klára Réthy wrote:
HÁTA: Kössünk, amíg a darabunk .... cm-es, (ahonnan a háta szemeit felszedtük)" Mikor szedtük fel a háta szemeit? Erről nem volt leírás!!!! Nem értem a kötés egész menetét! Videót sem találok!
28.10.2018 kl. 21:09:DROPS Design answered:
Kedves Klára! Köszönjük levelét, amely felhívta a figyelmünket egy hibára. A hiba javításra került, így a leírás talán érthetőbb lesz. Az ujja után a TESTRÉSZ feliratú szakaszban felszedett szemekkel készíti a darab hátát. Kérdéseire közvetlenül is választ kaphat a Facebookon Magyar DROPS csoportban. Sikeres kézimunkázást!
29.10.2018 kl. 00:18:
![]() Hajnalka Klára Réthy wrote:
Hajnalka Klára Réthy wrote:
Elkészítettem az ujját, és a "TESTRÉSZ:"-ig, és felszedtem a a szemeket az eleje közepe felé. Nem értem, hogy "A DARABOT EZUTÁN ETTŐL A PONTTÓL MÉRJÜK!" melyik ponttól? Hová kell a jelölőt tenni? A hónalj pontba (az ujja és az eleje találkozáshoz? ..
28.10.2018 kl. 21:07:DROPS Design answered:
Kedves Klára! Miután a testrészhez felszedte a szemeket tegye egy jelölőt a szemek közé, és a többi mérést a későbbiekben ettől a ponttól végezze. A legegyszerűbb, ha az ujja és a kardigán oldala találkozásához teszi a jelölőt. és az oldalán méri a darabot. Kérdéseire közvetlenül is választ kaphat a Facebookon a Magyar Drops csoportban. Sikeres kézimunkázást!
29.10.2018 kl. 00:14:
![]() Susan wrote:
Susan wrote:
Thank you. I finally figured out the answer to my question by going over and over the pattern. Because you make 52 increase rows and at the end it says 52 stitches will be left on the needle to go back and forth. So that means you do cast off the marked corner stitch.
20.09.2018 kl. 16:26:
![]() Susan wrote:
Susan wrote:
Thank you for your reply. It looks like the sweater dimensions will be fine with just a little variance in tension. I used the exact same yarn that was done in the pattern. My question is about how far down from the neck do I need to cast off. The pattern says bind off 74 stitches from the neckline and down the front band of the jacket. I understand that. Does that include what I call the corner stitch, or the stitch that you increase on each side.? Thank you.
19.09.2018 kl. 16:06:DROPS Design answered:
Dear Susan, in the largerst size the sts for front band are cast off when piece measures 22 cm from the sleeve - see chart, then you continue working over the remaining sts for the bottom edge. You will find all relevant measurements to help you adjusting your jacket in the measurement chart. Happy knitting!
20.09.2018 kl. 09:04:
![]() Susan Habegger wrote:
Susan Habegger wrote:
I have a question about how far down from the neck that I cast off on the button side.? My tension increased some after i knit awhile. So on size 5/6 i couldn't do 52 increase rows since i got to 8 inches a little earlier. Do i cast off from the neck down to and including the marked stitch where you increase on each side? Then the rest of the stitches are knit back and forth till the front and back are the same length. I assume you cast off that corner stitch. Just want to make sure. Thanks
19.09.2018 kl. 05:50:DROPS Design answered:
Dear Mrs Habegger, with this kind of pattern, tension in width and height is very important to keep the correct measurements at the end. Make sure to adjust the needle size if needed. Should you need any assistance to adjust the pattern to your yarn, please contact the store where you bought the yarn - even per Email or telephone. Happy knitting!
19.09.2018 kl. 10:08:
![]() Mme Bernier wrote:
Mme Bernier wrote:
Modèle formidable que j'ai réalisé il y a déjà 2 ans pour mon fils, il souhaiterais que je lui en tricote un autre, d'une autre couleur mais aujourd'hui il lui faut du 10 ans et je n'arrive pas a transposer ce modèle dans la bonne taille...c'est très dommage! je n'en trouve pas d'équivalent dans vos archives.
28.08.2018 kl. 13:03:
![]() Susan wrote:
Susan wrote:
Appreciate your response. I think the sweater is darling. I got the yarn. But still need to have you clarify how to get the stitches on the other side of the diagonal? None of your responses tell this. I see how the diagonal is moved along with the increased stitches with the st marker. I think if you told exactly what to do on each of the next 5 rows after the sleeve is done it would help. Then I could continue on. Please be very specific. I really want to understand this. Thank you.
09.07.2018 kl. 15:16:DROPS Design answered:
Dear Susan, continuing increasing on each side of the st with the marker will creates the pattern as it looks on the picture, working only 5 rows may not be enough, just continue as explained, if you have any doubt, do not hesitate to bring your work to your store/send them a picture per email so that they can help you. Happy knitting!
09.07.2018 kl. 15:46:
![]() Susan wrote:
Susan wrote:
Thank you for responding. I still need to know what "back over" at the bottom of the front means. I realize you need to continue knitting the stitches left on the needle. Do you need to turn your work and pick up stitches and go backwards?
09.07.2018 kl. 15:02:DROPS Design answered:
Dear Susan, sorry I don't understand what you mean with "back over", you cast on the sts on the left side for back piece (seen from RS) and increase for the front piece with 1 YO on each side of the st with the marker = there will be always more st before marker and this will make the garter st look different before and after marker. Happy knitting!
09.07.2018 kl. 15:44:
![]() Susan wrote:
Susan wrote:
In the front piece near the end it says to knit back and forth over these stitches for 1 1/8". What does that mean?
09.07.2018 kl. 07:08:DROPS Design answered:
Hi Susan, The stitches you have left on the needle are continued for one and one eighth inch back and forth on the needle before binding off (check first that the front and back pieces are of equal length). Happy knitting!
09.07.2018 kl. 07:52:
![]() Susan wrote:
Susan wrote:
When I see the front of 20-15 I see vertical knitting rows then the yarn overs making a diagonal line to a right angle to horizontal rows. Why don't I see this in the pattern? Why am I confused ? It seems like there should be about the same number of stitches added on to each side of the sleeve. I think I understand the moving marker but still a triangle of the sleeve is missing. In English, Freda, Lucie, Georgia and Hannah had the same question. Why don't I get it? Appreciate help.
09.07.2018 kl. 06:49:DROPS Design answered:
Dear Susan, this diagonal (dotted line in chart) is created by increasing with a YO on each side of the st with marker on front piece. Happy knitting!
09.07.2018 kl. 08:57:
![]() Jean Wong wrote:
Jean Wong wrote:
I am knitting the 3/4 sweater. After all increases and decreases I only have 90 stitches instead of 121. Any ideas as to where I have gone wrong?
03.05.2018 kl. 06:21:DROPS Design answered:
Dear Mrs Wong, it's a bit complicated to get an idea where it's wrong. Make sure your tension is correct and that you have increased 2 sts at the marker. You can bring your work to your store (or send them a picture per mail) so that they can have a look together with you. Happy knitting!
03.05.2018 kl. 09:45:
![]() MARTINE PITSCHON wrote:
MARTINE PITSCHON wrote:
Un grand merci pour votre réponse ! Ce modèle me plait beaucoup.
02.05.2018 kl. 22:15:
![]() Pitschon Martine wrote:
Pitschon Martine wrote:
Bonjour, je viens de terminer ce joli gilet en taille 6 ans. Mais il fait des jaloux(ses) chez les plus grand(e)s... Ne pourrait-on pas avoir les explications en tailles femmes ?... Merci !!!
30.04.2018 kl. 17:57:DROPS Design answered:
Bonjour Mme Pitschon, vous avez ici un modèle femme dont la construction est différente mais qui ressemble à celui-ci. Bon tricot!
02.05.2018 kl. 09:24:Lesley Baker wrote:
I am confused about the increase to either side of the inserted marker. I am knitting the size 6-9 months cardigan. I have increased by 2 stitches 22 times (so 44 stitches) but have now reached the 9cm point and am supposed to only continue knitting over the left 65 stitches? But I am equally still supposed to increase next to the marker another 18 times (I.e. 40 times in total) - how is that done if I am not knitting these stitches at present?
25.04.2018 kl. 23:45:DROPS Design answered:
Dear Mrs Baker, make sure to get and keep correct tension (= 24 sts x 38 rows = 10 x 10 cm) - you increase in 2nd size on every other row a total of 40 times on each side of the st with marker and at the same time when piece measures 9 cm work over the 65 sts on the left side (seen from RS = end of row from RS) for back piece, put all remaining sts on a st holder, they will be worked back later for front piece. Happy knitting!
26.04.2018 kl. 08:49:
![]() Kerry Patton wrote:
Kerry Patton wrote:
I have completed the first half of the sweater, however the front half is about 2 inches wider than the back half. Not sure how to fix this! Any suggestions are welcome! Thanks!
25.04.2018 kl. 17:10:DROPS Design answered:
Dear Mrs Patton, did you get and kept the correct tension? Front piece should be somewhat longer than back piece for button band, maybe you can arrange then the width when sewing the buttons on front piece. Happy knitting!
26.04.2018 kl. 08:30:
![]() Sandrine wrote:
Sandrine wrote:
Je suis à l'étape où je dois insérer un marqueur dans la 2è maille (appelons ce rang le rang n°2), puis augmenter de part et d'autre. Or je ne comprends pas car si j'insère le marqueur dans la maille, ce marqueur reste au niveau du rang n°2, et lorsque je tricote le rang 3 puis que je dois augmenter au rang n° 4, le marqueur est 2 rangs en-dessous. Dois-je comprendre qu'il faut placer le marqueur après la 1ère maille au lieu de "dans la 2è maille"?
17.03.2018 kl. 12:08:DROPS Design answered:
Bonjour Sandrine, votre marqueur doit rester dans cette maille tout du long des augmentations, cette maille avec le marqueur correspond à la ligne diagonale dans le schéma des mesures: vous augmentez ensuite avant cette maille et après cette maille = le nombre de mailles avant le marqueur va donc augmenter. Bon tricot!
19.03.2018 kl. 09:22:
![]() Sandrine wrote:
Sandrine wrote:
Je suis à l'étape où je dois insérer un marqueur dans la 2è maille (appelons ce rang le rang n°2), puis augmenter de part et d'autre. Or je ne comprends pas car si j'insère le marqueur dans la maille, ce marqueur reste au niveau du rang n°2, et lorsque je tricote le rang 3 puis que je dois augmenter au rang n° 4, le marqueur est 2 rangs en-dessous. Dois-je comprendre qu'il faut placer le marqueur après la 1ère maille au lieu de "dans la 2è maille"?
17.03.2018 kl. 11:53:
![]() Gaby wrote:
Gaby wrote:
Sorry for the confusion. I understand the increasing at each end. But is 1 row equals to just one RS? or one RT and one WS?
08.03.2018 kl. 16:40:DROPS Design answered:
Dear Gaby, 1 row is when you work all sts on needle either from RS or from WS. When you work 2 rows (= 1 from RS + 1 from WS) you get a ridge of the garter st. Happy knitting!
09.03.2018 kl. 09:40:
![]() Gaby Swank wrote:
Gaby Swank wrote:
Sorry for the confusion. I understand the increasing at each end. But is 1 row equals to just one RS? or one RT and one WS?
08.03.2018 kl. 16:23:
![]() Gaby Swank wrote:
Gaby Swank wrote:
When doing the sleeve it says to add a stitch at each end every 8th row. Do you count one row to as one right and one wrong side or is it counted as one row being a ½ row?
08.03.2018 kl. 14:55:DROPS Design answered:
Dear Mrs Swank, when increasing 1 st on each side of sleeve, increase 1 st at the beg of row from RS and 1 st at the end of the same row, work 7 rows without increasing and repeat these 8 rows starting from RS. Happy knitting!
08.03.2018 kl. 15:29:
![]() Nicole wrote:
Nicole wrote:
En suivant les explications le devant du gilet se présente en pointe ; il me manque la partie inférieure qui semble être tricotée dans le sens horizontal. Comment puis-je y parvenir ?
25.02.2018 kl. 22:56:DROPS Design answered:
Bonjour Nicole, veillez à bien augmenter de chaque côté de la maille avec le marqueur, le nombre de mailles avant le marqueur va augmenter et la ligne diagonale dans le schéma représente cette maille avec le marqueur. La partie droite (avant le marqueur) est crée par le début/la fin des rangs avant ce marqueur (avec les augmentations qui forme l'angle). Bon tricot!
26.02.2018 kl. 09:58:
![]() Pam wrote:
Pam wrote:
I have made it through the sleeve and to the part where one increases on either side of stitch to form the front. In the photo, there seems to be a discernible diagonal line. I’ve only knitted 5 increase rows so far., but I don’t see any sign of this yet. I made increases by yo and have been knitting in the back to avoid a hole. It occurs to me that here the hole may be needed to give the desired effect. Any useful information would be appreciated.
05.02.2018 kl. 05:25:DROPS Design answered:
Dear Pam, the diagonal is made through the sts increased on each side of the st with marker (see dotted line in chart), ie marker should stay in this st and increase should be worked on each side of this st (there will be always more st before the st with marker, seen from RS). YO's should be worked twisted on next row to avoid holes. Happy knitting!
05.02.2018 kl. 10:14:
![]() Johanna Schultze wrote:
Johanna Schultze wrote:
I can't seem to understand how to continue this pattern. I did the sleeve but cannot seem to follow the directions when you put markers in and increase and add stitches. Is there a YOU Tube video? Might make it easier for me to understand.
29.01.2018 kl. 06:30:DROPS Design answered:
Dear Mrs Schultze, after sleeve is done, cast on new sts for back piece and add a marker in the 2nd st from RS (leave the marker in this st = dotted line in chart) and now increase 1 st on each side of the st with marker (remember to move marker upwards but always in the same st which won't be the 2nd st on row anymoroe) every other row (= every row from RS) for front piece. Happy knitting!
29.01.2018 kl. 10:22:
![]() Iris wrote:
Iris wrote:
Ich liebe diese Jacke!! Könnten Sie bitte eine Anleitung für Größe 134 posten? Das wäre so schön!
24.01.2018 kl. 22:41:DROPS Design answered:
Liebe Iris, diese Jacke gibt es nur bis Größe 116 und eine ähnliche für Damen finden Sie hier. Viel Spaß beim stricken!
25.01.2018 kl. 08:20:
![]() Helle Sonne wrote:
Helle Sonne wrote:
Hej Super flot trøje - er ved at strikke den med striber - hvordan strikkes udtagninger på venstre halvdel, når den ikke skal vende vrangen ud ved sammensyning? :-)
22.01.2018 kl. 06:53:DROPS Design answered:
Hej Helle, jo venstre halvdel skal monteres med vrangen ud. God fornøjelse!
30.01.2018 kl. 11:27:
![]() Gudrun wrote:
Gudrun wrote:
Tack för uppmuntrande svar. Kanske jag vågar. Men ett par mer konkreta frågor: Måste man sticka m rundstickor? Det står ju ”fram och tillbaka” så det borde gå m vanliga stickor. När det står FRAM- O BAKST - vilken del av koftan är det?
04.01.2018 kl. 08:43:DROPS Design answered:
Hei igjen. Du strikker fram -og bakstykket samtidig, så rundpinner er nok det beste alternativet på grunn av mange masker. Om du ser på målskissen nederst på oppskriften og ser strekene går både til venstre (bakstykket/BAKST) og til høyre (fremstykket/FRAMST) og opp til der det felles av til halsen, så er det dette som blir kalt FRAM – OCH BAKST. Når FRAM – OCH BAKST er ferdig strikket, setter du maskene til fram stykket på en tråd og strikker bak stykket ferdig. God Fornøyelse!
04.01.2018 kl. 13:57:
![]() Gudrun wrote:
Gudrun wrote:
Jag förstår inte den här beskrivningen. Hur blir det en diagonal? Hur ska man öka när man kommer till bakstycket - så många på stickan? Hur gör man detta med markör? Finns det någon ytterligare instruktion eller video? För jag vill gärna kunna göra denna kofta men vågar inte nu!
03.01.2018 kl. 18:50:DROPS Design answered:
Hei Gudrun. Denne oppskriften er skrevet litt anderledes enn man kanskje er vant til. Men se på målskissen og les godt igjennom oppskriften før man begynner, så er dette en morsom måte å strikke en jakke på. Vi har ingen video på hvordan strikke hele jakken, men mange videoer på de ulike teknikkene som brukes i oppskriften. God Fornøyelse!
04.01.2018 kl. 07:16:Jackie Taber wrote:
I am sorry, but I am still confused. The picture suggests that the fronts of the sweater worn by the child has a rectangle shape. If the front is finished in a diagonal shape after all increases are completed, then how does it become a rectangle shape when there are no further instructions?
07.11.2017 kl. 16:54:Jackie Taber answered:
I finally figured it out. When doing the increases, the stitch marker is moved with each increase. I was leaving the stitch marker on the second stitch for the entire front piece creating a severe diagonal shape.
08.11.2017 kl. 14:07:Jackie Taber wrote:
When working the front section, it finishes in a diagonal shape. The pattern does not explain how it becomes rectangle shaped. Can you help me?
07.11.2017 kl. 00:47:DROPS Design answered:
Dear Mrs Taber, look at the chart with measurement, the front piece should have this shape, the dotted line on front piece marks the st with marker where you increase on each side. Happy knitting!
07.11.2017 kl. 09:13:
![]() Pam wrote:
Pam wrote:
Any advice for keeping the color “bands” symmetrical?
05.11.2017 kl. 14:23:DROPS Design answered:
Dear Pam, the magic of these long color repat yarns lies with their irregularoty and assimetric nature... however, you can match the two sides, with taking notes and starting at the same color sequence when you need to change the balls at the two sides. Happy Knitting!
06.11.2017 kl. 02:25:
![]() Lydia wrote:
Lydia wrote:
For the first size, when you are to put stitches for front on a holder, how many stitches should you have?
26.10.2017 kl. 18:56:DROPS Design answered:
Dear Lydia, with sts for back piece you start with 89 sts, then work 8.5 cm increasing 2 sts for front piece every other row, you should have increased 2 sts 20 times = 129 sts in total - 60 sts for back piece = 69 sts for front piece. Happy knitting!
03.11.2017 kl. 11:29:
![]() Lene wrote:
Lene wrote:
Hallo, beim Tipp zum Aufnehmen wird der Umschlag in der nächsten Reihe verschränkt gestrickt. Ich kenne nur links verschränkt. Wie geht rechts verschränkt bei Krausripp? Gibt es dazu ein Video? Habe nichts finden können. Vielen Dank Im Voraus.
25.10.2017 kl. 23:41:DROPS Design answered:
Liebe Lene, die rechts verschränkte Masche wird rechts in das hintere Glied der Masche (= Umschlag hier) anstatt in das vordere Glied gestrickt. Viel Spaß beim stricken!
26.10.2017 kl. 10:07:
![]() Rosi wrote:
Rosi wrote:
Hallo :) Hab jetzt schon zwei von diesen Jacken gestrickt. Kann ich dieses wunderschöne Modell auch mit Big Delight stricken? Wirkt das genauso schön? Da gibt es einfach noch schönere Farben und zum Winter kann es ja auch etwas dicker werden! Viele Dank im voraus für die Antwort! Rosi
11.09.2017 kl. 22:36:DROPS Design answered:
Liebe Rosi, Big Delight ist Garngruppe C, dieses Modell wurde für eine Garngruppe A geschrieben, dh die Muster sollen Sie dann anpassen. Viel Spaß beim stricken!
12.09.2017 kl. 08:22:
![]() Lesley Griffiths wrote:
Lesley Griffiths wrote:
After much frogging I have now completed first half.
16.07.2017 kl. 00:07:
![]() Marie-Christèle MARTINEAU wrote:
Marie-Christèle MARTINEAU wrote:
Merci infiniment pour la rapidité de votre réponse et la clarté des explications
09.05.2017 kl. 10:24:
![]() Marie-Christèle MARTINEAU wrote:
Marie-Christèle MARTINEAU wrote:
Bonjour. Je ne comprends pas l'indication suivante pour les premières augmentations : [moitié droite] "à 6-6-5 (5-6-6) cm de hauteur totale, augmenter 1 m de chaque côté". Je ne comprends pas où faire l'augmentation ; s'agit-il d'augmenter d'une maille en début de rang et d'une maille en fin de rang ?
09.05.2017 kl. 00:06:DROPS Design answered:
Bonjour Mme Martineau, vous commencez par la manche, et vous augmentez 1 m au début + 1 m en fin de rang 6-14 fois (cf taille) tous les 8 rangs. Bon tricot!
09.05.2017 kl. 08:18:Yvette Guyot wrote:
Bonjour, y a t il moyen d'avoir les explications en français svp Merci d'avance
28.04.2017 kl. 22:15:DROPS Design answered:
Bonjour Yvette, cliquez sur la flèche sous la photo et sélectionnez "français".
29.04.2017 kl. 20:16:
![]() Marjan wrote:
Marjan wrote:
Is er ook een video instructie voor het minderen? Ik zie dat er meerdere manieren bestaan om te minderen, maar weet niet goed welke ik moet toepassen.
20.03.2017 kl. 20:00:DROPS Design answered:
Hoi Marjan. Je kan gewoon minderen op de standaard manier door 2 st r samen te breien.
21.03.2017 kl. 14:53:
![]() Ania Jarting wrote:
Ania Jarting wrote:
Hej, Det verkar vara fel på antalet maskor kontra varv på stick-teset mönster Drops baby 20-15 kofta i Delight. Det står 24 maskor/48 varv slätstickning! Ska bli 10x10 cm! Det blir väl långt hur jag än byter stickor. 48 varv måste vara fel!!? Mvh Ania
12.02.2017 kl. 18:09:DROPS Design answered:
Hej I mönstret står det "24 m x 48 v i rätst på 10 x 10 cm". Lycka till!
01.03.2017 kl. 12:22:
![]() Mary Jo Matthews wrote:
Mary Jo Matthews wrote:
Would it be possible to put the inch equivalents on the diagram of the sweater? I have chosen US English but it doesn't change the measurements on the diagram, just in the pattern. I am being very lazy, I know, but it would be more convenient.😉
10.02.2017 kl. 17:10:DROPS Design answered:
Dear Mrs Matthews, you can convert all measurement in chart here. Happy knitting!
13.02.2017 kl. 09:00:
![]() Geneviève wrote:
Geneviève wrote:
Bonjour, pour le triangle, faut-il tricoter la maille marquée à l'envers comme pour tricoter un carré
04.02.2017 kl. 14:24:DROPS Design answered:
Bonjour Geneviève, la maille avec le marqueur se tricote au point mousse, comme les autres mailles, le marqueur sert à délimiter où faire les augmentations. Bon tricot!
06.02.2017 kl. 09:25:
![]() Núria wrote:
Núria wrote:
Precioso modelo. Mi pregunta es: (talla 12-18 meses) cuando aumento los 50 puntos, el MP lo coloco entre el segundo y tercer punto de los 50 puntos montados. Comienzo a tejer un punto derecho, hebra,un punto derecho, MP, un punto derecho, hebra. Es como lo acabo de explicar? Gracias.
04.10.2016 kl. 08:42:DROPS Design answered:
Ver la respuesta abajo
07.10.2016 kl. 17:57:
![]() Núria wrote:
Núria wrote:
Precioso modelo. Mi pregunta es: (talla 12-18 meses) cuando aumento los 50 puntos, el MP lo coloco entre el segundo y tercer punto de los 50 puntos montados. Comienzo a tejer un punto derecho, hebra,un punto derecho, MP, un punto derecho, hebra. Es como lo acabo de explicar? Gracias.
02.10.2016 kl. 09:27:DROPS Design answered:
Hola Nuria. El MP se coloca en el 2º pt , es decir, se trabaja de la sig manera: 1 HEB, 1 derecho (el pt con MP) , 1 HEB. En tu interpretación sobra 1 pt de derecho.
07.10.2016 kl. 17:56:
![]() Marsha Bowles wrote:
Marsha Bowles wrote:
Having some trouble with drops baby 20-15. I have put stitches back on the needle. I don't understand "continue increase." There's been no increase on this piece. How do I proceed? FRONT PIECE: Put sts from stitch holder back on needle but leave 9-10-10 (10-12-12) sts towards the back on the stitch holder for neckline. Continue inc on every other row – ...
25.09.2016 kl. 10:54:DROPS Design answered:
Dear Mrs Bowles, when you put sts on front piece on a st holder, all inc were not done. When you work front piece sts back, then continue inc as before (= on each side of marker). At the same time, shape neckline slipping the 9-10-12 sts towards back piece (= towards neckline) on a st holder and continue dec towards neckline as stated. Happy knitting!
26.09.2016 kl. 11:29:
![]() Gudrun Sundberg wrote:
Gudrun Sundberg wrote:
Är inte ärmaran onödigt långa? Mvh Gudrun
11.08.2016 kl. 10:38:Patricia E Waters wrote:
I bought 6 skein of drops fable print yarn, color 913-dye lot 6619- 50 grams each. I am in the process of crocheting the Irish cloud cardigan and went to start my second skein, it was all cut up and wound together in many pieces, it's a skein of yarn that's totally wasted, I need another skein in place of it and I don't see why I should have to buy another skein, if you want this broken up skein if you could sent me a self addressed and stamp. A lot of this skein is wasted! Thank you!
28.07.2016 kl. 18:17:DROPS Design answered:
Dear Mrs Waters, please contact the store where you bought your yarn giving them all possible informations as well as picture if possible. They will then contact us. Happy knitting!
29.07.2016 kl. 08:36:
![]() Marion wrote:
Marion wrote:
Ich benötige Ihre Unterstützung, bitte beantworten Sie meine Frage. Vielen Dank vorab...
05.07.2016 kl. 14:28:DROPS Design answered:
Siehe Antwort bei Ihrer Frage.
06.07.2016 kl. 08:05:
![]() Marion wrote:
Marion wrote:
Was bedeutet: die nächste R. wird von der Rückseite gestrickt.
04.07.2016 kl. 18:25:DROPS Design answered:
Das bedeutet, dass die Arbeit gewendet wird.
06.07.2016 kl. 08:04:Patricia Waters wrote:
In my last question I ask you about the sts but with the increases on the right it doesn't work when you tell me after to pick up the 65 sts and knit to where the increase started
13.06.2016 kl. 22:01:DROPS Design answered:
Dear Mrs Waters, the 65 sts you have to work are for back piece (shoulder + mid on back piece) - put the first sts from RS before the 65 sts (end of row from RS) on a stitch holder, you will then work these sts later for front piece. All sts for front piece (ont the right, section with mark where you inc) are not inc yet when working on the 65 sts for back piece - see also chart. Happy knitting!
14.06.2016 kl. 09:10:Patricia Waters wrote:
Hi, I have been working on baby drops 20-15,by drops design I did the right half, then when time added 43 stitches for body,then increased on both sis go marker 40 times for the size I am making , finished that, now I thoroughly confused it says work only 65 sts and put remaining on a holder, but then it says work on back piece to wear the 43 sets were cast on.
13.06.2016 kl. 16:45:DROPS Design answered:
Dear Mrs Waters, when piece measures 9 cm (in your size), you keep the 65 sts on the left side seen from RS (= the first 65 sts seen from WS) on needle, and put the remaining sts on a stitch holder for front piece, they will be worked later. You will first the sts on back piece to the half back piece (half neckline) and bind off. Then work the sts from front on st holder and finish front piece. Happy knitting!
13.06.2016 kl. 17:51:Patricia Waters wrote:
Image the pattern for baby drops 20-15 and this is my 1st time trying something like this, do I start with the right half,then the body and then the back piece then I do the left half then the body then the back piece! I really want to learn this pattern! Thank you for your reposing back to me, I appreciate it!
19.04.2016 kl. 21:33:DROPS Design answered:
Dear Mrs Waters, jacket is worked from bottom of sleeve, then cast on new sts for back piece and inc on each side of marker for front piece (see diagonal dotted line in chart on front piece) - then finish back and front piece separately for neck. Happy knitting!
20.04.2016 kl. 08:20:
![]() Doreen Stratton wrote:
Doreen Stratton wrote:
I am knitting Drops jacket in garter Delight,I am stuck,where it says BODY cast on 50 stiches increase one stich at each side of the stich,with every other row ,does that mean you cast on 80 stiches,it looks so strange to me and I cannot work out where the arms are,Sorry about this
30.03.2016 kl. 15:18:DROPS Design answered:
Dear Mrs Stratton, the jacket is worked sideways starting on wrist (see measurement chart and arrow for knitting direction) - for body, first cast on 50 sts at the end of row from RS, then turn and work next row from WS. Now you will start to inc for front piece on each side of the st with the marker creating the diagonally line (dotted line in chart). Happy knitting!
30.03.2016 kl. 15:54:Doreen Stratton wrote:
What does W.O mean in abbreviations
25.03.2016 kl. 10:29:DROPS Design answered:
Dear mrs Stratton, if you mean WS - this mean "wrong side", i.e. wrong side of piece (facing inside piece). Happy knitting!
25.03.2016 kl. 11:20:
![]() Enne wrote:
Enne wrote:
Come si inizia?
09.03.2016 kl. 12:08:DROPS Design answered:
Buongiorno Enne, questo cardigan è lavorato avanti e indietro sui f circolari ma può usare anche i ferri dritti dal momento che non si lavora in tondo, ed è tutto lavorato a legaccio. Deve avviare il n° di maglie indicato per la taglia che vuole seguire con l'avvio che preferisce e seguire esattamente le istruzioni. Ci riscriva se ha ulteriore bisogno di aiuto. Buon lavoro!
09.03.2016 kl. 12:15:
![]() Freda wrote:
Freda wrote:
I'm having trouble with the increase on each side of the marker. Are you saying the first increase to K1, YO, K1, YO, K rest of row. the next time I'm on the right side, K2, YO, K1, YO, K to rest of row, etc? thanks
10.12.2015 kl. 23:25:DROPS Design answered:
Dear Freda, that's correct, marker should be kept in the same st and inc are done on each side of this st so that number of sts inc on each side of this (dotted line in the chart). Happy knitting!
11.12.2015 kl. 10:00:
![]() Bregje wrote:
Bregje wrote:
Het meerderen na de opzet aan de zijkant is mij nog steeds niet duidelijk. Ik heb andere vragen hierover ook gelezen. Brei verder en meerder TEGELIJKERTIJD 1 st aan iedere kant van de st met markeerdraad om de nld in totaal xx keer. Meerder je nu steeds aan het begin van de naald of steeds waar de markeerdraad de eerste keer is geplaatst?
12.11.2015 kl. 17:34:DROPS Design answered:
Hoi Bregje. Je hebt de nieuwe st opgezet en vervolgens een markeerder geplaatst in de tweede st op de nld. Je meerdert nu aan iedere kant van de st met de markeerder. Je meerdert steeds om de st met de markeerder, je markeerder zal dus ook steeds blijven opschuiven (dan krijg je de lijn, die je ook ziet op de foto).
16.11.2015 kl. 14:07:
![]() Lucy wrote:
Lucy wrote:
My front side is the shape of a triangle. Where did I go wrong?
09.11.2015 kl. 22:03:DROPS Design answered:
Dear Lucy, when increasing for front piece, the dotted line in chart represents the st with marker where you inc on each side. Happy knitting!
10.11.2015 kl. 09:41:
![]() Susanne Riis wrote:
Susanne Riis wrote:
Hej Er der nogen der har erfaringer med at opgradere opskriften til str 8 år og/eller 12år?
08.11.2015 kl. 14:14:
![]() Margret S Holberg wrote:
Margret S Holberg wrote:
Synes jakken er kjempekul. Ble noe feil da jeg skulle begynne å øke ut etter armen var ferdig - ble en snipp som noen andre har kommentert. Oppskrifta er ikke enkel å skjønne, har strikket mye og mange plagg men denne oppskrifta har jeg ikke sett maken til. Når en får så mange kommentarer om akkurat denne øvinga på plagget, må det være noe med hvordan den er forklart som blir veldig komplisert å forstå. Må bare ha dette inn med teskje tror jeg. Hjelp !!!
01.11.2015 kl. 19:37:
![]() Lucy wrote:
Lucy wrote:
After now measure from here on body how many stitches are increased...it says 50 times(for size 4) but I am not sure if I am to increase a total of 50 stitches or 100?? Thank you
21.10.2015 kl. 18:09:DROPS Design answered:
Dear Lucy, you have to inc 1 st on each side of the st with marker a total of 50 times = 100 sts increased. But when piece measures 12 cm, work only the last 86 sts for back piece and put sts for front piece into a st holder (they will be worked again after back piece). Happy knitting!
22.10.2015 kl. 10:00:
![]() Kate Larsen wrote:
Kate Larsen wrote:
Hej Drops Vil høre om man skal måle ned på skrå der hvor man tager ud på hver side af markeringen eller man måler fra hvor man startet med at sætte markering og lige ned. Håber det er til at forstå.
17.10.2015 kl. 12:30:DROPS Design answered:
Hej Kate, Målene er taget lige ned (ikke ved udtagningerne) se også gerne måleskitsen nederst i opskriften. God fornøjelse!
26.11.2015 kl. 14:45:
![]() Birgitta wrote:
Birgitta wrote:
Jag vill ha garnförslag till denna jättefina kofta. Deligt har jag virkat en pläd i och vill ej ha det i babykofta. Gärna med mixade färger och bomull. Eventuellt mix med akryl.
11.10.2015 kl. 11:09:DROPS Design answered:
Hej Birgitte, Klickar du på "garnalternativ" i beskrivningen får du upp alla de garner (i garngrupp A) du kan sticka den fina koftan i. Lycka till!
12.10.2015 kl. 11:48:Elizabeth wrote:
I find the instructions could be clearer as I had to unpick and start again at the point of increasing on either side of the marker. I managed to get it in the end. However, I feel it would be a help if you stated how many stitches to knit up around the neckline depending on the chosen size. Mine is 12-18 months. Any advice?
29.09.2015 kl. 01:59:DROPS Design answered:
Dear Elizabeth, the number of sts you will pick up depends on your tension (nber of rows/10 cm), you can follow our videos to know how to pick up sts along edge and along garter st edge. Happy knitting!
29.09.2015 kl. 09:48:
![]() Denise Bernardin wrote:
Denise Bernardin wrote:
When working the body piece the pattern says to inc 1 st on each side of stitch with marker.....does that mean you inc on each side of marker which would give you 2 increases on every other row or is it 1 inc per every other row....thanks in advance......
24.09.2015 kl. 23:21:DROPS Design answered:
Dear Mrs Bernardin, you inc 1 st before + 1 st after the st with marker on every other row = 2 sts inc per inc row. Happy knitting!
25.09.2015 kl. 09:32:Lucie wrote:
Help! Everything is fine, up to the point where I increase for the front side (after 25 cm) But this front side is building diagonally : how is worked the part that should attach or be knitted from this diagonal edge? It needs to be square as the other side of the sleeve!
21.09.2015 kl. 21:00:DROPS Design answered:
Dear Lucie, You then inc each side of the st with marker, this will shape the diagonally dotted line in measurement chart. Happy knitting!
22.09.2015 kl. 11:24:
![]() Janet Hood wrote:
Janet Hood wrote:
The pattern say "adjust so that the last row is worked from the WS" Does that mean with the wrong side towards you an how do you know which is the wrong side in garter stitch?
20.06.2015 kl. 21:38:DROPS Design answered:
Dear Mrs Hood, 1st row in piece is worked from RS, ie the tail from cast on edge should be on the right hand side seen from RS. Adjusting so that last row is worked from the WS means you have worked the last row from WS and will continue from RS on next row. Happy knitting!
22.06.2015 kl. 10:27:
![]() Elizabeth wrote:
Elizabeth wrote:
I love this pattern! It looks similar to Elizabeth Zimmerman's pattern, but much quicker. I have three baby boys to make these for, and am seriously considering making an adult one for me using some of my stash. Thank you for such a cutie!
27.05.2015 kl. 01:15:
![]() Carmina wrote:
Carmina wrote:
?que he de hacer si la muestra de 10x10 no coincide? Con las agujas del 3 Con 24 puntos me da 8 cm. Y para 10 cm. 54 filas. En la indicación pone 24 puntos y 48 filas He de hacer reglas de 3 para que me salgan las proporciones?
21.05.2015 kl. 13:53:DROPS Design answered:
Hola Carmina, lo que deberías hacer es usar una aguja de un tamaño más grande. Es más importante que te coincida el nº de pts que el nº de filas puesto que el largo lo medimos por cm y en último caso se pueden trabajar más filas. El nº de pts sin embargo debe coincidir para poder seguir las instrucciones de cada talla.
28.05.2015 kl. 10:31:Margaret Elliott wrote:
Finished the right side but I still have 10 stitches on the holder as stated for the front piece for "the neck line" but can see no reference to them at the end. Please help as I can't see where I have gone wrong.
14.05.2015 kl. 14:36:DROPS Design answered:
Dear Mrs Elliot, the sts put on a st holder are moved back on to needle when picking up the sts around neckline for collar. Happy knitting!
15.05.2015 kl. 09:17:
![]() Delgrange wrote:
Delgrange wrote:
Très agréable à réaliser,très beau résultat !!! Merci pour toutes ces explications & vidéo! Bon tricot!
03.05.2015 kl. 20:34:Judy Tomlin wrote:
My local wool store does not have Delight yarn, but does carry Fabel. Would Fabel be acceptable for the guage required on this pattern?
19.03.2015 kl. 21:12:DROPS Design answered:
Dear Mrs Tomlin, DROPS Delight & Fabel both belong to group A so that you can use Fabel here - click here to calculate amount of yarn when using alternative. Happy knitting!
20.03.2015 kl. 09:11:
![]() Peggy Innes wrote:
Peggy Innes wrote:
I'm still struggling with this pattern and hope to find someone who can help me or I shall have to abandon it. I wouldn't call myself a novice but I think this pattern is a translation to english, hence so much confusion. I will not be buying your patterns again unfortunately a I am so totally confused. It would be helpful to state level of expertise needed for patterns too. I haven't found any useful youtube videos to help either.
03.03.2015 kl. 19:01:DROPS Design answered:
Dear Mrs Innes, we are sorry to hear that you have worries with this pattern, it is a very popular pattern that has been worked so many times succesfully. If you need help, you are welcome to ask your question there or contact your DROPS store. Happy knitting!
04.03.2015 kl. 09:36:Georgia Mosesson wrote:
I am not sure how to increase on either side of stich with marker ,please explain how to do this. Thank you, Georgia
02.03.2015 kl. 20:43:DROPS Design answered:
Dear Mrs Mosesson, increase are done with a YO, on next row, work YO into back of loop - see also video below - work until st with marker, make a YO, K st with marker, make a YO. Happy knitting!
03.03.2015 kl. 08:59:
![]() Murielle wrote:
Murielle wrote:
Bonjour, j'ai tricote la première partie sans problème, faut il inverser cote dos et devant pour l autre partie (tricoter en vis versa?)
03.01.2015 kl. 10:11:DROPS Design answered:
Bonjour Murielle, la 2e partie se tricote exactement comme la 1ère mais elle sera cousue sur l'envers pour qu'elle soit l'inverse de la 1ère partie. Bon tricot!
03.01.2015 kl. 15:23:
![]() Jvonne Ravanelli wrote:
Jvonne Ravanelli wrote:
Ops non ci ho pensato: ho rimediato prendendo il filo srotolando un po' il gomitolo però ti assicuro che lo portato quasi uguale. Un' altra volta controllo. Grazie infinite per avermi risposto. Jvonne
26.12.2014 kl. 16:48:
![]() Jvonne Ravanelli wrote:
Jvonne Ravanelli wrote:
Ho iniziato il lato sinistro del golfino ma i colori e le righe mi vengono tutte diverse dal primo pezzo. Ho usato lo stesso filato e colore della foto cosa mi dici è bello ugualmente? Non da lo stesso effetto. Grazie jvonne
21.12.2014 kl. 12:39:DROPS Design answered:
Buongiorno Jvonne, per avere la stessa sfumatura dovrebbe iniziare l'altro lato con un gomitolo che abbia la stessa sequenza di sfumature di quello precedente. In ogni caso è molto carino anche se i due lati non sono identici. Buon lavoro!!
23.12.2014 kl. 14:17:
![]() Elise Hansen wrote:
Elise Hansen wrote:
Do you have this pattern in larger children's sizes and adult sizes? Regards Elise
15.12.2014 kl. 16:32:DROPS Design answered:
Dear Mrs Hansen, what about this one, 127-12 ? Click here to find a choice of jacket worked in Fabel. Happy knitting!
15.12.2014 kl. 17:35:
![]() Peggy Innes wrote:
Peggy Innes wrote:
I'm stuck. I've done the right sleeve on 4 double pointed needles but am unclear how to continue and would appreciate your advice.
07.12.2014 kl. 18:23:DROPS Design answered:
Dear Mrs Innes, if you have worked the sleeve in the round, you have then to continue back and forth on a circular needle, casting on the sts for back piece and inc for front piece as stated. Happy knitting!
09.12.2014 kl. 13:37:
![]() Christin wrote:
Christin wrote:
Hallo, ih habe nun beide Teile fertig gestrickt und zusammengenäht. Jetzt habe ich aber noch auf jeder Seite 10 Maschen auf der Hilfsnadel. Jetzt soll man laut Anleitung rundum den HHalsausschnitt neue Maschen anschlagen und ca. 3cm stricken. Aber was mache ich jetzt mit den Maschen auf dwr Hilfsnadel? Komme hier leider nicht weiter. Freue mich auf eure Hilfe.
29.11.2014 kl. 14:04:DROPS Design answered:
Die M auf der Hilfsnadel gehören zu den M für die Halsblende dazu. Sie stricken also die auf der Hilfsnadel stillgelegten M des einen Vorderteils zurück auf die Arbeitsnadel, fassen dann aus dem Halsausschnitt M auf und stricken die stillgelegten M des anderen Vorderteils auf die Nadel. Insgesamt müssen Sie dann die angegebene M-Zahl auf der Nadel haben (auf eine M mehr oder weniger kommt es dabei nicht an).
01.12.2014 kl. 13:29:
![]() Anne Dassen wrote:
Anne Dassen wrote:
Goedemiddag. Ik ben nu bij het lijfje. Heb 43 steken erbij opgezet. Nu moet ik meerderen aan weerszijden (begin 2e steek). Moet je ook bij de teruggaande naald meerderen als je van het lusje een steek hebt gemaakt?
17.09.2014 kl. 13:53:DROPS Design answered:
Hoi Anne. Je meerdert om de nld, dus in elke nld op de goede kant door 1 omsl te maken. Brei de omsl in de teruggaande nld gedraaid om een gaatje te voorkomen. Dus geen meerdering op de verkeerde kant.
17.09.2014 kl. 15:10:
![]() Sveti wrote:
Sveti wrote:
Wie kette ich den Halsausschnitt ab? Komme hier nicht weiter!
15.09.2014 kl. 01:42:DROPS Design answered:
Sie lassen für den Halsausschnitt 9-10-10 (10-12-12) M in Richtung Rückenteil (d.h. die letzten M, betrachtet von der Vorderseite) auf dem Hilfsfaden liegen. Dann stricken Sie weiter kraus re (und nehmen an der markierten M wie zuvor zu), aber neben den stillgelegten M, d.h. am Anfang der Rück-R, ketten Sie in jeder 4. R (= in jeder 2. Rück-R) 1 M ab. Somit ergibt sich die Rundung, die Sie auf der Schnittzeichnung sehen können.
20.09.2014 kl. 10:19:
![]() Anna wrote:
Anna wrote:
Det är inte striber utan selfstribet garn
28.08.2014 kl. 20:58:
![]() Tina Andersson wrote:
Tina Andersson wrote:
Ja det har jeg set, men nu har jeg lavet den i striber også duer mønstret åbentbart ikke. ØV
28.08.2014 kl. 15:25:
![]() Tina Andersson wrote:
Tina Andersson wrote:
Hej Jeg har strikket denne trøje og skal nu til at montere. Men står med 2 ene stykker også bliver den ene side jo med vrangen ud!! Det står i opskriften at venstre halvdel strikkes som højre men uden knaphul. Og det har jeg gjort men kan ikke få det til at stemme nu. Håber I kan hjælpe. På forhån tak. Vh Tina
28.08.2014 kl. 10:49:DROPS Design answered:
Hej Tina. Den venstre halvdel monteres med vrangen ud. Det staar der jo ogsaa i mönstret
28.08.2014 kl. 14:42:
![]() Joyce wrote:
Joyce wrote:
Do you have an adult version of this: BabyDROPS 20-15 by DROPS Design
02.08.2014 kl. 20:08:DROPS Design answered:
Dear Joyce, what about jacket DROPS 113-8 ? Happy knitting!
04.08.2014 kl. 09:25:
![]() B.de Beer wrote:
B.de Beer wrote:
Hoe kan ik het beste de middenachternaden sluiten zonder een dikke naad te krijgen?
02.05.2014 kl. 12:57:DROPS Design answered:
U kunt bij onze video's kijken voor technieken voor het afwerken.
03.05.2014 kl. 11:19:
![]() Pia wrote:
Pia wrote:
Har börjat sticka denna förtjusande kofta, men tycker garnet, Delight, känns mycket strävt för att vara till ett litet barn. Blir det mjukare när det tvättas? Eller kan man göra något för att få det mjukare?
20.02.2014 kl. 18:37:DROPS Design answered:
Hej Pia, det finns förstås mjukare garner, men vi har gjort många designs i Delight till barn, vi tycker det fungerar fint :) Delight brukar fungera fint när man har det i ett plagg som inte är direkt mot huden, en kofta som denna har man nog alltid något under. Det blir också mjukare vid användning och tvätt. Det är fint att det är superwash, så kan enkelt tvättas i maskin.
03.03.2014 kl. 23:35:
![]() Malene wrote:
Malene wrote:
Jeg strikkede denher til min nevø. Han elsker den! Det er hans yndlingtrøje, han vil altid have dén på om aftenen når han har været i bad. Jeg bliver nok nødt til at starte på en mere til når han er vokset ud af den.
06.02.2014 kl. 23:10:
![]() Claudia wrote:
Claudia wrote:
Komme nicht mehr weiter! bin bei VORDERTEIL die maschen auf hilfsnadel legen (alles klar!) ABER mit den AUFNAHMEN WEITERFAHREN kapier ich nicht... wo mache ich diese aufnahmen weiter??? habe ja vorhin dort abgekettet?? (beim entstandenen dreieck) danke für die hilfe!!
18.11.2013 kl. 14:39:DROPS Design answered:
Liebe Claudia, die Maschen wurden ja nicht abgekettet, sondern nur stillgelegt während das Rückenteil gestrickt wurde. Die Aufnahmen müsse Sie weiter stricken, damit die Diagonallinie und richtige Form entsteht.
18.11.2013 kl. 15:37:
![]() Hannah Arendt (pseudonym) wrote:
Hannah Arendt (pseudonym) wrote:
This is a beautiful design but I don't know whether I am doing it right. Have done the first sleeve section and the casting on - am now increasing. Am I right in thinking I increase on either side of the 2nd stitch, then knit one row then increase of either side of 4th stitch, then k one row, then either side of 6th stitch etc, for 50 times (size 3/4)? That seems to make a diagonal pattern which goes the opposite way from the discontinuous line shown on the pattern diagram.
09.11.2013 kl. 14:21:DROPS Design answered:
Dear Hannah, you put a marker in the 2nd st on right side, seen from RS - this marker will stay in this st all the way - and inc then for front piece each side of the st with marker, so that on 2nd inc row, the st with marker will be the 3rd st on needle. Inc should follow the dotted diagonal line in chart. Happy knitting!
11.11.2013 kl. 09:46:
![]() Claude La Cigogne wrote:
Claude La Cigogne wrote:
Suis-la seule à patauger au cours de l'exécution de ce modèle ? je ne vois vraiment pas où je vais...
25.10.2013 kl. 20:16:DROPS Design answered:
Bonjour Claude La Cigogne, suivez pas à pas toutes les indications de ce modèle, et, pour toute aide complémentaire, n'hésitez pas à vous adresser à votre magasin ou au forum DROPS où vous pourrez recevoir l'aide requise. Bon tricot!
29.10.2013 kl. 08:43:
![]() Titklo wrote:
Titklo wrote:
Il est dit : "placer un marqueur dans la 2ème m de l'aiguille sur l'endroit.. augmenter 1 m de chaque côté de la m avec le marqueur .. tous les 2 rangs" Est-ce que l'augmentation se fait toujours à 2 mailles du bord (sur la ligne pointillée du devant)? Ou est-ce qu'il faut augmenter toujours à la même distance du bord de la manche(sur la 2eme maille la 1ere fois, sur la 3eme maille 2 rangs plus haut, sur la 4eme maille 2 rangs aprés, etc....) Merci!
24.09.2013 kl. 09:24:DROPS Design answered:
Bonjour Titklo, on met un marqueur dans la 2ème m et on laisse ce marqueur en place sur cette même maille, les augmentations se font de part et d'autres de celle-ci. Elle sera donc la 3ème m après la 1ère augmentation et ainsi de suite. Bon tricot!
24.09.2013 kl. 09:32:
![]() Eryn wrote:
Eryn wrote:
After binding off the front of the body, one continues to knit the bottom of the front until it matches the length of the back panel (when folded at shoulder). This creates a different texture edge on the front, below the bottom buttonhole, than the previously bound-off stitches. Is there a good way to instead create a uniform front edge all the way down?
22.09.2013 kl. 02:51:DROPS Design answered:
Dear Eryn, you may add a crochet border around openning of the jacket to "hide" this part if you'd like to. Happy knitting!
23.09.2013 kl. 09:19:
![]() Donna Parker wrote:
Donna Parker wrote:
How many stitches do I actually pick up and knit for the neck? The directions say: knit up 55 to 80 st. I'm confused. Thanks.
28.08.2013 kl. 03:16:DROPS Design answered:
Dear Mrs Parker, number of sts you pick up depends on which size you are working and how you'll pick your sts. Check there is enough sts so that collar is not too tight. You'll find 2 videos showing how to pick up sts under tab "videos" on the right side of the picture. Happy knitting!
28.08.2013 kl. 11:16:
![]() Sybil wrote:
Sybil wrote:
At the beginning of body... Put in marker at second sitch and increase either side. On subsequent increase row tthis then becomes increase either side of third sitch and so on. Is this correct or does it mean always second stitch increase either side of in increase row ? Thank you
21.08.2013 kl. 11:34:DROPS Design answered:
Dear Sybil, marker should stay on this st, the 2nd at the beg of body and inc should be done either side of this st all the way. Happy knitting!
21.08.2013 kl. 13:00:
![]() Fianna wrote:
Fianna wrote:
Hallo, ich möchte diese Jacke gerne in 122/128 stricken. Wie kann ich die Maschen umrechnen. Für eine schnell Antwort wäre ich Dankbar. Gruß fianna
10.07.2013 kl. 19:27:DROPS Design answered:
Liebe Fianna, leider machen wir keine individuellen Umrechnungen einzelner Modelle. Vielleicht finden Sie ja in unserer Musterdatenbank ein anderes passendes Modell.
22.07.2013 kl. 07:30:
![]() Andrea wrote:
Andrea wrote:
Dobrý deň, chcem sa spýtať, ako sa dopracujem k spodnej časti predného dielu, chápem, ako budem pridívať očká, bude sa mi tvoriť diagonála, ale neviem, ako to dotvoriť do obdĺžnika predného dielu, nechýba časť návodu? Podľa obrázka vidím, akoby sa to tam prištrikovalo z boku, ale netuším ako. Vďaka za pomoc i odpoved. Pekný večer. Andrea
03.05.2013 kl. 19:04:Klara Papp wrote:
Would you be so kind to help me with the following. When you say "put the marker in the 2nd stitch" does this mean always this original 2nd stitch (constant) around which to increase or is it the 2nd stitch (moving) of each new row on the RS? Thank you very much and kind regards, Klara
27.02.2013 kl. 23:35:DROPS Design answered:
Dear Mrs Papp, the marker should be kept in that sts, and inc will be done either side of this st, so always the "original" 2nd st. Happy knitting!
02.03.2013 kl. 10:49:
![]() Libelle wrote:
Libelle wrote:
Ich habs hinbekommen,sieht schön aus,hat mich aber,als Wiedereinsteigerin beinahe umgebracht bis ich verstanden habe wie es funzt.Das Garn hat sich bei mir immer wieder einfach aufgedreht-ich empfinde es als falschrum gesponnen-ich musste oft alle Heiligen beschwören bis es geschafft war(das Jäckchen,nicht ich;))
27.02.2013 kl. 15:18:
![]() Anne Mattila wrote:
Anne Mattila wrote:
Hei, Haluaisin vastauksen koskien etukappaleen palasta, joka kaavaan piirretty katkoviivalla. Missä on ohje tähän palaseen???? Odotan nopeaa vastaustanne.
29.01.2013 kl. 13:53:
![]() Anne Mattila wrote:
Anne Mattila wrote:
Hei, Jälleen sama kysymys, missä on ohje etukappaleen kolmioon? Kaikki ohjeet löytyvät muuten, mutta etukappaleesta puuttuu palanen. Miten se tehdään? Olen kysynyt tätä myös Menita-liikkeestä, mutta sielläkin sanoivat, että ohjeessa on virhe. Voisitteko vihdoin vastata tähän kysymykseen????? Anne Mattila
28.01.2013 kl. 16:11:
![]() Anne Mattila wrote:
Anne Mattila wrote:
Hei, Odotan yhä vastaustanne koskien etukappaleen kolmiota, josta ei ohjeessa puhuta ollenkaan. Kävin liikkeessä, josta langat on ostettu, mutta he totesivat saman. Voitteko vastata mahdollisimman pian!
24.01.2013 kl. 11:04:DROPS Design answered:
Hei! Tämä katkoviiva näyttää mistä vaate taitetaan, ennen kuin työ ommellaan yhteen.
27.01.2013 kl. 13:15:
![]() Anne Mattila wrote:
Anne Mattila wrote:
Hei, Odotan yhä vastaustanne koskien etukappaleen kolmiota, josta ei ohjeessa puhuta ollenkaan. Kävin liikkeessä, josta langat on ostettu, mutta he totesivat saman. Voitteko vastata mahdollisimman pian!
24.01.2013 kl. 11:04:
![]() Anne Mattila wrote:
Anne Mattila wrote:
Hei, Odotan yhä vastaustanne koskien etukappaleen kolmiota, josta ei ohjeessa puhuta ollenkaan. Kävin liikkeessä, josta langat on ostettu, mutta he totesivat saman. Voitteko vastata mahdollisimman pian!
24.01.2013 kl. 11:03:
![]() Anne Mattila wrote:
Anne Mattila wrote:
Hei! Mistä tuo etukappaleen kolmio muodostuu, joka kuvaankin piirretty katkoviivalla? Toinen etukappale muuten valmis, mutta tuo kolmion ohje ikäänkuin puuttuu?
20.01.2013 kl. 20:45:
![]() Ruth Habermehl wrote:
Ruth Habermehl wrote:
Leider beantwortet das meine Frage nicht. Das rechte Teil ist ja unvollständig. Im Muster ist nicht beschrieben, wie die Maschen unterhalb der Diagonale rechts (vorderteil) angestrickt werden.
16.11.2012 kl. 21:48:DROPS Design answered:
Nochmals hallo, da wird nichts angestrickt oder angesetzt, die Ecke entsteht beim Stricken. (an dieser Stelle: GLEICHZEITIG auf beiden Seiten der M. mit dem Markierungsfaden je 1 M. aufnehmen).
18.11.2012 kl. 10:23:
![]() Ruth Habermehl wrote:
Ruth Habermehl wrote:
Ich meinte das Abketten am Ende des letzten Satzes im Zitat:"Nach allen Auf- und Abnahmen sind noch 90-93-109 (115-121-126) M. auf der Nadel. Wenn die Aufnahmen auf der rechten Seite fertig sind vom Hals her an der Blende herunter 51-52-62 (66-70-74) M. abk. (von der linken Seite) = 39-41-47 (49-51-52) M. Über diese M. 1-1-2 (2-3-3) cm hin und zurück stricken (dem Rückenteil anpassen). Danach abk."
13.11.2012 kl. 21:02:DROPS Design answered:
Hallo Frau Habermehl, danach stricken Sie das linke Teil genau gleich, nur ohne Knopflöcher. Es muss nicht spiegelverkehrt gestrickt werden, da die linke Seite nach außen genommen werden kann. Folgen Sie einfach der in der Anleitung angegebenen Reihenfolge.
15.11.2012 kl. 10:29:
![]() Ruth Habermehl wrote:
Ruth Habermehl wrote:
Wie kann ich das untere Dreieck auf der Vorderseite ansetzen? Das obere Dreieck ist fertig und 66 Maschen sind abgekettet. Was jetzt?
11.11.2012 kl. 20:07:DROPS Design answered:
Liebe Frau Habermehl, ich verstehe leider Ihre Frage nicht ganz. Diese Jacke hat ja nur eine Naht in der hinteren Mitte.
13.11.2012 kl. 11:43:
![]() Bettina wrote:
Bettina wrote:
Schon schon, kraus rechts sieht von beiden Seiten gleich aus. Aber nicht mehr mit Mustern und verschiedenen Farben... Wenn ich mir also einbilde, die Anleitung einfach abwandeln zu können... Dank und Gruß, Bettina
10.11.2012 kl. 18:41:
![]() Bettina wrote:
Bettina wrote:
Nur eine Anregung zur Anleitung der tollen Jacke: Ich war so blöd, mit Farben und Muster zu arbeiten, ohne daran zu denken, dass ich dann einen Teil spiegelverkehrt arbeiten muss. Also nicht einfach einen Teil auf links verwenden konnte. Vielleicht als Warnung (für Doofe) oben drüber schreiben. 1000 Dank für alle tollen Anleitungen!!! Bettina
05.11.2012 kl. 11:50:DROPS Design answered:
Liebe Bettina, sie müssen das Teil gar nicht spiegelverkehrt stricken. Da kraus rechts von beiden Seiten gleich aussieht, nehmen Sie einfach die Rückseite nach aussen.
05.11.2012 kl. 13:10:
![]() Heidi wrote:
Heidi wrote:
Nå har jeg fått hjelp til å skjønne oppskrifta, - så nå blir det riktig. Men oppskrifta er ikke klar nok på hvordan man øker. Jeg økte på hver side av maska i hver side og fikk en "snipp". Den maska som det skal økes rundt må forflyttes et hakk til venstre hele veien! Kanskje det bør skrives klarere? Mvh Heidi
27.10.2012 kl. 10:58:
![]() Lisbet Silver wrote:
Lisbet Silver wrote:
Jeg har forsøgt at følge opskrift ,men tror nok der mangler noget med vedstrikning, som opskriften har glemt. Pleace ! hjælp mig at gøre den færdig. Med venlig hilsen Lisbet Silver
26.10.2012 kl. 16:16:
![]() Heidi wrote:
Heidi wrote:
Er oppskrifta riktig? Jeg får høyre framside til å bli lenger enn bakstykket. På bildet ser det ut som rillene går vannrett nederst, men når/hvordan skifter man strikkeretning?
09.10.2012 kl. 15:56:DROPS Design answered:
Heisann. Det skal ikke være noe galt med denne oppskriften. Strikkeretningen forandres når det økes 1 m på hver side av m med merke på hver 2.p.
15.10.2012 kl. 11:37:Simona wrote:
Good morning, I'd like to know if it's possible translate this pattern in Italian. Usually I don't need it, but for me this particular pattern is a bit difficult. Thank you so much. Simona
06.10.2012 kl. 16:09:DROPS Design answered:
Tradurremo al più presto questo bellissimo giacchino anche in italiano!
09.10.2012 kl. 11:14:
![]() Patrcia wrote:
Patrcia wrote:
Bonjour, je cite:"placer un marqueur dans la 2eme , de l'aiguille sur l'endroit" ma question est: le marquer est du coté manche ou de l'autre coté? merci Patricia
26.06.2012 kl. 17:35:DROPS Design answered:
Bonjour Patricia, le gilet se commence par la manche, à ce niveau là, vous avez monté, à gauche (= en fin de rang sur l'endroit) les mailles du dos, et vous placez ce marqueur à droite (= au début du rang sur l'end) pour faire les augmentations (= diagonale en pointillé dans le schéma) qui vont donner le devant. Bon tricot !
27.06.2012 kl. 09:09:
![]() Marie Danneels wrote:
Marie Danneels wrote:
Ik moet glimlachen als ik al die vragen zie m.b.t. het patroontje. Het is inderdaad een echte uitdaging maar ik ga deze zeker niet uit de weg. Hoed af voor de ontwerpster van dit patroon. Ten aanval !!!
15.06.2012 kl. 11:39:
![]() Anne-Beate Dokken wrote:
Anne-Beate Dokken wrote:
Forstykke: fra der økningen på forstykke startet og mot midt foran. Skal det måles på skrå langs økninger eller rett ned. Takk for all hjelp.
07.06.2012 kl. 11:57:DROPS Design answered:
Hei. Det måles rett ned.
27.06.2012 kl. 07:47:Tine Jensen wrote:
Hej Anne-Beate. Se DROPS 127-12. Der er dame modellen af denne jakke
05.06.2012 kl. 20:35:
![]() Anne-Beate Dokken wrote:
Anne-Beate Dokken wrote:
Har lyst til og strikke denne til voksen. Har dere forslag til garn/oppskrift jeg kan bruke.
05.06.2012 kl. 14:08:DROPS Design answered:
Bruk vår søkemotor ved å velge garnkvalitet og/eller fagord/stikkord, så finner du nok en oppskrift du vil strikke.
06.06.2012 kl. 14:22:
![]() Elli wrote:
Elli wrote:
Die Anleitung beeinhaltet für das Vorderteil nur das obere Dreick Wie bekomme ich das untere Dreieck? Bitte nicht einfach mit "Dominoviereck" antworten ich weiß nicht was das ist oder wie man das macht
08.03.2012 kl. 17:11:DROPS Design answered:
Am besten schauen Sie auf die Skizze. Die gestreifte Linie auf der rechten ist die Diagonale am Vorderteil. Auf beiden Seiten der Markierung werden Maschen aufgenommen die das Dreiekc bilden.
09.03.2012 kl. 09:33:
![]() Elli wrote:
Elli wrote:
Ich bin gerade dabei das Vorderteil zu stricken. Da steht man soll 9Maschen auf dem Hilfsfaden lassen und dann das Vorderteil weiter stricken und dabei den Halsausschnitt abketten (das ist alles klar) Aber was soll ich mit den 9Maschen auf dem Hilfsfaden machen??
08.03.2012 kl. 17:08:DROPS Design answered:
Die Maschen auf dem Hilfsfaden (9 M.) werden am Schluss für die Halskante gebraucht.
09.03.2012 kl. 09:30:
![]() Helma Riße wrote:
Helma Riße wrote:
Komme hier nicht weiter, verstehe nicht, wie ein Domio-Viereck gestrickt werden soll ? Stecke fest bei der Aufnahme von 43 Maschen nach dem Ärmchen. Vielen Dank im vorraus
03.03.2012 kl. 09:20:DROPS Design answered:
Die Aufnahme bei der 2. M. ergibt die markante Diagonale am Vorderteil.
05.03.2012 kl. 10:39:Sollasalma wrote:
Merci
03.12.2011 kl. 02:41:
![]() DROPS Deutsch wrote:
DROPS Deutsch wrote:
Schreiben Sie doch bitte wo Sie nicht weiterkommen. Dann versuche ich Ihnen weiterzuhelfen.
28.11.2011 kl. 08:37:
![]() Libelle wrote:
Libelle wrote:
Meines Erachtens ist die Anleitung nicht strickbar so dass das hübsche Jäckchen dabei entsteht,könnte das evtl. geändert werden
27.11.2011 kl. 10:03:
![]() DROPS Deutsch wrote:
DROPS Deutsch wrote:
Da das Dominovierecke im Muster durch Aufnahmen erreicht wird und die Vierecke im Video durch Abnahmen passt das Video nicht zum Muster und wurde entfernt.
28.10.2011 kl. 10:18:
![]() Dolina Von Raedern wrote:
Dolina Von Raedern wrote:
Es wäre wünschenswert,dass diese Anleitung schnell überarbeitet wird. Die Anleitung zu "Domino" fehlt im Strickmuster völlig. Wie ish sehe, bin ich nicht die erste, der das auffällt
27.10.2011 kl. 19:59:Marcia wrote:
Muito boa esta receita, gostei muito obrigada
17.08.2011 kl. 22:58:
![]() Drops Design France wrote:
Drops Design France wrote:
Bonjour Lolotte, ce modèle se tricote en allers retours sur aiguille circulaire pour avoir suffisamment de place pour y loger toutes les mailles. Il peut donc tout à fait se tricoter sur aiguilles droites, mais les mailles seront beaucoup plus serrées. N'hésitez pas à consulter notre vidéothèque pour apprendre à tricoter en allers et retours sur aiguille circulaire.
12.08.2011 kl. 14:18:Lolotte wrote:
Ce modèle peut-il être tricoté avec des aiguilles droites?Si oui, des modifications éventuelles doivent-elles être apportées? Merci d'avance de votre réponse.
12.08.2011 kl. 12:28:
![]() Wilma Meurs wrote:
Wilma Meurs wrote:
Dat heb ik gelezen, maar is de bedoeling nu meerderen aan het begin in elke volgende naald , of meerderen op de plaats van de markeerdraad in de eerste naald, dus hoe verder het werk volgt hoe verder uit kant? En hoe ontstaat dan het stuk in het voorpand onder de mouw? (staat op de foto haaks gebreid?
11.08.2011 kl. 09:50:Drops Design NL answered:
Meerderen op de plaats van de markeerdraad, zoals in het patroon staat. Dus aan elke kant van de st met de markeerdraad, dat is de eerste keer de 2e st, daarna komen aan beide kanten van deze st er steken bij en ontstaat de juiste vorm vanzelf.
11.08.2011 kl. 12:14:
![]() Wilma Meurs wrote:
Wilma Meurs wrote:
Hoe wordt het voorpand gevormd? In de beschrijving staat vermeld dat om de naald aan weerszijde van de tweede steek van de naald 1 steek meerderen (38x) Is dit bij het begin van iedere tweede naald, of ter hoogte van de eerste keer? Er ontstaat een schuine kant. Hoe brei ik er het onderste gedeelte van het voorpand tot aan de mouw aan, zodat de kleur van het garen doorloopt?
10.08.2011 kl. 19:14:Drops Design NL answered:
Er staat: "plaats een markeerdraad in de tweede st op de nld" en u meerdert aan elke kant van deze steek elke keer - bij tip voor het meerderen staat hoe. Als u de aanwijzigen in het patroon volgt, lopen de kleuren door zoals op de foto. Succes, Angelique
11.08.2011 kl. 08:55:
![]() DROPS Design DE wrote:
DROPS Design DE wrote:
Man muss nur für das Rückenteil anschlagen, das Vorderteil ergibt sich durch die Aufnahmen neben der markierten Masche. Bis 8½-9-10½ (11-12-13) cm nach dem Anschlagen der Rückenmaschen werden beide Teile zusammen gestrickt.
08.08.2011 kl. 10:56:
![]() Bettina Schmaltz wrote:
Bettina Schmaltz wrote:
Nach dem Ärmel werden unter "Vorder-und Rückenteil" am Schluss der Reihe 41 M angeschlagen. Muss man für das Rückenteil am anderen Ende der Reihe auch 41 M anschlagen? Werden die Reihen für das Dominoviereck immer bis zum Ende gestrickt, also Vorderteil mit Domino und Rückenteil gleichzeitig?
06.08.2011 kl. 01:09:
![]() DROPS Deutsch wrote:
DROPS Deutsch wrote:
Das Vorderteil ist ein Dominoviereck.
29.07.2011 kl. 14:36:
![]() Claudia wrote:
Claudia wrote:
Ich verstehe, wie das obere Dreieck (vom Hals bis nach unten) durch die Zunahmen jede 2. R. zustande kommt. Wie kommt das untere Dreieck zustande? Das Dreieck, das bis unter den Arm reicht? Was hat es mit dem empfohlenen Video "Domino" auf sich? Hat das damit zu tun? Herzlichen Dank!
28.07.2011 kl. 10:10:
![]() Drops Design France wrote:
Drops Design France wrote:
Le "triangle" du devant se forme au moment des augmentations sous "dos et devant", je cite : "– EN MÊME TEMPS, augmenter 1 m de chaque côté de la m avec le marqueur 38-40-46 (48-50-52) fois au total tous les 2 rangs "
14.06.2011 kl. 13:46:
![]() Anne wrote:
Anne wrote:
Bonjour, Je ne comprends pas à quel moment on tricote le "triangle" en bas du devant. Merci pour votre réponse.
05.06.2011 kl. 17:31:
![]() Drops Design France wrote:
Drops Design France wrote:
Tout à fait Emilie, la "diagonale" en pointillé sur le devant situe les augmentations et l'angle que l'on voit sur la photo.
10.05.2011 kl. 10:17:
![]() Emilie wrote:
Emilie wrote:
Bonjour, la ligne discontinue de la manche( diagramme )ne sert qu'à situer le milieu de la manche, de l'ouvrage alors que celle du devant est la diagonale des diminutions/augmentations n'est-ce pas? merci!
10.05.2011 kl. 09:50:Kommentér oppskrift DROPS Baby 20-15
Vi vil gjerne høre din mening om denne modellen!
Hvis du ønsker å stille et spørsmål, husk å velge riktig kategori i menyen under - det vil sørge for at du får svar raskere.
Din mailadresse vil ikke synes. Obligatoriske felt er markert med *.
Hej Jeg bil gerne vide om denne opskrift findes til voksne. Og hvis den gør så hvor . På f orhånd tak Venlig hilsen christa
27.11.2023 kl. 15:23: