Comments to DROPS 110-28
![]() Keri wrote:
Keri wrote:
I love you bolero patterns but as a beginner I need something simple. Do you have any suggestions of a simple pattern I could try?
17.03.2022 kl. 21:50:DROPS Design answered:
Dear Keri, you will find all our patterns for boleros here - read the one you like and if you have any questions, please just ask them there, so that we can help you. Happy knitting!
18.03.2022 kl. 09:35:
![]() Maria wrote:
Maria wrote:
When I add the new 12 stitches either side how do I carry on with the pattern, gather first 3 and then do I start the pattern with purl 3 together or k p k same stitch?
19.01.2022 kl. 19:54:DROPS Design answered:
Dear Maria, depending on the next stitch after the new sts, you will have to calculate how to start the pattern after the 3 sts in garter stitch to maintain pattern as before. Happy knitting!
20.01.2022 kl. 09:11:
![]() Maria wrote:
Maria wrote:
After the piece measures 9cm and we add the 12 new stitches either side it’s almost impossible to purl 3 together on the new stitches! Any tricks?
19.01.2022 kl. 17:59:DROPS Design answered:
Dear Maria, maybe use a crochet hook to help you? Contact your yarn store, they might have any other idea or tipp for you. Happy knitting!
20.01.2022 kl. 09:05:
![]() Maria wrote:
Maria wrote:
Hi, I don’t know what to do from: NOW MIRROR PIECE FROM HERE! Any videos that explain that? Thanks
19.01.2022 kl. 17:40:DROPS Design answered:
Dear Maria, just continue as explained in the pattern, ie you will cast off sts instead of casting them on and increase inestead of decrease, just as explained in the pattern. Happy knitting!
20.01.2022 kl. 09:00:
![]() Olga Terekhov wrote:
Olga Terekhov wrote:
I understand that if " 3 garter sts " at the beginning and end of each row , the edge sts will be K. Thank you.
25.02.2021 kl. 22:38:
![]() Olga Terekhov wrote:
Olga Terekhov wrote:
Hello, Can you please tell if the edge st should be knitted in P or K? Thank you.
25.02.2021 kl. 19:57:DROPS Design answered:
Dear Mrs Terekhov, you are working back piece with blackberry stitches and 3 stitches in garter stitch on each side, ie there is no extra edge stitches as the one explained in the pattern. You work the stitches as follows: 3 sts in garter st, blackberry stitch until 3 sts remain, 3 sts in garter stitch. Happy knitting!
26.02.2021 kl. 08:21:
![]() Olga Terekhov wrote:
Olga Terekhov wrote:
Hello. I started to work on schematic. My question is why 9 cm for rib showing only on a cast on row? I would assume that if this rib goes around all bolero the whole piece will measure from top to bottom 83cm for M size ( not 74 cm) . Please let me know where I am mistaking.
17.02.2021 kl. 19:30:DROPS Design answered:
Dear Mrs Terekhov, the rib edge is worked at the end around the whole edge (in stitches from cast on rows + stitches from last row worked) over 9 cm. In size M the whole piece will be 74 cm including the 9 cm on each side: 9 cm rib + (9+38+9 cm main piece worked with blacbkerry stitches) + 9 cm rib = 74 cm. Hope this helps, Happy knitting!
18.02.2021 kl. 09:16:
![]() Sylvia Hofmann wrote:
Sylvia Hofmann wrote:
Hallo. Was genau ist mit „ Die Arbeit von hier spiegelverkehrt stricken.“ gemeint? Liebe Grüße
31.12.2020 kl. 12:41:DROPS Design answered:
Liebe Frau Hofmann, es bedeudet, daß Sie jetzt die Hälfte gestrickt haben, und nach 44-47-50-53-56-59 cm werden Sie dann die 12 früher angeschlagenen Maschen abketten und dann bis 52-56-60-64-68-72 cm über die restlichen Maschen stricken. Viel Spaß beim stricken!
04.01.2021 kl. 13:50:
![]() Veronique Vigot wrote:
Veronique Vigot wrote:
Bonjour pouvez vous me dire ce que vous entendez par tricoter le coté en miroir je ne saisi pas bien merci
03.02.2020 kl. 13:13:DROPS Design answered:
Bonjour Mme Vigot, on va tricoter l'autre moitié en sens inverse, suivez simplement les indications suivantes des explications: on rabat les 12 mailles que l'on a monté et on augmentez 24 mailles (au lieu de les diminuer). Bon tricot!
03.02.2020 kl. 13:45:
![]() Katiuscia wrote:
Katiuscia wrote:
Scusate, le misure scritte,sono giuste? Ad esempio l'altezza,36+8+8+9 voi scrivete 70. Forse non sono capace di leggere i modelli. Sono alle prime armi. Vi ringrazio.
03.01.2019 kl. 14:45:DROPS Design answered:
Buongiorno Katiuscia. Alle misure indicate, deve aggiungere altri 9 cm del bordo a coste anche nella parte in alto. E' il bordo a coste che viene lavorato tutto intorno al bolero, alla fine, ma nel grafico è disegnata solo la parte in basso. Buon lavoro!
03.01.2019 kl. 15:18:
![]() Beth Cole wrote:
Beth Cole wrote:
I am going to take this pattern and knit st st instead of the bobble with some colored yarn. I have two daughters and doing the bobbles for 2 boleros might just drive me mad ;) I will tackle the pattern as is for myself, however. Great pattern!
24.07.2013 kl. 16:08:
![]() Carol Brown wrote:
Carol Brown wrote:
I have completed the body of the shrug and am ready to begin the ribbing. It looks to me as though I should sew up the side seams before I do the ribbing, but the directions are written in such a way as to make me think the seams are done after the ribbing. Could you clarify for me? Thank you.
20.12.2012 kl. 19:07:DROPS Design answered:
Dear Mrs Brown, you are right, you work the edge around the shrug : sts on needle + sts picked up along cast on edge. Seams for sleeves are done afterwards (see dotted lines on charts). Happy knitting!
20.12.2012 kl. 21:09:
![]() Margreet wrote:
Margreet wrote:
Hallo Rita, dank je wel, je bevestigt mijn vermoeden. Dit blijft een mooie bolero, maar dus minder flatteus voor wat vollere vrouwen. Ik kies een ander patroon.
04.10.2012 kl. 21:22:
![]() Rita wrote:
Rita wrote:
Hallo Margreet, ik heb dit gemaakt in XL en het verdikt verschrikkellijk op de boezem,heb het maar een keer gedragen.
04.10.2012 kl. 16:15:
![]() Margreet wrote:
Margreet wrote:
Wat een prachtige bolero, ik zou 'm graag maken voor mezelf, maar ik vraag mij af of het in XL nog steeds leuk is?
03.10.2012 kl. 22:49:
![]() Eva wrote:
Eva wrote:
Hallo zusammen, habe mir dieses Modell passenderweise in "brombeer" gestrickt. Was mich etwas stört, ist das es im nacken eine große Falte gibt, und würde beim nächsten mal einen Halsausschnitt einbringen. Aber sonst eine Top Anleitung trage den Bolero gerne. Danke!
07.09.2012 kl. 10:30:
![]() Rina Luban wrote:
Rina Luban wrote:
I am about to start this pattern. what is the measurement for the two smallest sizes? the pattern does not say. Thanks so much.
14.05.2012 kl. 22:35:DROPS Design answered:
We are publishing a measure chart with each design. There you see the actual garments finished measures. The measures in the chart is in cm and measured from side to side. So to figure out which size to make, the best is to measure a garment you already have and like the size of and then compare with the chart.
17.05.2012 kl. 20:38:
![]() DROPS Deutsch wrote:
DROPS Deutsch wrote:
Links auf rechts = li. auf der Vorderseite.
25.12.2010 kl. 20:06:
![]() A.m. wrote:
A.m. wrote:
Frage zum Brombeermuster: in der Legende zum Diagramm steht, man möge in der Hinreihe "links auf rechts" stricken (verstehe ich als Maschen so stricken, wie sie erscheinen, ist das ein bundesdeutscher Ausdruck??), bei der Videoanleitung steht "1. u. 3. R. li stricken". Habe ich irgendwas falsch verstanden? Danke im Voraus.
25.12.2010 kl. 08:54:
![]() DROPS Design wrote:
DROPS Design wrote:
Man nimmt unten an der Kante auf sodass rund um die Arbeit mit dem Brombermuster ein Bündchen gestrickt werden kan.
08.10.2010 kl. 08:21:
![]() Nina wrote:
Nina wrote:
Hallo! Ich befinde mich gerade an der Stelle wo man mit dem Bündchen anfängt und komme nicht weiter. Ich verstehe einfach nicht was gemeint ist mit "...an der Anschlagskante x Maschen aufnehmen...die Arbeit wird jetzt rund gestrickt."?? Wo stricke ich die rund? Nina
07.10.2010 kl. 22:52:
![]() DROPS Design NL wrote:
DROPS Design NL wrote:
Dwz, dat u het eerste stuk (32 cm) nu in spiegelbeeld moet breien - niet het patroon. Dus u gaat door in braambessen zoals eerst en bij een hoogte van 53 cm afkanten voor de mouwen en brei de laatste 11 cm met 3 ribbelst aan weerskanten - zoals in het begin. U kunt ook op de maattekening zien hoe het breiwerk eruit moet zien. Succes. Gr. Tine
16.08.2010 kl. 10:36:
![]() Irene wrote:
Irene wrote:
Ik maak maat xl, ben bij 32 cm, dan moet ik in spiegelbeeld gaan breien. Hoe bedoelen jullie dat? Ik ben geeindigd met naald 4 in de braambessensteek, moet ik nu eerst een naald averecht en dan weer een naald 4 ipv naald 2?
12.08.2010 kl. 23:13:
![]() DROPS Design DE wrote:
DROPS Design DE wrote:
Hallo, das ist völlig richtig, es muss beim letzten Mal "re" heissen. Ich habe es gleich korrgiert. Vielen Dank für den Hinweis!
27.07.2010 kl. 08:31:
![]() Frauke wrote:
Frauke wrote:
Hallo! Die Anleitung sagt für das Bünchen: zuerst nach 6cm in jeder Linksrippe zunehmen. Dann nach 9cm (gesamt) NOCHMALS in jeder Linksrippe. Gestrickt wird danach aber nicht 2 re 4 links, sondern 2 re 2 li. Dem Bild nach und der Logik nach müsste beim zweiten Mal in der Rechtsrippe zugenommen werden. Ist hier ein Fehler in der Anleitung? Danke schonmal!
26.07.2010 kl. 21:18:
![]() Chris1943 wrote:
Chris1943 wrote:
Just the thing for the British summer. Casting on now can't believe I missed this one earlier
15.04.2010 kl. 10:03:
![]() DROPS Design NL wrote:
DROPS Design NL wrote:
Hallo. Kijk onderaan het patroon. Hier is een schematekening, waarin u kunt zien hoe u het vestje in elkaar moet zetten. De gestipte lijnen op het model zijn de naden voor de mouwen. Naai deze aan elkaar en u krijgt twee armsgaten. Leg eventueel het model plat op een tafel leggen en vouwen zoals op de tekening. Succes. Tine
05.04.2010 kl. 15:53:
![]() E.hofman wrote:
E.hofman wrote:
Hoe zet ik hem verder in elkaar snap er niets van moet eerst de mouwen en zykant aan elkaar en dan graag een schema
03.04.2010 kl. 10:02:
![]() DROPS Design NL wrote:
DROPS Design NL wrote:
Hoi. Vervelend! Maar om u beter te kunnen helpen, zou u dan willen aangeven wat uw probleem is??? Gr. Tine
29.03.2010 kl. 19:14:
![]() Eefje.hofman wrote:
Eefje.hofman wrote:
Kom er niet uit
27.03.2010 kl. 13:52:
![]() Ruth wrote:
Ruth wrote:
Really enjoyed knitting this one,pattern perfetly constructed. A great addition to my wardrobe, many thanks
24.01.2010 kl. 17:30:
![]() A.K. wrote:
A.K. wrote:
Tein 7-veljeksestä ja hyvä tuli.
06.01.2010 kl. 15:28:
![]() Amy wrote:
Amy wrote:
Thank you. I can't believe I couldn't see it, but I guess this is what I get for burning the midnight oil.
03.01.2009 kl. 03:46:
![]() Nordic Mart wrote:
Nordic Mart wrote:
Amy, it says to add 12 sts Each Side of work, i.e. 12 + 12 - which adds 24 sts to the total amount of sts.
03.01.2009 kl. 02:38:
![]() Amy wrote:
Amy wrote:
When it says 'add 12 sts for sleeves' the result sts given are actually when you add 24 sts. Is it supposed to be 24 sts or 12 sts?
03.01.2009 kl. 02:26:
![]() Linda Moore wrote:
Linda Moore wrote:
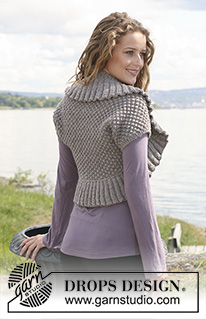
Another Gotta Have! Love the texture on the body and the wide fanned out edge to form the collar. VERY CUTE!
04.08.2008 kl. 00:19:
![]() Petra wrote:
Petra wrote:
Så himla läcker den skulle vara till jeans, längtar tills ni lägger ut mönstret på den.
05.07.2008 kl. 07:40:
![]() Solfrid wrote:
Solfrid wrote:
Ønsker meg oppskriften på denne!
04.07.2008 kl. 21:21:
![]() Bettina wrote:
Bettina wrote:
Die ist superschön, die ist auf meiner wunschliste!
27.06.2008 kl. 20:45:
![]() Elizabeth wrote:
Elizabeth wrote:
I can hardly wait. It will look so wonderful on my niece.
21.06.2008 kl. 04:35:
![]() Laritza wrote:
Laritza wrote:
Can't wait for this one! very nice!
21.06.2008 kl. 04:30:
![]() Beaucourt wrote:
Beaucourt wrote:
Super beau!!il y a vraiment des personnes qui ont des donts!! je les envies!!magnifique et bravo pour la personne qui l'a créer et j'espère que nous aurons l'ocassion de le voir dans les prochaines publications bravo!!
05.06.2008 kl. 13:32:
![]() Héléne wrote:
Héléne wrote:
Un bon point pour le col qui fait tout le chic de ce petit-chauffe épaule.
31.05.2008 kl. 22:30:Therese Renaut wrote:
Que voilà un modèle très féminin et très flateur. Bravo.
30.05.2008 kl. 19:58:
![]() Anita Lielholm wrote:
Anita Lielholm wrote:
Den er skøn
30.05.2008 kl. 17:04:
![]() Liz Mills wrote:
Liz Mills wrote:
Such a useful shrug love the shaping and the wide rib around edge.
30.05.2008 kl. 13:39:
![]() Cmc wrote:
Cmc wrote:
I like the shape
30.05.2008 kl. 13:01:
![]() Anna-Karin wrote:
Anna-Karin wrote:
Björnbärsmönstret är "pricken över i:et". Fastnade mer för denna än nån annan i samma modell.
30.05.2008 kl. 08:49:Post a comment to pattern DROPS 110-28
We would love to hear what you have to say about this pattern!
If you want to leave a question, please make sure you select the correct category in the form below, to speed up the answering process.
Your email address will not be published. Required fields are marked *.
Vil blot fortælle jer, at jeres garnforbrug på 400 g til denne bluse i str. M ikke stemmer - der skal bruges 450 g, altså eet nøgle mere…. Ret irriterende, at jeg nu skal bestille et nøgle yderligere til sidst, hvor farven måske ikke er helt den samme, jeg gemte ikke omslaget, troede opskrift passede. ÆV !
17.10.2022 kl. 09:10: