Kommentarer till DROPS 86-10
![]() June wrote:
June wrote:
Do I do the first two rows actually like they are written after doing the first increase row?
23.03.2024 kl. 00:43:DROPS Design answered:
Dear June, in this pattern you have a rib pattern, where you will repeat the rib explained in rows 1 and 2. However, as you increase, the rib will slightly change. For example, in the first increase at 3", you increase from P1 in the rib to P2 from the RS (by purling 2 stitches in 1 purl stitch). Then, on the WS knit over the new purl stitches (so the new rib will look like K2, P2 from the RS and P2, K2 from the WS). As you continue increasing you will add P stitches from the RS, which are knitted from the WS (so K2, P3 from the RS and P2, K3 from the WS; then K2, P4 from the RS and P2, K4 from the WS). Continue increasing like this. Happy knitting!
25.03.2024 kl. 00:00:
![]() June wrote:
June wrote:
When the piece messages 3 ins what do I do now?
23.03.2024 kl. 00:30:DROPS Design answered:
Dear June, in the first increase at 3", you will work as follows from the RS: K 1 (edge st knit in garter st), * K 2, P 2 (that is, purl 2 stitches in the P1 to increase 1 purl stitch) * repeat a total of 5 times – finish row with K 2 and K 1 (edge st knit in garter st). Due to these increases, in the WS the rib also changes: from P2, K1 to P2, K2 (you don't increase in this row, just work over the increased stitches in the previous row). Happy knitting!
25.03.2024 kl. 00:00:
![]() Carole Saidah wrote:
Carole Saidah wrote:
Bonjour, pour le bandeau, est ce que les diminutions se font sur l'endroit du travail comme pour les augmentations ? Merci pour votre réponse
27.12.2022 kl. 19:55:DROPS Design answered:
Bonjour Mme Saidah, tout à fait, on doit diminuer le nombre de mailles envers, vu sur l''endroit, on va tricoter ainsi 2 m ens à l'envers sur l'endroit. Bon tricot!
02.01.2023 kl. 10:33:
![]() Brenda wrote:
Brenda wrote:
Any chance of doing a video tutorial on you-tube. I really like this headband, but am confused with the written pattern.
01.12.2022 kl. 01:02:DROPS Design answered:
Dear Brenda, you will find videos relative to the techniques used in that pattern at the bottom of the pattern, feel free to ask your question here so that we can help you further in the part of the pattern you don't understand. Happy knitting!
01.12.2022 kl. 11:46:
![]() Kathy wrote:
Kathy wrote:
I am on the first increase row to 24 stitches and following the established rib pattern but there are not enough stitches to complete the rib pattern! What do I do?
11.10.2021 kl. 01:08:DROPS Design answered:
Hi Kathy, You increase all P1 to P2 (5 stitches increased) which gives you 24 stitches. You now have 1 stitch in garter stitch, 5 x K2, P2 (20 stitches), K2 and 1 stitch in garter stitch = 24 stitches. Happy knitting!
11.10.2021 kl. 07:04:
![]() Iris wrote:
Iris wrote:
Hallo! Ich bin ziemliche Anfängerin und komme mit der Anleitung nicht ganz zurecht. Betrifft das Fertigstellen des Stirnbands mit den Maschen auf einem Hilfsfaden. Habe leider auch kein passendes Videotutorial dazu finden können. Wie lange muß der Hilfsfaden sein? und wird er mithineingenäht? Danke im Voraus für die Hilfe!
01.01.2021 kl. 22:03:DROPS Design answered:
Liebe Iris, die stillgelegten Maschen werden wie in diesem Video zusammen mit der Anschlagskante - wie in diesem Video zusammen genäht, dh so eine "Mischung" je nach den Maschen. Viel Spaß beim zusammennähen!
04.01.2021 kl. 14:43:
![]() Kirsty wrote:
Kirsty wrote:
Hi, wow many thanks for your helpful video reply. I really appreciate it. Love your site. Well wishes, Kirsty
28.06.2020 kl. 20:24:
![]() Kirsty wrote:
Kirsty wrote:
Hi, Sorry to ask but how do you increase stitches please? I've done basic knit purl only, very new to knitting. Could knit shrug cardi as basic one. But when this lovely pattern talks about increasing 1 stitch to 2 etc im lost sorry. Anyone able to describe simply how to do this? Many thanks, Kirsty, Scotland
24.06.2020 kl. 08:02:DROPS Design answered:
Dear Kirsty, you will increase in the purl-sections in rib - this video shows how to increase in purl stitches. Happy knitting!
24.06.2020 kl. 13:49:
![]() Sherie Rodrigues wrote:
Sherie Rodrigues wrote:
To all the knitters who commented and asked questions, and to all the staff who answered the questions, I say THANK YOU. Without your help I may not have worked the pattern out by myself, but I am so glad I did. It is simple, when the light bulb goes off. I would suggest you look at the questions and answers until it makes sense. I do so LOVE this pattern . Thanks again everyone. Regards and happy knitting.
10.06.2020 kl. 15:30:
![]() Karren wrote:
Karren wrote:
Thank you so much for the guidance in my pattern. I am almost finished and think I will love it. Karren
18.04.2020 kl. 01:05:
![]() Karren wrote:
Karren wrote:
I do not understand what I am supposed to do on the wrong side of the pattern in between the increase rows. The increases occur on the right side. Does the ribbing continue through out the whole pattern?
17.04.2020 kl. 00:53:DROPS Design answered:
Dear Karren, you increase in the P-sections seen from RS (these sts are worked K from WS), when working from WS you will K over K and P over P, and the number of K stitches from WS will increase (then decrease on the 2nd half of piece) as the P stitches from WS increases. Happy knitting!
17.04.2020 kl. 09:01:
![]() Judith wrote:
Judith wrote:
I was sold a yarn that gets 2 st/inch on an 8 needle and is not too stiff. will the pattern work as written? Do I knit first stitch, then do the edge stitch? hat seem strange to me, so I am asking. I thought the edge stitch would be first. Thank you
16.12.2019 kl. 04:45:DROPS Design answered:
Dear Judith, please check your tension - read more here about tension. Pattern is worked in rib with 1 edge stitch in garter stitch on each side. Happy knitting!
16.12.2019 kl. 09:10:
![]() Shannon wrote:
Shannon wrote:
What is the multi colored yarn in the second picture?
14.12.2019 kl. 04:07:DROPS Design answered:
Dear Shannon, in the second picture, the mittens are made with Vivaldi ( from group C) but this yarn is discontinued. Happy knitting!
15.12.2019 kl. 18:41:
![]() Sabina wrote:
Sabina wrote:
Jag lyckades räkna ut när minskningar ska göras. Men för en nybörjare är det ingen självklarhet. Ett förslag är att uppdatera det. Minskningar när arbete mäter 27cm, 30cm, 34cm, 40cm och färdig när det mäter 48cm
11.12.2019 kl. 10:12:
![]() Sabina wrote:
Sabina wrote:
Jag tycker det är synd att man bara för halva mönstret. Det hade verkligen underlättat om resten hade stått med, hur långt arbetet bör möta när man ska göra minskningar.
11.12.2019 kl. 10:06:
![]() Hilde Pedersen wrote:
Hilde Pedersen wrote:
Hei! På den norske oversettelsen på pannebåndet, står bare en pinne forklart. Jeg skjønner at rett og vrangsiden skal strikkes ulikt, men dette går ikke frem i den norske oversettelsen. Resultatet blir derfor feil.
17.04.2019 kl. 10:29:DROPS Design answered:
Hej Hilde, det stemmer, pandebåndet strikkes i rib med 2 ret fra retsiden, det vil sige at du tager ud i vrangmaskerne fra retsiden. God fornøjelse!
03.05.2019 kl. 11:01:
![]() Diane wrote:
Diane wrote:
Thank you for sharing this pattern. I am a beginner at knitting and found your pattern very easy to follow. I love my headband and received many compliments.
19.03.2019 kl. 14:50:
![]() Wendy wrote:
Wendy wrote:
I have made several of these headbands, LOVE the pattern, did not have any issues with it all!! Thank you Drops!
25.02.2019 kl. 02:25:
![]() MJ.the.SKEINdinavian wrote:
MJ.the.SKEINdinavian wrote:
Dear Drops employee, I want to thank you for the information you shared with all of us, and me. It has helped this old lady to better understand this wonderful pattern that I want to turn into pieces for my granddaughters. I appreciate your understanding and input so much. Have a great day... KNITTING, as I do.
14.02.2019 kl. 10:44:
![]() MJ, The SKEINdinavian wrote:
MJ, The SKEINdinavian wrote:
If this pattern is so popular, has this “Purl-section error” and is SO POORLY WRITTEN. The ONLY instructions are: “Row 1 (RS): K1 (garter edge), * K2, P1 * 5 times – finish row with K2 and K1 (garter edge), and Row 2 (WS): K1 (garter edge), * P2, K1 * 5 times – finish row with P2 and K1 (garter edge). We are left to figure out and change, HOW MANY ROWS? These are errata! IT’S TIME FOR DROPS TO REWRITE THE PATTERN!!! PLEASE! DO SOMETHING ABOUT THIS!!!
06.02.2019 kl. 05:52:DROPS Design answered:
Dear Mrs The SKEINdinavian, we are very sorry to hear you have worries with this popular pattern. Just repeat the 2 rows until piece measures 8 cm (the number of rows will depend on your tension in height), then increase 1 stitch in each P-section seen from RS = there are now 24 sts. Continue with K over K and P over P and repeat the decreases when piece measures 14, 18, and 21 cm. Insert a marker at 24 cm (=middle of piece) then continue with K over K and P over P decreasing this time after 3, 6, 10, and 16 cm from marker. Happy knitting!
06.02.2019 kl. 09:13:
![]() MJ, The SKEINdinavian wrote:
MJ, The SKEINdinavian wrote:
I agree with Susan and Lindsay, wholeheartedly! The responding Drops Design employee should be doing tech editing and pattern writing. I find so many errors in Drops patterns... and others. Is it really so hard to edit patterns? NO!!! I speak from experience.
05.02.2019 kl. 20:36:
![]() Annika Nilsson wrote:
Annika Nilsson wrote:
Lättstickat pannband. Det som var tråkigt var att det inte räckte med 50g. Så jag rekommenderar att beställa 100g.
14.01.2019 kl. 17:40:
![]() Susan wrote:
Susan wrote:
Totally agree with Lindsay....I gave up after trying to understand what appears to be an easy pattern in the picture.
09.12.2018 kl. 03:58:DROPS Design answered:
Dear Susan, sorry to hear you had worries working this so popular pattern. Please feel free to ask your question here and/or contact the store where you bought the yarn for any individual assistance. Happy knitting!
10.12.2018 kl. 10:44:
![]() Maria wrote:
Maria wrote:
I understand that we are suppose to increase on purl stitch. So when increasing to 24 stitches do you do it gradually or all at once in that 1st row of the increase. I am just a little confused. Thanks Maria
04.12.2018 kl. 04:24:DROPS Design answered:
Dear Maria, when piece measures 8 cm, you will increase 1 st in each P-section = there are 5 P-sections (= 19 sts) you will increase 5 sts (=24 sts) and you will now work (seen from RS): K1 (edge st), *K2,P2* and finish with K2, K1. On next increase row, increase 1 more P stitch (= K2/P3) and so on. Happy knitting!
04.12.2018 kl. 07:50:
![]() Paula wrote:
Paula wrote:
Hola! me gustaría saber cómo hacer las disminuciones en este patrón, ya que viene el vídeo específico de cómo hacer los aumentos pero no qué tipo de disminuciones hacer. Gracias!
20.11.2018 kl. 18:22:DROPS Design answered:
Hola Paula. En este modelo para las disminuciones se trabajan 2 puntos juntos de revés.
30.12.2018 kl. 18:03:
![]() Erika Offerdahl wrote:
Erika Offerdahl wrote:
I have made this headband at least 10 times. Easy pattern, despite what others say, and gorgeous results. I first made it as a beginner knitter. Thank you!
16.11.2018 kl. 06:55:
![]() Grace Sverdlove wrote:
Grace Sverdlove wrote:
Thank you for this pattern. I\'m fairly new to knitting and was determined to complete this project. It was a bit challenging but I did complete it after restarting several times and rereading your posts. I love the headband! Hang in there knitters, it really is simple once you allow yourself to absorb the directions. Thank you!
20.10.2018 kl. 13:04:
![]() Christine wrote:
Christine wrote:
How much negative ease should I work into the length? I know that "one size" will be too small for the person I want to knit this for (59cm head), but I don't want to accidentally not leave enough ease. Would working to 54cm be long enough, or too long?
19.10.2018 kl. 05:45:DROPS Design answered:
Dear Christine, you can check measurements when you have worked half the piece how much it will extend to stay comfortable (without tighten but still keeping in place). Do not hesitate to request further assistance from your DROPS store, even per mail or telephone. Happy knitting!
19.10.2018 kl. 08:48:
![]() Zattara wrote:
Zattara wrote:
Bonjour, Je suis débutante et je me demandais si l\'échantillon, il fallait le faire en point mousse ou en jersey. Je ne trouve pas cette précision. Merci beaucoup pour votre réponse.
15.10.2018 kl. 19:08:DROPS Design answered:
Bonjour Zattara, l'échantillon se tricote ici en jersey. Bon tricot!
16.10.2018 kl. 09:16:Lynn wrote:
I don't see a yarn size on this pattern. Is it worsted weight?
21.08.2018 kl. 14:47:DROPS Design answered:
Dear Lynn, the yarn used for this pattern is Alaska, which is aran worsted. You can always check in the yarn section the characteristics of each yarn or group of yarns.
26.08.2018 kl. 16:30:
![]() Lindsay wrote:
Lindsay wrote:
This is a beautiful headband, but I really feel like it could have been written way more clearly. I’ve been knitting for years and consider myself to be fairly advanced. I rarely find a pattern anymore that is so convoluted as this one, especially for something so simple in theory. Way to go.
17.08.2018 kl. 19:50:
![]() Denise wrote:
Denise wrote:
Hi, I am new to knitting. What does "K 1 (edge st knit in garter st)" mean? Do you mean just knit the first stitch? Same question at the end. What does "K 2 and K 1 (edge st knit in garter st)" mean? Do you knit the last 3 stitches? Thank you.
05.08.2018 kl. 23:00:DROPS Design answered:
Dear Denise it means that the first and last row on each row is knitter with a garter stitch. In other words, the frirst and the last stitch is always KNITTED from the right and from the wrong side as well. I hope this helped. Happy Knitting.
06.08.2018 kl. 00:35:Beth wrote:
Thank you for design . It knitted up nicely and hugs the contour of the head.
27.06.2018 kl. 08:05:
![]() Annie wrote:
Annie wrote:
Make all incs on right side rows, inc by P 2 sts into 1 P stitch. Does that mean increasing by two purl stitches anywhere, where there is a purl stitch across the row? Thanks
12.01.2018 kl. 22:11:DROPS Design answered:
Dear Annie, it basically means that you should do the increases on rows you are knitting from the right side. Also, in the rows you do the increases, they are done in every purled segment. The pattern does not specify where, so you can do them anywhere in the purled segment, however I would suggest you do them alternately at the beginning and at the end of each segment with purls. Happy Knitting!
13.01.2018 kl. 10:01:
![]() Andrea wrote:
Andrea wrote:
So once we get to the inc on RS, just to clarify, are we then going k2 p2/3/4/5 on RS to p2 k2/3/4/5 on WS?
15.11.2017 kl. 06:26:DROPS Design answered:
Dear Andrea, that's correct, the increase are done in the P-sections seen from RS, so that the number of P sts from RS and K sts from wS will inc (and then decrease on the 2nd half of headband). Happy knitting!
15.11.2017 kl. 08:55:Katharina Splettstößer wrote:
Diese Anleitung ist nicht gut übersetzt! Anleitung: "Wenn die Arb. 8 cm mißt, alle 1 li. auf 2 li aufnehmen." Hä? Eine völlig unübliche Ausdrucksweise und irreführend. Gemeint ist wohl: Re M re str, aus jeder li M 2 M herausstricken (englisch pfb) 24 M. Wenn die Arb. 14 cm mißt, 1. M re, dann *aus der 1. li M 2 M herausstricken (pfb), 1 M li, 1 M re * 29 M Vielen Dank für die vielen kostenlosen Drops Anleitungen! Katharina
07.10.2017 kl. 22:09:DROPS Design answered:
Liebe Frau Splettstößer, danke für Ihre Rückmeldung, Anleitung wurde überarbeitet. Viel Spaß beim stricken!
09.10.2017 kl. 10:29:
![]() Mollie wrote:
Mollie wrote:
My daughter wants a headband like this, but wants ties at the end (maybe cord?). Do you have a pattern like that, or any idea how I could make that?? Thanks!!
02.06.2017 kl. 14:15:DROPS Design answered:
Dear Mollie! Thank you for your comment, this pattern is a favorite of ours to. If I would want to make this with ties, insted of sewing up at the ends, I would just turn about 0,5 -1 cm the casting on and casting off edges toward the wrong side, sew the edge down with a few stitches. Then make a tie and bull it through the casing I just seved, and tie with the two and two tie-ends held together. I hope this helps. Happy knitting!
08.06.2017 kl. 07:00:
![]() Iris wrote:
Iris wrote:
Hallo, leider komme ich mit den Abnahmen für die 2. Hälfte des Stirnbandes nicht zurecht. Muss ich linke oder rechte Maschen für die Abnahmen zusammenstricken? LG Iris
14.10.2016 kl. 08:25:DROPS Design answered:
Liebe Iris, Sie müssen die linke Maschen abenehmen, und dies wird spiegelverkehrt gemacht, dh: 1. Abnahme 3 cm nach der Markierung, 2. Abnahme 6 cm nach der Markierung, 3. Abnahme 10 cm nach der Markierung und letzte Abnahme 16 cm nach der Markierung = es bleiben 19 M (2 M re, 1 M li).
14.10.2016 kl. 09:30:
![]() Christina wrote:
Christina wrote:
Ich habe ein Stirnband mit Brushed Alpaca Silk gemacht - wunderschön und federleicht! Leichter wäre es allerdings geworden, wäre in der Beschreibung angegeben, wie die Rückreihen zu stricken sind. So musste ich es mir aus den Kommentaren raussuchen. Aber das Ergebnis ist super.
18.07.2016 kl. 11:13:
![]() Gail Thorpe wrote:
Gail Thorpe wrote:
Can you tell me which Alaska brown is featured in this pattern? Thank you!
02.05.2016 kl. 20:07:DROPS Design answered:
Dear Mrs Thorpe, in this pattern it's used Alaska colour n° 50, dark brown. Happy knitting!
02.05.2016 kl. 20:11:France wrote:
Bonjour est ce possible d'avoir le patron du bandeau en Français. Merci
11.02.2016 kl. 05:53:DROPS Design answered:
Bonjour France, vous pouvez obtenir les explications en français de tous nos modèles en cliquant sur la flèche sous la photo, sélectionnez "français" - voir ici Bon tricot!
11.02.2016 kl. 10:49:
![]() Christine Fabiani wrote:
Christine Fabiani wrote:
Hi! Thanks so much for this pattern. It will be perfect for Knots of Love's brain surgery patients. Knots of Love donates over 1,000 pieces EVERY WEEK to chemo patients and blankets to fragile new lives in incubators. Much love and many blessings, Christine M. Fabiani
17.01.2016 kl. 17:05:Amanda wrote:
"bind off an sew"
21.12.2015 kl. 17:40:
![]() Amanda wrote:
Amanda wrote:
Once finished, do you use a button and buttonhole or sew the ends together? How do you finish? I don't see this included in the directions. Thanks.
21.12.2015 kl. 14:16:DROPS Design answered:
Dear Amanda, after you have cast off sts, sew cast-off edge to cast-on edge. Happy knitting!
22.12.2015 kl. 10:10:Heather wrote:
Can you tell me the width of this headband, thanks
25.11.2015 kl. 16:51:DROPS Design answered:
Dear Heather, you can estimate the width from picture - and adjust when working the headband increasing more or less sts as you rather like. Happy knitting!
26.11.2015 kl. 09:25:
![]() Anna Rita wrote:
Anna Rita wrote:
Buona sera, se gli aumenti vanno fatti sul dritto del lavoro e si fa un aumento a rovescio in tutti i gruppi di m lavorate a rov. ,dove trovo i gruppi di 2 maglie lavorate a rovescio per esempio quando sono a 8 cm. , visto che i ferri diritti dopo il vivagno si lavorano 2 diritti e 1 rovescio?
07.02.2015 kl. 22:54:DROPS Design answered:
Buongiorno Anna Rita. Quando ha ancora le coste 2 m dir, 1 m rov, aumenta prima o dopo la m rov; così avrà coste 2 m dir, 2 m rov. Continuando gli aumenti, le coste diventeranno: 2 m dir, 3 m rov; 2 m dir, 4 m rov e infine, dopo l'ultimo aumento 2 m dir, 5 m rov. Buon lavoro!
08.02.2015 kl. 08:36:
![]() Lisa wrote:
Lisa wrote:
Hello! I know how to increase, but I'm confused about what to do at the 14cm increase. The previous row has 24 sts, and the next increase only has the row going to 29. So, 4 stitches. I just don't get this "inc all p2 to p3". Help! WHAT p2? This is probably easy, but I'm just not seeing it, thanks!
19.01.2015 kl. 04:48:DROPS Design answered:
Dear Lisa, the inc will be done in the purl sections, ie you have now P2 in each P section, you inc 1 st by P2 sts into 1 P st in each P section => you get P3 in each section. Happy knitting!
19.01.2015 kl. 14:13:
![]() Simone Preikschat wrote:
Simone Preikschat wrote:
I love the headband!!! I'm wondering if you've made a toque/hat following the pattern established in the headband?
17.01.2015 kl. 04:17:DROPS Design answered:
Dear Mrs Preikschat, please click here to get an overview of all our knitted hats. Happy knitting!
19.01.2015 kl. 11:14:
![]() Celine wrote:
Celine wrote:
Ou est le modele pour le tour de tete? il n'y a que le patron du châle, pouvez vs me l'envoyer? merci
12.01.2015 kl. 17:22:DROPS Design answered:
Bonjour Céline, les explications du tour de tête sont ici, en haut de page, suivies par celles du châle. Bon tricot!
12.01.2015 kl. 18:26:
![]() Delphine wrote:
Delphine wrote:
Bonjour, serait il possible de connaitre la taille du tour de tête en centimètre (circonférence). Car je souhaiterais le faire pour une personne qui a un tour de tête plus grand que la normale (sup à 56-58 cm). Merci
29.12.2014 kl. 09:43:DROPS Design answered:
Bonjour Delphine, vous pouvez ajuster la hauteur totale, en tricotant quelques cm de moins que le tour de tête pour que le bandeau reste bien en place (il doit être plus serré que la dimension "finale"). Bon tricot!
30.12.2014 kl. 14:06:
![]() Judy Lippard wrote:
Judy Lippard wrote:
When I get to the increase stitches at p3-to p4 on the rs the stitches on ws start to look like a garder stitch. There is no groves just flat. What am I doing wrong?
22.11.2014 kl. 02:21:DROPS Design answered:
Dear Mrs Lippard, when you inc P3 to P4 from RS, you will then work from WS P2, K4 or K3 in P3 sections that are not inc yet with 1 edge st. The video below may help you, it shows how to inc in P sts. Happy knitting!
22.11.2014 kl. 10:09:
![]() Birgit wrote:
Birgit wrote:
Ein ganz tolles Stirnband, sieht gut aus uns passt perfekt. Werde es nochmal Stricken:-)
14.11.2014 kl. 06:32:
![]() Iris wrote:
Iris wrote:
Gibt es eine Videoanleitung dazu, wie man die Maschen auf eine Hilfsnadel legt und von dort mit dem Anschlagrand zusammennäht? Ich kann mir das leider gar nicht vorstellen :-(
12.09.2014 kl. 19:40:DROPS Design answered:
Liebe Iris, genau dazu gibt es kein Video, aber vielleicht hilft Ihnen das Video unter "Tipps & Hilfe" => "Technikvideos" => "fertigstellen" und dort "Fertigstellen: Maschenstich" weiter. Damit können Sie sehen, wie die stillgelegten M in die Naht eingearbeitet werden.
20.09.2014 kl. 10:24:Madeleine Laroche wrote:
Bonjour, Comment faites-vous pour joindre les deux extrémités sans rabattre les mailles restantes. Merci
10.09.2014 kl. 19:13:DROPS Design answered:
Bonjour Mme Laroche, vous pouvez faire un "mix" des 2 techniques ci-dessous. Bon tricot!
11.09.2014 kl. 08:49:
![]() Riseon wrote:
Riseon wrote:
Hello...
30.06.2014 kl. 19:01:
![]() Jenny wrote:
Jenny wrote:
Buongiorno, premetto che sono alle primissime armi, ho realizzato la fascia, tutto perfetto fino alla chiusura.. non ho capito come devo procedere alla chiusura quando le istruzioni dicono "unire l’estremità con la riga di avvio delle m (non chiudere le m prima di cucire). Grazie mille in anticipo per la risposta e per i video chiari e utilissimi
28.04.2014 kl. 20:53:DROPS Design answered:
Buongiorno Jenny, se ha già iniziato il modello, può intrecciare alla fine e cucire i due bordi. Altrimenti può fare un avvio provvisorio e chiudere seguendo il video qui sotto: Buon lavoro!
29.04.2014 kl. 11:43:
![]() Sipkjepost wrote:
Sipkjepost wrote:
Ik kom bij de telling met 19 st zoals beschreven alleen uit als ik brei: 1r *1 av en 2 r* 5 maal (ipv *2r 1 av*)en eindig dan wel met 2 r, en 6 ribbels gebreid.
17.03.2014 kl. 10:04:DROPS Design answered:
Hoi Sikjepost. Als je breit zoals in het patroon staat, dan heb je met de 19 st 1 ribbel + 2 r aan beide kanten en 4 x 2 r steken met av tussen in het midden. En dat is ook het correcte volgens de foto.
17.03.2014 kl. 14:35:
![]() Danielle wrote:
Danielle wrote:
Bonjour j'ai fini le bandeau mais je ne comprends la derniere etape comment faire pour le joindre au rang de montage .je ne comprends pas qu'il ne faut pas rabattre les mailles. merci de votre reponse
07.03.2014 kl. 10:32:DROPS Design answered:
Bonjour Danielle, on assemble les mailles au rang de montage, comme pour un grafting. Bon tricot!
07.03.2014 kl. 13:56:
![]() Alma wrote:
Alma wrote:
I'm new to knitting. This will be my first project. I did rows 1 and 2, but I'm lost for other. rows. Do I continue with rows 1 and 2 until I reach 3"? Also what does "start at center back" mean? Thank you
11.01.2014 kl. 01:21:DROPS Design answered:
Dear Alma, you are correct, repeat rows 1 and 2 until you reach 3" then inc as stated. Start at center back means first row from RS start on the left side of head when worn, ie end of rows from RS = towards face. Happy knitting!
11.01.2014 kl. 10:10:
![]() Nicole wrote:
Nicole wrote:
Very pretty headband!
06.01.2014 kl. 02:18:
![]() Patricia Hill wrote:
Patricia Hill wrote:
DROPS 86-10 headband - pattern for flower with button center (Toumaya). Where can I get pattern?
04.01.2014 kl. 21:23:DROPS Design answered:
Dear Mrs Hill, The flower you are talking about is an extra added by a customer, please contact her directly on Ravelry to get more informations. Happy knitting!
06.01.2014 kl. 09:25:
![]() Heidi wrote:
Heidi wrote:
I fi ished this headband recently and LOVE it. I am a very new knitter and found the directions easy to follow. I experimented with making this slightly longer and added buttons and buttonholes (a first for me). I can't wait to make more.
13.12.2013 kl. 17:13:
![]() Joy Stephens wrote:
Joy Stephens wrote:
Hello. I am having trouble understanding the instructions. What does "inc by P2 sts into 1P stitch" mean? This is the instructions for row 3. Thanks!
04.11.2013 kl. 02:32:DROPS Design answered:
Dear Mrs Stephens, on 3rd row, inc 1 st in all P section to get rib K2/P2 at the end of row (seen from RS). Happy knitting!
04.11.2013 kl. 09:25:
![]() Tara Buffington wrote:
Tara Buffington wrote:
I got the increases/decreases, but am confused about how many rows of garter/stockinette stitch are between the increases, there's no information on that...does anyone know the answer?!!!
25.10.2013 kl. 14:51:DROPS Design answered:
Dear Mrs Buffington, inc are done when piece measures 3", 51/2", 7" and 8 1/4". When work measures 9 1/2", place a marker and measure then from this marker for the dec. Happy knitting!
29.10.2013 kl. 10:14:
![]() Choppinet wrote:
Choppinet wrote:
Bonjour, qu'est ce que c'est les mailles lis au point mousse ?
14.10.2013 kl. 08:18:DROPS Design answered:
Bonjour Mme Choppinet, 1 m lis au point mousse est tricotée tous les rangs à l'end, c'est la 1ère et la dernière m du rang. Bon tricot!
14.10.2013 kl. 09:34:
![]() Malin wrote:
Malin wrote:
Hej! I mönstret på svenska, står inget om hur fjärde varvet ska stickas. Fortsatte som i beskrivningen men det ger ju inga ränder. Men jag antar att man ska sticka "bakvänt", dvs det som var avig maska på förra varvet, blir nu rät maska, osv, för att bilda ränder. Det vore hjälpsamt om detta skrevs tydligt. För den som är hyfsat nybörjare är det inte så lätt att räkna ut. :)
25.04.2013 kl. 22:18:DROPS Design answered:
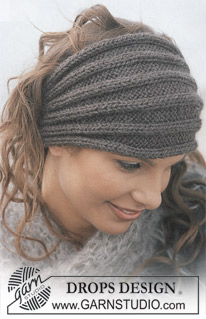
Om du stickar enligt beskrivningen så här: "1 rätst m, * 2 rm, 1 am * upprepa totalt 5 ggr – avsluta v med 2 rm och 1 rätst m" och fortsätter enligt beskrivningen får du ränderna som på bilden.
03.05.2013 kl. 10:16:
![]() Veniesta wrote:
Veniesta wrote:
I Crochet but know how to knit and purl , so I am going to take a shot at this head band and let you know how I did.
22.04.2013 kl. 18:21:
![]() Ann wrote:
Ann wrote:
Once I start the increase purl stitches... do I continue to follow the knit/purl sequence based on the stitches that I see. ie. after the purl increase row, turn and working back do I then do a "knit 1,purl 2,knit 1, purl 3 - or follow the pattern and do the purl 2, knit 1 repeat, as indicated for the WS. Hope this makes sense.
23.03.2013 kl. 17:43:DROPS Design answered:
Dear Ann, you will inc P1 in all P sections seen from RS, so that after 1st inc sequence, youll have K2, P2 with 1 edge st in garter st each side. Happy knitting!
25.03.2013 kl. 11:30:
![]() Paola Rigon wrote:
Paola Rigon wrote:
Cara Marica, riesci sempre a stupirmi! Questo modello lo farò per mia figlia super critica,ma stavolta sarà contentissima! Grazie
13.02.2013 kl. 14:03:
![]() Kordula wrote:
Kordula wrote:
Habe das Stirnband gestrickt mit Alaska Wolle und Nadelstärke 4. Laut Anleitung hat alles prima geklappt und passt sehr gut. Werde noch ein Weiteres stricken und verschenken!
12.12.2012 kl. 19:32:
![]() Elizabeth wrote:
Elizabeth wrote:
So, I did the beginning 5 stitches, okay. Now I'm tripped up by "Make all incs on right side rows, inc by P 2 sts into 1 P stitch." Let the record show I have been knitting for 6 months, so maybe I'm just dumb, but how do I do that? Does increase mean GO UP? How... just... How? Help me. Please?
12.12.2012 kl. 16:24:DROPS Design answered:
Dear Elizabeth, there are different ways to increase, click on the link to our videos to check and see how to do. Your RS rows are odd numbered rows : 1,3,5 ... and you will have (with K1 each side for edges): *K2, P1*, repeat from *-*. After the first inc, you will have first *K2, P2, K2, P1*, after the 2nd inc, you will have *K2,P2*. etc.. Happy knitting !
13.12.2012 kl. 18:10:
![]() Nicole wrote:
Nicole wrote:
Hallo! Ich habe ein Problem mit der Anleitung. Wie stricke ich die Rückreihe? Irgendwie krieg ich das Muster nicht so hin wie auf dem Bild... Danke für die Hilfe schonmal!
14.11.2012 kl. 08:04:DROPS Design answered:
Liebe Nicole, in der Rückreihe stricken Sie die Maschen wie sie erscheinen, also rechte Maschen rechts und linke Maschen links.
15.11.2012 kl. 10:24:
![]() Elena wrote:
Elena wrote:
Buongiorno, ho realizzato la fascia ed il risultato è molto molto carino. Temo però che nella traduzione italiana ci sia un errore. Infatti l'ultima riga delle istruzioni indica di unire le estremità "Quando il lavoro misura 48 cm dal segno", ma dovrebbe essere "quando il lavoro misura 48 cm di lunghezza totale". Grazie per i vostri bei filati e per i video di istruzione, che permettono di realizzare più facilmente i vostri fantastici modelli!!!
22.10.2012 kl. 08:59:DROPS Design answered:
Grazie per la segnalazione. Ora correggeremo.
22.10.2012 kl. 16:06:
![]() Lisette wrote:
Lisette wrote:
Ben beginner. Hoe komt het dat ik alles goed brei en toch geen "ribbels" heb. Mijn breiwerk ziet er plat uit. Ligt dat aan de wol.
10.10.2012 kl. 10:23:DROPS Design answered:
Nee, dan brei je toch iets verkeerd denk ik. Je moet breit op de goede kant 2 r, 1 av, maar op de verkeerde kant moet je dan de 2 r av breien en de 1 av r, dan krijg je de ribbel zoals te zien is op de foto.
11.10.2012 kl. 10:58:Francine Labrie wrote:
J,aimerais beaucoup avoir le patron de ce bandeau 86-10 merci Francine du QUÉBEC
04.10.2012 kl. 19:04:DROPS Design answered:
Bonjour Francine, les explications du bandeau se trouvent un peu plus bas sur la page. Bon tricot !
05.10.2012 kl. 09:09:
![]() Minnie wrote:
Minnie wrote:
Could you please clarify how the pattern continues after the increases? For example, after the increase to 24 stitches, on the next row, do you then do K2, P2?
27.09.2012 kl. 03:21:DROPS Design answered:
Dear Minnie, you increase each time a st in P section, so that you inc each time the number of sts in each P section until you get rib K2, P5. Happy knitting!
13.11.2012 kl. 11:10:
![]() Lindsey Loxley wrote:
Lindsey Loxley wrote:
How do you do the inc and get the pattern to still follow? please could i have a step by step guide?
10.07.2012 kl. 00:25:
![]() Susana wrote:
Susana wrote:
Gostaria de saber como fazer o avesso das carreiras depois de comecar os aumentos. Obrigada.
16.02.2012 kl. 00:28:DROPS Design answered:
Uma vez que se fazem aumentos, pelo direito da peça, nas partes tricotadas em liga, tricotam-se os aumentos, pelo avesso, em meia. É importante não esquecer que os aumentos são sempre feitos pelo direito da peça. Esperamos tê-la ajudado na sua dúvida. Obrigado por nos contactar.
21.02.2012 kl. 18:58:
![]() Drops Design France wrote:
Drops Design France wrote:
Tout à fait Sarah, merci. Bon tricot.
14.11.2011 kl. 13:36:Sarah wrote:
"A 48 cm du marqueur, joindre au rang de montage" Ne serait-ce pas à 48cm de hauteur totale?
14.11.2011 kl. 11:13:Marilena Coppola wrote:
Sono italiana, potreste tradurre questo modello in italiano? grazie marilena
09.06.2011 kl. 12:33:
![]() Rebecca wrote:
Rebecca wrote:
Loved it!
03.04.2011 kl. 21:10:Carole Boisclair wrote:
Ce bandeau est tellement bien, il s'ajuste à toutes les têtes.Merci de nous partager vos modèles, ils sont géniaux.
31.03.2011 kl. 19:22:
![]() Drops Design France wrote:
Drops Design France wrote:
Merci Josette, les différentes modifications nécessaires ont été effectuées.
06.09.2010 kl. 09:26:
![]() JEANTIN JOSETTE wrote:
JEANTIN JOSETTE wrote:
Autre correction : A 16cm de hauteur du marqueur (non H.Totale) A 24cm de hauteur du marqueur (Il faut que les tricoteuses comprennent qu'il faut tricoter 8cm sur les 19m restantes ainsi on obtient 48 cm de HAUTEUR TOTALE) merci
03.09.2010 kl. 17:50:
![]() JEANTIN JOSETTE wrote:
JEANTIN JOSETTE wrote:
Faire toutes les augmentations à l'ENDROIT : Celà signifie que la 1ère augmentation doit se faire sur 1m envers et non 2 car à l'endroit on commence avec des côtes 2 Endroit/1 Envers et ainsi de suite A 8cm aug. 1m envers dans la m envers A 14cm aug.1m envers dans les 2m envers A 18cm aug. 1m envers dans les 3m envers A 21 cm aug. 1m envers dans les 4m envers
03.09.2010 kl. 17:46:
![]() Anna wrote:
Anna wrote:
Rolig att sticka. Blev precis så fin som på bilden. Tack!
22.07.2010 kl. 16:44:
![]() Johanna wrote:
Johanna wrote:
Hur stickar jag varv 4? Räta i räta och aviga i aviga?
18.03.2010 kl. 07:15:
![]() Karen K Bak wrote:
Karen K Bak wrote:
Utrolig nem at lave der kan blive ca 2 af 50 g lavede den i merino silk. og husk at hver anden p skal være modsat altså 2v1r
03.11.2009 kl. 23:05:
![]() DROPS Design wrote:
DROPS Design wrote:
Yes, on the return row from WS it will be P2 K2, i.e work sts as they come, K over K and P over P.
27.04.2009 kl. 18:47:Megso wrote:
I am a bit confused about how to make the increases. At 8 cm it says to increase P1 to P2 so therefore it would be K2 P2 x5 but how does the row after look. is it P2 K2?
25.04.2009 kl. 20:58:
![]() Drops Design France wrote:
Drops Design France wrote:
Fanny, votre tension est elle bonne ? si vous avez tendance à tricoter trop serré, pensez à utiliser des aiguilles d'un demi voire d'un numéro supérieur pour réussir à piquer dans les mailles.
10.02.2009 kl. 09:26:
![]() Fanny wrote:
Fanny wrote:
Au bout de quelques rangs je n'arrive plus à triquoter tellement les mailles se resserent. C'est a cause des mailles 2 end, 1 env. Avez vous une astuce ou une explication?
09.02.2009 kl. 14:38:
![]() DROPS Design wrote:
DROPS Design wrote:
If you use kitchener st you pick up the same number of sts that you have remaining on the needle on the other side.
28.01.2009 kl. 17:10:
![]() Jennifer wrote:
Jennifer wrote:
Are we to use a Kitchener stitch to join the two ends? If so do we need to pick up stitches on the cast on edge and how many?
27.01.2009 kl. 02:06:
![]() DROPS Design wrote:
DROPS Design wrote:
The finest result is if you use kitchener sts.
24.11.2008 kl. 21:26:
![]() Claire wrote:
Claire wrote:
How do you join the two ends together exactly?
23.11.2008 kl. 23:53:
![]() Claire wrote:
Claire wrote:
Do you just increase on the purl stitches? What about the method. Is it YO or P1F+B?
17.11.2008 kl. 22:27:
![]() DROPS Design wrote:
DROPS Design wrote:
You inc by knitting 2 sts in 1 stitch.
17.11.2008 kl. 19:36:
![]() Claire wrote:
Claire wrote:
How exactly do you do the increases?
17.11.2008 kl. 18:47:
![]() Claire wrote:
Claire wrote:
How exactly do you do the increases?
17.11.2008 kl. 18:45:
![]() Drops Nathalie wrote:
Drops Nathalie wrote:
Merci Céline, le modèle a été corrigé.
29.10.2008 kl. 18:11:Céline wrote:
Dans la version en français, il y a une erreur dans le patron du "Tour de tête". Les diminutions devraient se faire respectivement à 3 cm, 6 cm, 10 cm, 16 cm du marqueur. Comparez avec la version en anglais pour avoir les bonnes mesures. Merci.
29.10.2008 kl. 15:49:
![]() Dixie wrote:
Dixie wrote:
I increased in the second knit stitch of the K2,P2 rib, doing a Kf&b. The extra stitch makes a little wrap at the bottom and looks like a purl. On the next ws row you just remember to knit that stitch and you are all set to go on. Dixie at Yellow Dog Knitting Garnstudio retailer in the US
30.04.2008 kl. 22:49:
![]() Jill wrote:
Jill wrote:
How do you make the increases on the right side rows? Do you knit into the front and back of the K1 stitches on one row as a set up row and then begin to P2 on the following right side row?
30.04.2008 kl. 22:15:
![]() Drops Design NL wrote:
Drops Design NL wrote:
Je hebt gelijk. Ik heb het patroon gewijzigd.
13.02.2008 kl. 12:32:
![]() Patricia wrote:
Patricia wrote:
In de Nederlandse vertaling is een kleine fout geslopen. De laatste steken op eerste rij zijn 2r en 1 ribbelsteek (ipv 2).
13.02.2008 kl. 11:29:
![]() Drops Design wrote:
Drops Design wrote:
Hei! En rille betyr 1 rille = 2 pinner. 1.p: Rett, 2.p: Rett. Mvh Drops Design
16.04.2007 kl. 10:51:
![]() Hege Berentsen wrote:
Hege Berentsen wrote:
I starten av oppskriften står det at en skal strikke rille; betyr det bare rett på retten og vrang på vrangen, eller skal du snu arbeidet og strikke en rett til?
14.04.2007 kl. 20:23:
![]() Karen wrote:
Karen wrote:
For the headband you inc by inc the purled sections from P1 to P2, then from P2 to P3 and so forth until you have P5 and 39 sts. You then dec in the same manner until you're left with P1 again and 19 sts. The instructions begin in line 6 in pattern. For the shawl you inc by knitting 2 sts in the same st on one side until you have 50 sts and dec by knitting 2 tog on the same side until you're left with 4 sts. Hope this helps! Karen, SKD
16.01.2007 kl. 09:25:
![]() Zed mama wrote:
Zed mama wrote:
I don't understand where the increases are? Where does the pattern actually tell you how to make the increases? Please help!
15.01.2007 kl. 21:52:
![]() Rachel wrote:
Rachel wrote:
OOPS I'm thinking inches! Disregard previous comment!
17.12.2006 kl. 03:40:
![]() Rachel wrote:
Rachel wrote:
My head only has a 22cm circumference, not 44. Also, it's easier to do a provisional cast on, and join the ends with a 3 needle bind off.
17.12.2006 kl. 03:39:
![]() Rachel wrote:
Rachel wrote:
You can do a provisional cast on, then do a 3 needle bind off when done knitting.
17.12.2006 kl. 03:34:Kommentér oppskrift DROPS 86-10
Vi vill gärna ha din åsikt om denna modell!
Om du har en fråga kring den, kom ihåg att välja rätt kategori i menyn under, så får du snabbare svar!
Din mailadress kommer inte att publiceras. Obligatoriska fält är markerade med *.
This increase is called a make 1 in English. If you’d written it like this many here wouldn’t have had so many problems, make 1 is a term used when you increase by picking up the loop between stitches. Hope this helps.
27.10.2020 kl. 21:20: