Opmerkingen op DROPS Children 7-5
![]() Ida wrote:
Ida wrote:
I am having trouble with these instructions….shape the sleeve cap as follows: put 2 sts on each side of the marker on a holder. Knit the sleeve cap back and forth on the needle placing sts at each edge on a holder every other row as follows: 8 sts 2 times. Then put all sts back on needle and knit Pattern 1.
03.04.2024 kl. 20:42:DROPS Design answered:
Dear Ida, When you knit the upper part of the sleeve, you knit back and forth, and while doing that, at the beginning of each row, you put the number of stitches described on a stitch-holder (after you knitted them). Then you put all the stitches back to the circular needle, and continue with the pattern. I hope this helps. Happy Knitting!
03.04.2024 kl. 23:20:
![]() Linda Mccoy wrote:
Linda Mccoy wrote:
When sewing in the Sleeve s is it done from wrong side or right side?
16.01.2023 kl. 21:37:DROPS Design answered:
Dear Mrs Mccoy, sleeves are generally sewn from right side - see this video. Happy assembly!
17.01.2023 kl. 10:12:
![]() Lisa Hertel wrote:
Lisa Hertel wrote:
Does this cap take place under the arm? i cannot figure this out. I have knitted this portion of the pattern 3 times. the graphic does not show a cap for shoulder it looks straight across. again may i ask what is the purpose of this?
19.12.2022 kl. 15:43:DROPS Design answered:
Dear Mrs Hertel, this portion is the sleeve cap, is you will work short rows (leaving first 2 sts 1 time then 8 sts 2 times unworked on each side of mid under sleeve, ie the first 2+8+8 sts from mid under sleeve and the last 2-8-8 sts towards mid under sleeve (the middle 36 sts under sleeve the sleeve are on a thread, 16 sts on each side of mid under sleeve) - chart is just standard and just don't show this sleeve cap. Hope it can help. Happy knitting!
19.12.2022 kl. 15:59:
![]() Lisa Hertel wrote:
Lisa Hertel wrote:
I followed the directions given to Mrs. Frew. The pattern was askew and the work was done under the arm. If it is a cap, shouldn't it be on the top near the shoulder? I am very confused
18.12.2022 kl. 19:16:DROPS Design answered:
Dear Mrs Hertel, please let us know if the previous answer could help you or if you need more information.
19.12.2022 kl. 09:40:
![]() Lisa Hertel wrote:
Lisa Hertel wrote:
I have tried knitting the sleeve cap according to the directions. When that didn't work, I went to the comments section and saw someone else asked a similar question. I followed those directions which included short rows (although no where in the pattern does it say to use short rows). That didn't work either because the pattern was askew, I am writing to you for a better and in depth explanation of the sleeve cap. I have invest a lot of time and money and would hate to rip it out.
18.12.2022 kl. 18:09:DROPS Design answered:
Dear Mrs Hertel, to shape the sleeve cap you will work: work the first 8 sts at the beg of the next row and slip them on a thread, work to the end of the row, turn, work the first 8 sts at the beg of the row and slip them on a thread, work to the end of the row. Repeat these 2 rows one more time (16 sts on the thread on each side + the 4 sts mid under sleeve), cut the yarn after the last row. Now put all stitches back on needle and work diagram M.1 over all stitches starting on middle under sleeve as before. Happy knitting!
19.12.2022 kl. 09:39:
![]() Catherine wrote:
Catherine wrote:
To shape the sleeve, do I put 2 stitches on either side of the marker on a holder, then follow pattern to the end of the row. Then on the next row, add 8 stitches to one of the holders with 2 stitches (making 10 stitches on that holder), then follow pattern to end of row. At the beginning of the next row add 8 stitches to the other holder, making 10 stitches on that holder and knit to the end of the row. Then add back all held stitches, knit M1 then cast off?
10.09.2022 kl. 19:32:DROPS Design answered:
Dear Catherine, work the stitches before slipping them on the thread, ie work 2 sts at the beg of the round and slip them on a thread, work to the end of the round, turn, work the first 2 sts and slip them on a thread, continue the row to the end, turn, work the first 8 sts and slip them on a thread, finish row, turn work the first 8 sts and slip them on a thread and repeat these 2 rows one more time (= there are 2+8+8 sts on a thread on each side of the middle of sleeve =34 sts in total on the thread) then work all stitches again. Happy knitting!
12.09.2022 kl. 09:52:
![]() Catherine Frew wrote:
Catherine Frew wrote:
Thank you.for your last reply. I am following your guidance. I am knitting size 3-4 years. Over 68 stitches on row 2 of the pattern (wrong side) k2, P2 (knitting for purl and purling for knit) ends with two purls, which are knits on the right side, meaning that I am not purling into purls on Row 3 of the pattern (right side) as I should be. Can you advise how I should proceed?
28.06.2022 kl. 18:42:DROPS Design answered:
Dear Mrs Frew, the pattern will not be symmetrical here, your number of sts is divisible by 4, if you start with K2, P2 ending with P2 from WS, work now from WS starting either with P2 (if you have to work now like a row 3) or K2 (if you have now to work a row like a row 2). Happy knitting!
29.06.2022 kl. 09:04:
![]() Catherine Frew wrote:
Catherine Frew wrote:
Hello. I have started the sweater and will shortly need to divide front and back and continue knitting the front on the flat. Will pattern 2 be the same when I'm working on the flat? I understand that stockinette and reverse stockinette will be different from working in the round, but wanted to check about Pattern 2. Also, do I measure from the top of the rib for the length before dividing? I wish there was a video for dividing front and back when working in the round. Thanks. Catherine
25.06.2022 kl. 17:05:DROPS Design answered:
Dear Catherine, yes, M.2 is worked differently than in the round. The symbol for K is knitted in a row on the RS and purled in a row on the WS. The symbol for P is purled in a row on the RS and knitted in a row on the WS. To measure when to divide, you measure from the cast on edge. To divide for the front and back, split the stitches in half and mark the sides with marker stitches. Leave one half in an extra needle or thread and work the other half up to their final measurement. Then slip the half that was left in the thread back to the needles and work it. Happy knitting!
26.06.2022 kl. 13:35:
![]() Catherine Frew wrote:
Catherine Frew wrote:
Is 60cm sufficient length for the 5mm and 3.5mm circular needles for the 3-4 years size? Thanks. Hope I can manage this. I usually follow video tutorials!
12.06.2022 kl. 20:57:DROPS Design answered:
Dear Mrs Frew, yes sure, but you might then need double pointed needles - for the beginning of sleeves at least. Happy knitting!
13.06.2022 kl. 11:12:
![]() Atika ZOU wrote:
Atika ZOU wrote:
Bonjour, Je suis une fidèle de "mes pelotes.com" qui vend vos produits. J'en suis ravie. Je souhaite tricoter ce modèle, mais je n'ai pas trouver les instructions en francais. Donc j'ai tenté de traduire, mais je ne comprend pas "P 2 et k2" car ce n'est pas traduit. Quelle laine superwash pour remplacer Alaska. merci de votre réponse.
15.02.2022 kl. 12:09:DROPS Design answered:
Bonjour Mme Zou et merci pour votre retour :) Tous nos modèles sont disponibles en français, il vous suffit à chaque fois de cliquer sur le menu déroulant sous la photo pour sélectionner "français" - pour ce pull, vous le trouverez ici. Utilisez notre convertisseur pour voir les alternatives possibles - soit 1 fil du groupe C comme Alaska (ex. Big Merino) ou bien 2 fils du groupe A (ex. Baby Merino, Fabel). Bon tricot!
15.02.2022 kl. 13:54:
![]() PATRICIA SMITH wrote:
PATRICIA SMITH wrote:
Can you please explain how to do the shoulder cap.
04.11.2021 kl. 13:13:DROPS Design answered:
Dear Mrs Smith, do you need the top of sleeve? You have to cast off 4 sts mid under sleeve (last 2 sts + first 2 sts on round) then work short rows like this: work back and forth slipping 8 stitches on each side on every other row a total of 2 times (= 16 sts unworked on each side), then work all stitches back on needle and work M.1. Cast off when M.1 is done. Hope this will help. Happy knitting!
04.11.2021 kl. 15:48:
![]() PATRICIA SMITH wrote:
PATRICIA SMITH wrote:
Videos are not pertinent, perhaps more thorough instructions will make it clearer. Also can you make all comments translatable, perhaps answers are there we just can't read them.
29.10.2021 kl. 02:22:DROPS Design answered:
Dear Patricia, if you can't find a video that answers your question linked below, then unfortunately we do not have others related to this particular pattern. Also, unfortunately we cannot translate all comments and all answers to all available languages. Happy Stitching!
29.10.2021 kl. 12:11:
![]() PATRICIA SMITH wrote:
PATRICIA SMITH wrote:
Is there a video on the shoulder shaping in the round then straight then back to in the round?
28.10.2021 kl. 20:50:DROPS Design answered:
Dear Patricia, you can find all the relevant videos we have for this piece linked just below the pattern. Happy Stitching!
28.10.2021 kl. 23:21:
![]() Barbro Wallin wrote:
Barbro Wallin wrote:
Hur får man resår 2rm och 2av att fungera på 30 maskor enligt mönstret 3 - 4 år?
31.01.2021 kl. 20:03:DROPS Design answered:
Hej Barbro. Jag ser att det inte kommer passa med 30m, så här hade jag valt att lägga upp 32 m och ökat 2 maskor istället för 4 efter resåren. Mvh DROPS Design
02.02.2021 kl. 12:08:
![]() Barbro Wallin wrote:
Barbro Wallin wrote:
Hur får man resår 2rm och 2av att fungera på 30 maskor enligt mönstret 3 - 4 år?
31.01.2021 kl. 20:01:
![]() Susan Khaladkar wrote:
Susan Khaladkar wrote:
I am knitting this for my grandson in size 14. I have finished the body and one sleeve. It looks like it is more likely to fit my husband who takes large because of his height. My first question is: should the back be longer than the front? The front is 53 cm long and the back is 60 cm long. Thé armhole is 18 cm wide but the top of the arm is 21 cm. The sleeve length is 43 Cm but seems quite short in relation to the body. I think I may redo the sleeves so the sweater will fit my husband.
29.04.2020 kl. 18:43:DROPS Design answered:
Dear Mrs Khaladkar, the measurements in the chart can help you to adjust to the required size - please not that this pattern was written years agao as the trend was to wear wide/oversized pullover. read more about measurement charts here - you can measure a similar jumper he has and like the shape to adjust individually. Happy knitting!
30.04.2020 kl. 09:52:
![]() Nicolr wrote:
Nicolr wrote:
For pattern 1, as it is knitted in the round, isit 2 knit rows, 2 purl rows and 2 knit rows? thank you for clarification
11.03.2020 kl. 23:06:DROPS Design answered:
Hi Nicolr, Yes, you knit 2 rounds, purl 2 rounds and knit 2 rounds . Happy knitting!
12.03.2020 kl. 07:11:
![]() Anne Wilde wrote:
Anne Wilde wrote:
I have arrived at the front neck. About to bind off centre stitches. My confusion is after that pattern says alternate each row ( bind off 2 at neck edge 1 time and bind off 1 one time ) knit til pattern end. So am i just binding off the 3 stiches and no other shaping. Or is that a repeat instruction up until required length. IHope this makes sense. Not sure if the other one said question.
01.03.2018 kl. 21:09:DROPS Design answered:
Dear Mrs Wilde, see answer below. Happy knitting!
02.03.2018 kl. 08:32:
![]() Anne Wilde wrote:
Anne Wilde wrote:
I have arrived at the front neck. About to bind off centre stitches. My confusion is after that pattern says alternate each row ( bind off 2 at neck edge 1 time and bind off 1 one time ) knit til pattern end. So am i just binding off the 3 stiches and no other shaping. Or is that a repeat instruction up until required length. IHope this makes
01.03.2018 kl. 14:05:DROPS Design answered:
Dear Mrs Wilde, you will bind off for neck on front piece: first the middle 22-26 sts (see size), then at the beg of row from neck: 2 sts 1 time and 1 st 1 time = 3 more sts will bind off for neck. Happy knitting!
01.03.2018 kl. 16:50:Vicki Grierson wrote:
Please could you confirm that the sentence regarding increasing after the ribbing is as follows. For size 5 to 6, I start with 38 stitches and every alternate 4th and 5th row I increase 1 stitch, ON EACH SIDE Does it mean, for example, on the first increase row (the 4th row) with 38 stitches, that I K19, increase 1, K19 and increase 1, making 40 sts and carry on like this. On the following 5th row I would K20, inc1, K2, inc1 making 42 sts. Many thanks for your help. Best wishes, Vicki
11.07.2016 kl. 16:11:DROPS Design answered:
Dear Mrs Grierson, sleeves are worked in the round on double pointed needle, you will inc 1 st on each side of marker at beg of round starting before marker, inc 1 st, then slip marker and inc 1 st - see video below - you can also work 1/2 st between inc at end and beg of round. Happy knitting!
12.07.2016 kl. 09:26:
![]() Andrée Marin wrote:
Andrée Marin wrote:
Le patron children 7-5 - comment former le haut de la manche merci
07.04.2016 kl. 20:33:DROPS Design answered:
Chère Madame Marin, à 21.5-37.5 cm (cf taille), mettez en attente les 4 m au milieu sous la manche (= 2 m de chaque côté du marqueur) puis continuez en aller et retours en mettant en attente 2 fois 8 m de chaque côté. Puis reprenez toutes les mailles en attente et tricotez M.1 , et rabattez ensuite toutes les mailles. Bon tricot!
08.04.2016 kl. 08:42:
![]() Vivian Nielsen wrote:
Vivian Nielsen wrote:
Hej Jeg kan ikke printe diagrammet til opskrift smådrops 7-5 ud hvordan kan det være mvh Vivian
20.11.2015 kl. 14:52:DROPS Design answered:
Hej Vivian. Vi skal faa lagt det til asap.
20.11.2015 kl. 15:21:
![]() Ton Sarlemijn wrote:
Ton Sarlemijn wrote:
Hallo Drops, ik heb een vraag over bovenstaand patroon ik kan niet met een rond breinaald overweg is dit patroon ook gewoon te breien met gewone naalden ? en hoe verdeel ik het dan ik vraag dit voordat ik wol ga kopen. dank u
19.10.2015 kl. 11:37:DROPS Design answered:
Beste Ton. Ja, dat zou mogelijk moeten zijn, kijk hier hoe je aanpast van rondbreinaald naar rechte naalden. Veel breiplezier.
19.10.2015 kl. 14:59:
![]() Laine Sandström wrote:
Laine Sandström wrote:
Har stuckit nästan hela tröjan. River upp allt när jag upptäcker hur feldimensionerad tröjan blir. Jättestor i storleken fram-bakstycke armarna i förhållande till tröjan superkorta.Storleken 7/8 år som jag stickat passar hellre en tonåring.Provar nu en ny modell där maskantalet verkar mera rimligt enl. storleken.
15.03.2015 kl. 09:31:
![]() Belt wrote:
Belt wrote:
Bij dit patroon staat bij de teltekening = rett pa retten = vrang pa retten = rm pa rats = am pa rats Kunt u mij vertellen wat dat betekend.Hartelijk dank Alda Belt
14.01.2014 kl. 23:34:DROPS Design answered:
Hoi Belt. Onder motief in het patroon stond er: "De Nederlandse verklaring van de symbolen in de teltekening staan onderaan dit patroon, in dezelfde verticale volgorde als de symbolen naast de teltekening". Dit is standaard in alle oude patronen totdat we deze handmatig hebben aangepast. Ik heb inmiddels ook dit patroon aangepast.
15.01.2014 kl. 14:27:Ewa wrote:
Thank you for quick response. There's a part missing in the British English translation that's why I was confused. Now it's all clear:) Happy NEW YEAR:)
31.12.2013 kl. 16:37:Ewa wrote:
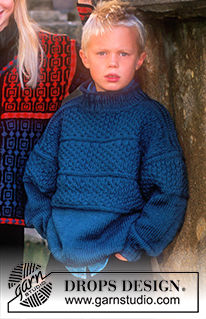
Hello. Shouldn't there be a part knitted in stt stich before starting the pattern for front and back wneh rib is finished? It looks like it in the picture but there's nothing in the pattern description. or am I missing sth? It's a beautiful sweater I would like to mąkę one for my son:-)
29.12.2013 kl. 16:35:DROPS Design answered:
Dear Ewa, for body, you first work 2 st st rows, then continue in rib until work measures 4-5 cm (check size), continue then with larger needle in stockinette until work measures 17-24.5 cm before starting textured pattern & diagrams. Happy knitting!
30.12.2013 kl. 16:09:
![]() Carol Cole wrote:
Carol Cole wrote:
Can anyone translate these comments into English. I would like to make this sweater, but am concerned that there might be corrections identified in the comments. Please advise. Thank you
27.10.2012 kl. 17:54:
![]() DROPS Design wrote:
DROPS Design wrote:
Hvilken str strikker du?
06.02.2012 kl. 10:09:
![]() Lena Johannesson wrote:
Lena Johannesson wrote:
Jag har stickat denna tröja till ett barnbarn och när ärmarna var klara efter mönstret såg de ut att räcka till armbågen jag undrar därför om det inte smugit sig in ett fel på längden på ärmarna. Mvh Lena
04.02.2012 kl. 10:03:
![]() Annie Lindhé wrote:
Annie Lindhé wrote:
Jeg vil meget gerne have opskriften på denne sweater
20.07.2010 kl. 23:12:
![]() Risskov Garn Og Strik wrote:
Risskov Garn Og Strik wrote:
Hej Else Du finder opskriften under det norske flag - god fornøjelse.
28.06.2010 kl. 14:53:
![]() Risskov Garn Og Strik wrote:
Risskov Garn Og Strik wrote:
Hej Else Du finder opskriften under det norske flag - god fornøjelse.
28.06.2010 kl. 14:53:
![]() Else Jakobsen wrote:
Else Jakobsen wrote:
Hvorfor er der ikke nogen opskrift på dansk til denne pæne trøje?
28.06.2010 kl. 09:38:Laat een opmerking achter voor DROPS Children 7-5
Wij horen graag wat u vindt van dit patroon!
Wilt u een vraag stellen, kies dan de juiste categorie in het formulier hieronder om sneller een antwoord te krijgen.
Uw e-mailadres wordt niet openbaar gemaakt. Verplichte velden zijn gemarkeerd met een *.
Hello and Happy New year. This has got to be the worst pattern to follow. I have been reading patterns 50 yrs. I have never had a pattern that has stumped me like this one. I realise that this has been translated from another language. However maybe someone should rewrite it so people can understand what the pattern is saying. Thank you
04.01.2023 kl. 19:59: