
Popular categories
Looking for a yarn?


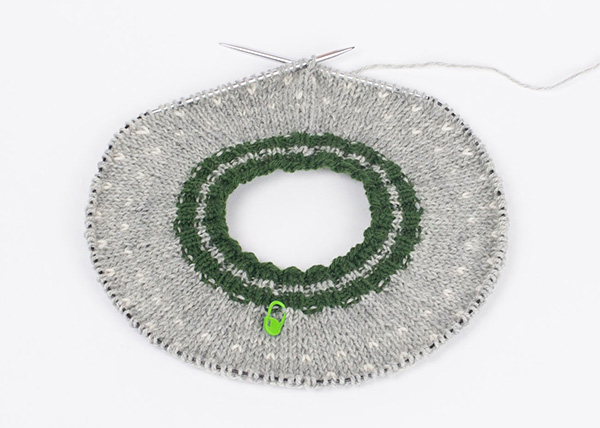
Clue #2 - The yoke

Now that our sweater has a neck, the next step is working on the yoke with motifs.
EXPLANATIONS FOR THE PATTERN:
Children/Women:
PATTERN:
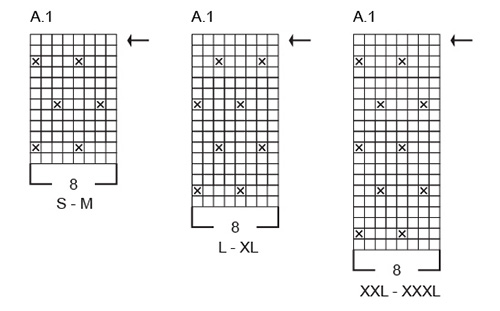
See diagrams A.1 to A.4. Choose diagram for your size (applies to A.1). The patterns are worked in stockinette stitch
INCREASE TIP (evenly spaced):
Increase 1 stitch by making 1 yarn over, which is worked twisted on the next round to avoid a hole.
KNITTING TIP-1:
To avoid the knitting gauge losing its elasticity when working pattern it is important that the strands at the back are not tight. Use a size larger needle when working pattern if the piece becomes tight.
KNITTING GAUGE:
The knitting gauge in this pattern is 21 stitches in width and 28 rows in height with stockinette stitch = 10 x 10 cm = 4” x 4”. If you get too many stitches on 10 cm = 4”, change to a larger needle size. If you get too few stitches on 10 cm = 4”, change to a smaller needle size.
Let’s get started!
Children/Women:
Change to circular needle size 4 MM = US 6. Work stockinette stitch with color light grey.

Children:
When the yoke measures 2-2-2-2-3-3-3 cm = 3/4"-3/4"-1 1/8"-1 1/8"-1 1/8" from the marker, increase 20-22-24-24-28-28-30 stitches evenly spaced – remember INCREASE TIP = 120-128-136-136-144-144-152 stitches. REMEMBER THE KNITTING GAUGE!
Women:
When the yoke measures 4-4-5-5-6-7 cm = 1 1/2"-1 1/2"-2"-2"-2 3/8"-2 3/4" from the marker, increase 38-41-44-46-52-54 stitches evenly spaced – remember INCREASE TIP = 168-176-184-200-216-224 stitches. REMEMBER THE KNITTING GAUGE!

Children/Women:
Now work pattern and continue to increase as described below – read KNITTING TIP-1 and PATTERN in explanations above.
Children:
Work A.1, 15-16-17-17-18-18-19 times on the round. On the round marked with an arrow increase 40-40-48-48-48-56-56 stitches evenly spaced = 160-168-184-192-200-208 stitches. Change to circular needle when needed.
Diagram
 |
= | light grey |
 |
= | off white |
 |
= | increase round |

Women:
Work A.1, 21-22-23-25-27-28 times on the round. AT THE SAME TIME on the round marked with an arrow increase 48-48-56-56-64-72 stitches evenly spaced = 216-224-240-256-280-296 stitches. Change to a longer circular needle when needed.
Diagram
|
= | light grey |
|
= | off white |
|
= | increase round |
Children:
When A.1 is finished in your size, work A.2, 20-21-23-23-24-25-26 times on the round. On the round marked with an arrow increase 32-32-32-32-40-40-48 stitches evenly spaced = 192-200-216-216-232-240-256 stitches.
Diagram
|
= | light grey |
|
= | off white |
 |
= | anthracite |
 |
= | wine red |
|
= | increase round |

Women:
When A.1 is finished in your size, work A.2, 27-28-30-32-35-37 times on the round. AT THE SAME TIME on the round marked with an arrow increase 40-48-48-56-64-64 stitches evenly spaced = 256-272-288-312-344-360 stitches.
Diagram
|
= | light grey |
 |
= | forest green |
|
= | increase round |


Children:
When A.2 is finished, work A.3, 24-25-27-27-29-30-32 times on the round. On the round marked with an arrow increase 16-16-16-24-24-24-24 stitches evenly spaced = 208-216-232-240-256-264-280 stitches.
Diagram
|
= | light grey |
|
= | forest green |
|
= | increase round |

Women:
When A.2 is finished, work A.3, 32-34-36-39-43-45 times on the round. AT THE SAME TIME on the round marked with an arrow increase 32-40-48-48-48-56 stitches evenly spaced = 288-312-336-360-392-416 stitches.
Diagram
|
= | light grey |
|
= | off white |
|
= | anthracite |
|
= | wine red |
|
= | increase round |


Children:
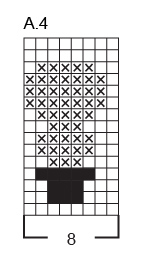
When A.3 is finished, work A.4, 26-27-29-30-32-33-35 times on the round. Continue the pattern – and at the same time divide for the sleeves and body as described below.
Diagram
|
= | light grey |
|
= | off white |
|
= | anthracite |
Women:
When A.3 is finished, work A.2 again 36-39-42-45-49-52 times on the round. AT THE SAME TIME on the round marked with an arrow increase 16-16-24-40-40-48 stitches evenly spaced = 304-328-360-400-432-464 stitches.
When A.2 is finished, work A.4, 38-41-45-50-54-58 times on the round. Continue the pattern – at the same time divide for the sleeves and body as described below.
Diagram
|
= | light grey |
|
= | off white |
|
= | anthracite |
|
= | forest green |
|
= | increase round |

DIVIDE FOR SLEEVES AND BODY:
Children:
Work until the yoke measures 14-15-16-17-18-19-20 cm = 6 1/4"-6 3/4"-7"-7 1/2"-8" from the marker. The increases are finished but not the pattern, which you continue on the body and sleeves.
Women:
Work until the yoke measures 22-24-25-27-29-31 cm = 8 3/4"-9 1/2"-9 3/4"-10 5/8"-11 3/8"-12 1/4" from the marker. The increases are finished but not the pattern, which you continue on the body and sleeves.

Children:
On the next round divide as follows: Work 30-32-34-36-38-40-42 stitches as before (half back piece), place the next 44-44-48-48-52-52-56 stitches on a thread for the sleeve, cast on 8 stitches with color light grey (in side under sleeve), work 60-64-68-72-76-80-84 stitches as before (front piece), place the next 44-44-48-48-52-52-56 stitches on a thread for the sleeve, cast on 8 stitches with color light grey (in side under sleeve), work the last 30-32-34-36-38-40-42 stitches as before (half back piece) = 136-144-152-160-168-176-184 stitches.
Cut the strand. Body and sleeves are finished separately. The piece is now measured from here!
Women:
On the next round divide as follows: Work 46-50-54-60-66-72 stitches as before (half back piece), place the next 60-64-72-80-84-88 stitches on a thread for the sleeve, cast on 8 stitches with color light grey (in side under sleeve), work 92-100-108-120-132-144 stitches as before (front piece), place the next 60-64-72-80-84-88 stitches on a thread for the sleeve, cast on 8 stitches with color light grey (in side under sleeve), work the last 46-50-54-60-66-72 stitches as before (half back piece) = 200-216-232-256-280-304 stitches.
Cut the strand. Body and sleeves are finished separately. The piece is now measured from here!

And that’s all for the yoke!
Now we are done with the yoke and the second clue in this KAL has been solved. Are you ready to continue? Then click below on Next > to get to the next step of the sweater.
Remember to send pictures of your progress to our gallery. Click here to submit a link!


With over 40 years in knitting and crochet design, DROPS Design offers one of the most extensive collections of free patterns on the internet - translated to 17 languages. As of today we count 304 catalogs and 11422 patterns - 11417 of which are translated into English (US/in).
We work hard to bring you the best knitting and crochet have to offer, inspiration and advice as well as great quality yarns at incredible prices! Would you like to use our patterns for other than personal use? You can read what you are allowed to do in the Copyright text at the bottom of all our patterns. Happy crafting!