Clue #1 - Let’s run with Rudolph!


Christmas is approaching and that means it’s time to get started on new holiday jumpers for the whole family! So what better than joining us and knitting together these cute Rudolph jumpers in DROPS Nepal - the yarn has 30% discount the rest of the year!
Still missing the materials to knit the jumper? See a list of what you need here.
Already got the yarn? Then keep reading and join us working on the back piece!
Hesitating about your skills? Remember that our clues and accompanied by tutorial videos where we show you how to cast on, how to knit a rib, how to knit garter stitch, and so much more. We will try to make sure that everyone can do this!
One last thing before we start - do you know what size you want to knit? You'll find both patterns (with and without the reindeer on the back) below, just make sure to follow the same one on every clue, they are not exactly the same.
Children jumper
Sizes: 2 - 3/4 - 5/6 - 7/8 - 9/10 - 11/12 years
Size (by height in cm): 92 - 98/104 - 110/116 - 122/128 - 134/140 - 146/152
You can make this jumper with or without the reindeer in the back, just choose your favourite option! You’ll find both patterns below.
Back piece without reindeer
INFORMATION FOR THE PATTERN:
RIDGE/GARTER STITCH (worked back and forth):
1 ridge = Knit 2 rows.
1 edge stitch in garter stitch = knit the stitch from both the right and wrong side
Back piece is worked back and forth with circular needle from the bottom to the top.
Cast on 54-58-62-66-70-74 stitches (including 1 edge stitch on each side) with circular needle size 4 mm and denim blue (colour b). Purl 1 row (= wrong side). The next row is worked as follows from the right side: 1 edge stitch in GARTER STITCH – read description above, * knit 2, purl 2 * work from *-* until there is 1 stitch left on the row and finish with 1 edge stitch in garter stitch. Continue this rib for 2-2-2-3-3-3 cm – adjust so that the next row is from the right side.
Change to circular needle size 5 mm. Work 10-12-14-16-20-24 rows stocking stitch with 1 edge stitch in garter stitch on each side. REMEMBER THE KNITTING TENSION!
Change to red (colour a) and continue with stocking stitch and 1 edge stitch in garter stitch in each side. When the piece measures 21-23-26-29-32-35 cm cast off 1 stitch at the beginning of the next 2 rows for armholes = 52-56-60-64-68-72 stitches. Continue with stocking stitch and 1 edge stitch in garter stitch on each side. When the piece measures 31-34-38-42-46-50 cm cast off the middle 18-20-22-24-24-26 stitches for neck and each shoulder is finished separately. Then cast off 1 stitch on the next row from the neck = 16-17-18-19-21-22 stitches left on shoulder. Continue working until the piece measures 32-35-39-43-47-51 cm – adjust so that the next row is worked from the wrong side. Knit 1 row from the wrong side, knit 1 row from the right side and knit 1 row from the wrong side. Cast off with knit from the right side. Work the other shoulder in the same way. The jumper measures approx. 33-36-40-44-48-52 cm from the shoulder down.
Back piece with reindeer

INFORMATION FOR THE PATTERN:
RIDGE/GARTER STITCH (worked back and forth):
1 ridge = Knit 2 rows.
1 edge stitch in garter stitch = knit the stitch from both the right and wrong side
PATTERN:
See diagram A.1.
The reindeer is worked in stocking stitch.
To avoid long strands at the back of the piece when working pattern, you can work with 3/5 balls. In other words, work with 1 ball of red (colour a) on each side of the reindeer and 1 ball of the pattern colour in the middle. To avoid holes when changing colour, twist the strands together when changing colour.
Back piece is worked back and forth with circular needle from the bottom to the top.
Cast on 54-58-62-66-70-74 stitches (including 1 edge stitch in each side) with circular needle size 4 mm and denim blue (colour b). Purl 1 row (= wrong side). The next row is worked as follows from the right side: 1 edge stitch in GARTER STITCH – read description above, * knit 2, purl 2 * work from *-* until there is 1 stitch left on the row, finish with 1 edge stitch in garter stitch. Continue this rib for 2-2-2-3-3-3 cm – adjust so that the next row is from the right side.
Change to circular needle size 5 mm. Work 10-12-14-16-20-24 rows stocking stitch with 1 edge stitch in garter stitch on each side. REMEMBER THE KNITTING TENSION!
Change to red (colour a) and work the next row as follows from the right side: Work 1 edge stitch in garter stitch, 13-15-17-19-21-23 stitches in stocking stitch, work A.1 (= 26 stitches) – read PATTERN, work 13-15-17-19-21-23 stitches in stocking stitch and finish with 1 edge stitch in garter stitch.
Continue this pattern. When the piece measures 21-23-26-29-32-35 cm cast off 1 stitch at the beginning of the next 2 rows for the armholes = 52-56-60-64-68-72 stitches. Continue with stocking stitch and A.1. When A.1 has been completed, continue with red (colour a) over all stitches. When the piece measures 31-34-38-42-46-50 cm cast off the middle 18-20-22-24-24-26 stitches for neck and each shoulder is finished separately. Then cast off 1 stitch on the next row from the neck = 16-17-18-19-21-22 stitches left on shoulder. Continue working until the piece measures 32-35-39-43-47-51 cm – adjust so that the next row is worked from the wrong side. Knit 1 row from the wrong side, knit 1 row from the right side and knit 1 row from the wrong side. Cast off with knit from the right side. Work the other shoulder in the same way. The jumper measures approx. 33-36-40-44-48-52 cm from the shoulder down.
Diagram
 | = colour a |
 | = colour e |
 | = colour d |

Adult jumper
Size: S - M - L - XL - XXL - XXXL
You can make this jumper with or without the reindeer showing in the back. Choose below which of both options to follow.
Back piece without reindeer
INFORMATION FOR THE PATTERN:
RIDGE/GARTER STITCH (worked back and forth):
1 ridge = Knit 2 rows.
INCREASE TIP (for raglan):
All increases are worked from the right side!
Work 1 edge stitch in garter stitch, knit 1, 1 yarn over, work until there are 2 stitches left, 1 yarn over, knit 1, 1 edge stitch in garter stitch. On the next row, purl the yarn overs twisted to avoid holes. Then work the new stitches in stocking stitch.
BACK PIECE:
The piece is worked back and forth, top down, with circular needle and with raglan increases.
Cast on 28-30-32-34-36-38 stitches (including 1 edge stitch in garter stitch on each side) with circular needle size 5.5 mm and red (colour a). Purl 1 row from the wrong side. Then work stocking stitch with 1 edge stitch in garter stitch on each side. At the same time on the first row from the right side increase 1 stitch on each side to raglan - remember INCREASE TIP. Increase like this every 2nd row a total of 20-21-23-25-27-29 times = 68-72-78-84-90-96 stitches.
When all the increases to raglan are finished, the piece measures approx. 20-21-23-25-27-29 cm. At the end of the next 2 rows cast on 4-5-5-5-7-9 stitches for the armhole on each side of the piece = 76-82-88-94-104-114 stitches. THE PIECE IS NOW MEASURED FROM HERE! Continue with stocking stitch and 1 edge stitch in garter stitch on each side. When the piece measures 18-17-16-15-14-12 cm continue with off white (colour b) to finished length. When the piece measures 25-25-25-25-25-25 cm, increase 16-18-20-22-24-26 stitches evenly on row = 92-100-108-116-128-140 stitches. Change to circular needle size 4.5 mm and work rib as follows from the right side: 1 edge stitch in garter stitch, (knit 2, purl 2) until there are 3 stitches left on the row, knit 2 and 1 edge stitch in garter stitch. Continue like this until the rib measures 6 cm. Cast off with knit over knit and purl over purl. The back piece measures 51-52-54-56-58-60 cm from the neck down.
Back piece with reindeer
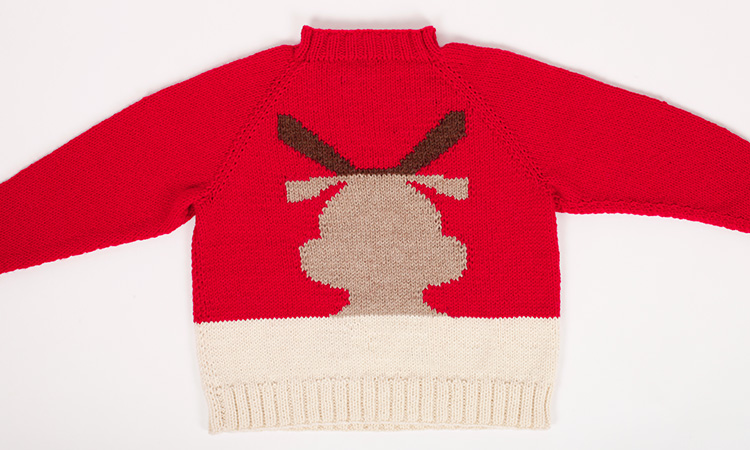
INFORMATION FOR THE PATTERN:
RIDGE/GARTER STITCH (worked back and forth):
1 ridge = Knit 2 rows.
INCREASE TIP (for raglan):
All increases are worked from the right side!
Work 1 edge stitch in garter stitch, knit 1, 1 yarn over, work until there are 2 stitches left, 1 yarn over, knit 1, 1 edge stitch in garter stitch. On the next row, purl the yarn overs twisted to avoid holes. Then work the new stitches in stocking stitch.
PATTERN:
See diagrams A.2a & A.2b.
Diagrams A.2a and A.2b (reindeer back): The whole diagram is worked in stocking stitch. Work with 3/5 balls so you avoid long strands on the wrong side. In other words, work with 1 ball red (colour a) on each side of the jumper and 1 ball of the pattern colour in the middle. NOTE: To avoid holes when changing colours, twist the strands together.
BACK PIECE:
The piece is worked back and forth, top down, with circular needle and with raglan increases.
Cast on 28-30-32-34-36-38 stitches (including 1 edge stitch in garter stitch on each side) with circular needle size 5.5 mm and red (colour a). Purl 1 row from the wrong side. Then work stocking stitch with 1 edge stitch in GARTER STITCH - read description above, on each side. At the same time, on the first row from the right side increase 1 stitch on each side for raglan - read INCREASE TIP. Increase like this every 2nd row a total of 20-21-23-25-27-29 times = 68-72-78-84-90-96 stitches. REMEMBER THE KNITTING TENSION!
AT THE SAME TIME when you have increased 7-7-8-9-10-10 times on each side and there are 42-44-48-52-56-58 stitches on the needle, work pattern as follows: 1 edge stitch in garter stitch, knit 1, 1 yarn over (= increase), knit 0-1-3-5-7-8, work A.2a (= 38 stitches) - read PATTERN above, knit 0-1-3-5-7-8 stitches, 1 yarn over (= increase), knit 1 and 1 edge stitch in garter stitch = 44-46-50-54-58-60 stitches. When all the increases to raglan are finished, the piece measures approx. 20-21-23-25-27-29 cm. At the end of the next 2 rows cast on 4-5-5-5-7-9 stitches for the armhole on each side of the piece = 76-82-88-94-104-114 stitches. THE PIECE IS NOW MEASURED FROM HERE!
Continue with stocking stitch, pattern and 1 edge stitch in garter stitch on each side. When A.2a has been completed, work A.2b over A.2a. When you see the arrow in A.2b, continue with off white (colour b), stocking stitch and 1 edge stitch in garter stitch on each side until the piece measures 25-25-25-25-25-25 cm. Now increase 16-18-20-22-24-26 stitches evenly on row = 92-100-108-116-128-140 stitches. Change to circular needle size 4.5 mm and work rib as follows from the right side: 1 edge stitch in garter stitch, (purl 2, knit 2) until there are 3 stitches left on the row, purl 2 and 1 edge stitch in garter stitch. Continue like this until the rib measures 6 cm. Cast off with knit over knit and purl over purl. The back piece measures 51-52-54-56-58-60 cm from the neck down.
Diagram
 | = colour a |
 | = colour b |
 | = colour d |
 | = colour e |
 | = the arrow indicates the point of change of the background colour from red (colour a) to off white (colour b) |


Finished
Now we are done with the back!
Come back next week to work together on the front of the jumper!
Need some help?
Here’s a list of resources to help you with the back of the jumpers!
- Lesson: How to cast on
- Lesson: How to knit stitches
- Lesson: How to work purl stitches
- Lesson: How to increase stitches at the end of a row (adult jumper)
- Lesson: How to increase/decrease evenly (adult jumper)
- Video: How to cast on with the continental method
- Video: How to knit a rib (K1, P1)
- Video: How to knit stockinette stitch back and forth on a circular needle
- Video: How to knit garter stitch
- Video: How to bind off from the right side (RS) (children jumper)
- Video: How to cast off in rib (adult jumper)
- Video: How to increase with a yarn over (yo)
- Video: How to cast on new stitches at side of work (adult jumper)
- Video: How to knit with 3 skeins at the same time



Først tusind tak for denne flotte opskrift. Er vild med denne julebluse, og det tog mig lidt tid at lave den færdig. Men sikke resultat. Vil gerne lave elegant julesweater fra julemands-kostumer.dk/vare-kategori/julesweater/. Denne juletrøje skal bruge en hvid og en meget lidt lys rød farve. Har I denne farve evt farvekode? Vh Lone
05.05.2020 - 10:00