
Popular categories
Looking for a yarn?


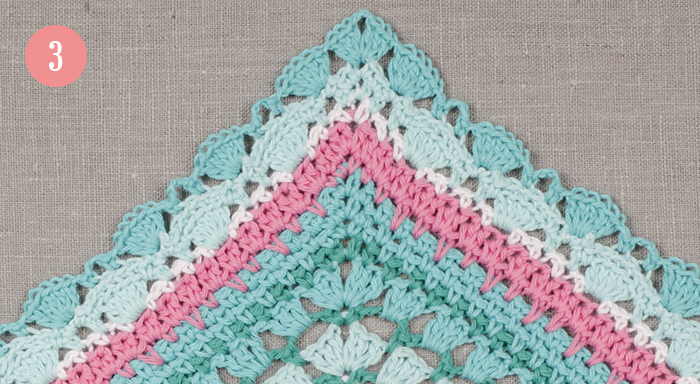
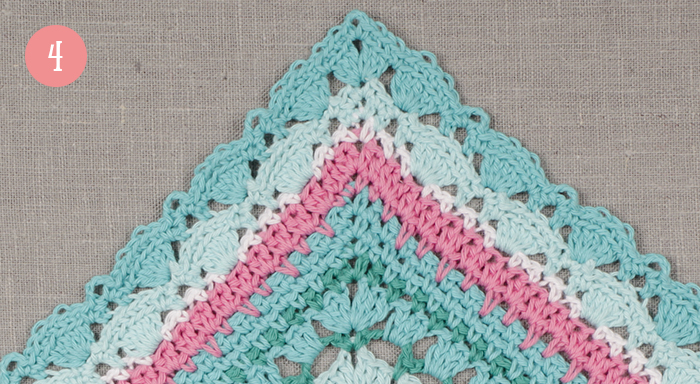
Clue #13 - 5th edge - beautiful fan patterns around our flower field

This new clue consists of 6 crochet rounds that will add a beautiful trio of displaced fan patterns to the edge of our blanket. You already know all the techniques we will be using - enjoy!

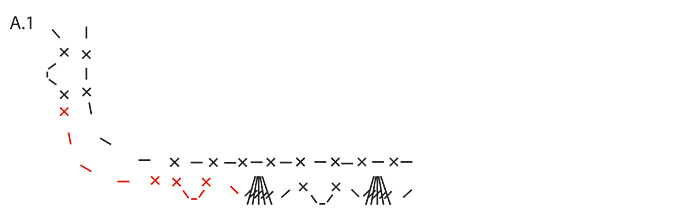
ROUND 1: Switch to light turquoise (no 19). Work 1 sl st around next ch, 3 ch, (= 1st tr), 4 tr around same ch, 1 ch, skip 2 sts, 1 dc in next st, 3 ch, skip next st, 1 dc in next st, 1 ch, skip 2 sts, * 5 tr around next ch, 1 ch, skip 2 sts, 1 dc in next st, 3 ch, skip next st, 1 dc in next st, 1 ch, skip 2 sts * repeat *-* the entire round, but finish in each side as follows: 5 tr in same ch, 1 ch, skip 2 sts, 1 dc in next st, 3 ch, skip 1 st, 1 dc in last st.
Work as follows in the corners: 1 dc, 3 ch, 1 dc, and 1 dc in next st, 3 ch, skip 1 st, 1 dc in next st, 1 ch, skip 2 sts.
Finish round with 1 sl st in back loop of 3rd ch from beg of round.
= 25 repetitions of diagram A.1 in each long side and 18 repetitions of diagram A.1 in each short side (see diagram A.1 below).
Chart A.1, see red.
 |
= ch |
 |
= dc |
 |
= 5 tr |

Finish in each side, see red in the chart:
5 tr in same ch, 1 ch, skip 2 sts, 1 dc in next st, 3 ch, skip 1 st, 1 dc in last st.
|
= ch |
|
= dc |
|
= 5 tr |

Work as follows in the corners:
1 dc, 3 ch, 1 dc, and 1 dc in next st, 3 ch, skip 1 st, 1 dc in next st, 1 ch, skip 2 sts.
|
= ch |
|
= dc |
Finish round with 1 sl st in back loop of 3rd ch from beg of round, see red:
 |
= sl st |


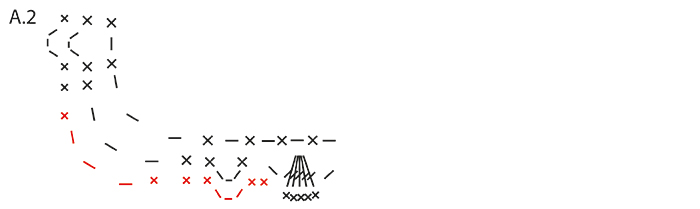
ROUND 2: Work 1 ch (= 1st st). 1 dc in back loop each of the next 4 tr, 1 dc around ch, 1 dc around ch-space, 3 ch and 1 dc around same ch-space, 1 dc around next ch.
Continue like this * 1 dc in back loop of each of the next 5 tr, 1 dc around ch, 1 dc around ch-space, 3 ch, 1 dc around same ch-space, 1 dc in/around next st*, repeat from *-* the entire round.
Work as follows in the corners: 1 dc, 3 ch, 1 dc, and 1 dc in next st, 1 dc around ch-space, 3 ch, 1 dc around same ch-space and 1 dc around next ch.
Finish round with 1 sl st in back loop of 1st st from beg of round. READ COLOUR CHANGE! = 25 repetitions of diagram A.2 in each long side and 18 repetitions of diagram A.2 in each short side (see diagram A.2 below).
COLOUR CHANGE:
When changing colour work as follows: Before last pull through of last loop on hook, switch colour, pull the last loop on hook through with the new colour.
Chart A.2, see red.
|
= ch |
|
= dc |

Work as follows in the corners: 1 dc, 3 ch, 1 dc, and 1 dc in next st, 1 dc around ch-space, 3 ch, 1 dc around same ch-space and 1 dc around next ch.
|
= ch |
|
= dc |
Finish round with 1 sl st in back loop of 1st st from beg of round.
|
= sl st |

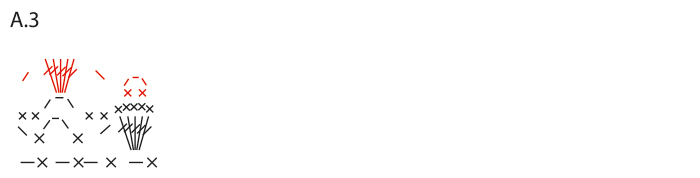
ROUND 3: Switch to turquoise (no 18), work 1 ch (= 1st st) * 1 dc in back loop of next dc, 3 ch, skip 1 st, 1 dc in back loop of next dc, 1 ch and 5 tr around next ch-space, 1 ch, skip 3 sts * repeat from *-* the entire round.
Work as follows in the corners: 3 tr, 3 ch, 3 tr, and 1 ch, 5 tr in next ch-space, 1 ch.
Finish round with 1 sl st in 1st st at beg of round. = 25 repetitions of diagram A.3 in each long side and 18 repetitions of diagram A.3 in each short side (see diagram A.3 below).
Chart A.3, see red.
|
= ch |
|
= dc |
|
= 5 tr |
Work as follows in the corners: 3 tr, 3 ch, 3 tr, and 1 ch, 5 tr in next ch-space, 1 ch.
|
= ch |
|
= dc |
 |
= 3 tr |
|
= 5 tr |

Finish round with 1 sl st in 1st st at beg of round.
|
= sl st |

ROUND 4: Work 1 dc around ch-space, 3 ch, 1 dc around same ch-space, 1 dc around next ch, 1 dc in back loop of each of the next 5 tr. Work * 1 dc around next ch, 1 dc around next ch-space, 3 ch, 1 dc around same ch-space, 1 dc around next ch, 1 dc in back loop of each of the next 5 tr *, repeat from *-* the entire round but finish each side with 1 dc around next ch and 1 dc in back loop of each of the next 3 tr.
Work as follows in the corners: 1 dc, 3 ch, 1 dc, and 1 dc in back loop of each of the next 3 tr, 1 dc around next ch, 1 dc in back loop of each of the next 5 tr.
Finish round with 1 dc around last ch and 1 sl st around first ch-space.
= 25 repetitions of diagram A.4 in each long side and 18 repetitions of diagram A.4 in each short side (see diagram A.4 below).
Chart A.4 see red.
|
= ch |
|
= dc |

Finish each side with 1 dc around next ch and 1 dc in back loop of each of the next 3 tr.
|
= dc |

Work as follows in the corners: 1 dc, 3 ch, 1 dc, and 1 dc in back loop of each of the next 3 tr, 1 dc around next ch, 1 dc in back loop of each of the next 5 tr.
|
= ch |
|
= dc |
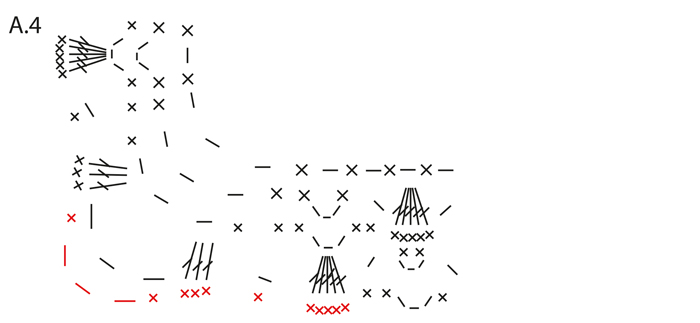
Finish round with 1 dc around last ch and 1 sl st around first ch-space.
|
= sl st |
|
= dc |


ROUND 5: Switch to light turquoise (no 19). Work 3 ch (= 1st tr), 4 tr around same ch-space, 1 ch, skip 3 sts, 1 dc in back loop of next st, 3 ch, skip 1 dc, 1 dc in back loop of nexts st, 1 ch, skip 3 sts, * 5 tr around next ch-space, 1 ch, skip 3 sts, 1 dc in back loop of next st, 3 ch, skip 1 dc, 1 dc in back loop of next st, 1 ch, skip 3 sts * repeat from *-* the entire round, but finish by only skipping 2 dc, 1 dc in back loop of next st, 3 ch, skip 1 dc, 1 dc in back loop of next st, 1 ch and skip 1 dc.
Work as follows in the corners: 1 dc, 3 ch, 1 dc, and 1 ch, skip 1 st, 1 dc in back loop of st, 3 ch, skip next dc, 1 dc in back loop of next dc, 1 ch, skip 2 sts, 1 dc in back loop of next dc, 3 ch, skip next dc, 1 dc in back loop of next dc, 1 ch, skip 3 dc.
Finish round with 1 sl st in the back loop of 3rd ch from beg of round.
= 25 repetitions of diagram A.5 in each long side and 18 repetitions of diagram A.5 in each short side (see diagram A.5 below).
Chart A.5, see red.
|
= ch |
|
= dc |
|
= 5 tr |
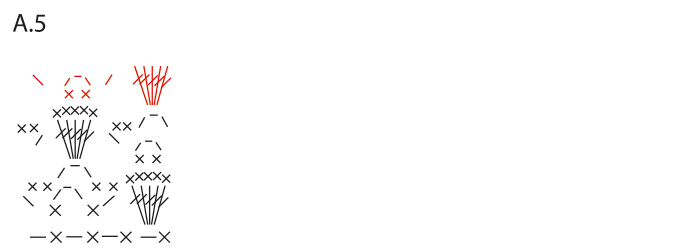
Finish by only skipping 2 dc, 1 dc in back loop of next st, 3 ch, 1 dc in back loop of next st, 1 ch and skip 1 dc.
|
= ch |
|
= dc |
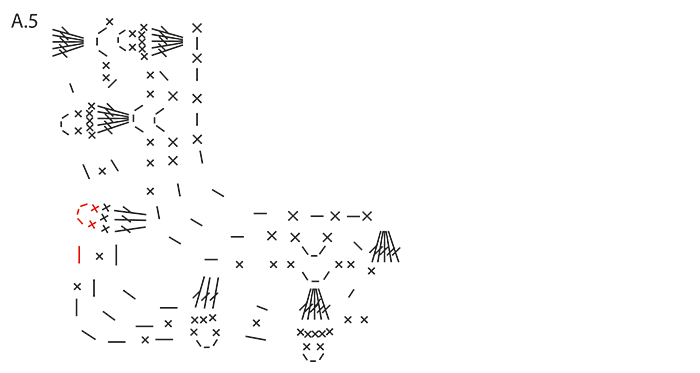
Work as follows in the corners: 1 dc, 3 ch, 1 dc, and 1 ch, skip 1 st, 1 dc in back loop of st, 3 ch, skip next dc, 1 dc in back loop of next dc, 1 ch, skip 2 sts, 1 dc in back loop of next dc, 3 ch, skip next dc, 1 dc in back loop of next dc, 1 ch, skip 3 dc.
|
= ch |
|
= dc |
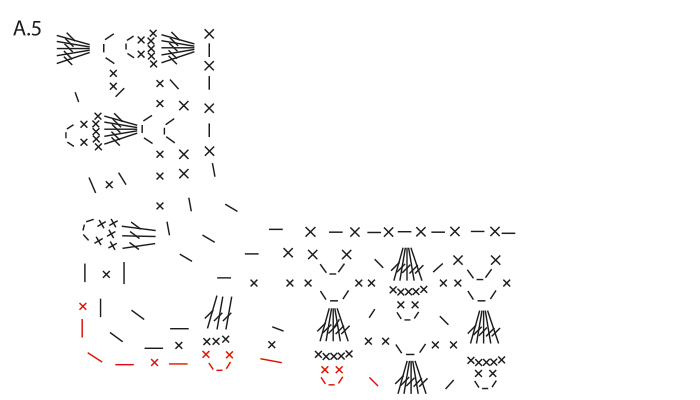
Finish round with 1 sl st in the back loop of 3rd ch from beg of round.
|
= sl st |


ROUND 6: Work 1 ch (= 1st st). 1 dc in back loop of each of the next 4 tr, 1 dc around ch, 1 dc around ch-space, 3 ch, 1 dc around same ch-space and 1 dc around next ch. Then work as follows * 1 dc in back loop of the next 5 tr, 1 dc around next ch, 1 dc around ch-space, 3 ch, 1 dc around same ch-space, 1 dc around next ch *, repeat from *-* the entire round but finish each side with 1 dc around next ch-space, 3 ch, 1 dc around same ch-space, 1 dc around ch and 1 dc in back loop of next dc.
Work as follows in the corners: 1 dc, 3 ch, 1 dc, and 1 dc in back loop of next dc, 1 dc around next ch, 1 dc around next ch-space, 3 ch, 1 dc around same ch-space, 1 dc around next ch, 1 dc around next ch-space, 3 ch, 1 dc around same ch-space and 1 dc around next ch.
Finish round with 1 sl st in the back loop of 1st st from beg of round. at the same time change to white (no 01) = 25 repetitions of diagram A.6 in each long side and 18 repetitions of diagram A.6 in each short side (see diagram A.6 below). Do not cut the light turquoise yarn (no 19) but fasten the other strands.
Chart A.6, see red.
|
= ch |
|
= dc |

Finish each side with 1 dc around next ch-space, 3 ch, 1 dc in same ch-space, 1 dc around ch and 1 dc in back loop of next dc.
|
= ch |
|
= dc |
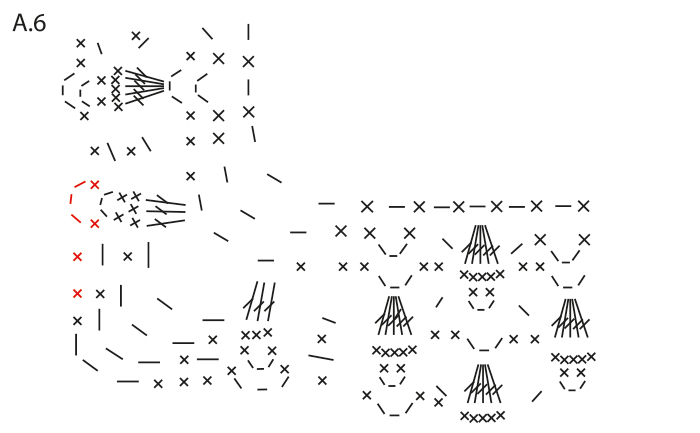
Work as follows in the corners: 1 dc, 3 ch, 1 dc, and 1 dc in back loop of next dc, 1 dc around next ch, 1 dc around next ch-space, 3 ch, 1 dc around same ch-space, 1 dc around next ch, 1 dc around next ch-space, 3 ch, 1 dc around same ch-space and 1 dc around next ch.
|
= ch |
|
= dc |

Finish round with 1 sl st in the back loop of 1st st from beg of round. at the same time change to white (no 01).
|
= sl st |
Tutorial Video
IMPORTANT: The pictures and the video show an example where we crochet the edge around 1 single square. You need to crochet this edge around the whole blanket (40 squares).


With over 40 years in knitting and crochet design, DROPS Design offers one of the most extensive collections of free patterns on the internet - translated to 17 languages. As of today we count 304 catalogues and 11422 patterns - 11422 of which are translated into English (UK/cm).
We work hard to bring you the best knitting and crochet have to offer, inspiration and advice as well as great quality yarns at incredible prices! Would you like to use our patterns for other than personal use? You can read what you are allowed to do in the Copyright text at the bottom of all our patterns. Happy crafting!
Jeg har ikke fulgt jeres mønster slavisk, da jeg har hæklet mine blomsterfirkanter sammen på en anden måde, som så har givet mig flere maskerpå hver side. Mit spørgsmål: hvor mange masker passer vifterne til?
14.07.2016 - 15:27