The yarn cost is calculated from the pattern’s smallest size and the yarn’s cheapest product type. Looking for an even better price? You might find it on the DROPS Deals!
-------------------------------------------------------
Alternative Yarn – See how to change yarns here
Yarn Groups A to F – Use the same pattern and change the yarn here
Yarn usage using an alternative yarn – Use our yarn converter here
-------------------------------------------------------
The yarn cost is calculated from the pattern’s smallest size and the yarn’s cheapest product type. Looking for an even better price? You might find it on the DROPS Deals!
This pattern has been corrected. Click here to see the correction/s.
= black | |
= grand canyon | |
= between 2 stitches make 1 yarn over. On next round knit yarn over twisted to avoid holes. | |
= knit 2 together with black | |
= slip 1 stitch knitwise, knit 1 with black, pass slipped stitch over stitch worked | |
= slip 1 stitch knitwise, knit 2 stitches together, pass slipped stitch over stitches worked together | |
= stitch cast off in A.3, A.4 and A.5. Skip this stitch |
Each of our patterns has specific tutorial videos to help you.
These step-by-step tutorials might also help you:
Why is the knitting/crochet tension so important?
Knitting tension is what determines the final measurements of your work, and is usually measured per 10 x 10 cm. It is provided like so: number of stitches in width x number of rows in height - eg: 19 stitches x 26 rows = 10 x 10 cm.
The knitting tension is very individual; some people knit/crochet loosely while others work tightly. You adjust the knitting tension with the needle size, which is why the suggested needle size is only meant as a guide! You need to adjust this (up or down) to ensure that YOUR knitting tension matches the knitting tension provided in the pattern. If you work with a different knitting tension than provided you will have a different yarn consumption, and your work will have different measurements than what the pattern suggests.
The knitting tension also determines which yarns can replace each other. As long as you achieve the same knitting tension you can replace one yarn with another.
See DROPS lesson: How to measure your tension/gauge
See DROPS video: How to make a gauge tension swatch
How do I know how many balls of yarn I need?
The required amount of yarn is provided in grams, eg: 450 g. To calculate how many balls you’ll need you first need to know how many grams are in 1 ball (25g, 50g or 100g). This information is available if you click on the individual yarn quality on our pages. Divide the amount required with the amount of each ball. For example, if each ball is 50g (the most common amount), the calculation will be as follows: 450 / 50 = 9 balls.
Can I use a different yarn than what the pattern suggests?
The important thing when changing from one yarn to another is that the knitting/crochet tension remains the same. This is so that the measurements of the finished piece will be the same as on the sketch provided. It is easier to achieve the same knitting tension using yarns from the same yarn group. It is also possible to work with multiple strands of a thinner yarn to achieve the knitting tension of a thicker one. Please try our yarn converter. We recommend you to always work a test swatch.
Please NOTE: when changing yarn the garment might have a different look and feel to the garment in the photo, due to individual properties and qualities of each yarn.
See DROPS lesson: Can I use a different yarn than the one mentioned in the pattern?
What are the yarn groups?
All our yarns are categorised into yarn groups (from A to F) according to thickness and knitting tension – group A contains the thinnest yarns and group F the thickest. This makes it easier for you to find alternative yarns to our patterns, should you wish to switch yarn. All yarns within the same group have a similar knitting tension and can easily replace each other. However, different yarn qualities have different structures and properties which will give the finished work a unique look and feel.
How do I use the yarn calculator?
At the top of all our patterns you’ll find a link to our yarn calculator, which is a helpful tool should you wish to use a different yarn than suggested. By filling in the yarn quality you wish to replace, the amount (in your size) and number of strands, the calculator will present good alternative yarns with the same knitting tension. Additionally it will tell you how much you’ll require in the new qualities and whether you’ll need to work with multiple strands. Most skeins are 50g (some are 25g or 100g).
If the pattern is worked with multiple colours, every colour will have to be calculated separately. Similarly, if the pattern is worked with several strands of different yarns (for example 1 strand Alpaca and 1 strand Kid-Silk) you will have to find alternatives for each, individually.
Why do you show discontinued yarns in the patterns?
Since different yarns have different qualities and textures we have chosen to keep the original yarn in our patterns. However, you can easily find options among our available qualities by using our yarn calculator, or simply pick a yarn from the same yarn group.
It is possible that some retailers still have discontinued yarns in stock, or that someone has a few skeins at home that they would like to find patterns for.
The yarn calculator will provide both alternative yarn as well as required amount in the new quality.
What size should I knit?
If you think it's hard to decide what size to make, it can be a good idea to measure a garment you own already and like the size of. Then you can pick the size by comparing those measures with the ones available in the pattern's size chart.
You'll find the size chart at the bottom of the pattern.
See DROPS lesson: How to read size chart
Why do I get the wrong knitting tension with the suggested needle size?
The needle size provided in the pattern serves only as a guide, the important thing is to follow the knitting tension. And since knitting tension is very individual, you will have to adjust the needle size to ensure that YOUR tension is the same as in the pattern – maybe you’ll have to adjust 1, or even 2 needle sizes, up or down to achieve the correct tension. For this, we recommend that you work test swatches.
Should you work with a different knitting tension than the one provided, the measurements of the finished garment might deviate from the measurement sketch.
See DROPS lesson: How to measure your tension/gauge
See DROPS video: How to make a tension/gauge swatch
Why is the pattern worked top-down?
Working a garment top-down provides more flexibility and room for personal adjustment. For example it is easier to try the garment on while working, as well as making adjustments to length of yoke and shoulder caps.
The instructions are carefully explaining every step, in the correct order. Diagrams are adjusted to the knitting direction and are worked as usual.
How do I work according to a knitting diagram?
The diagram depicts all rows/rounds, and every stitch seen from the right side. It is read from bottom to top, from right to left. 1 square = 1 stitch.
When working back and forth, every other row is worked from the right side and every other row is worked from the wrong side. When working from the wrong side, the diagram will have to be worked reversed: from left to right, knit stitches are purled, purl stitches are knit etc.
When working in the round every round is worked from the right side and the diagram are worked from right to left on all rounds.
See DROPS lesson: How to read knitting diagrams
How do I work according to a crochet diagram?
The diagram depicts all rows/rounds, and every stitch seen from the right side. It is worked from bottom to top, from right to left.
When working back and forth every other row is worked from the right side: from right to left and every other row is worked from the wrong side: from left to right.
When working in the round, every row in the diagram are worked from the right side, from right to left.
When working a circular diagram you start in the middle and work your way outwards, counter clockwise, row by row.
The rows usually start with a given number of chain stitches (equivalent to the height of the following stitch), this will either be depicted in the diagram or explained in the pattern.
See DROPS lesson: How to read crochet diagrams
How do I work several diagrams simultaneously on the same row/round?
Instructions for working several diagrams after each other on the same row/round, will often be written like so: “work A.1, A.2, A.3 a total of 0-0-2-3-4 times". This means you work A.1 once, then A.2 is worked once, and A.3 is repeated (in width) the number of times provided for your size – in this case like so: S = 0 times, M = 0 times, L=2 times, XL= 3 times and XXL = 4 times.
The diagrams are worked as usual: begin with the first row in A.1, then work the first row in A.2 etc.
See DROPS lesson: How to read knitting diagrams
See DROPS lesson: How to read crochet diagrams
Why are the sleeves shorter in larger sizes?
The total width of the garment (from wrist-to-wrist) will be larger in the larger sizes, despite the actual sleeves being shorter. The larger sizes have longer sleeve caps and wider shoulders, so there will be a good fit in all sizes.
Where on the garment is the length measured?
The measurement sketch/schematic drawing provides information regarding the full length of the garment. If it’s a jumper or a jacket the length is measured from the highest point on the shoulder closest to the neckline, and straight down to the bottom of the garment. It is NOT measured from the tip of shoulder. Similarly, the length of yoke is measured from the highest point on the shoulder and down to where yoke is split into body and sleeves.
On a jacket measures are never taken along bands, unless specifically stated. Always measure inside band stitches when measuring the length.
See DROPS lesson: How to read a schematic drawing
What is a repeat?
Diagrams are often repeated on the round or in height. 1 repeat is the diagram the way it appears in the pattern. If it says to work 5 repeats of A.1 in the round, then you work A.1 a total of 5 times after/next to each other in the round. If it says to work 2 repeats of A.1 vertically/in height you work the entire diagram once, then begin again at the start and work the entire diagram one more time.
Why does the piece start with more chain stitches than it’s worked with?
Chain stitches are slightly narrower than other stitches and to avoid working the cast-on edge too tight, we simply chain more stitches to begin with. The stitch count will be adjusted on the following row to fit the pattern and measurement sketch.
Why increase before the rib edge when the piece is worked top-down?
The rib edge is more elastic and will contract slightly compared to, for example, stocking stitch. By increasing before the rib edge, you avoid a visible difference in width between the rib edge and the rest of the body.
Why increase in the cast-off edge?
It’s very easy to cast off too tightly, and by making yarn overs while casting off (and simultaneously casting these off) you avoid a too tight cast off edge.
See DROPS video: How to bind off with yarn overs (yo)
How do I increase/decrease on every 3rd and 4th row/round alternately?
To achieve an even increase (or decrease) you can increase on, for example: every 3rd and 4th row alternately, like so: work 2 rows and increase on the 3rd row, work 3 rows and increase on the 4th. Repeat this until the increase is complete.
See DROPS lesson: Increase or decrease 1 st on every 3rd and 4th row alternately
How can I work a jacket in the round instead of back and forth?
Should you prefer to work in the round instead of back and forth, you may of course adjust the pattern. You’ll need to add steeks mid-front (usually 5 stitches), and follow the instructions. When you would normally turn and work from the wrong side, simply work across the steek and continue in the round. At the end you’ll cut the piece open, pick up stitches to work bands, and cover the cut edges.
See DROPS video: How to knit steeks and cut open
Can I work a jumper back and forth instead of in the round?
Should you prefer to work back and forth instead of in the round, you may of course adjust the pattern so you work the pieces separately and then assemble them at the end. Divide the stitches for the body in 2, add 1 edge stitch in each side (for sewing) and work the front and back pieces separately.
See DROPS lesson: Can I adapt a pattern for circular needles into straight needles?
Why is the pattern slightly different than what I see in the photo?
Pattern repeats can vary slightly in the different sizes, in order to get the correct proportions. If you’re not working the exact same size as the garment in the photo, yours might deviate slightly. This has been carefully developed and adjusted so that the complete impression of the garment is the same in all sizes.
Make sure to follow instructions and diagrams for your size!
How do I make a women’s size garment into a men’s size one?
If you have found a pattern you like which is available in women’s size it’s not very difficult to convert it to men’s size. The biggest difference will be the length of sleeves and body. Start working on the women size that you think would fit across the chest. The additional length will be worked right before you cast off for the armhole/sleeve cap. If the pattern is worked top-down you can add the length right after the armhole or before the first decrease on sleeve.
Regarding additional yarn amount, this will depend on how much length you add, but it is better with a skein too many than too few.
How do I prevent a hairy garment from shedding?
All yarns will have excess fibres (from production) that might come off as lint or shedding. Brushed yarns (ie hairier yarns) have more of these loose, excess fibres, causing more shedding.
Shedding also depends on what is worn under or over the garment, and whether this pulls at the yarn fibres. It’s therefore not possible to guarantee that there will be no shedding
Below are some tips on how to get the best result when working with hairier yarns:
1. When the garment is finished (before you wash it) shake it vigorously so the looser hairs come off. NOTE: do NOT use a lint roller, brush or any method that pulls at the yarn.
2. Place the garment in a plastic bag and put it in your freezer - the temperature will cause the fibres to become less attached to each other, and excess fibres will come off easier.
3. Leave in the freezer for a few hours before taking it out and shaking it again.
4. Wash the garment according to the instructions on the yarn label.
Why does my garment pill?
Pilling is a natural process that happens to even the most exclusive of fibers. It's a natural sign of wear and tear that is hard to avoid, and that is most visible in high friction areas of your garment like a sweater's arms and cuffs.
You can make your garment look as new by removing the pilling, using a fabric comb or a pill/lint remover.
Queen of Hearts |
||||||||||||||||||||||
|
|
|||||||||||||||||||||
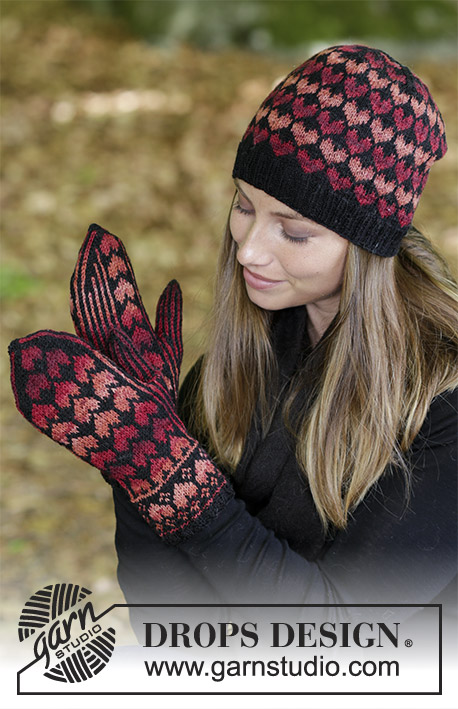
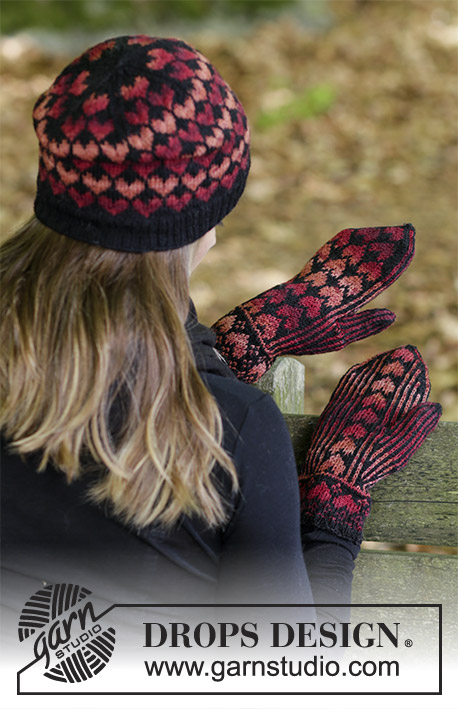
Set consists of: Hat and mittens with hearts. Piece is knitted in DROPS Fabel.
DROPS 183-23 |
||||||||||||||||||||||
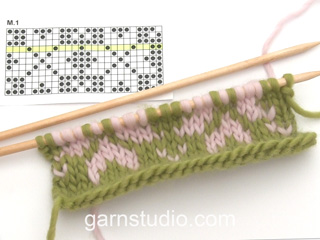
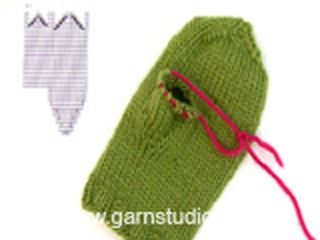
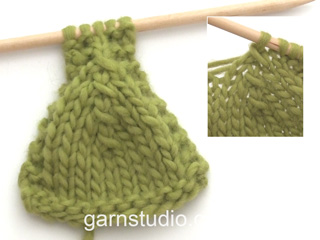
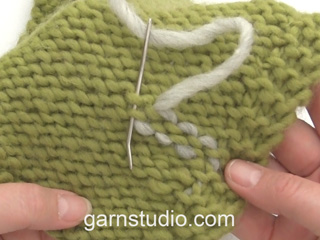
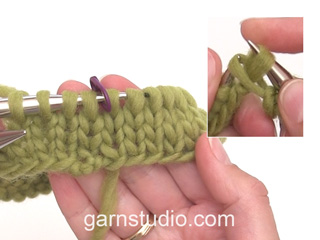
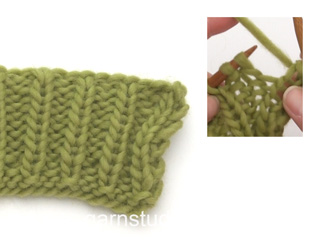
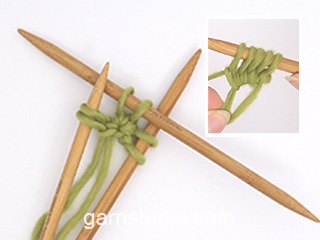
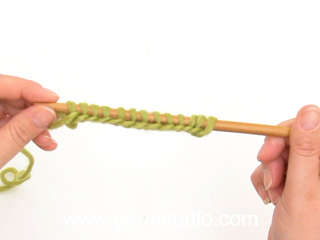
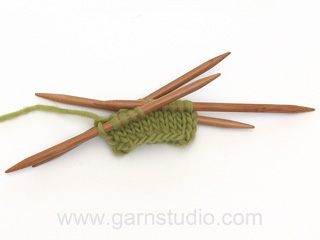
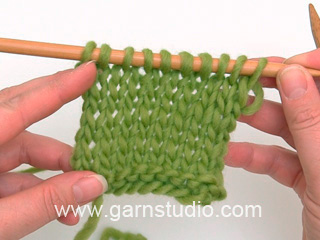
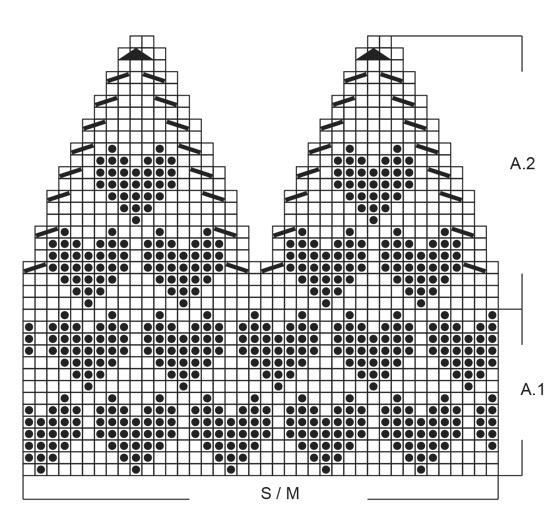
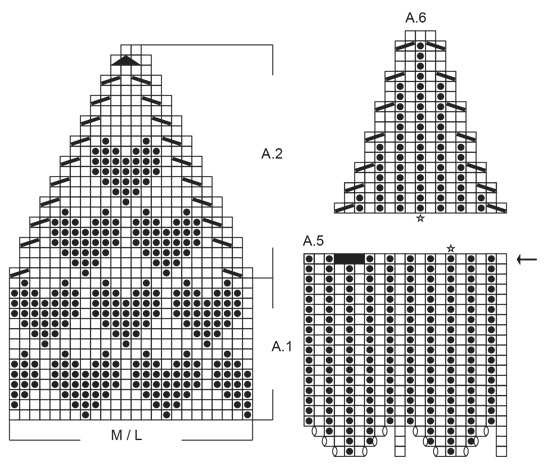
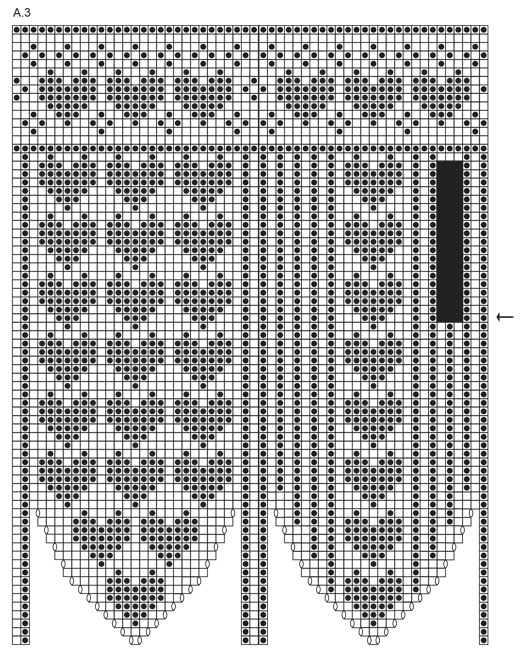
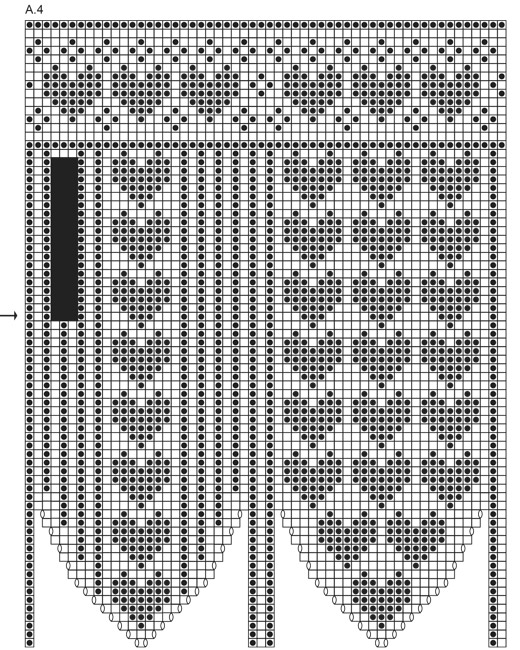
INFORMATION FOR PATTERN: MAGIC CIRCLE: To avoid hole in the middle beg with this technique: Hold yarn end in the left hand and make a loop around left index finger (from left to right). Hold the loop with left thumb and index finger. Insert needle through loop, get yarn from ball (i.e. place yarn 1 time over needle from you), pull yarn back through loop, 1 yarn over (now place yarn from the back and towards you) and pull yarn over through stitches on needle, * insert needle through loop, 1 yarn over (place yarn from the back and towards you), pull yarn over through loop, 1 yarn over (from the back and towards you) and pull yarn over through outermost stitch on right needle (i.e. the last stitch made) *, repeat from *-* until there are 8 stitches on needle. Distribute stitches on 4 double pointed needles size 2.5 mm as explained in pattern. Then work as explained in pattern – AT THE SAME TIME pull yarn end so that loop is tighten tog and the hole disappears. PATTERN: See diagrams A.1 to A.5. Diagrams show all rows in pattern seen from the right side. See diagrams A.1 and A.2 - choose diagram for your size. ---------------------------------------------------------- HAT: Worked in the round on circular needle, switch to double pointed needles when decreasing at the top of hat. Due to the pattern on the hat, it is available in sizes XS/S and M/L. Should you wish to make a size S/M (fits head size 54/56 cm) you can follow instructions for XS/S but increase ½ needle size. Cast on 128-152 stitches on circular needle size 2 mm with black and knit 1 round. On next round work rib knit 2 and purl 2 until piece measures approx. 4 cm. Switch to circular needles size 2.5 mm, knit 1 round while decreasing 8 stitches evenly on round = 120-144 stitches. Work diagram A.1 (pattern in diagram is divisible with 8 stitches, but since the diagrams should fit above each other you must start on different part of the pattern depending on size). Work A.1 3-6 times in width. REMEMBER THE KNITTING TENSION! Work diagram 3 times vertically, piece measures approx. 17 cm. Then work A.2 over A.1. When diagram has been worked vertically, 12 stitches remain on needle. Knit stitches together 2 by 2 = 6 stitches. Cut the yarn. Pull yarn through the remaining stitches a couple of times and fasten. ---------------------------------------------------------- MITTENS: Work mittens in the round on double pointed needles. Work hand from fingers and upwards to thumb gusset. Thumb is worked in the round from the top before casting off for thumb gusset and slip it together with the rest of mitten. Then continue in the round. MITTEN PART 1: Start with black and MAGIC CIRCLE - see explanation above = 8 stitches distributed on 4 double pointed needles 2.5 mm - NOTE: If you do not want to start with a magic circle cast on 8 stitches with black (when mitten is done baste a yarn up and down through stitches around hole at the tip and tighten tog). Then work pattern in the round according to diagram A.3 for left mitten and A.4 for right mitten. When increases in diagram are done, there are 56 stitches on round. REMEMBER THE KNITTING TENSION! Continue until round marked with arrow in diagram (piece measures approx. 12 from tip), on this round cast off 3 stitches for thumb gusset (the black squares in diagram shows where to cast off). Put mitten aside and work the thumb. THUMB: Start with black and MAGIC CIRCLE = 8 stitches distributed on double pointed needles 2.5 mm. Work in the round according to diagram A.5. When increases in diagram are done, there are 20 stitches on round. On last round in diagram cast off 3 stitches for thumb gusset on round (the black squares in diagram shows where to cast off). 17 stitches remain on thumb. The thumb is now done. MITTEN PART 2: Now work thumb together with mitten, place thumb on needles where stitches for thumb gusset were cast off on mitten. Continue in the round according to diagram A.3/A.4 over stitches on mitten as before, skip the black squares, here work diagram A.6 (= thumb gusset). Star in A.6 should fit star in A.5 to continue pattern. When diagram A.6 is done, there are 56 stitches on round. Continue according to A.3/A.4. When diagram has been worked, switch to double pointed needle size 2 mm and knit 1 round, then work rib knit 2 and purl 2 for 5 rounds. Loosely cast off stitches with K over K and P over P. Sew the opening between thumb and mitten. Cut the yarn and fasten yarn ends. |
||||||||||||||||||||||
Diagram explanations |
||||||||||||||||||||||
|
||||||||||||||||||||||
Have you made this or any other of our designs? Tag your pictures in social media with #dropsdesign so we can see them! Do you need help with this pattern?You'll find tutorial videos, a Comments/Questions area and more by visiting the pattern on garnstudio.com. © 1982-2024 DROPS Design A/S. We reserve all rights. This document, including all its sub-sections, has copyrights. Read more about what you can do with our patterns at the bottom of each pattern on our site. |
With over 40 years in knitting and crochet design, DROPS Design offers one of the most extensive collections of free patterns on the internet - translated to 17 languages. As of today we count 304 catalogues and 11422 patterns - 11422 of which are translated into English (UK/cm).
We work hard to bring you the best knitting and crochet have to offer, inspiration and advice as well as great quality yarns at incredible prices! Would you like to use our patterns for other than personal use? You can read what you are allowed to do in the Copyright text at the bottom of all our patterns. Happy crafting!
Comments / Questions (23)
Doris Axelsson wrote:
Hej, varför krångla till beskrivningen och börja uppifrån. Svårt att förstå hur man lägger till tummen och tumkilen. En video där ni visar detta krångliga sätt att lägga till tummen vore bra. Dessutom blir vanten väldigt liten och smal.
13.03.2023 - 08:09Maree wrote:
Can I start this pattern from the bottom rather than the top?
20.02.2023 - 17:23DROPS Design answered:
Dear Maree, probably, but you will then have to change all description/explanation to start with the end and read the diagrams top down - knit first a swatch to check if you like the coloured pattern worked from top down. Happy knitting!
21.02.2023 - 09:58KAREE B GANDER wrote:
I’m still struggling with how to start these mittens. I don’t understand your response So, I’ve got the 8 beginning stitches on my magic loop. What do I do next? Please help step by step or refer me to another source that could help. I appreciate your assistance. Thank you.
14.02.2023 - 05:55DROPS Design answered:
Dear Mrs Gander, read the diagram A.3/A.4 from the bottom corner on the right side towards the left on every round, for ex on first round work: K1 with MC, K1 with CC, (YO, K1, YO) with MC, K1 with CC, K1 with MC, K1 with CC, (YO, K1, YO) with MC, K1 with CC (you have increased 4 sts). Hope it will help. Happy knitting!
14.02.2023 - 14:17Karee Gander wrote:
I’m starting 183-23. I’ve got the eight stitches on my needles. Now I’m to go to A3 who’s appears to be the bottom of the mitten band which has many more than 8 stitches. What am I supposed to do?
11.02.2023 - 20:43DROPS Design answered:
Dear Karee, there are 8 stitches in the first row of A.3; there is a lot of blank space between the stitches which is represented in this way so that the later rows are better visualized. Start as follows: 1 st in grand canyon, yarn over, 1 st in black, yarn over, 1 st in grand canyon, 1 st in black, 1 st in grand canyon, yarn over, 1 st in black, yarn over, 1 st in grand canyon, 1 st in black. So, you worked over 8 stitches and worked 4 yarn overs. Happy knitting!
12.02.2023 - 20:58Lilian wrote:
Could i use 3,5mm needles and thicker yarn and downsize the stitches?
02.02.2023 - 02:49DROPS Design answered:
Hi Lilian, You will need to downsize the number of stitches (and rows) quite considerable if you both increase the yarn thickness and the needle size. Recommend that you work a swatch and adjust all stitch-numbers before you start working. Good luck and happy knitting!
02.02.2023 - 06:48Ghislaine Guay wrote:
Pourquoi que le diagramme est séparé en deux dans la grandeur s/m
27.02.2022 - 21:27DROPS Design answered:
Bonjour Mme Guay, lorsque A.1 est terminé, vous tricotez A.2, et vous devez répéter le diagramme A.2 tel qu'indiqué autrement dit, vous diminuez avant les 2 premiers coeurs, après ces 2 coeurs, puis après les 2 suivants, et continuez ainsi en répétant toutes les mailles de A.2 en largeur (ceci pour que les diminutions soient adaptées au jacquard). Bon tricot!
28.02.2022 - 10:34Therese Meland wrote:
Det er størrelse M/L eg prøved meg på fikk ikkje den til
19.10.2020 - 14:31DROPS Design answered:
Hej Therese, når du kommer til fellingen kan du ikke strikke lige så mange hjerter, efter de 2 hjerter får du 15 masker (mellem hjerterne) som tages ind til 13 masker. Sørg for at spidserne på de 2 hjerter kommer imellem hjerterne på rækken nedenfor. God fornøjelse!
22.10.2020 - 15:14Therese Meland wrote:
Eg trur oppskriften på luen er ikkje heilt riktige og det.får ikkje heilt til
16.10.2020 - 11:21Therese Meland wrote:
Eg får ikkje mønster til å stemme på luen
16.10.2020 - 09:16Therese Meland wrote:
Eg får ikkje mønster til å stemme når eg skal begynne å fellingen
16.10.2020 - 08:46DROPS Design answered:
Hei Therese. Hvilken størrelse strikker du? Når du skal starte med fellingene, 4. omgang av A.2 vil det være ulike sorte masker mellom hvert hjerte. Husk å hake av for "Spørsmål" når du har spørsmål til en oppskrift, hakes det av for "Kommentarer" vil det ikke bli besvart. mvh DROPS design
19.10.2020 - 11:37