
Popular categories
Looking for a yarn?


|
||||
Georgetown Vest |
||||
 |
 |
|||
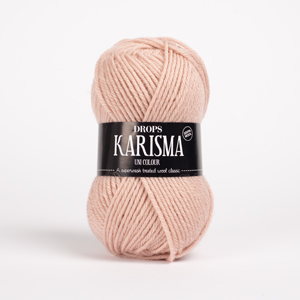
Knitted vest for men in DROPS Karisma. The piece is worked top down with round neck and ribbed edges. Sizes S - XXXL.
DROPS 219-1 |
||||
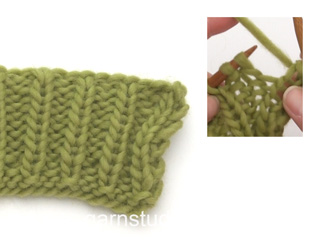
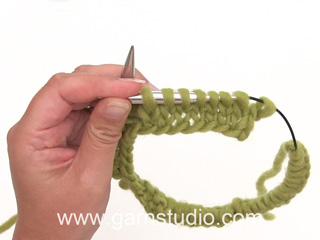
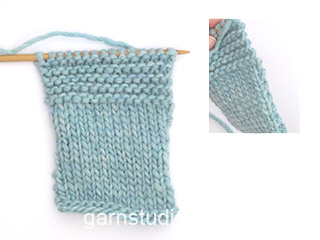
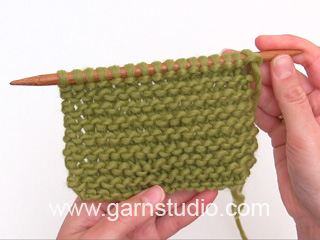
|
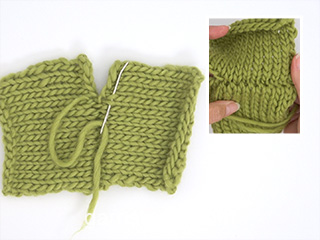
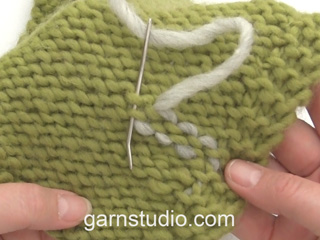
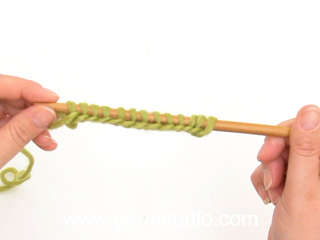
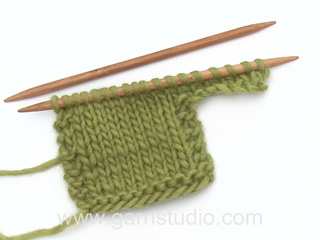
------------------------------------------------------- EXPLANATIONS FOR THE PATTERN: ------------------------------------------------------- RIDGE/GARTER STITCH (worked back and forth): Knit all rows. 1 ridge in height = Knit 2 rows. INCREASE TIP: Increase 1 stitch by making 1 yarn over. On the next row, work the yarn over twisted to avoid a hole. DECREASE TIP (for sides of body): Decrease 1 stitch on each side of the stitch with the marker thread as follows: Work until there are 3 stitches left before the stitch with the marker thread, knit 2 together, knit 1, slip 1 stitch as if to knit, knit 1 and pass the slipped stitch over the knitted stitch (= 2 stitches decreased). BINDING-OFF TIP: To avoid the bind-off edge being tight you can bind off with a larger size needle. If the edge is still tight, make 1 yarn over after approx. each 4th stitch at the same time as binding off; the yarn overs are bind off as normal stitches. ------------------------------------------------------- START THE PIECE HERE: ------------------------------------------------------- VEST – SHORT OVERVIEW OF THE PIECE: The vest is worked top down. Each shoulder is first worked separately, back and forth, at the same time stitches are increased/cast on for the neck. The front and back pieces are worked separately, back and forth, until the increases for the armholes are finished. Then the pieces are joined and the body worked in the round. Stiches are picked up for the neck and sleeve edges and worked in rib in the round. BACK PIECE: Each shoulder is worked separately. Right shoulder: Cast on 18-19-19-20-20-21 stitches (including 1 edge stitch on each side) using circular needle size 4 mm = US 6 and Karisma. Work 1 edge stitch in GARTER STITCH – read description above, work stockinette stitch until there is 1 stitch left on the row and then 1 edge stitch in garter stitch. Continue like this back and forth. When the piece measures 4 cm = 1½" increase 1 stitch inside 1 edge stitch on the beginning of next row from the right side – read INCREASE TIP in description above = 19-20-20-21-21-22 stitches. Lay the piece to one side and work the left shoulder. Left shoulder: Cast on 18-19-19-20-20-21 stitches (including 1 edge stitch on each side) using circular needle size 4 mm = US 6 and Karisma. Work 1 edge stitch in GARTER STITCH – read description above, work stockinette stitch until there is 1 stitch left on the row and then 1 edge stitch in garter stitch. Continue like this back and forth. When the piece measures 4 cm = 1½", increase 1 stitch inside 1 edge stitch at the end of the next row from the right side = 19-20-20-21-21-22 stitches. Work 1 row back from the wrong side. REMEMBER THE KNITTING GAUGE! Now join the 2 shoulders together as follows: Knit the 19-20-20-21-21-22 stitches on the left shoulder, cast on 40-40-42-42-44-44 stitches at the end of the row (= neck), knit the 19-20-20-21-21-22 stitches from the right shoulder onto the same needle = 78-80-82-84-86-88 stitches. Continue back and forth with stockinette stitch and 1 edge stitch in garter stitch on each side. When the piece measures 18-18-18-17-17-16 cm = 7"-7"-7"-6¾"-6¾"-6¼", increase/cast on stitches for the armhole on each side as follows: Increase 1 stitch inside 1 edge stitch on each row from the right side 2-1-1-3-4-4 times, then cast on new stitches for the armholes at the end of each row as follows: Cast on 2 stitches 0-2-2-3-3-4 times and 3 stitches 0-0-1-1-2-3 times (= a total of 2-5-8-12-16-21 stitches increased for each armhole) = 82-90-98-108-118-130 stitches. Lay the piece to one side and work the front piece. FRONT PIECE: Each shoulder is worked separately. Left shoulder: Cast on 18-19-19-20-20-21 stitches (including 1 edge stitch on each side) using circular needle size 4 mm = US 6 and Karisma. Work 1 edge stitch in garter stitch, work stockinette stitch until there is 1 stitch left on the row and then 1 edge stitch in garter stitch. Continue like this back and forth. When the piece measures 5-5-6-6-7-7 cm = 2"-2"-2⅜"-2⅜"-2¾"-2¾", increase/cast on stitches for the neck as follows: Increase 1 stitch inside 1 edge stitch on the beginning of the next row from the right side = 19-20-20-21-21-22 stitches. Then cast on stitches at the end of each row from the wrong side as follows: Cast on 2 stitches 3 times and 3 stitches 1 time = 28-29-29-30-30-31 stitches. Lay the piece to one side and work the right shoulder. Right shoulder: Cast on 18-19-19-20-20-21 stitches (including 1 edge stitch on each side) using circular needle size 4 mm = US 6 and Karisma. Work 1 edge stitch in garter stitch, work stockinette stitch until there is 1 stitch left on the row and then 1 edge stitch in garter stitch. Continue like this back and forth. When the piece measures 5-5-6-6-7-7 cm = 2"-2"-2⅜"-2⅜"-2¾"-2¾", increase/cast on stitches for the neck as follows: Increase 1 stitch inside 1 edge stitch at the end of the next row from the right side = 19-20-20-21-21-22 stitches. Then cast on stitches at the end of each row from the right side as follows: Cast on 2 stitches 3 times and 3 stitches 1 time = 28-29-29-30-30-31 stitches. Now join the right and left shoulders together from the right side as follows: Knit the 28-29-29-30-30-31 stitches on the right shoulder, cast on 22-22-24-24-26-26 stitches for the neck, knit the 28-29-29-30-30-31 stitches from the left shoulder = 78-80-82-84-86-88 stitches. Continue back and forth with stockinette stitch and 1 edge stitch in garter stitch on each side. When the piece measures 18-18-18-17-17-16 cm = 7"-7"-7"-6¾"-6¾"-6¼", increase/cast on stitches for the armholes as follows. Increase 1 stitch inside 1 edge stitch on each row from the right side 2-1-1-3-4-4 times, then cast on new stitches for the armholes at the end of each row as follows: Cast on 2 stitches 0-2-2-3-3-4 times and 3 stitches 0-0-1-1-2-3 times (= a total of 2-5-8-12-16-21 stitches increased for each armhole) = 82-90-98-108-118-130 stitches. THE PIECE IS NOW MEASURED FROM HERE! BODY: Now join the front and back pieces together from the right side as follows: Work stockinette stitch over the 82-90-98-108-118-130 stitches from the front piece, cast on 11-11-13-13-15-15 new stitches on the needle (= in side under sleeve), stockinette stitch over the next 82-90-98-108-118-130 stitches on the back piece and cast on 11-11-13-13-15-15 new stitches on the needle (= in side under sleeve) = 186-202-222-242-266-290 stitches. Insert 1 marker in the middle stitch of the 11-11-13-13-15-15 new stitches in each side. Allow the markers to follow your work onwards; stitches will later be decreased on each side of both markers. Work stockinette stitch in the round. When the piece measures 5 cm = 2", decrease on both sides of each marker – read DECREASE TIP (= 4 stitches decreased). Decrease like this every 9-9-10-10-10-11 cm = 3½"-3½"-4"-4"-4"-4⅜" a total of 4 times = 170-186-206-226-250-274 stitches. When the piece measures 34-35-36-37-38-39 cm = 13⅜"-13¾"-14¼"-14½"-15"-15¼" increase 26-26-30-34-38-42 stitches evenly spaced = 196-212-236-260-288-316 stitches. Change to circular needle size 3 mm = US 2,5 and work rib (= knit 2 / purl 2) in the round for 4 cm = 1½". Bind off with knit over knit and purl over purl – read BINDING-OFF TIP. The vest measures approx. 57-59-61-63-65-67 cm = 22½"-23¼"-24"-24¾"-25½"-26⅜" from the shoulder down. ASSEMBLY: Sew the shoulder seams with grafting stitches. ARMHOLE EDGE: Knit up approx. 88-132 stitches inside the 1 stitch with short circular needle size 3 mm = US 2,5 and Karisma. Adjust so the number of stitches is divisible by 4. Work rib (= knit 2 / purl 2) in the round for 2 cm = ¾". Bind off with knit over knit and purl over purl – remember BINDING-OFF TIP! Work the other sleeve edge in the same way. NECK: Knit up 104-120 stitches inside the 1 stitch with short circular needle size 3 mm = US 2,5 and Karisma. Adjust so the number of stitches is divisible by 4. Work rib (= knit 2 / purl 2) in the round for 2 cm = ¾". Bind off with knit over knit and purl over purl. |
||||
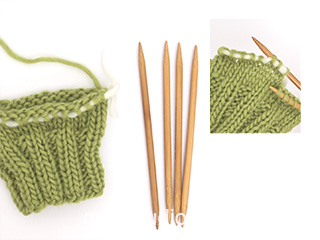
Diagram explanations |
||||
|
||||

|
||||
|
Have you made this or any other of our designs? Tag your pictures in social media with #dropsdesign so we can see them! Do you need help with this pattern?You'll find tutorial videos, a Comments/Questions area and more by visiting the pattern on garnstudio.com. © 1982-2024 DROPS Design A/S. We reserve all rights. This document, including all its sub-sections, has copyrights. Read more about what you can do with our patterns at the bottom of each pattern on our site. |
||||


With over 40 years in knitting and crochet design, DROPS Design offers one of the most extensive collections of free patterns on the internet - translated to 17 languages. As of today we count 304 catalogs and 11422 patterns - 11417 of which are translated into English (US/in).
We work hard to bring you the best knitting and crochet have to offer, inspiration and advice as well as great quality yarns at incredible prices! Would you like to use our patterns for other than personal use? You can read what you are allowed to do in the Copyright text at the bottom of all our patterns. Happy crafting!
Comments / Questions (45)
Sig mig lige… er opskriften ikke blevet opdateret?:/( jeg er igang med at lave den nedefra og op? Kan jeg få sendt den version jeg er begyndt på?:/)
19.03.2024 - 15:25DROPS Design answered:
Hei Betina. Denne oppskriften er skrevet ovenfra og ned (ikke vært skrevet den andre veien). Mulig du har forvekslet den med en annen oppskrift. mvh DROPS Design
02.04.2024 - 09:38Hei Kysyisin, voiko tähän ohjeeseen käyttää MAGIC LOOP -tekniikkaa, jolloin voisin käyttää vain yhden 80 cm:n pituisen pyöröpuikon/puikkokoko?
28.02.2024 - 11:55DROPS Design answered:
Hei, tämä malli neulotaan aluksi tasona, mutta voit halutessasi neuloa alasosan suljetun neuleen magic loop -tekniikalla.
06.03.2024 - 17:16Hej! Min kærestes brystmål er 111 cm. Jeg er tvivl, om vesten har noget positive easy eller om den sidder helt stramt? Den må nemlig gerne have lidt bevægelsesrumfang, og derfor overvejer jeg at strikke en str. XXL i stedet for XL. Mvh Kristine
04.01.2024 - 18:32DROPS Design answered:
Hej Kristine, ja hvis du strikker XL og holder strikkefastheden som står i opskriften, så bliver brystmålet på vesten 116 cm :)
05.01.2024 - 14:40Hallo. Ich würde gerne das Vorderteil direkt aus den Maschen des Hinterteils raus stricken um nicht zusammen nähen zu müssen. Wie viel kürzer müsst ich die Maschen Schulter arbeiten? Reicht da jeweils 1 cm? Herzliche Grüße
05.10.2023 - 08:59DROPS Design answered:
Liebe Frau Kreckwitz, Sie können dann die Maschen für die Schulter, Vorderteil in den Maschen von den Schulter, Rückenteil auffassen (anstatt die Maschen anschlagen), dann stricken Sie wie in der Anleitung weiter. Viel Spaß beim stricken!
06.10.2023 - 08:31Hello, I am at the very start of the pattern and have knitted the right shoulder to 4cm, and increased one stitch on the right side. Do I also need to now add one row on the wrong side (with a twist to avoid a hole as in the tip) before setting aside? Or do I set aside after having completed the right side increase row?
26.09.2023 - 12:08DROPS Design answered:
Dear Mrs Thomson, work the next row from WS and slip stitches aside, after you have worked the left shoulder, you will work both shoulders from RS casting on new stitches for neck in between. Happy knitting!
26.09.2023 - 13:44Min mands brystmål er 115, skal jeg så vælge en Large eller XL?
23.09.2023 - 16:06DROPS Design answered:
Hej Trine, da skal du vælge en XL :)
26.09.2023 - 15:39Ho iniziato questo modello con i ferri normali, non so lavorare con i ferri circolari. Sono arrivata agli aumenti per lo sprone.. Posso proseguire con i ferri normali? Come devo regolarmi per aumenti e diminuzioni? Grazie
06.09.2023 - 16:56DROPS Design answered:
Buonasera Virginia, all'inizio il davanti e il dietro vengono lavorati in parti separate, che poi vengono unite e si prosegue in tondo. Per un'assistenza più personalizzata può rivolgersi al suo rivenditore DROPS di fiducia. Buon lavoro!
07.09.2023 - 23:15Hello! In the pattern it says to work until the piece measures 7” and then cast on additional stitches for the armhole. Is the 7” measured from the start of the shoulder or from the start of the neckline? Thanks!
15.03.2023 - 15:56DROPS Design answered:
Dear Mrs Brunetti, measure from the cast on edge on shoulders. Happy knitting!
15.03.2023 - 16:10Hi - follow up to my question about setting the first shoulder piece aside. I understand that you put the stitches on a stitch holder or another needle, but what do you do with the working yarn? Do you start the left shoulder piece with another skein? If so, what do you do when you put the two shoulders and neckline together, because then you would have two working skeins (one on each shoulder)? Thanks!
12.03.2023 - 17:09DROPS Design answered:
Dear Cheryl, you start the other shoulder with another thread/ skein. Then, when you join both shoulders and the neckline, work with the thread of the left shoulder (so you cut the working yarn of the right shoulder). Happy knitting!
12.03.2023 - 18:49Hello - I need clarification on how to “set aside” part of the piece. Do you move the stitches to a stitch holder? Do you cut the yarn? I am at the very beginning, where I’ve done the 1 1/2” of the right shoulder, then done a stitch increase and then worked one more ws row. How do I now set that aside to then make the left shoulder? Thanks!
12.03.2023 - 04:57DROPS Design answered:
Dear Cheryl, put the stitches on a stitch-holder, or a piece of leftover yarn, or -if you have it, an extra needle. Or, if you have more needles of the appropriate size, you can leave it on, and use your extra needle to knit the next piece. Happy Crafting!
12.03.2023 - 15:52