Popular categories
Looking for a yarn?
Order DROPS Needles & Hooks
Clicking the ORDER button will redirect you to Wool Warehouse Direct Ltd website
The yarn cost is calculated from the pattern’s smallest size and the yarn’s cheapest product type. Looking for an even better price? You might find it on the DROPS Deals!
Lili Rose
Knitted suit for babies in DROPS BabyMerino. The piece is worked top down with moss stitch. Sizes 0 – 4 years.
Change language:
English (US/in)- English (US/in)
- Česky
- Dansk
- Deutsch
- Eesti keel
- English (UK/cm)
- Español
- Français
- Íslenska
- Italiano
- Magyar
- Nederlands
- Norsk
- Polski
- Português
- Suomi
- Svenska
- English (UK/cm), Bulgaria
- English (UK/cm), Croatia
- English (UK/cm), Greece
- English (UK/cm), Latvia
- English (UK/cm), Lithuania
- English (UK/cm), Romania
- English (UK/cm), Slovenia
- Česky, Slovakia
#liliroseoverall
DROPS Design: Pattern bm-149-byYarn group A
-----------------------------------------------------------
SIZES:
Sizes: 0/1 - 1/3 - 6/9 - 12/18 months (2 - 3/4) years
Child’s height in cm:
48/52 - 56/62 - 68/74 - 80/86 (92-104)
Child’s height in feet:
1ft/1ft8 - 1ft 10/2ft - 2ft3/2ft5 - 2ft7/2ft9 (3ft –3ft5)
Finished measurements:
Chest measurements: 46-50-56-60 (66-70) cm = 18"-19¾"-22"-23⅝" (26"-27½")
Full length: 45-53-63-73 (79-98) cm = 17¾"-21"-24¾"-28¾" (31"-38½")
All measurements in charts are in cm.
YARN:
DROPS BABY MERINO from Garnstudio (belongs to yarn group A)
200-250-250-250 (300-300) g color 49, desert rose
BUTTONS:
DROPS BUTTONS NO 628: 5-5-5-6 (6-6) items.
NEEDLES:
DROPS CIRCULAR NEEDLE SIZE 3.5 MM = US 4: Length 40 cm = 16" and 80 cm = 32".
DROPS CIRCULAR NEEDLE SIZE 3 MM = US 2.5: Length 40 cm = 16" and 80 cm = 32".
DROPS DOUBLE POINTED NEEDLES SIZE 3.5 MM = US 4.
DROPS DOUBLE POINTED NEEDLES SIZE 3 MM = US 2.5.
KNITTING GAUGE:
24 stitches in width and 32 rows in height with A.1 = 10 x 10 cm = 4" x 4".
NOTE: Needle size is only a guide. If you get too many stitches on 10 cm = 4", change to a larger needle size. If you get too few stitches on 10 cm = 4", change to a smaller needle size.
-------------------------------------------------------
Alternative Yarn – See how to change yarns here
Yarn Groups A to F – Use the same pattern and change the yarn here
Yarn usage using an alternative yarn – Use our yarn converter here
-------------------------------------------------------
Order DROPS Needles & Hooks
Clicking the ORDER button will redirect you to Wool Warehouse Direct Ltd website
The yarn cost is calculated from the pattern’s smallest size and the yarn’s cheapest product type. Looking for an even better price? You might find it on the DROPS Deals!
Pattern instructions
EXPLANATIONS FOR THE PATTERN:
-------------------------------------------------------
GARTER STITCH (worked back and forth):
Knit all rows.
1 ridge = knit 2 rows.
PATTERN:
See diagram A.1. The diagram shows all rows in the pattern from the right side.
DECREASE TIP (inside leg):
Start 2 stitches before the marker, knit 2 together, (marker), knit 2 twisted together.
INCREASE TIP (for sleeves):
Work until there is 1 stitch left before the marker thread, make 1 yarn over, knit 2 (marker thread sits between these stitches), 1 yarn over (2 increased stitches). On the next round knit the yarn overs twisted to avoid holes. Then work the new stitches into the pattern.
-------------------------------------------------------
START THE PIECE HERE:
-------------------------------------------------------
SUIT - SHORT OVERVIEW OF THE PIECE:
The back and front pieces are worked separately, top down, then joined and continued back and forth with circular needle. Stitches are bind off for the crotch and the legs are finished in the round separately. The sleeves are worked in the round and sewn in. The bands and neck are worked to finish.
BACK PIECE:
Each shoulder is worked separately before being joined, and stitches cast on for the neck.
RIGHT SHOULDER:
Cast on 10-14-18-18 (22-22) stitches with circular needle size 3.5 MM = US 4 and DROPS Baby Merino. Work the first row from the right side as follows: 1 edge stitch in GARTER STITCH – read description above, work pattern A.1 until there is 1 stitch left, 1 edge stitch in garter stitch. Continue this pattern. When the piece measures 2 cm = ¾", cast on 1 stitch for the neck at the end of the row from the wrong side = 11-15-19-19 (23-23) stitches. REMEMBER THE KNITTING GAUGE! Lay the piece to one side.
LEFT SHOULDER:
Cast on and work in the same way as the right shoulder but cast on 1 stitch for the neck at the end of a row from the right side. Work 1 row from the wrong side.
BACK PIECE:
Work the left and right shoulders together from the right side as follows:
Work the 11-15-19-19 (23-23) stitches from the left shoulder as before, cast on 20-20-20-24 (24-28) stitches for the neck, work the 11-15-19-19 (23-23) stitches from the right shoulder as before = 42-50-58-62 (70-74) stitches. Continue the pattern back and forth with 1 edge stitch in garter stitch on each side until the piece measures 11-12-13-14 (15-16) cm = 4⅜"-4¾"-5⅛"-5½" (6"-6¼") and the last row was from the wrong side. Lay the piece to one side.
FRONT PIECE:
Each front piece is worked separately and new stitches are cast on for the neck. The parts are then put together and the suit is continued in the round.
RIGHT FRONT PIECE:
Cast on 10-14-18-18 (22-22) stitches with circular needle size 3.5 MM = US 4 and DROPS Baby Merino. Work the first row from the right side as follows: 1 edge stitch in garter stitch, work A.1 until there is 1 stitch left, 1 edge stitch in garter stitch. Continue this pattern. When the piece measures 3-3-4-4 (5-5) cm = 1⅛"-1⅛"-1½"-1½" (2"-2"), cast on for the neck at the end of each row from the right side as follows: 1 stitch 2 times, then 2 stitches 3-3-3-4-4-5 times = 18-22-26-28 (32-34) stitches. Continue the pattern with 1 edge stitch in garter stitch on each side until the piece measures 11-12-13-14 (15-16) cm = 4⅜"-4¾"-5⅛"-5½" (6"-6¼"), with the last row from the wrong side (matches the back piece). Lay the piece to one side and work left front piece.
LEFT FRONT PIECE:
Cast on and work in the same way as the right front piece, casting on stitches for the neck at the end of each row from the wrong side.
SUIT:
Join all the pieces, working back and forth with needle size 3.5 MM = US 4 as follows:
Work the left front piece, cast on 14-10-10-10 (10-10) stitches for the armhole, work the back piece, cast on 14-10-10-10 (10-10) stitches for the armhole and work the right front piece = 106-114-130-138 (154-162) stitches. Continue the pattern with 1 edge stitch in garter stitch on each side until the piece measures 12-18-24-29 (30-29) cm = 4¾"-7"-9½"-11⅜" (11¾"-11⅜") from where the piece was put together under the sleeves. Bind off the edge stitches on the next 2 rows (start from the right side) = 104-112-128-136 (152-160) stitches.
Now work for the crotch as follows: Work all stitches as before and cast on 8 stitches at the end of the row from the right side = 112-120-136-144 (160-168) stitches. Insert 1 marker-thread here – allow it to follow your work onwards. Continue in the round with pattern over all stitches, until the piece measures 17-23-29-34-35-34 cm = 6¾"-9"-11⅜"-13⅜"-13¾"-13⅜" from where the piece was joined after the armholes.
Divide for the legs as follows: Start 6-8-10-10 (14-14) stitches before the marker-thread, bind off the next 4-8-12-12 (20-20) stitches, work the next 52-52-56-60 (60-64) stitches and place them on a thread/stitch-holder, bind off 4-8-12-12 (20-20) stitches, work the next 52-52-56-60 (60-64) stitches. Now work the right leg.
LEGS:
= 52-52-56-60 (60-64) stitches.
Use double pointed needles size 3.5 MM = US 4. Insert a marker inside leg and continue A.1 in the round. When the leg measures 2 cm = ¾", decrease 1 stitch on each side of the marker – read DECREASE TIP. Decrease like this every 3-7-7-5 (10-15) cm = 1⅛"-2¾"-2¾"-2" (4"-6") a total of 4-2-2-4 (2-2) times = 44-48-52-52 (56-60) stitches. Continue working until the leg measures 14-15-17-20 (24-34) cm = 5½"-6"-6¾"-8" (9½"-13⅜"). Knit 1 round and increase 4-4-4-4 (8-12) stitches evenly spaced = 48-52-56-56 (64-72) stitches. Change to double pointed needles size 3 MM = US 2.5 and work rib (knit 2, purl 2) for 3-3-4-5 (5-5) cm = 1⅛"-1⅛"-1½"-2" (2"-2"). Bind off with knit. The leg measures 17-18-21-25 (29-39) cm = 6¾"-7"-8¼"-9¾" (11⅜"-15¼"). Work the other leg in the same way.
SLEEVES:
Cast on 44-44-48-56 (56-60) stitches with double pointed needles size 3 MM = US 2.5 and DROPS Baby Merino. Knit 1 round, then work rib (knit 2, purl 2) for 3-3-4-5 (5-5) cm = 1⅛"-1⅛"-1½"-2" (2"-2"). Change to double pointed needles size 3.5 MM = US 4. Insert 1 marker-thread at the beginning of the round = mid-under sleeve. Work A.1. When the sleeve measures 5-6-7-9 (9-10) cm = 2"-2⅜"-2¾"-3½" (3½"-4"), increase 1 stitch on each side of the marker-thread - read INCREASE TIP.
Increase like this every 2-1½-1½-1½ (2-2½) cm = ¾"-½"-½"-½" (3/4"-1") a total of 4-7-7-6 (8-8) times = 52-58-62-68 (72-76) stitches. Work until the sleeve measures 13-17-19-22 (26-30) cm = 5⅛"-6¾"-7½"-8¾" (10¼"-11¾"). Divide the sleeve at the marker thread and finish the sleeve cap back and forth. Bind off when the sleeve measures 16-20-21-24 (28-32) cm = 6¼"-8"-8¼"-9½" (11"-12½"). Work the other sleeve in the same way.
RIGHT BAND:
Start from the right side, where stitches were cast on for the crotch. Use circular needle size 3 MM = US 2.5 and knit up 48 to 96 stitches (stitch-count should be divisible by 4) inside the 1 edge stitch along the right front piece as far as the neck. Purl 1 row from the wrong side. Work rib as follows from the right side: 1 edge stitch in garter stitch, * knit 2, purl 2 *, work from *-* until there are 3 stitches left, knit 2 and 1 edge stitch in garter stitch. Continue this rib for 1 cm = ⅜". Now work 5-5-5-6 (6-6) buttonholes evenly spaced. 1 buttonhole = bind off 2 stitches and cast on 2 stitches over the bind-off stitches on the next row - NOTE: It is neatest if you work the buttonholes in purled sections (seen from the right side). The bottom buttonhole is 3 cm = 1⅛" from the bottom edge, the top buttonhole 1 cm = ⅜" from the top edge. Place the remaining buttonholes evenly spaced between these two. Continue working until the band measures 3 cm = 1⅛". Bind off.
LEFT BAND:
Start from the right side at the top of the left front piece. Use circular needle size 3 MM = US 2.5 and knit up stitches in the same way as on the right front piece. Purl 1 row from the wrong side and work rib in the same way as on the right band – do not work buttonholes.
NECK:
Start mid-front from the right side and knit up 68 to 88 stitches (stitch-count should be divisible by 4) around the neck, with circular needle size 3 MM = US 2.5 and DROPS Baby Merino. Work rib from the wrong side as follows: 1 edge stitch in garter stitch, purl 2, * knit 2, purl 2 *, work from *-* until there is 1 stitch left, 1 edge stitch in garter stitch. Work this rib for 2-2-3-3 (3-3) cm = ¾"-¾"-1⅛"-1⅛" (1⅛"-1⅛"). Bind off with knit from the right side.
ASSEMBLY:
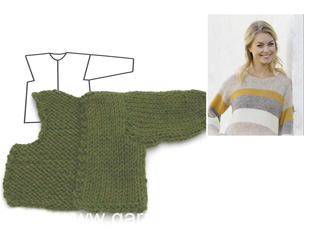
Sew the shoulder seams. Sew the sleeve cap to the armhole, then the top 3-3-2-2 (2-2) cm = 1⅛"-1⅛"-¾"-¾" (3/4"-¾") of the sleeve to the bottom of the armhole– see sketch. Sew the opening between the legs.
Lay the right band over the left and fasten to the suit where stitches were cast on for the crotch. Sew the buttons onto the left band. The rib on the sleeves and legs can be folded up.
Diagram
All measurements in charts are in cm.

|
= knit from right side, purl from wrong side |

|
= purl from right side, knit from wrong side |

|
= sleeve cap sewn to armhole: a to A and b to B |


What can you do with our patterns? You can share DROPS patterns online, using the pattern original picture, materials, name and number. But you are NOT ALLOWED to reproduce the complete pattern digitally in any way. Yarn stores are welcome to use the DROPS pattern database to promote the sale of our assortment. You can print out our patterns, make as many copies as you’d like. The only thing we ask is that you don't make any changes / additions to the original printed document. And that the patterns according to the DROPS philosophy are given out to the consumers for free. Editorials that wish to publish our patterns in printed books or magazines can contact us for more information. The sale of garments based on DROPS patterns is permitted as long as they are sold as single items or per order. Further commercial use of the patterns is not permitted. It has to be clearly stated that the garment is made based on a design from DROPS DESIGN. The use of clothing labels of which DROPS DESIGN forms part is conditioned by the inclusion of the following text: “A DROPS DESIGN made by …..”. The use of DROPS photos for marketing purposes/sales is only permitted in connection with the use/sale of DROPS products. The photos may not be cut or edited and the logo should be clearly visible.
We reserve the right to withdraw the permission for use of our patterns at any time, notwithstanding the reason.
Each of our patterns has specific tutorial videos to help you.
These step-by-step tutorials might also help you:
Why is the knitting/crochet tension so important?
Knitting tension is what determines the final measurements of your work, and is usually measured per 10 x 10 cm. It is provided like so: number of stitches in width x number of rows in height - eg: 19 stitches x 26 rows = 10 x 10 cm.
The knitting tension is very individual; some people knit/crochet loosely while others work tightly. You adjust the knitting tension with the needle size, which is why the suggested needle size only serve as a guide! You need to adjust this (up or down) to ensure that YOUR knitting tension matches the knitting tension provided in the pattern. If you work with a different knitting tension than provided you will have a different yarn consumption, and your work will have different measurements than what the pattern suggests.
The knitting tension also determines which yarns can replace each other. As long as you achieve the same knitting tension you can replace one yarn with another.
See DROPS lesson: How to measure your tension/gauge
See DROPS video: How to make a gauge tension swatch
How do I know how many balls of yarn I need?
The required amount of yarn is provided in grams, eg: 450 g. To calculate how many balls you’ll need you first need to know how many grams are in 1 ball (25g, 50g or 100g). This information is available if you click on the individual yarn quality on our pages. Divide the amount required with the amount of each ball. For example, if each ball is 50g (the most common amount), the calculation will be as follows: 450 / 50 = 9 balls.
Can I use a different yarn than what the pattern suggests?
The important thing when changing from one yarn to another is that the knitting/crochet tension remains the same. This is so that the measurements of the finished piece will be the same as on the sketch provided. It is easier to achieve the same knitting tension using yarns from the same yarn group. It is also possible to work with multiple strands of a thinner yarn to achieve the knitting tension of a thicker one. Please try our yarn converter. We recommend you to always work a test swatch.
Please NOTE: when changing yarn the garment might have a different look and feel to the garment in the photo, due to individual properties and qualities of each yarn.
See DROPS lesson: Can I use a different yarn than the one mentioned in the pattern?
What are the yarn groups?
All our yarns are categorised into yarn groups (from A to F) according to thickness and knitting tension – group A contains the thinnest yarns and group F the thickest. This makes it easier for you to find alternative yarns to our patterns, should you wish to switch yarn. All yarns within the same group have a similar knitting tension and can easily replace each other. However, different yarn qualities have different structures and properties which will give the finished work a unique look and feel.
How do I use the yarn converter?
At the top of all our patterns you’ll find a link to our yarn converter, which is a helpful tool should you wish to use a different yarn than suggested. By filling in the yarn quality you wish to replace, the amount (in your size) and number of strands, the converter will present good alternative yarns with the same knitting tension. Additionally it will tell you how much you’ll require in the new qualities and whether you’ll need to work with multiple strands. Most skeins are 50g (some are 25g or 100g).
If the pattern is worked with multiple colours, every colour will have to be converted separately. Similarly, if the pattern is worked with several strands of different yarns (for example 1 strand Alpaca and 1 strand Kid-Silk) you will have to find alternatives for each, individually.
Why do you show discontinued yarns in the patterns?
Since different yarns have different qualities and textures we have chosen to keep the original yarn in our patterns. However, you can easily find options among our available qualities by using our yarn converter, or simply pick a yarn from the same yarn group.
It is possible that some retailers still have discontinued yarns in stock, or that someone has a few skeins at home that they would like to find patterns for.
The yarn converter will provide both alternative yarn as well as required amount in the new quality.
What size should I knit?
If you think it's hard to decide what size to make, it can be a good idea to measure a garment you own already and like the size of. Then you can pick the size by comparing those measures with the ones available in the pattern's size chart.
You'll find the size chart at the bottom of the pattern.
See DROPS lesson: How to read size chart
Why do I get the wrong knitting tension with the suggested needle size?
The needle size provided in the pattern serves only as a guide, the important thing is to follow the knitting tension. And since knitting tension is very individual, you will have to adjust the needle size to ensure that YOUR tension is the same as in the pattern – maybe you’ll have to adjust 1, or even 2 needle sizes, up or down to achieve the correct tension. For this, we recommend that you work test swatches.
Should you work with a different knitting tension than the one provided, the measurements of the finished garment might deviate from the measurement sketch.
See DROPS lesson: How to measure your tension/gauge
See DROPS video: How to make a gauge tension swatch
Why is the pattern worked top-down?
Working a garment top-down provides more flexibility and room for personal adjustment. For example it is easier to try the garment on while working, as well as making adjustments to length of yoke and shoulder caps.
The instructions are carefully explaining every step, in the correct order. Diagrams are adjusted to the knitting direction and are worked as usual.
How do I work according to a knitting diagram?
The diagram depicts all rows/rounds, and every stitch seen from the right side. It is read from bottom to top, from right to left. 1 square = 1 stitch.
When working back and forth, every other row is worked from the right side and every other row is worked from the wrong side. When working from the wrong side, the diagram will have to be worked reversed: from left to right, knit stitches are purled, purl stitches are knit etc.
When working in the round every round is worked from the right side and the diagram are worked from right to left on all rounds.
See DROPS lesson: How to read knitting diagrams
How do I work according to a crochet diagram?
The diagram depicts all rows/rounds, and every stitch seen from the right side. It is worked from bottom to top, from right to left.
When working back and forth every other row is worked from the right side: from right to left and every other row is worked from the wrong side: from left to right.
When working in the round, every row in the diagram are worked from the right side, from right to left.
When working a circular diagram you start in the middle and work your way outwards, counter clockwise, row by row.
The rows usually start with a given number of chain stitches (equivalent to the height of the following stitch), this will either be depicted in the diagram or explained in the pattern.
See DROPS lesson: How to read crochet diagrams
How do I work several diagrams simultaneously on the same row/round?
Instructions for working several diagrams after each other on the same row/round, will often be written like so: “work A.1, A.2, A.3 a total of 0-0-2-3-4 times". This means you work A.1 once, then A.2 is worked once, and A.3 is repeated (in width) the number of times provided for your size – in this case like so: S = 0 times, M = 0 times, L=2 times, XL= 3 times and XXL = 4 times.
The diagrams are worked as usual: begin with the first row in A.1, then work the first row in A.2 etc.
See DROPS lesson: How to read knitting diagrams
See DROPS lesson: How to read crochet diagrams
Why are the sleeves shorter in larger sizes?
The total width of the garment (from wrist-to-wrist) will be larger in the larger sizes, despite the actual sleeves being shorter. The larger sizes have longer sleeve caps and wider shoulders, so there will be a good fit in all sizes.
Where on the garment is the length measured?
The measurement sketch/schematic drawing provides information regarding the full length of the garment. If it’s a jumper or a jacket the length is measured from the highest point on the shoulder (usually closest to the neckline), and straight down to the bottom of the garment. It is NOT measured from the tip of shoulder. Similarly, the length of yoke is measured from the highest point on the shoulder and down to where yoke is split into body and sleeves.
See DROPS lesson: How to read a schematic drawing
What is a repeat?
Diagrams are often repeated on the round or in height. 1 repeat is the diagram the way it appears in the pattern. If it says to work 5 repeats of A.1 in the round, then you work A.1 a total of 5 times after/next to each other in the round. If it says to work 2 repeats of A.1 vertically/in height you work the entire diagram once, then begin again at the start and work the entire diagram one more time.
Why does the piece start with more chain stitches than it’s worked with?
Chain stitches are slightly narrower than other stitches and to avoid working the cast-on edge too tight, we simply chain more stitches to begin with. The stitch count will be adjusted on the following row to fit the pattern and measurement sketch.
Why increase before the rib edge when the piece is worked top-down?
The rib edge is more elastic and will contract slightly compared to, for example, stocking stitch. By increasing before the rib edge, you avoid a visible difference in width between the rib edge and the rest of the body.
Why increase in the cast-off edge?
It’s very easy to cast off too tightly, and by making yarn overs while casting off (and simultaneously casting these off) you avoid a too tight cast off edge.
See DROPS video: How to bind off with yarn overs (yo)
How do I increase/decrease on every 3rd and 4th row/round alternately?
To achieve an even increase (or decrease) you can increase on, for example: every 3rd and 4th row alternately, like so: work 2 rows and increase on the 3rd row, work 3 rows and increase on the 4th. Repeat this until the increase is complete.
See DROPS lesson: Increase or decrease 1 st on every 3rd and 4th row alternately
How can I work a jacket in the round instead of back and forth?
Should you prefer to work in the round instead of back and forth, you may of course adjust the pattern. You’ll need to add steeks mid-front (usually 5 stitches), and follow the instructions. When you would normally turn and work from the wrong side, simply work across the steek and continue in the round. At the end you’ll cut the piece open, pick up stitches to work bands, and cover the cut edges.
See DROPS video: How to knit steeks and cut open
Can I work a jumper back and forth instead of in the round?
Should you prefer to work back and forth instead of in the round, you may of course adjust the pattern so you work the pieces separately and then assemble them at the end. Divide the stitches for the body in 2, add 1 edge stitch in each side (for sewing) and work the front and back pieces separately.
See DROPS lesson: Can I adapt a pattern for circular needles into straight needles?
Why is the pattern slightly different than what I see in the photo?
Pattern repeats can vary slightly in the different sizes, in order to get the correct proportions. If you’re not working the exact same size as the garment in the photo, yours might deviate slightly. This has been carefully developed and adjusted so that the complete impression of the garment is the same in all sizes.
Make sure to follow instructions and diagrams for your size!
How do I make a women’s size garment into a men’s size one?
If you have found a pattern you like which is available in women’s size it’s not very difficult to convert it to men’s size. The biggest difference will be the length of sleeves and body. Start working on the women size that you think would fit across the chest. The additional length will be worked right before you cast off for the armhole/sleeve cap. If the pattern is worked top-down you can add the length right after the armhole or before the first decrease on sleeve.
Regarding additional yarn amount, this will depend on how much length you add, but it is better with a skein too many than too few.
How do I prevent a hairy garment from shedding?
All yarns will have excess fibres (from production) that might come off as lint or shedding. Brushed yarns (ie hairier yarns) have more of these loose, excess fibres, causing more shedding.
Shedding also depends on what is worn under or over the garment, and whether this pulls at the yarn fibres. It’s therefore not possible to guarantee that there will be no shedding
Below are some tips on how to get the best result when working with hairier yarns:
1. When the garment is finished (before you wash it) shake it vigorously so the looser hairs come off. NOTE: do NOT use a lint roller, brush or any method that pulls at the yarn.
2. Place the garment in a plastic bag and put it in your freezer - the temperature will cause the fibres to become less attached to each other, and excess fibres will come off easier.
3. Leave in the freezer for a few hours before taking it out and shaking it again.
4. Wash the garment according to the instructions on the yarn label.
Why does my garment pill?
Pilling is a natural process that happens to even the most exclusive of fibers. It's a natural sign of wear and tear that is hard to avoid, and that is most visible in high friction areas of your garment like a sweater's arms and cuffs.
You can make your garment look as new by removing the pilling, using a fabric comb or a pill/lint remover.
In the meantime, you can read the questions and answers that others have left to this pattern or join the DROPS Workshop on Facebook to get help from fellow knitters/crocheters!
Lili Rose |
||||||||||
 |
 |
|||||||||
Knitted suit for babies in DROPS BabyMerino. The piece is worked top down with moss stitch. Sizes 0 – 4 years.
DROPS Baby 45-5 |
||||||||||
|
------------------------------------------------------- EXPLANATIONS FOR THE PATTERN: ------------------------------------------------------- GARTER STITCH (worked back and forth): Knit all rows. 1 ridge = knit 2 rows. PATTERN: See diagram A.1. The diagram shows all rows in the pattern from the right side. DECREASE TIP (inside leg): Start 2 stitches before the marker, knit 2 together, (marker), knit 2 twisted together. INCREASE TIP (for sleeves): Work until there is 1 stitch left before the marker thread, make 1 yarn over, knit 2 (marker thread sits between these stitches), 1 yarn over (2 increased stitches). On the next round knit the yarn overs twisted to avoid holes. Then work the new stitches into the pattern. ------------------------------------------------------- START THE PIECE HERE: ------------------------------------------------------- SUIT - SHORT OVERVIEW OF THE PIECE: The back and front pieces are worked separately, top down, then joined and continued back and forth with circular needle. Stitches are bind off for the crotch and the legs are finished in the round separately. The sleeves are worked in the round and sewn in. The bands and neck are worked to finish. BACK PIECE: Each shoulder is worked separately before being joined, and stitches cast on for the neck. RIGHT SHOULDER: Cast on 10-14-18-18 (22-22) stitches with circular needle size 3.5 MM = US 4 and DROPS Baby Merino. Work the first row from the right side as follows: 1 edge stitch in GARTER STITCH – read description above, work pattern A.1 until there is 1 stitch left, 1 edge stitch in garter stitch. Continue this pattern. When the piece measures 2 cm = ¾", cast on 1 stitch for the neck at the end of the row from the wrong side = 11-15-19-19 (23-23) stitches. REMEMBER THE KNITTING GAUGE! Lay the piece to one side. LEFT SHOULDER: Cast on and work in the same way as the right shoulder but cast on 1 stitch for the neck at the end of a row from the right side. Work 1 row from the wrong side. BACK PIECE: Work the left and right shoulders together from the right side as follows: Work the 11-15-19-19 (23-23) stitches from the left shoulder as before, cast on 20-20-20-24 (24-28) stitches for the neck, work the 11-15-19-19 (23-23) stitches from the right shoulder as before = 42-50-58-62 (70-74) stitches. Continue the pattern back and forth with 1 edge stitch in garter stitch on each side until the piece measures 11-12-13-14 (15-16) cm = 4⅜"-4¾"-5⅛"-5½" (6"-6¼") and the last row was from the wrong side. Lay the piece to one side. FRONT PIECE: Each front piece is worked separately and new stitches are cast on for the neck. The parts are then put together and the suit is continued in the round. RIGHT FRONT PIECE: Cast on 10-14-18-18 (22-22) stitches with circular needle size 3.5 MM = US 4 and DROPS Baby Merino. Work the first row from the right side as follows: 1 edge stitch in garter stitch, work A.1 until there is 1 stitch left, 1 edge stitch in garter stitch. Continue this pattern. When the piece measures 3-3-4-4 (5-5) cm = 1⅛"-1⅛"-1½"-1½" (2"-2"), cast on for the neck at the end of each row from the right side as follows: 1 stitch 2 times, then 2 stitches 3-3-3-4-4-5 times = 18-22-26-28 (32-34) stitches. Continue the pattern with 1 edge stitch in garter stitch on each side until the piece measures 11-12-13-14 (15-16) cm = 4⅜"-4¾"-5⅛"-5½" (6"-6¼"), with the last row from the wrong side (matches the back piece). Lay the piece to one side and work left front piece. LEFT FRONT PIECE: Cast on and work in the same way as the right front piece, casting on stitches for the neck at the end of each row from the wrong side. SUIT: Join all the pieces, working back and forth with needle size 3.5 MM = US 4 as follows: Work the left front piece, cast on 14-10-10-10 (10-10) stitches for the armhole, work the back piece, cast on 14-10-10-10 (10-10) stitches for the armhole and work the right front piece = 106-114-130-138 (154-162) stitches. Continue the pattern with 1 edge stitch in garter stitch on each side until the piece measures 12-18-24-29 (30-29) cm = 4¾"-7"-9½"-11⅜" (11¾"-11⅜") from where the piece was put together under the sleeves. Bind off the edge stitches on the next 2 rows (start from the right side) = 104-112-128-136 (152-160) stitches. Now work for the crotch as follows: Work all stitches as before and cast on 8 stitches at the end of the row from the right side = 112-120-136-144 (160-168) stitches. Insert 1 marker-thread here – allow it to follow your work onwards. Continue in the round with pattern over all stitches, until the piece measures 17-23-29-34-35-34 cm = 6¾"-9"-11⅜"-13⅜"-13¾"-13⅜" from where the piece was joined after the armholes. Divide for the legs as follows: Start 6-8-10-10 (14-14) stitches before the marker-thread, bind off the next 4-8-12-12 (20-20) stitches, work the next 52-52-56-60 (60-64) stitches and place them on a thread/stitch-holder, bind off 4-8-12-12 (20-20) stitches, work the next 52-52-56-60 (60-64) stitches. Now work the right leg. LEGS: = 52-52-56-60 (60-64) stitches. Use double pointed needles size 3.5 MM = US 4. Insert a marker inside leg and continue A.1 in the round. When the leg measures 2 cm = ¾", decrease 1 stitch on each side of the marker – read DECREASE TIP. Decrease like this every 3-7-7-5 (10-15) cm = 1⅛"-2¾"-2¾"-2" (4"-6") a total of 4-2-2-4 (2-2) times = 44-48-52-52 (56-60) stitches. Continue working until the leg measures 14-15-17-20 (24-34) cm = 5½"-6"-6¾"-8" (9½"-13⅜"). Knit 1 round and increase 4-4-4-4 (8-12) stitches evenly spaced = 48-52-56-56 (64-72) stitches. Change to double pointed needles size 3 MM = US 2.5 and work rib (knit 2, purl 2) for 3-3-4-5 (5-5) cm = 1⅛"-1⅛"-1½"-2" (2"-2"). Bind off with knit. The leg measures 17-18-21-25 (29-39) cm = 6¾"-7"-8¼"-9¾" (11⅜"-15¼"). Work the other leg in the same way. SLEEVES: Cast on 44-44-48-56 (56-60) stitches with double pointed needles size 3 MM = US 2.5 and DROPS Baby Merino. Knit 1 round, then work rib (knit 2, purl 2) for 3-3-4-5 (5-5) cm = 1⅛"-1⅛"-1½"-2" (2"-2"). Change to double pointed needles size 3.5 MM = US 4. Insert 1 marker-thread at the beginning of the round = mid-under sleeve. Work A.1. When the sleeve measures 5-6-7-9 (9-10) cm = 2"-2⅜"-2¾"-3½" (3½"-4"), increase 1 stitch on each side of the marker-thread - read INCREASE TIP. Increase like this every 2-1½-1½-1½ (2-2½) cm = ¾"-½"-½"-½" (3/4"-1") a total of 4-7-7-6 (8-8) times = 52-58-62-68 (72-76) stitches. Work until the sleeve measures 13-17-19-22 (26-30) cm = 5⅛"-6¾"-7½"-8¾" (10¼"-11¾"). Divide the sleeve at the marker thread and finish the sleeve cap back and forth. Bind off when the sleeve measures 16-20-21-24 (28-32) cm = 6¼"-8"-8¼"-9½" (11"-12½"). Work the other sleeve in the same way. RIGHT BAND: Start from the right side, where stitches were cast on for the crotch. Use circular needle size 3 MM = US 2.5 and knit up 48 to 96 stitches (stitch-count should be divisible by 4) inside the 1 edge stitch along the right front piece as far as the neck. Purl 1 row from the wrong side. Work rib as follows from the right side: 1 edge stitch in garter stitch, * knit 2, purl 2 *, work from *-* until there are 3 stitches left, knit 2 and 1 edge stitch in garter stitch. Continue this rib for 1 cm = ⅜". Now work 5-5-5-6 (6-6) buttonholes evenly spaced. 1 buttonhole = bind off 2 stitches and cast on 2 stitches over the bind-off stitches on the next row - NOTE: It is neatest if you work the buttonholes in purled sections (seen from the right side). The bottom buttonhole is 3 cm = 1⅛" from the bottom edge, the top buttonhole 1 cm = ⅜" from the top edge. Place the remaining buttonholes evenly spaced between these two. Continue working until the band measures 3 cm = 1⅛". Bind off. LEFT BAND: Start from the right side at the top of the left front piece. Use circular needle size 3 MM = US 2.5 and knit up stitches in the same way as on the right front piece. Purl 1 row from the wrong side and work rib in the same way as on the right band – do not work buttonholes. NECK: Start mid-front from the right side and knit up 68 to 88 stitches (stitch-count should be divisible by 4) around the neck, with circular needle size 3 MM = US 2.5 and DROPS Baby Merino. Work rib from the wrong side as follows: 1 edge stitch in garter stitch, purl 2, * knit 2, purl 2 *, work from *-* until there is 1 stitch left, 1 edge stitch in garter stitch. Work this rib for 2-2-3-3 (3-3) cm = ¾"-¾"-1⅛"-1⅛" (1⅛"-1⅛"). Bind off with knit from the right side. ASSEMBLY: Sew the shoulder seams. Sew the sleeve cap to the armhole, then the top 3-3-2-2 (2-2) cm = 1⅛"-1⅛"-¾"-¾" (3/4"-¾") of the sleeve to the bottom of the armhole– see sketch. Sew the opening between the legs. Lay the right band over the left and fasten to the suit where stitches were cast on for the crotch. Sew the buttons onto the left band. The rib on the sleeves and legs can be folded up. |
||||||||||
Diagram explanations |
||||||||||
|
||||||||||

|
||||||||||

|
||||||||||
|
Have you made this or any other of our designs? Tag your pictures in social media with #dropsdesign so we can see them! Do you need help with this pattern?You'll find tutorial videos, a Comments/Questions area and more by visiting the pattern on garnstudio.com. © 1982-2024 DROPS Design A/S. We reserve all rights. This document, including all its sub-sections, has copyrights. Read more about what you can do with our patterns at the bottom of each pattern on our site. |
||||||||||
With over 40 years in knitting and crochet design, DROPS Design offers one of the most extensive collections of free patterns on the internet - translated to 17 languages. As of today we count 309 catalogs and 11624 patterns - 11615 of which are translated into English (US/in).
We work hard to bring you the best knitting and crochet have to offer, inspiration and advice as well as great quality yarns at incredible prices! Would you like to use our patterns for other than personal use? You can read what you are allowed to do in the Copyright text at the bottom of all our patterns. Happy crafting!







Comments / Questions (24)
Mam jeszcze jedno pytanie, tym razem odnośnie rękawów. Chodzi o tę część: "Podzielić teraz rękaw w miejscu nitki markera i przerabiać główkę rękawa w tę i z powrotem" Jak dzieli się rękaw w miejscu markera? Niestety nie znalazłam nigdzie informacji.
16.10.2024 - 19:23DROPS Design answered:
Witaj Elu, od nitki markera zaczniesz przerabiać w tę i z powrotem (nie na okrągło jak dotychczas), w wyniku tego powstanie pęknięcie/otwór pod spodem rękawa. Pozdrawiamy!
16.10.2024 - 21:08Czy mogłabym prosić o wyjaśnienie początku robienia nogawki? Czym jest ten fragment ze znakiem równości? Czy powinnam robić nogawkę od tego momentu jako kolejne oczka, czy osobno? NOGAWKI: = 52-52-56-60 (60-64) oczka. Używać drutów pończoszniczych nr 3,5. Umieścić 1 marker po wewnętrznej stronie nogawki i dalej przerabiać schemat A.1 na okrągło.
08.10.2024 - 21:33DROPS Design answered:
Witaj Elu, nogawkę przerabiamy na drutach pończoszniczych nr 3,5 (możesz przerabiać na drutach z żyłką, gdy pracujesz magic loopem). Zaczynamy od prawej nogawki i przerabiamy ją od góry do dołu. Nogawka jest przerabiana razem z kombinezonem, nie osobno. Pozdrawiamy!
09.10.2024 - 09:49Luulen keksineeni vastauksen edellä kysymääni: "Jaa nyt työ lahkeita varten seuraavasti (lahkeet neulotaan erikseen sukkapuikoilla): Aloita 6-8-10-10 (14-14) silmukan päässä merkkilangasta, " Tämä " päässä" sana voisi tarkentaa, että _ennen_ merkkilankaa? Kun aloitin jälkeen niin lahkeet asettuvat väärin keskilinjasta.
01.10.2024 - 12:14Hallo, auch ich finde diese Anleitung hochgradig unverständlich und kompliziert. Schade, das geht mit Sicherheit auch einfacher. Von oben nach unten oder anderrsum stricken erspart mir viele Nähte.
01.10.2024 - 00:32Hei, lahkeiden silmukkajako ja haaraosa tuntuu asettuvan vinoon tai eivät ole ikään kuin yhtä etäällä keskilinjasta. Mitähän teen väärin silmukkajaossa vai kuuluko olla näin?
29.09.2024 - 21:13DROPS Design answered:
Hei, jaa työ lahkeita varten seuraavasti: Aloita 6-8-10-10 (14-14) silmukan päässä merkkilangasta, päätä seuraavat 4-8-12-12 (20-20) silmukkaa, neulo ensimmäiset 52-52-56-60 (60-64) silmukkaa kuten aiemmin ja siirrä sitten nämä silmukat apulangalle tai apupuikolle, päätä 4-8-12-12 (20-20) silmukkaa, neulo seuraavat 52-52-56-60 (60-64) silmukkaa kuten aiemmin. Lahkeiden tulee olla yhtä etäällä keskilinjasta. Ota tarvittaessa yhteyttä lähimpään DROPS liikkeeseen, he auttavat sinua paikan päällä.
02.10.2024 - 17:53Hello again! I have knitted this piece down to the crotch and a little further and have come to realise that while I was figuring out how to assemble the back and two fronts together I have lost a cm in length on all of them! So my back from the cast on edge at the shoulders and the left and right fronts come to 10cm instead of 11cm. Will this make a major difference in the finished product? Ought I to pick up and knit at the top to lengthen the bodice?
05.09.2024 - 12:22Hello there, I am unused to reading Drops Patterns but have fallen in love with the Lili Rose onesie and have already some confusion with knitting the two shoulders and casting on for the back. When I attempt to continue moss stitch over these stitches the moss stitch pattern is disrupted with the odd "loose cannon" stitch that doesn't fit with the pattern. Any help would be appreciated! Thank you Antonia
31.08.2024 - 08:27DROPS Design answered:
Dear Antonia, in the shoulders you had 1 stitch in garter stitch in the edges and rib/moss stitch stitches in between them. Now, all stitches except the edge stitches of the back piece itself are worked in the chart. So you work: 1 stitch in garter stitch, A.1 over all stitches of the first shoulder (including the stitch cast on for the neck at the end of the shoulder), then cast on for the neck and then work A.1 over all of the stitches of the other shoulder until 1 stitch remains, 1 stitch in garter stitch. Since you have cast on an even number of stitches (1 + neck stitches + 1 = even) all stitches should fit the pattern in the following rows. Happy knitting!
31.08.2024 - 19:06Ihr habt wunderschöne Strickstücke, aber es tut mir leid, ich kann mit euren Anleitungen nichts anfangen. Es wird so kompliziert gestrickt, das ich jedesmal aussteige :( schade, den seit einiger Zeit kaufe ich nur eure wolle, aber suche mir immer andere Anleitungen. Warum kann man den Einteiler nicht in einem Stück von oben nach unten mit Raglan stricken? Ist doch viel einfacher, warum immer so kompliziert?
24.08.2024 - 17:30Ik snap het patroon niet bij de beschrijving aan het eind van het kruippak. Hebt daar 112 steken. Vervolgens brei je 6 st voor de markeerdraad + 4 st afkanten + 52 breien+ 4 afkanten + 52 breien = 118 st. Dat is toch meer dan de112 die ik heb?
11.07.2024 - 21:22DROPS Design answered:
Dag Dini,
Helaas begrijp ik je vraag niet. Waar staat dat je 118 zou moeten hebben. Ben je bij de paragraaf 'KRUIPPAK'? En welke maat brei je?
14.07.2024 - 12:04Hei Finnes det oppskrift på lue til denne dressen?
06.07.2024 - 11:11DROPS Design answered:
Hei Hege. Dessverre, ikke akkurrat samme perlestrikk (dobbelt perlestrikk, både i høyden og bredden). men bruk vår søkemotor og søk på Baby-Tilbehør-Luer&Hatter-Luer, og velg perlestrikk under Stuktur. Kanskje du finner en lue som du vil mene passe til dressen mvh DROPS Design
08.07.2024 - 14:30