


How to increase in English rib by making several stitches in 1 stitch
Keywords: english rib, jumper, raglan, top down,

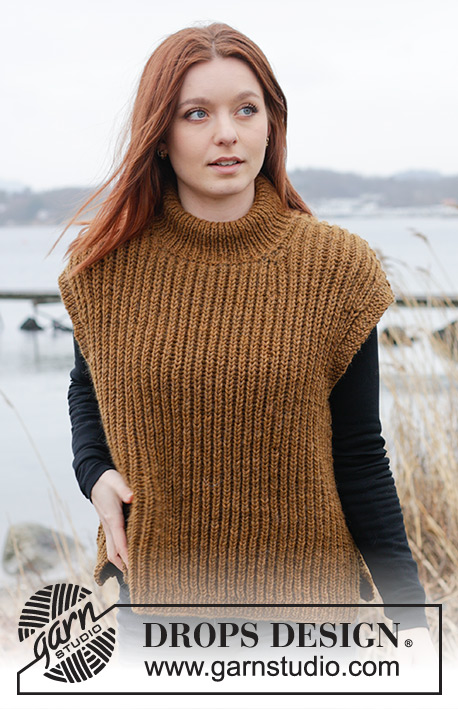
In this DROPS video we show how to work the increase in English rib by making several stitches in 1 stitch, and how to work the next round. This technique is used in the jumper in DROPS 194-13. NB! Even if our sample is worked back and forth, all rows have been worked from RS.
On 1st round in the video, we knit a little bit of the 3. Round explanation of the English rib, both before and after the increase.
Increase like this: Work 5 stitches in the stitch and the yarn over as follows: * Knit the yarn over and stitch together, but wait with slipping the stitch and yarn over off the needle, make 1 yarn over the right needle *, knit from * - * a total of 2 times and knit the stitch and yarn over 1 more time = 5 stitches (= 4 stitches increased).
On next round (= 2nd round of explanation of English rib), the increased works into the English rib pattern. There is no yarn over in the increase, so the stitch that is to be worked with the yarn over is knit without yarn over.
Next round work as 3rd round of English rib.
In this video we use the yarn DROPS Snow.
You MUST read the pattern to be able to follow this video properly. You’ll find a pattern by clicking on one of the pictures below.
The video above can be used in the following patterns


Comments (4)
![]() Elly De Hooge wrote:
Elly De Hooge wrote:
Goedemiddag, ik brei het vest 216.14 . Ie toer van het meerere snap ik. Bij de terugnaald zie ik dat de in de vijf gemeerderde steken dat er 2 steken averecht worden gebreid… terwijl bij het tel patroon staat dat de steken recht gebreid moeten worden..\r\nVierkantje met - erin recht op de verkeerde kant? \r\nHellp … wat is het nu?\r\nVriendelijk groet Elly
26.10.2022 - 17:43DROPS Design answered:
Dag Elly,
De omslagen brei je recht op de verkeerde kant (en averecht op de goede kant). Dat zijn de streepjes links en rechts boven de steek waar je op de vorige naald aan de goede kant de 5 steken in 1 steek hebt gebreid.
26.10.2022 - 19:30
![]() Cristina wrote:
Cristina wrote:
E poi sempre nel secondo giro prima e dopo gli aumenti prende le due maglie assieme di rovescio, cosa che nel modell Scotch mist non viene fatto... Inoltre questa frase in italiano non ha senso “ in modo che la maglia che dev'essere lavorata con il gettato sia lavorata senza il gettato.”. Grazie ☺️
16.07.2021 - 16:30DROPS Design answered:
Buongiorno Cristina, abbiamo modificato la spiegazione del video in modo da renderlo più chiaro. Buon lavoro! 23.07.2021 - 14:59
![]() Cristina wrote:
Cristina wrote:
Ciao io non capisco come fare il secondo ferro dopo gli aumenti. Io sto lavorando a Scotch Mist. Nel video fa un gettato e prende il primo aumento a rovescio senza lavorarlo, sul secondo aumento fa un rovescio, il terzo di nuovo un gettato e rovescio non lavorato, quarto aumento fa un rovescio e il quinto gettato con rovescio senza lavorarlo. Ma nel lavoro Scotch Mist non ci sono rovesci, facciamo sempre gettato con rovescio non lavorato e due punti insieme a dritto. Non capisco...
16.07.2021 - 16:02DROPS Design answered:
Buongiorno Cristina, ci può spiegare esattamente a quale punto del modello Scotch Mist fa riferimento? Può anche scrivere direttamente nel modello! Buon lavoro! 23.07.2021 - 14:54


Får for mange masker på pinden, på pinden efter opslagningsomgangen. Seks gange tre = 18 masker for meget?
20.09.2018 - 11:39